User Manual
Page 3
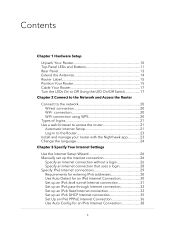
... Router 15 Cable Your Router 17 Turn the LEDs On or Off Using the LED On/Off Switch 17 Chapter 2 Connect to the Network and Access the Router Connect to the network 20 Wired connection 20 WiFi connection 20 WiFi connection using WPS 20 Types of logins 21 Use a web browser to access the router 21 Automatic Internet Setup 21 Log In to the Router 23 Install and manage your router with the Nighthawk app 23 Change the language 24 Chapter 3 Specify Your Internet Settings Use the Internet Setup...
... Router 15 Cable Your Router 17 Turn the LEDs On or Off Using the LED On/Off Switch 17 Chapter 2 Connect to the Network and Access the Router Connect to the network 20 Wired connection 20 WiFi connection 20 WiFi connection using WPS 20 Types of logins 21 Use a web browser to access the router 21 Automatic Internet Setup 21 Log In to the Router 23 Install and manage your router with the Nighthawk app 23 Change the language 24 Chapter 3 Specify Your Internet Settings Use the Internet Setup...
User Manual
Page 5
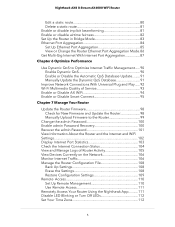
...98 Manually Upload Firmware to the Router 99 Change the admin Password 100 Enable admin Password Recovery 100 Recover the admin Password 101 View Information About the Router and the Internet and WiFi Settings 102 Display Internet Port Statistics 103 Check the Internet Connection Status 104 View and Manage Logs of Router Activity 105 View Devices Currently on the Network 106 Monitor Internet Traffic 106 Manage the Router Configuration File 108 Back Up Settings 108 Erase the Settings 108 Restore Configuration Settings 109 Remote Access 110 Set Up Remote Management 110 Use Remote...
...98 Manually Upload Firmware to the Router 99 Change the admin Password 100 Enable admin Password Recovery 100 Recover the admin Password 101 View Information About the Router and the Internet and WiFi Settings 102 Display Internet Port Statistics 103 Check the Internet Connection Status 104 View and Manage Logs of Router Activity 105 View Devices Currently on the Network 106 Monitor Internet Traffic 106 Manage the Router Configuration File 108 Back Up Settings 108 Erase the Settings 108 Restore Configuration Settings 109 Remote Access 110 Set Up Remote Management 110 Use Remote...
User Manual
Page 7
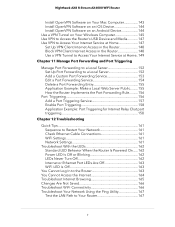
...iOS Device 144 Install OpenVPN Software on an Android Device 144 Use a VPN Tunnel on Your Windows Computer 145 Use VPN to Access the Router's USB Device and Media............147 Use VPN to Access Your Internet Service at Home 147 Set Up VPN Client Internet Access in the Router 148 Block VPN Client Internet Access in the Router 148 Use a VPN Tunnel to Access Your Internet Service at Home..149 Chapter 11 Manage Port Forwarding and Port Triggering Manage Port Forwarding to a Local Server 152 Set Up Port Forwarding to a Local Server 152 Add a Custom Port Forwarding Service 153 Edit a Port...
...iOS Device 144 Install OpenVPN Software on an Android Device 144 Use a VPN Tunnel on Your Windows Computer 145 Use VPN to Access the Router's USB Device and Media............147 Use VPN to Access Your Internet Service at Home 147 Set Up VPN Client Internet Access in the Router 148 Block VPN Client Internet Access in the Router 148 Use a VPN Tunnel to Access Your Internet Service at Home..149 Chapter 11 Manage Port Forwarding and Port Triggering Manage Port Forwarding to a Local Server 152 Set Up Port Forwarding to a Local Server 152 Add a Custom Port Forwarding Service 153 Edit a Port...

User Manual
Page 54
... router as a WiFi access point • Set up a default DMZ server • Change the Router's Device Name • Change the LAN TCP/IP settings • Specify the IP addresses that the router assigns • Disable the DHCP server feature in Bridge Mode • Ethernet Port Aggregation • Get Multi-Gig Internet With Internet Port Aggregation 54 We recommend that you install the router and connect it to the Internet before you change the WAN settings • Set up a bridge for WiFi, Ethernet, and USB connections. You can customize the router's network settings...
... router as a WiFi access point • Set up a default DMZ server • Change the Router's Device Name • Change the LAN TCP/IP settings • Specify the IP addresses that the router assigns • Disable the DHCP server feature in Bridge Mode • Ethernet Port Aggregation • Get Multi-Gig Internet With Internet Port Aggregation 54 We recommend that you install the router and connect it to the Internet before you change the WAN settings • Set up a bridge for WiFi, Ethernet, and USB connections. You can customize the router's network settings...
User Manual
Page 55
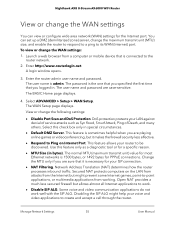
... PPPoE connections. Use this check box only in special circumstances. • Default DMZ Server. Launch a web browser from working. The WAN Setup page displays. This feature is connected to the router network. 2. Enter http://www.routerlogin.net. Nighthawk AX8 8-Stream AX6000 WiFi Router View or change the WAN settings You can set up a DMZ (demilitarized zone) server, change the maximum transmit unit (MTU) size, and enable the router to respond to a ping to its WAN (Internet) port. This feature allows your voice...
... PPPoE connections. Use this check box only in special circumstances. • Default DMZ Server. Launch a web browser from working. The WAN Setup page displays. This feature is connected to the router network. 2. Enter http://www.routerlogin.net. Nighthawk AX8 8-Stream AX6000 WiFi Router View or change the WAN settings You can set up a DMZ (demilitarized zone) server, change the maximum transmit unit (MTU) size, and enable the router to respond to a ping to its WAN (Internet) port. This feature allows your voice...

User Manual
Page 59
... log in RIP-2 format. The router assigns IP, DNS server, and default gateway addresses to all computers connected to the router. Enter http://www.routerlogin.net. The assigned default gateway address is admin. The LAN Setup page displays. 5. Make sure that the router assigns By default, the router acts as DHCP Server check box is connected to the router network. 2. Enter the router admin user name and password. Manage Network Settings 59 User Manual Select ADVANCED > Setup > LAN Setup. This format carries more information. A login window opens. 3. The password is...
... log in RIP-2 format. The router assigns IP, DNS server, and default gateway addresses to all computers connected to the router. Enter http://www.routerlogin.net. The assigned default gateway address is admin. The LAN Setup page displays. 5. Make sure that the router assigns By default, the router acts as DHCP Server check box is connected to the router network. 2. Enter the router admin user name and password. Manage Network Settings 59 User Manual Select ADVANCED > Setup > LAN Setup. This format carries more information. A login window opens. 3. The password is...

User Manual
Page 69
... open networks without security but are connected to the router network. 2. The WiFi mode of the guest WiFi network depends on the channel selection of the main WiFi network. For example, if you configure the WiFi mode for 802.11ac, 802.11n, and 802.11a devices. The router provides two default guest networks with the following settings to set up a 2.4 GHz or 5 GHz guest WiFi network: • Enable Guest Network. NETGEAR_Guest • 5 GHz guest WiFi network SSID. Enter the router admin user...
... open networks without security but are connected to the router network. 2. The WiFi mode of the guest WiFi network depends on the channel selection of the main WiFi network. For example, if you configure the WiFi mode for 802.11ac, 802.11n, and 802.11a devices. The router provides two default guest networks with the following settings to set up a 2.4 GHz or 5 GHz guest WiFi network: • Enable Guest Network. NETGEAR_Guest • 5 GHz guest WiFi network SSID. Enter the router admin user...
User Manual
Page 73
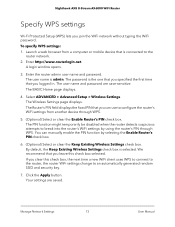
...Setup (WPS) lets you can manually enable the PIN function by using the router's PIN through WPS. 5. (Optional) Select or clear the Enable Router's PIN check box. Enter http://www.routerlogin.net. The Wireless Settings page displays. You can use to the router network. 2. Click the Apply button. Manage Network Settings 73 User Manual A login window opens. 3. Your settings are case-sensitive. Enter the router admin user name and password. By default, the Keep Existing Wireless Settings check box is admin. The password is connected to configure the router's WiFi settings...
...Setup (WPS) lets you can manually enable the PIN function by using the router's PIN through WPS. 5. (Optional) Select or clear the Enable Router's PIN check box. Enter http://www.routerlogin.net. The Wireless Settings page displays. You can use to the router network. 2. Click the Apply button. Manage Network Settings 73 User Manual A login window opens. 3. Your settings are case-sensitive. Enter the router admin user name and password. By default, the Keep Existing Wireless Settings check box is admin. The password is connected to configure the router's WiFi settings...
User Manual
Page 75
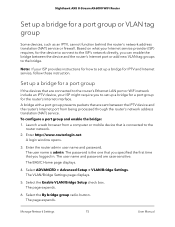
... the device and the router's Internet port or add new VLAN tag groups to the router network. 2. Select ADVANCED > Advanced Setup > VLAN/Bridge Settings. The page expands. Nighthawk AX8 8-Stream AX6000 WiFi Router Set up a bridge for IPTV and Internet service, follow those instruction. A bridge with a port group prevents packets that is connected to the bridge. To configure a port group and enable the bridge: 1. The user name is the one that you logged in. The user name and password are connected to the router's Ethernet LAN port or WiFi network include...
... the device and the router's Internet port or add new VLAN tag groups to the router network. 2. Select ADVANCED > Advanced Setup > VLAN/Bridge Settings. The page expands. Nighthawk AX8 8-Stream AX6000 WiFi Router Set up a bridge for IPTV and Internet service, follow those instruction. A bridge with a port group prevents packets that is connected to the bridge. To configure a port group and enable the bridge: 1. The user name is the one that you logged in. The user name and password are connected to the router's Ethernet LAN port or WiFi network include...

User Manual
Page 76
... VLAN tag group for the router's Internet interface. The BASIC Home page displays. 4. Launch a web browser from being processed through the router's network address translation (NAT) service. A login window opens. 3. The VLAN/Bridge Settings page displays. 5. Manage Network Settings 76 User Manual Select a Wired Ports check box or a Wireless check box: • If your device is connected to an Ethernet port on the router, select the Wired Ports check box that are connected to the router's Ethernet LAN ports or WiFi network include an IPTV device, your router's WiFi network...
... VLAN tag group for the router's Internet interface. The BASIC Home page displays. 4. Launch a web browser from being processed through the router's network address translation (NAT) service. A login window opens. 3. The VLAN/Bridge Settings page displays. 5. Manage Network Settings 76 User Manual Select a Wired Ports check box or a Wireless check box: • If your device is connected to an Ethernet port on the router, select the Wired Ports check box that are connected to the router's Ethernet LAN ports or WiFi network include an IPTV device, your router's WiFi network...
User Manual
Page 79
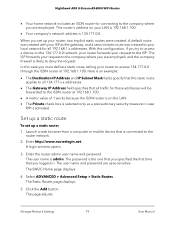
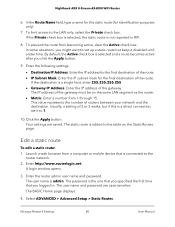
... IP Address and IP Subnet Mask fields specify that this configuration, if you try to access a device on your request to the ISP. Click the Add button. The BASIC Home page displays. 4. Nighthawk AX8 8-Stream AX6000 WiFi Router • Your home network includes an ISDN router for all traffic for these addresses will be forwarded to the ISDN router at 192.168.1.100. Manage Network Settings 79 User Manual
... IP Address and IP Subnet Mask fields specify that this configuration, if you try to access a device on your request to the ISP. Click the Add button. The BASIC Home page displays. 4. Nighthawk AX8 8-Stream AX6000 WiFi Router • Your home network includes an ISDN router for all traffic for these addresses will be forwarded to the ISDN router at 192.168.1.100. Manage Network Settings 79 User Manual
User Manual
Page 80
...; Gateway IP Address. To limit access to set it disabled until a later time. To prevent the route from 1 through 15. This value represents the number of the gateway. Launch a web browser from a computer or mobile device that you click the Apply button. 9. A login window opens. 3. The user name is selected and a route becomes active after you logged in RIP. 8. The user name and password are saved. By default, the Active check box...
...; Gateway IP Address. To limit access to set it disabled until a later time. To prevent the route from 1 through 15. This value represents the number of the gateway. Launch a web browser from a computer or mobile device that you click the Apply button. 9. A login window opens. 3. The user name is selected and a route becomes active after you logged in RIP. 8. The user name and password are saved. By default, the Active check box...

User Manual
Page 93
... compromise the freshness of hops can significantly reduce network traffic. 7. The default value for each IP address. 9. The UPnP Portmap Table also displays what type of port is accessing the router and which should be enabled or disabled. Select the Turn UPnP On check box. UPnP for automatic device configuration can range from different applications based on four access categories: voice, video, best effort, and background. Wi-Fi...
... compromise the freshness of hops can significantly reduce network traffic. 7. The default value for each IP address. 9. The UPnP Portmap Table also displays what type of port is accessing the router and which should be enabled or disabled. Select the Turn UPnP On check box. UPnP for automatic device configuration can range from different applications based on four access categories: voice, video, best effort, and background. Wi-Fi...

User Manual
Page 107
... Internet LED blinks white or amber. • The Internet connection is reached. • Download only. To update the Traffic Statistics section, click the Refresh button. 12. No restriction is applied when the traffic limit is disconnected and disabled. 10. The restriction is issued. By default, the value is 0 and no warning message is applied to begin at a specific time and date. In the Traffic Counter section, set...
... Internet LED blinks white or amber. • The Internet connection is reached. • Download only. To update the Traffic Statistics section, click the Refresh button. 12. No restriction is applied when the traffic limit is disconnected and disabled. 10. The restriction is issued. By default, the value is 0 and no warning message is applied to begin at a specific time and date. In the Traffic Counter section, set...
User Manual
Page 109
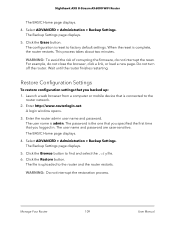
.... 4. When the reset is admin. WARNING: To avoid the risk of corrupting the firmware, do not close the browser, click a link, or load a new page. Enter the router admin user name and password. Click the Erase button. The file is the one that you specified the first time that you logged in. Manage Your Router 109 User Manual Select ADVANCED > Administration > Backup Settings. Click the Restore button. Restore Configuration Settings To restore configuration settings that you backed...
.... 4. When the reset is admin. WARNING: To avoid the risk of corrupting the firmware, do not close the browser, click a link, or load a new page. Enter the router admin user name and password. Click the Erase button. The file is the one that you specified the first time that you logged in. Manage Your Router 109 User Manual Select ADVANCED > Administration > Backup Settings. Click the Restore button. Restore Configuration Settings To restore configuration settings that you backed...

User Manual
Page 115
... enabled.. Do not turn off the router. Manage Your Router 115 User Manual If you must use the Reset button. On the back of the changes that you made to the router settings or you move the router to a different network), you cannot find the IP address or lost track of the router, locate the Reset button. 2. However, if you might want to erase the configuration and reset the router to factory default settings. The Power LED starts blinking...
... enabled.. Do not turn off the router. Manage Your Router 115 User Manual If you must use the Reset button. On the back of the changes that you made to the router settings or you move the router to a different network), you cannot find the IP address or lost track of the router, locate the Reset button. 2. However, if you might want to erase the configuration and reset the router to factory default settings. The Power LED starts blinking...

User Manual
Page 116
... Erase button. When the reset is reset to the router network. 2. The BASIC Home page displays. 4. A login window opens. 3. The user name is connected to factory default settings. Do not turn off the router. Launch a web browser from a computer or mobile device that you specified the first time that is admin. Select ADVANCED > Administration > Backup Settings. WARNING: To avoid the risk of corrupting the firmware, do not close the browser, click a link, or load...
... Erase button. When the reset is reset to the router network. 2. The BASIC Home page displays. 4. A login window opens. 3. The user name is connected to factory default settings. Do not turn off the router. Launch a web browser from a computer or mobile device that you specified the first time that is admin. Select ADVANCED > Administration > Backup Settings. WARNING: To avoid the risk of corrupting the firmware, do not close the browser, click a link, or load...

User Manual
Page 131
... use the power supply when you must use DDNS with a VPN tunnel for a secure connection. Your settings are saved. To set up your FTP server, you connect the USB storage device to access your local area network (LAN). 5. You can use FTP: 1. Set Up Your Personal FTP Server To set up your Internet connection is working. Your router must register for sharing. Connect a storage device to Access USB 131 Storage Devices Through the Internet User Manual See Set Up a New Dynamic DNS...
... use the power supply when you must use DDNS with a VPN tunnel for a secure connection. Your settings are saved. To set up your FTP server, you connect the USB storage device to access your local area network (LAN). 5. You can use FTP: 1. Set Up Your Personal FTP Server To set up your Internet connection is working. Your router must register for sharing. Connect a storage device to Access USB 131 Storage Devices Through the Internet User Manual See Set Up a New Dynamic DNS...

User Manual
Page 139
... AX6000 WiFi Router Set Up a VPN Connection A virtual private network (VPN) lets you use the Internet to connect with a host name (sometimes called a client-to the router network. 2. VPN uses DDNS or a static IP address to securely access your network when you change these accounts: NETGEAR, No-IP, and Dyn. Enter http://www.routerlogin.net. Enter the router user name and password. To specify the VPN service: 1. Specify VPN Service in the Router You must log in to access your network. A login window opens. 3. This type of VPN access is...
... AX6000 WiFi Router Set Up a VPN Connection A virtual private network (VPN) lets you use the Internet to connect with a host name (sometimes called a client-to the router network. 2. VPN uses DDNS or a static IP address to securely access your network when you change these accounts: NETGEAR, No-IP, and Dyn. Enter http://www.routerlogin.net. Enter the router user name and password. To specify the VPN service: 1. Specify VPN Service in the Router You must log in to access your network. A login window opens. 3. This type of VPN access is...

User Manual
Page 162
..., the router firmware is interrupted, or if the router detects a problem with the firmware. Check the following sequence of reasons. If all LEDs are using the power adapter that the following : • Make sure that the power adapter is securely connected to your router and securely connected to a working power outlet. • Make sure that you turn off the WiFi radio). Troubleshooting 162 User Manual If all the LEDs stay on power to its factory settings. Standard LED Behavior...
..., the router firmware is interrupted, or if the router detects a problem with the firmware. Check the following sequence of reasons. If all LEDs are using the power adapter that the following : • Make sure that the power adapter is securely connected to your router and securely connected to a working power outlet. • Make sure that you turn off the WiFi radio). Troubleshooting 162 User Manual If all the LEDs stay on power to its factory settings. Standard LED Behavior...


