
User Manual
Page 4
...unusual smell coming from putting the battery or other accident, take the equipment to a Nikon-authorized service representative for inspection, after unplugging the product and/or removing the battery. WARNINGS Turn off in the event of children Particular care should be read before using this equipment...., taking care to avoid burns. Continued operation could result in explosion or fire. For Your Safety To prevent damage to your Nikon product or injury to yourself or to others, read the following safety precautions in their mouths. Keep these safety instructions where all...
...unusual smell coming from putting the battery or other accident, take the equipment to a Nikon-authorized service representative for inspection, after unplugging the product and/or removing the battery. WARNINGS Turn off in the event of children Particular care should be read before using this equipment...., taking care to avoid burns. Continued operation could result in explosion or fire. For Your Safety To prevent damage to your Nikon product or injury to yourself or to others, read the following safety precautions in their mouths. Keep these safety instructions where all...

User Manual
Page 5
... casing. • Do not expose the battery to flame or to leakage when fully discharged. Failure to observe this product: • Before replacing the battery, turn the product off. Failure to observe these precautions could result in fire. • Do not handle the plug or go near the metal parts of...
... casing. • Do not expose the battery to flame or to leakage when fully discharged. Failure to observe this product: • Before replacing the battery, turn the product off. Failure to observe these precautions could result in fire. • Do not handle the plug or go near the metal parts of...
User Manual
Page 6
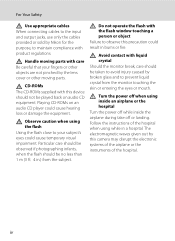
... or damage the equipment. Follow the instructions of the hospital. Observe caution when using while in a hospital. Turn the power off when using inside an airplane or the hospital Turn the power off while inside the airplane during take off or landing. For Your Safety Use appropriate cables When... connecting cables to the input and output jacks, use only the cables provided or sold by Nikon for the purpose, to maintain compliance...
... or damage the equipment. Follow the instructions of the hospital. Observe caution when using while in a hospital. Turn the power off when using inside an airplane or the hospital Turn the power off while inside the airplane during take off or landing. For Your Safety Use appropriate cables When... connecting cables to the input and output jacks, use only the cables provided or sold by Nikon for the purpose, to maintain compliance...

User Manual
Page 7
...COOLPIX P300 CAUTIONS Modifications The FCC requires the user to be notified that any changes or modifications made to this device that are designed to correct the interference by Nikon Corporation may exceed the limits of Class B Part 15 of the FCC rules. DANGER - interference to be determined by turning... to Part 15 of the proper configuration for the power outlet if needed. Interface Cables Use the interface cables sold or provided by Nikon for a Class B digital device, pursuant to radio communications. The power supply unit is connected. • Consult the dealer or ...
...COOLPIX P300 CAUTIONS Modifications The FCC requires the user to be notified that any changes or modifications made to this device that are designed to correct the interference by Nikon Corporation may exceed the limits of Class B Part 15 of the FCC rules. DANGER - interference to be determined by turning... to Part 15 of the proper configuration for the power outlet if needed. Interface Cables Use the interface cables sold or provided by Nikon for a Class B digital device, pursuant to radio communications. The power supply unit is connected. • Consult the dealer or ...

User Manual
Page 9
...All the Way 13 Attaching the Camera Strap ...13 First Steps ...14 Inserting the Battery...14 Removing the Battery...15 Charging the Battery ...16 Turning On and Off the Camera...19 Setting the Display Language, Date and Time 20 Inserting the Memory Card ...22 Removing the Memory Card...22 ...Basic Photography and Playback: A (Auto) Mode 24 Step 1 Turn the Camera On and Select A (Auto) Mode 24 Indicators Displayed in A (Auto) Mode 25 Step 2 Frame a Picture...26 Using the Zoom...27 Step 3 ...
...All the Way 13 Attaching the Camera Strap ...13 First Steps ...14 Inserting the Battery...14 Removing the Battery...15 Charging the Battery ...16 Turning On and Off the Camera...19 Setting the Display Language, Date and Time 20 Inserting the Memory Card ...22 Removing the Memory Card...22 ...Basic Photography and Playback: A (Auto) Mode 24 Step 1 Turn the Camera On and Select A (Auto) Mode 24 Indicators Displayed in A (Auto) Mode 25 Step 2 Frame a Picture...26 Using the Zoom...27 Step 3 ...
User Manual
Page 26
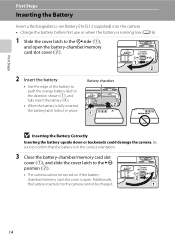
First Steps First Steps Inserting the Battery Insert a Rechargeable Li-ion Battery EN-EL12 (supplied) into the camera cannot be turned on if the batterychamber/memory card slot cover is open the battery-chamber/memory card slot cover (2). 2 Insert the battery. • Use the edge of ...
First Steps First Steps Inserting the Battery Insert a Rechargeable Li-ion Battery EN-EL12 (supplied) into the camera cannot be turned on if the batterychamber/memory card slot cover is open the battery-chamber/memory card slot cover (2). 2 Insert the battery. • Use the edge of ...
User Manual
Page 27
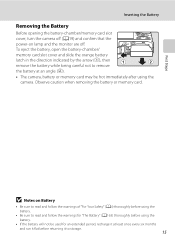
... caution when removing the battery or memory card. First Steps Inserting the Battery Removing the Battery Before opening the battery-chamber/memory card slot cover, turn the camera off . B Notes on lamp and the monitor are off (A19) and confirm that the power-on Battery • Be sure to read and...
... caution when removing the battery or memory card. First Steps Inserting the Battery Removing the Battery Before opening the battery-chamber/memory card slot cover, turn the camera off . B Notes on lamp and the monitor are off (A19) and confirm that the power-on Battery • Be sure to read and...
User Manual
Page 28
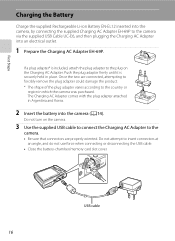
The Charging AC Adapter comes with the plug adapter attached in place. Do not turn on the Charging AC Adapter. Once the two are connected, attempting to forcibly remove the plug adapter could damage the product. * The shape of the ...
The Charging AC Adapter comes with the plug adapter attached in place. Do not turn on the Charging AC Adapter. Once the two are connected, attempting to forcibly remove the plug adapter could damage the product. * The shape of the ...
User Manual
Page 29
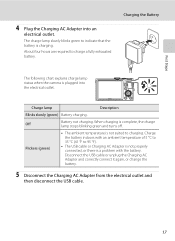
... the electrical outlet. Charging the Battery The following chart explains charge lamp status when the camera is complete, the charge lamp stops blinking green and turns off. Charge lamp Description Blinks slowly (green) Battery charging. Charge the battery indoors with an ambient temperature of 5 °C to 35 °C (41 °F to...
... the electrical outlet. Charging the Battery The following chart explains charge lamp status when the camera is complete, the charge lamp stops blinking green and turns off. Charge lamp Description Blinks slowly (green) Battery charging. Charge the battery indoors with an ambient temperature of 5 °C to 35 °C (41 °F to...
User Manual
Page 30
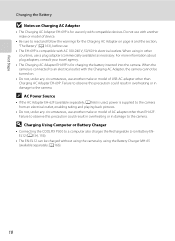
... ENEL12 (A134, 156). • The EN-EL12 can be turned on. • Do not, under any circumstances, use another make or model of USB-AC adapter other than Charging AC Adapter EH-69P. D Charging Using Computer or Battery Charger • Connecting the COOLPIX P300 to the camera. A166). 18 First Steps Charging the...
... ENEL12 (A134, 156). • The EN-EL12 can be turned on. • Do not, under any circumstances, use another make or model of USB-AC adapter other than Charging AC Adapter EH-69P. D Charging Using Computer or Battery Charger • Connecting the COOLPIX P300 to the camera. A166). 18 First Steps Charging the...
User Manual
Page 31
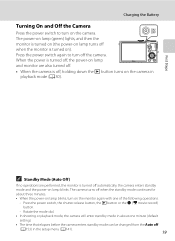
.... C Standby Mode (Auto Off) If no operations are also turned off. • When the camera is turned on (the power-on lamp turns off (A153) in about three minutes. • When the power-on lamp blinks, turn on ). The camera turns off when the standby mode continues for about one of the following... • In shooting or playback mode, the camera will enter standby mode in the setup menu (A141). 19 Press the power switch again to turn on the monitor again with one minute (default setting). • The time that elapses before the camera enters standby mode can be changed from the...
.... C Standby Mode (Auto Off) If no operations are also turned off. • When the camera is turned on (the power-on lamp turns off (A153) in about three minutes. • When the power-on lamp blinks, turn on ). The camera turns off when the standby mode continues for about one of the following... • In shooting or playback mode, the camera will enter standby mode in the setup menu (A141). 19 Press the power switch again to turn on the monitor again with one minute (default setting). • The time that elapses before the camera enters standby mode can be changed from the...
User Manual
Page 32
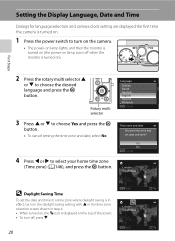
... the Display Language, Date and Time Dialogs for language selection and camera clock setting are displayed the first time the camera is turned on. 1 Press the power switch to turn off when the monitor is displayed on ). Yes No Cancel London Casablanca D Daylight Saving Time To set date and time? ...time zone selection screen shown in step 4. • When turned on, the W icon is turned on the top of the screen. • To turn on the camera. • The power-on lamp lights, and then the monitor is turned on (the power-on lamp turns off , press I. 20 Back London Casablanca Back First ...
... the Display Language, Date and Time Dialogs for language selection and camera clock setting are displayed the first time the camera is turned on. 1 Press the power switch to turn off when the monitor is displayed on ). Yes No Cancel London Casablanca D Daylight Saving Time To set date and time? ...time zone selection screen shown in step 4. • When turned on, the W icon is turned on the top of the screen. • To turn on the camera. • The power-on lamp lights, and then the monitor is turned on (the power-on lamp turns off , press I. 20 Back London Casablanca Back First ...

User Manual
Page 34
...; The camera, battery or memory card may be played back, deleted, or transferred. Be sure to confirm that the poweron lamp and the monitor are turned off and open the batterychamber/memory card slot cover. • Be sure to partially eject it, and then pull it clicks into place. Press the... memory card in lightly with your finger (1) to turn off the camera before opening the battery-chamber/memory card slot cover, turn the camera off . If a memory card is inserted in the camera, data is automatically stored on lamp and the...
...; The camera, battery or memory card may be played back, deleted, or transferred. Be sure to confirm that the poweron lamp and the monitor are turned off and open the batterychamber/memory card slot cover. • Be sure to partially eject it, and then pull it clicks into place. Press the... memory card in lightly with your finger (1) to turn off the camera before opening the battery-chamber/memory card slot cover, turn the camera off . If a memory card is inserted in the camera, data is automatically stored on lamp and the...
User Manual
Page 35
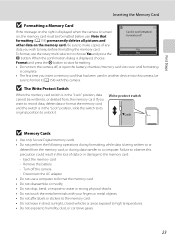
... data on the memory card. When the confirmation dialog is displayed, choose Format and press the k button to start formatting. • Do not turn the camera off the camera - B The Write Protect Switch When the memory card switch is being written to or deleted from , the memory card...switch is not formatted. First Steps Inserting the Memory Card B Formatting a Memory Card If the message on the right is displayed when the camera is turned Card is in the "Lock" position, slide the switch to its original position to unlock it (A154) with your fingers or metal objects. •...
... data on the memory card. When the confirmation dialog is displayed, choose Format and press the k button to start formatting. • Do not turn the camera off the camera - B The Write Protect Switch When the memory card switch is being written to or deleted from , the memory card...switch is not formatted. First Steps Inserting the Memory Card B Formatting a Memory Card If the message on the right is displayed when the camera is turned Card is in the "Lock" position, slide the switch to its original position to unlock it (A154) with your fingers or metal objects. •...

User Manual
Page 36
... level indicator 1/250 F5.6 26 Number of exposures remaining Number of Exposures Remaining The number of exposures remaining is turned on the remaining capacity of digital cameras. 1 Press the power switch to turn on the camera. • The lens extends, and the monitor is displayed. N Battery exhausted. Auto mode... remaining. Battery Level Display b Description Battery level high. Basic Photography and Playback: A (Auto) Mode Basic Photography and Playback: A (Auto) Mode Step 1 Turn the Camera On and Select A (Auto) Mode This section describes how to take pictures.
... level indicator 1/250 F5.6 26 Number of exposures remaining Number of Exposures Remaining The number of exposures remaining is turned on the remaining capacity of digital cameras. 1 Press the power switch to turn on the camera. • The lens extends, and the monitor is displayed. N Battery exhausted. Auto mode... remaining. Battery Level Display b Description Battery level high. Basic Photography and Playback: A (Auto) Mode Basic Photography and Playback: A (Auto) Mode Step 1 Turn the Camera On and Select A (Auto) Mode This section describes how to take pictures.

User Manual
Page 37
... and image size with Image mode (A74) in standby mode to save power (the power-on lamp is blinking) (A153), press the following buttons to turn it back on the Flash When the flash is lowered, the flash setting is fixed at the top of image quality (compression ratio) and image... can be applied to the memory card. In situations where a flash is needed, such as in A (auto) mode. Basic Photography and Playback: A (Auto) Mode Step 1 Turn the Camera On and Select A (Auto) Mode Indicators Displayed in A (Auto) Mode Shooting mode A is displayed in dark locations or when the subject is backlit...
... and image size with Image mode (A74) in standby mode to save power (the power-on lamp is blinking) (A153), press the following buttons to turn it back on the Flash When the flash is lowered, the flash setting is fixed at the top of image quality (compression ratio) and image... can be applied to the memory card. In situations where a flash is needed, such as in A (auto) mode. Basic Photography and Playback: A (Auto) Mode Step 1 Turn the Camera On and Select A (Auto) Mode Indicators Displayed in A (Auto) Mode Shooting mode A is displayed in dark locations or when the subject is backlit...
User Manual
Page 39
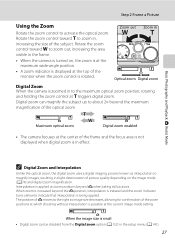
... the top of V moves to the right as interpolation to magnify images, resulting in to zoom in the frame. • When the camera is turned on the image mode (A74) and digital zoom magnification. C Digital Zoom and Interpolation Unlike the optical zoom, the digital zoom uses a digital imaging ...is small • Digital zoom can magnify the subject up to about 2× beyond the V position, interpolation is initiated and the zoom indicator turns yellow to activate the optical zoom. Digital zoom can be disabled from the Digital zoom option (A152) in effect. When zoom is in the ...
... the top of V moves to the right as interpolation to magnify images, resulting in to zoom in the frame. • When the camera is turned on the image mode (A74) and digital zoom magnification. C Digital Zoom and Interpolation Unlike the optical zoom, the digital zoom uses a digital imaging ...is small • Digital zoom can magnify the subject up to about 2× beyond the V position, interpolation is initiated and the zoom indicator turns yellow to activate the optical zoom. Digital zoom can be disabled from the Digital zoom option (A152) in effect. When zoom is in the ...
User Manual
Page 42
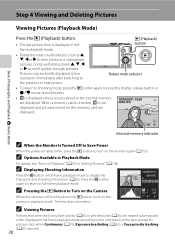
... the c (Playback) button. C Options Available in full- Basic Photography and Playback: A (Auto) Mode 44 Internal memory indicator C When the Monitor Is Turned Off to Save Power When the power-on the memory card are displayed. Press the k button again to return to full-frame playback mode. 100NIKON... 0004.JPG P 1/250 F5.6 C Pressing the c Button to Turn on the Camera When the camera is displayed when pictures stored in the internal memory are rotated automatically when displayed in full-frame playback mode...
... the c (Playback) button. C Options Available in full- Basic Photography and Playback: A (Auto) Mode 44 Internal memory indicator C When the Monitor Is Turned Off to Save Power When the power-on the memory card are displayed. Press the k button again to return to full-frame playback mode. 100NIKON... 0004.JPG P 1/250 F5.6 C Pressing the c Button to Turn on the Camera When the camera is displayed when pictures stored in the internal memory are rotated automatically when displayed in full-frame playback mode...
User Manual
Page 44
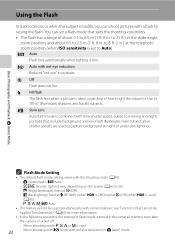
... for flash mode is stored in . U Auto Flash fires automatically when lighting is used to 6.5 m (1 ft. 8 in the camera's memory even after the camera is turned off. - W Off Flash does not fire. slow shutter speeds are used ) (A45) - Basic Photography and Playback: A (Auto) Mode Using the Flash In dark locations or...
... for flash mode is stored in . U Auto Flash fires automatically when lighting is used to 6.5 m (1 ft. 8 in the camera's memory even after the camera is turned off. - W Off Flash does not fire. slow shutter speeds are used ) (A45) - Basic Photography and Playback: A (Auto) Mode Using the Flash In dark locations or...
User Manual
Page 46
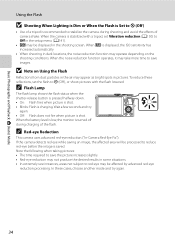
... is displayed, the ISO sensitivity has increased automatically. • When shooting in dark locations, the noise reduction function may be displayed in pictures. When E is turned off during shooting and avoid the effects of camera shake. To reduce these cases, choose another mode and try again. • Off: Flash does not...
... is displayed, the ISO sensitivity has increased automatically. • When shooting in dark locations, the noise reduction function may be displayed in pictures. When E is turned off during shooting and avoid the effects of camera shake. To reduce these cases, choose another mode and try again. • Off: Flash does not...


