

Reference Manual
Page 13
...6 Shooting Mode (Operation Controls)...7 Playback Mode (Information Display)...8 Playback Mode (Operation Controls) ...9 Switching Between Shooting Mode and Playback Mode 10 Using Menus (d Tab) ...11 Pressing the Shutter-release Button ...13 Attaching the Camera Strap ...13 Basic Steps for Shooting and Playback 15 Preparation 1 Insert the Battery...16 Preparation 2 Charge the Battery 18 Preparation 3 Insert a Memory Card 20 Internal Memory and Memory Cards ...21 Approved Memory Cards ...21 Step 1 Turn the Camera On ...22 Turning the Camera On and Off...23 Setting the Display Language, Date...
...6 Shooting Mode (Operation Controls)...7 Playback Mode (Information Display)...8 Playback Mode (Operation Controls) ...9 Switching Between Shooting Mode and Playback Mode 10 Using Menus (d Tab) ...11 Pressing the Shutter-release Button ...13 Attaching the Camera Strap ...13 Basic Steps for Shooting and Playback 15 Preparation 1 Insert the Battery...16 Preparation 2 Charge the Battery 18 Preparation 3 Insert a Memory Card 20 Internal Memory and Memory Cards ...21 Approved Memory Cards ...21 Step 1 Turn the Camera On ...22 Turning the Camera On and Off...23 Setting the Display Language, Date...
Reference Manual
Page 14
...Shooting Mode 54 Using the Flash (Flash Modes)...55 Using the Self-timer ...57 Using Macro Mode ...59 Adjusting Brightness (Exposure Compensation 61 Default Settings ...62 A Changing the Image Size (Image Mode 64 Image Mode Settings (Image Size and Quality 64 Functions that Cannot Be Applied Simultaneously 66 Face Detection ...68 Skin Softening ...70 Playback Features...71 Selecting Certain Types of Images for Playback 72 Available Playback Modes...72 Switching Between Playback Modes ...73 Setting the Picture Rating ...74 Functions Available in Playback Mode (Playback Menu 75 Connecting...
...Shooting Mode 54 Using the Flash (Flash Modes)...55 Using the Self-timer ...57 Using Macro Mode ...59 Adjusting Brightness (Exposure Compensation 61 Default Settings ...62 A Changing the Image Size (Image Mode 64 Image Mode Settings (Image Size and Quality 64 Functions that Cannot Be Applied Simultaneously 66 Face Detection ...68 Skin Softening ...70 Playback Features...71 Selecting Certain Types of Images for Playback 72 Available Playback Modes...72 Switching Between Playback Modes ...73 Setting the Picture Rating ...74 Functions Available in Playback Mode (Playback Menu 75 Connecting...

Reference Manual
Page 15
... Control: Adjusting a Sense of Perspective E20 i Filter Effects: Applying Digital Filter Effects E21 j Glamour Retouch: Softening Skin and Making Faces Looking Smaller with Larger Eyes...E23 g Small Picture: Reducing Image Size E24 o Crop: Creating a Cropped Copy E25 Connecting the Camera to a TV (Playback on a TV E27 Connecting the Camera to a Printer (Direct Print E29 Connecting the Camera to a Printer E30 Printing Images One by One...E31 Printing Multiple Images...E32 The Shooting Menu (for A (Auto) Mode E35 q/s/r Touch Shooting ...E35 X ISO...
... Control: Adjusting a Sense of Perspective E20 i Filter Effects: Applying Digital Filter Effects E21 j Glamour Retouch: Softening Skin and Making Faces Looking Smaller with Larger Eyes...E23 g Small Picture: Reducing Image Size E24 o Crop: Creating a Cropped Copy E25 Connecting the Camera to a TV (Playback on a TV E27 Connecting the Camera to a Printer (Direct Print E29 Connecting the Camera to a Printer E30 Printing Images One by One...E31 Printing Multiple Images...E32 The Shooting Menu (for A (Auto) Mode E35 q/s/r Touch Shooting ...E35 X ISO...

Reference Manual
Page 21
Parts of the Camera Parts of the Camera and Basic Operations 1 2 3 4 5 Under the connector cover 6 7 8 9 10 11 12 13 1 Monitor/touch panel 6 2 b (e movie-record) button 82 3 Charge lamp 19, E79 Flash lamp 55 4 A (shooting mode) button.......... 10, 26 5 c (playback) button 10, 32, 73 6 USB/audio/video output connector 18, 76, E27, E30 7 Tripod socket 8 Speaker 86, E59 9 Connector cover 18, 76, E27, E30 10 Battery-chamber/ memory card slot cover 16, 20 11 Memory card slot 20 12 Battery chamber 16 13 Battery latch 16, 17 3
Parts of the Camera Parts of the Camera and Basic Operations 1 2 3 4 5 Under the connector cover 6 7 8 9 10 11 12 13 1 Monitor/touch panel 6 2 b (e movie-record) button 82 3 Charge lamp 19, E79 Flash lamp 55 4 A (shooting mode) button.......... 10, 26 5 c (playback) button 10, 32, 73 6 USB/audio/video output connector 18, 76, E27, E30 7 Tripod socket 8 Speaker 86, E59 9 Connector cover 18, 76, E27, E30 10 Battery-chamber/ memory card slot cover 16, 20 11 Memory card slot 20 12 Battery chamber 16 13 Battery latch 16, 17 3

Reference Manual
Page 26
... 6 Internal memory indicator 32 a Current frame number/ 7 total number of frames 32 b Movie length 86 8 Image mode2 64 Movie options2 85, E62 9 File number and type E86 10 Date/time of recording 24 11 Rating indicator 74 C Small picture icon 75, E24 12 p Voice memo icon 75, E59 Print order icon 75, E53 13 Battery level indicator 22 5 Eye-Fi communication indicator 90, E82 1 Indicators displayed vary with current playback mode. 2 Indicators displayed vary depending on the setting for shooting. 3 The icon...
... 6 Internal memory indicator 32 a Current frame number/ 7 total number of frames 32 b Movie length 86 8 Image mode2 64 Movie options2 85, E62 9 File number and type E86 10 Date/time of recording 24 11 Rating indicator 74 C Small picture icon 75, E24 12 p Voice memo icon 75, E59 Print order icon 75, E53 13 Battery level indicator 22 5 Eye-Fi communication indicator 90, E82 1 Indicators displayed vary with current playback mode. 2 Indicators displayed vary depending on the setting for shooting. 3 The icon...

Reference Manual
Page 45
... icon. Six different effects are optimized to capture. Step 2 Select a Shooting Mode Available Shooting Modes A Auto mode A38 Used for the current shooting mode. 27 Settings can be adjusted in Each Shooting Mode • You can be applied to make skin tones of the desired scene mode in the shooting mode selection menu. Basic Steps for Shooting and Playback C Features That Are Available in the shooting menu (A39) to display the menu options for the flash mode, self-timer, macro mode...
... icon. Six different effects are optimized to capture. Step 2 Select a Shooting Mode Available Shooting Modes A Auto mode A38 Used for the current shooting mode. 27 Settings can be adjusted in Each Shooting Mode • You can be applied to make skin tones of the desired scene mode in the shooting mode selection menu. Basic Steps for Shooting and Playback C Features That Are Available in the shooting menu (A39) to display the menu options for the flash mode, self-timer, macro mode...

Reference Manual
Page 49
... be in focus despite the fact that the alternate subject is at different distances from the camera as expected in the following situations. C To Make Sure You Do Not Miss a Shot If you might miss a shot, press the shutter-release button all the way down. Do not open the battery-chamber/memory card slot cover or remove the battery or memory card while an indicator is...
... be in focus despite the fact that the alternate subject is at different distances from the camera as expected in the following situations. C To Make Sure You Do Not Miss a Shot If you might miss a shot, press the shutter-release button all the way down. Do not open the battery-chamber/memory card slot cover or remove the battery or memory card while an indicator is...

Reference Manual
Page 56
... (A39) without pressing the shutter-release button. Shooting Features 38 See "Options Available in the Auto Shooting Menu" (A39) for more information). • If no faces are displayed. Adjusting the A (Auto) Mode Settings • You can be released by simply tapping a subject in A (auto) mode are detected, the camera automatically selects one or more information. Shooting Features Using A (Auto) Mode Used for the flash mode, self-timer, macro mode, and exposure compensation. Settings can change the settings for general...
... (A39) without pressing the shutter-release button. Shooting Features 38 See "Options Available in the Auto Shooting Menu" (A39) for more information). • If no faces are displayed. Adjusting the A (Auto) Mode Settings • You can be released by simply tapping a subject in A (auto) mode are detected, the camera automatically selects one or more information. Shooting Features Using A (Auto) Mode Used for the flash mode, self-timer, macro mode, and exposure compensation. Settings can change the settings for general...

Reference Manual
Page 57
... the eye. E42 Allows you to take pictures of similar brightness, images can be changed. In Continuous, while the shutter-release button is held down, up to 6 images are functions with subjects of darker subjects. Set the flash mode (A55) to c (Off) when white balance is set to any setting other shooting modes. Although Auto (default setting) can be used when saving images (A64). Shooting Features On the A (Auto) mode shooting screen M Tap the d tab (A11) Option A Image mode q/s/r Touch shooting X ISO sensitivity V Continuous W White balance Description...
... the eye. E42 Allows you to take pictures of similar brightness, images can be changed. In Continuous, while the shutter-release button is held down, up to 6 images are functions with subjects of darker subjects. Set the flash mode (A55) to c (Off) when white balance is set to any setting other shooting modes. Although Auto (default setting) can be used when saving images (A64). Shooting Features On the A (Auto) mode shooting screen M Tap the d tab (A11) Option A Image mode q/s/r Touch shooting X ISO sensitivity V Continuous W White balance Description...

Reference Manual
Page 83
... all shooting modes. • There are functions with which this number may vary depending on the make of memory card, even when the memory cards have the same specified capacity. A Changing the Image Size (Image Mode) C Image Mode • The setting can also be changed in shooting modes other than A (auto) mode by tapping the d tab to display the menu options and then tapping the A. • Changes made to the image mode setting are applied to JPEG compression). Print sizes...
... all shooting modes. • There are functions with which this number may vary depending on the make of memory card, even when the memory cards have the same specified capacity. A Changing the Image Size (Image Mode) C Image Mode • The setting can also be changed in shooting modes other than A (auto) mode by tapping the d tab to display the menu options and then tapping the A. • Changes made to the image mode setting are applied to JPEG compression). Print sizes...

Reference Manual
Page 92
... playback mode and tap a rating icon to thumbnail display by using the zoom control (f (h)/g (i)). 4/ 4 0004. JPG 15/05/2012 15:30 0 1 2 3 4 5 Playing Back images by Rating Tap the rating tab in full-frame playback mode. • While setting the ratings, drag the current image to a maximum of 999 images. 74 • The ratings applied on the COOLPIX S4200 are displayed. It is possible to zoom or switch to display the images...
... playback mode and tap a rating icon to thumbnail display by using the zoom control (f (h)/g (i)). 4/ 4 0004. JPG 15/05/2012 15:30 0 1 2 3 4 5 Playing Back images by Rating Tap the rating tab in full-frame playback mode. • While setting the ratings, drag the current image to a maximum of 999 images. 74 • The ratings applied on the COOLPIX S4200 are displayed. It is possible to zoom or switch to display the images...
Reference Manual
Page 93
... selected folder, category or date. 2 The selected image is edited, and the copy is switched to copy images between the internal memory and a memory card. Voice memo E58 can be played back and deleted. E14 E12 E57 E Voice memo Record voice memos using favorite pictures mode, auto sort mode, or list by one in thumbnail playback mode. If the camera is saved with a different file name. E51 a Print order1 When using a printer to print images saved on the camera. Painted copies are played...
... selected folder, category or date. 2 The selected image is edited, and the copy is switched to copy images between the internal memory and a memory card. Voice memo E58 can be played back and deleted. E14 E12 E57 E Voice memo Record voice memos using favorite pictures mode, auto sort mode, or list by one in thumbnail playback mode. If the camera is saved with a different file name. E51 a Print order1 When using a printer to print images saved on the camera. Painted copies are played...
Reference Manual
Page 101
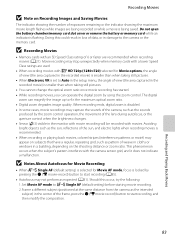
... for Movie AF mode, focus is smaller than when taking still pictures. • You cannot change the optical zoom ratio once movie recording has started. • While recording movies, you can magnify the image up to A Single AF (default setting) before starting movie recording. 2. When recording ends, digital zoom is disabled. • In some cases, movie recordings may not perform as pattern of weave in cloths or windows in damage to the camera or the memory card. Should...
... for Movie AF mode, focus is smaller than when taking still pictures. • You cannot change the optical zoom ratio once movie recording has started. • While recording movies, you can magnify the image up to A Single AF (default setting) before starting movie recording. 2. When recording ends, digital zoom is disabled. • In some cases, movie recordings may not perform as pattern of weave in cloths or windows in damage to the camera or the memory card. Should...

Reference Manual
Page 152
... the shade, direct sunlight, or under most types of lighting, the white balance setting suited to a particular light source can mimic this adjustment by processing images according to changes in the color of the light source, with the result that matches the light source before shooting. Digital cameras can be used under incandescent lighting. This is able to adapt to the color of the light source. Option s Auto (default setting) b Preset manual c Daylight d Incandescent...
... the shade, direct sunlight, or under most types of lighting, the white balance setting suited to a particular light source can mimic this adjustment by processing images according to changes in the color of the light source, with the result that matches the light source before shooting. Digital cameras can be used under incandescent lighting. This is able to adapt to the color of the light source. Option s Auto (default setting) b Preset manual c Daylight d Incandescent...
Reference Manual
Page 186
... not displayed in the monitor after the battery has finished charging. • Depending upon computer specifications, settings, and power supply and allocation, it may start. B Notes About Charging with connection to a computer before the battery can be charged or images can be transferred with Connection to a Computer • The battery cannot be charged, nor can data be impossible to print images with direct connection of charging the battery, exit the application. • The camera turns...
... not displayed in the monitor after the battery has finished charging. • Depending upon computer specifications, settings, and power supply and allocation, it may start. B Notes About Charging with connection to a computer before the battery can be charged or images can be transferred with Connection to a Computer • The battery cannot be charged, nor can data be impossible to print images with direct connection of charging the battery, exit the application. • The camera turns...

Reference Manual
Page 187
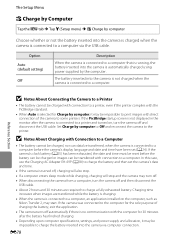
The Setup Menu C Charge Lamp The following chart explains charge lamp status when the camera is connected to 95°F). • A USB cable is not correctly connected or the battery is faulty. Charge lamp Flashes slowly (green) Off Flashes quickly (green) Description Battery charging. Charge the battery indoors with an ambient temperature of 5°C to 35°C (41°F to a computer. If the charge lamp changes from slow flashing (green) to off while the power-on...
The Setup Menu C Charge Lamp The following chart explains charge lamp status when the camera is connected to 95°F). • A USB cable is not correctly connected or the battery is faulty. Charge lamp Flashes slowly (green) Off Flashes quickly (green) Description Battery charging. Charge the battery indoors with an ambient temperature of 5°C to 35°C (41°F to a computer. If the charge lamp changes from slow flashing (green) to off while the power-on...

Reference Manual
Page 197
... screen. • Pictures taken at an Image mode setting of any images, make sure to tap No and save a copy. Delete images from album. • Add to other medium before formatting the memory card. used for use internal memory. 21 Error occurred while recording image. Formatting deletes all data stored on the memory card. No further pictures can be • Check that connectors are clean. 20 read. • Confirm that memory card is not formatted. Error Messages Display Cause/Solution A This card cannot be used . • Use...
... screen. • Pictures taken at an Image mode setting of any images, make sure to tap No and save a copy. Delete images from album. • Add to other medium before formatting the memory card. used for use internal memory. 21 Error occurred while recording image. Formatting deletes all data stored on the memory card. No further pictures can be • Check that connectors are clean. 20 read. • Confirm that memory card is not formatted. Error Messages Display Cause/Solution A This card cannot be used . • Use...

Reference Manual
Page 206
... computer connection. 18 90, E78 90, E78 90, E78 - • Battery is exhausted. 22 Camera cannot be • The camera cannot be possible via the Charging AC Adapter. Reconnect the USB cable. • The internal temperature of common problems below before consulting your retailer or Nikon-authorized service representative. Technical Notes and Index F6 Display, Settings and Power Supply Problem Cause/Solution A Battery inserted in the camera cannot be charged...
... computer connection. 18 90, E78 90, E78 90, E78 - • Battery is exhausted. 22 Camera cannot be • The camera cannot be possible via the Charging AC Adapter. Reconnect the USB cable. • The internal temperature of common problems below before consulting your retailer or Nikon-authorized service representative. Technical Notes and Index F6 Display, Settings and Power Supply Problem Cause/Solution A Battery inserted in the camera cannot be charged...

Reference Manual
Page 207
... as accurate as ordinary watches or clocks. Turn off . • Standby mode for Photo info in Monitor settings in the setup menu. • The camera clock is selected for saving power: press the power switch, the shutter-release button, A button, c button, or b (e movie-record) button. • When flash lamp flashes, wait until flash has charged. • Camera and computer are connected via USB cable. • Camera and TV are not correct. Troubleshooting Problem Monitor is exhausted; No indicators displayed in monitor.
... as accurate as ordinary watches or clocks. Turn off . • Standby mode for Photo info in Monitor settings in the setup menu. • The camera clock is selected for saving power: press the power switch, the shutter-release button, A button, c button, or b (e movie-record) button. • When flash lamp flashes, wait until flash has charged. • Camera and computer are connected via USB cable. • Camera and TV are not correct. Troubleshooting Problem Monitor is exhausted; No indicators displayed in monitor.

Reference Manual
Page 211
... Cannot zoom in favorite Data on television. • Choose correct Video mode. • Memory card contains no images. small pictures, or images that have been cropped to a size of g 4608×2592. • Select images that support editing functions. • Camera is turned off and images are displayed in the camera monitor. 90, E77 20 90, E28 Album icon restored to default settings, or images added to images taken with movies, - pictures mode. Troubleshooting Playback Problem Cause/Solution A File cannot be played...
... Cannot zoom in favorite Data on television. • Choose correct Video mode. • Memory card contains no images. small pictures, or images that have been cropped to a size of g 4608×2592. • Select images that support editing functions. • Camera is turned off and images are displayed in the camera monitor. 90, E77 20 90, E28 Album icon restored to default settings, or images added to images taken with movies, - pictures mode. Troubleshooting Playback Problem Cause/Solution A File cannot be played...


