

Instruction Manual
Page 2
NORDICTRACK and IFIT are trademarks of ICON Health & Fitness, Inc. WPA and WPA2 are registered trademarks of Wi-Fi Alliance. 2 and are registered trademarks of this .... The Bluetooth® word mark and logos are used under license. TABLE OF CONTENTS WARNING DECAL PLACEMENT 2 IMPORTANT PRECAUTIONS 3 BEFORE YOU BEGIN 5 PART IDENTIFICATION CHART 6 ASSEMBLY 7 HOW TO USE THE TREADMILL 16 HOW TO FOLD AND MOVE THE TREADMILL 28 MAINTENANCE AND TROUBLESHOOTING 29 EXERCISE GUIDELINES 32 PART LIST 34 EXPLODED...
NORDICTRACK and IFIT are trademarks of ICON Health & Fitness, Inc. WPA and WPA2 are registered trademarks of Wi-Fi Alliance. 2 and are registered trademarks of this .... The Bluetooth® word mark and logos are used under license. TABLE OF CONTENTS WARNING DECAL PLACEMENT 2 IMPORTANT PRECAUTIONS 3 BEFORE YOU BEGIN 5 PART IDENTIFICATION CHART 6 ASSEMBLY 7 HOW TO USE THE TREADMILL 16 HOW TO FOLD AND MOVE THE TREADMILL 28 MAINTENANCE AND TROUBLESHOOTING 29 EXERCISE GUIDELINES 32 PART LIST 34 EXPLODED...
Instruction Manual
Page 4
... the treadmill by an authorized service representative. Never remove the motor hood unless instructed to move the treadmill. 25. The heart rate monitor is properly assembled. (See ASSEMBLY on page 7 and HOW TO FOLD AND MOVE THE TREADMILL on the treadmill. 28. Do not attempt to do so by placing objects under...
... the treadmill by an authorized service representative. Never remove the motor hood unless instructed to move the treadmill. 25. The heart rate monitor is properly assembled. (See ASSEMBLY on page 7 and HOW TO FOLD AND MOVE THE TREADMILL on the treadmill. 28. Do not attempt to do so by placing objects under...
Instruction Manual
Page 6
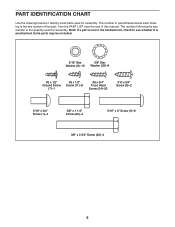
The number following the key number is the quantity used for assembly. Extra parts may be included. 5/16" Star Washer (8)-10 3/8" Star Washer (25)-8 #8 x 1/2" Ground Screw (7)-1 #8 x 1/2" Screw (11)-8 #8 x 3/4" Truss Head Screw (24)-20 #10 x 3/4" ...3/4" Screw (1)-4 3/8" x 1 1/4" Screw (20)-4 5/16" x 2" Screw (2)-8 3/8" x 2 3/4" Screw (23)-4 6 The number in the hardware kit, check to identify small parts used for assembly. Note: If a part is not in parentheses below to see whether it is preattached. PART IDENTIFICATION CHART Use the drawings below each drawing is the...
The number following the key number is the quantity used for assembly. Extra parts may be included. 5/16" Star Washer (8)-10 3/8" Star Washer (25)-8 #8 x 1/2" Ground Screw (7)-1 #8 x 1/2" Screw (11)-8 #8 x 3/4" Truss Head Screw (24)-20 #10 x 3/4" ...3/4" Screw (1)-4 3/8" x 1 1/4" Screw (20)-4 5/16" x 2" Screw (2)-8 3/8" x 2 3/4" Screw (23)-4 6 The number in the hardware kit, check to identify small parts used for assembly. Note: If a part is not in parentheses below to see whether it is preattached. PART IDENTIFICATION CHART Use the drawings below each drawing is the...

Instruction Manual
Page 7
... the following information to the email address or postal address on the exterior of the treadmill. ASSEMBLY • Assembly requires two persons. • Place all assembly steps. • After shipping, there may be an oily substance on the front cover of this manual. • your receipt (make sure to iconsupport.eu. ...
... the following information to the email address or postal address on the exterior of the treadmill. ASSEMBLY • Assembly requires two persons. • Place all assembly steps. • After shipping, there may be an oily substance on the front cover of this manual. • your receipt (make sure to iconsupport.eu. ...

Instruction Manual
Page 11
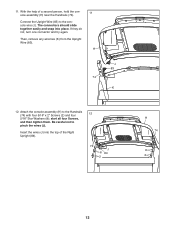
... the Screws. 9 11 101 11 11 94 H I 80 I I ). start all four Screws, and then tighten them. Set the console assembly (H) face down on a soft surface to the console assembly (H) with two 5/16" x 2" Screws (2), two 5/16" Star Washers (8), and two #10 x 2 3/4" Screws (6); Next, identify the... Left and Right Trays (94, 101). Attach the Trays to avoid scratching the console assembly. Then, remove the Pulse Crossbar (80). IMPORTANT: To avoid damaging the Pulse Crossbar (80), do not use power tools, and do 10 2 6 not...
... the Screws. 9 11 101 11 11 94 H I 80 I I ). start all four Screws, and then tighten them. Set the console assembly (H) face down on a soft surface to the console assembly (H) with two 5/16" x 2" Screws (2), two 5/16" Star Washers (8), and two #10 x 2 3/4" Screws (6); Next, identify the... Left and Right Trays (94, 101). Attach the Trays to avoid scratching the console assembly. Then, remove the Pulse Crossbar (80). IMPORTANT: To avoid damaging the Pulse Crossbar (80), do not use power tools, and do 10 2 6 not...
Instruction Manual
Page 12
... four 12 5/16" Star Washers (8); The connectors should slide together easily and snap into the top of a second person, hold the console assembly (H) near the Handrails (74). Attach the console assembly (H) to the console wire (J). Insert the wires (J) into place. If they do not, turn one connector and try again. start all...
... four 12 5/16" Star Washers (8); The connectors should slide together easily and snap into the top of a second person, hold the console assembly (H) near the Handrails (74). Attach the console assembly (H) to the console wire (J). Insert the wires (J) into place. If they do not, turn one connector and try again. start all...
Instruction Manual
Page 13
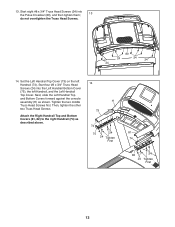
... Cover (73) on the left Handrail, and the Left Handrail Top Cover. Next, slide the Left Handrail Top and Bottom Covers forward against the console assembly (H) as described above. 14 H 73 74 75 24 24 Tighten First 81 74 82 24 24 Tighten First 13 Start four #8 x 3/4" Truss Head Screws (24...
... Cover (73) on the left Handrail, and the Left Handrail Top Cover. Next, slide the Left Handrail Top and Bottom Covers forward against the console assembly (H) as described above. 14 H 73 74 75 24 24 Tighten First 81 74 82 24 24 Tighten First 13 Start four #8 x 3/4" Truss Head Screws (24...


