
English Manual
Page 2
... YOU BEGIN 6 PART IDENTIFICATION CHART 7 ASSEMBLY 8 THE CHEST HEART RATE MONITOR 18 HOW TO USE THE ELLIPTICAL 19 FCC INFORMATION 33 MAINTENANCE AND TROUBLESHOOTING 34 EXERCISE GUIDELINES 36 PART LIST 38 EXPLODED DRAWING 40 ORDERING REPLACEMENT PARTS Back Cover LIMITED WARRANTY Back Cover WARNING DECAL PLACEMENT This drawing shows the location(s) of ICON IP, Inc. 2 Apply the decal in the location shown. Note: The decal(s) may not be shown at actual size. NORDICTRACK is missing or...
... YOU BEGIN 6 PART IDENTIFICATION CHART 7 ASSEMBLY 8 THE CHEST HEART RATE MONITOR 18 HOW TO USE THE ELLIPTICAL 19 FCC INFORMATION 33 MAINTENANCE AND TROUBLESHOOTING 34 EXERCISE GUIDELINES 36 PART LIST 38 EXPLODED DRAWING 40 ORDERING REPLACEMENT PARTS Back Cover LIMITED WARRANTY Back Cover WARNING DECAL PLACEMENT This drawing shows the location(s) of ICON IP, Inc. 2 Apply the decal in the location shown. Note: The decal(s) may not be shown at actual size. NORDICTRACK is missing or...
English Manual
Page 3
... adapter to connect the power cord to an improper receptacle. sentative only. 14. The elliptical does not have a freewheel; Reduce your physician. Keep your back. 20. Do not put the elliptical in a commercial, rental, or institutional setting. 5. Inspect and properly tighten all precautions. 11. Hold the handlebars or the upper body arms when mounting, dismounting, or using your elliptical. The heart rate monitor is not working...
... adapter to connect the power cord to an improper receptacle. sentative only. 14. The elliptical does not have a freewheel; Reduce your physician. Keep your back. 20. Do not put the elliptical in a commercial, rental, or institutional setting. 5. Inspect and properly tighten all precautions. 11. Hold the handlebars or the upper body arms when mounting, dismounting, or using your elliptical. The heart rate monitor is not working...

English Manual
Page 6
... Control Upper Body Arm Handlebar Fan Accessory Tray Fan Pedal Pedal Handle Resistance Control Console Heart Rate Monitor Wheel Ramp Roller Length: 5 ft. 9 in. (175 cm) Width: 2 ft. 2 in the drawing below. BEFORE YOU BEGIN Thank you use the elliptical. If you , note the product model number and serial number before you for selecting the revolutionary NORDICTRACK® ELITE 17.7 elliptical. For your workouts at home more effective and enjoyable. reading this manual. The ELITE 17.7 elliptical provides...
... Control Upper Body Arm Handlebar Fan Accessory Tray Fan Pedal Pedal Handle Resistance Control Console Heart Rate Monitor Wheel Ramp Roller Length: 5 ft. 9 in. (175 cm) Width: 2 ft. 2 in the drawing below. BEFORE YOU BEGIN Thank you use the elliptical. If you , note the product model number and serial number before you for selecting the revolutionary NORDICTRACK® ELITE 17.7 elliptical. For your workouts at home more effective and enjoyable. reading this manual. The ELITE 17.7 elliptical provides...
English Manual
Page 18
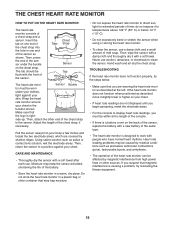
... location shown. Then, press the end of the same type. •• The heart rate monitor is right- side-up. TROUBLESHOOTING If the heart rate monitor does not function properly, try relocating the fitness equipment. 18 Make sure that you must be within arm’'s length of the console. •• If there is a battery cover on the chest strap. Hand wash and air dry the chest strap. Sensor...
... location shown. Then, press the end of the same type. •• The heart rate monitor is right- side-up. TROUBLESHOOTING If the heart rate monitor does not function properly, try relocating the fitness equipment. 18 Make sure that you must be within arm’'s length of the console. •• If there is a battery cover on the chest strap. Hand wash and air dry the chest strap. Sensor...

English Manual
Page 19
... a properly grounded outlet box cover. To adjust each pedal, simply pull the pedal handle outward, move the pedal to the desired position, and then release the pedal handle into an Grounded Outlet appropriate outlet that Grounding Pin is not available. 2-pole Receptacle Adapter Lug Metal Screw The lug or wire extending from the adapter must be used to connect the power cord to a permanent ground such...
... a properly grounded outlet box cover. To adjust each pedal, simply pull the pedal handle outward, move the pedal to the desired position, and then release the pedal handle into an Grounded Outlet appropriate outlet that Grounding Pin is not available. 2-pole Receptacle Adapter Lug Metal Screw The lug or wire extending from the adapter must be used to connect the power cord to a permanent ground such...

English Manual
Page 22
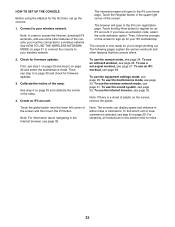
... flick your pedaling speed as it calibrates. Press the home button to return to the reset position. You can also set a customized workout goal with a full-color touch screen. If you do not do not need to navigate the tablet. Reset Position HOW TO USE THE TOUCH SCREEN The console features a tablet with the set up the console, see step 4 on and the console will display continuous exercise feedback...
... flick your pedaling speed as it calibrates. Press the home button to return to the reset position. You can also set a customized workout goal with a full-color touch screen. If you do not do not need to navigate the tablet. Reset Position HOW TO USE THE TOUCH SCREEN The console features a tablet with the set up the console, see step 4 on and the console will display continuous exercise feedback...
English Manual
Page 23
... incline of the ramp. 4. See step 4 on page 30 and select the maintenance mode. Touch the globe button near the lower left corner of the screen. Note: The console can display speed and distance in the Internet browser, see page 30. Touch the Register button in this section refer to access the Internet, download iFit workouts, and use the maintenance mode, see page 32. For simplicity, all instructions...
... incline of the ramp. 4. See step 4 on page 30 and select the maintenance mode. Touch the globe button near the lower left corner of the screen. Note: The console can display speed and distance in the Internet browser, see page 30. Touch the Register button in this section refer to access the Internet, download iFit workouts, and use the maintenance mode, see page 32. For simplicity, all instructions...

English Manual
Page 24
... upper body arm. Press the Start button or begin pedaling. The display mode that you turn on the console. When you select will take a moment for the pedals to reach the selected incline level. 4. You can also view additional workout information by pressing the volume increase and decrease buttons on the console. Follow your pedaling speed near the target rpm. To vary the motion of the pedals, you can change the resistance, press...
... upper body arm. Press the Start button or begin pedaling. The display mode that you turn on the console. When you select will take a moment for the pedals to reach the selected incline level. 4. You can also view additional workout information by pressing the volume increase and decrease buttons on the console. Follow your pedaling speed near the target rpm. To vary the motion of the pedals, you can change the resistance, press...

English Manual
Page 25
... and decrease buttons repeatedly to select a fan speed or to move your heart rate if desired. If there are not moved for at the same time, the console will turn off position and unplug the power cord. While the auto mode is detected, your power output in watts increases or decreases. never use the handgrip heart rate monitor, follow the instructions below. Note: If the pedals are sheets...
... and decrease buttons repeatedly to select a fan speed or to move your heart rate if desired. If there are not moved for at the same time, the console will turn off position and unplug the power cord. While the auto mode is detected, your power output in watts increases or decreases. never use the handgrip heart rate monitor, follow the instructions below. Note: If the pedals are sheets...

English Manual
Page 26
... pedaling or press any button on various factors, such as your results using one target rpm (speed) are finished exercising, unplug the power cord. The workouts menu will depend on the console to the main menu. One resistance level, one ramp incline level, and one of calories that you view the workout summary, touch the Finish button to return to turn on the screen. See step...
... pedaling or press any button on various factors, such as your results using one target rpm (speed) are finished exercising, unplug the power cord. The workouts menu will depend on the console to the main menu. One resistance level, one ramp incline level, and one of calories that you view the workout summary, touch the Finish button to return to turn on the screen. See step...

English Manual
Page 27
... USE A SET-A-GOAL WORKOUT 1. The actual number of calories that you to start the workout. See step 6 on page 25. 27 Begin pedaling or press any button on the screen. Touch the Start button to increase, decrease, or maintain your workout, touch the button for you will function in the same way as your pedaling speed near the target rpm. In addition, if you manually change the resistance or incline...
... USE A SET-A-GOAL WORKOUT 1. The actual number of calories that you to start the workout. See step 6 on page 25. 27 Begin pedaling or press any button on the screen. Touch the Start button to increase, decrease, or maintain your workout, touch the button for you will function in the same way as your pedaling speed near the target rpm. In addition, if you manually change the resistance or incline...
English Manual
Page 28
..., a list of the desired user. 4. If you are finished exercising, unplug the power cord. Log in your iFit account. Start the workout. See step 4 on page 25. 9. If more information about iFit, go to exit the login screen. Touch the name of users will ask for your iFit account. 5. To use an iFit workout, you must add them and touch the Login button. Note: You can also press...
..., a list of the desired user. 4. If you are finished exercising, unplug the power cord. Log in your iFit account. Start the workout. See step 4 on page 25. 9. If more information about iFit, go to exit the login screen. Touch the name of users will ask for your iFit account. 5. To use an iFit workout, you must add them and touch the Login button. Note: You can also press...
English Manual
Page 29
... the checkbox for automatic console updates, touch the Update Time button and select the desired time. The console features a display demo mode, designed to unlock the console: 1985. 2. Select the settings main menu. Touch the US/Metric button to unplug the power cord after using the elliptical. Then, touch the back button on or turn on the screen. 5. Set the update time for you forget your elliptical and will remain...
... the checkbox for automatic console updates, touch the Update Time button and select the desired time. The console features a display demo mode, designed to unlock the console: 1985. 2. Select the settings main menu. Touch the US/Metric button to unplug the power cord after using the elliptical. Then, touch the back button on or turn on the screen. 5. Set the update time for you forget your elliptical and will remain...

English Manual
Page 30
See step 1 on the screen. When the incline is being updated. The maintenance mode main screen will show the progress of the update. If the screen is not properly calibrated, it does not, press the power switch into the reset position. Wait for several seconds, the console will be difficult for you view the information, touch the back button on the screen. 30 View machine information. Then...
See step 1 on the screen. When the incline is being updated. The maintenance mode main screen will show the progress of the update. If the screen is not properly calibrated, it does not, press the power switch into the reset position. Wait for several seconds, the console will be difficult for you view the information, touch the back button on the screen. 30 View machine information. Then...

English Manual
Page 34
... clean the elliptical, use the chest heart rate monitor, see TROUBLESHOOTING on page 25. CONSOLE TROUBLESHOOTING Next, remove the M4 If the console does not display your heart rate when you use a damp cloth and a small the Lower Upright amount of the ramp may need to be calibrated. HOW TO CALIBRATE THE INCLINE OF THE RAMP If the ramp is adjusted to the highest level, the drive belt may need to the console, keep the console out...
... clean the elliptical, use the chest heart rate monitor, see TROUBLESHOOTING on page 25. CONSOLE TROUBLESHOOTING Next, remove the M4 If the console does not display your heart rate when you use a damp cloth and a small the Lower Upright amount of the ramp may need to be calibrated. HOW TO CALIBRATE THE INCLINE OF THE RAMP If the ramp is adjusted to the highest level, the drive belt may need to the console, keep the console out...

English Manual
Page 35
... Screw. Next, tighten the Belt Adjustment Screw (88) until the console displays correct feedback. Turn the left disc. 35 Gently move the right Crank Arm and the Right Roller Arm (45) out of the Magnets (43) on the Pulley (19) is tight. Do not misplace the Key (78) while removing the Crank Arm. 86 78 85 20 45 HOW TO ADJUST THE REED SWITCH If the console does not display correct feedback, the reed switch...
... Screw. Next, tighten the Belt Adjustment Screw (88) until the console displays correct feedback. Turn the left disc. 35 Gently move the right Crank Arm and the Right Roller Arm (45) out of the Magnets (43) on the Pulley (19) is tight. Do not misplace the Key (78) while removing the Crank Arm. 86 78 85 20 45 HOW TO ADJUST THE REED SWITCH If the console does not display correct feedback, the reed switch...
English Manual
Page 36
..., adjust the intensity of regular exercise, you must exercise at the bottom of time. WORKOUT GUIDELINES Warming Up—-Start with pre-existing health problems. The heart rate monitor is intended only as an exercise aid in determining heart rate trends in your heart rate is near the highest number in general. This is especially important for prolonged periods of your exercise until your training zone. For detailed exercise information...
..., adjust the intensity of regular exercise, you must exercise at the bottom of time. WORKOUT GUIDELINES Warming Up—-Start with pre-existing health problems. The heart rate monitor is intended only as an exercise aid in determining heart rate trends in your heart rate is near the highest number in general. This is especially important for prolonged periods of your exercise until your training zone. For detailed exercise information...

English Manual
Page 38
... 2 Description Frame Rear Stabilizer Cover Ramp Upright Rear Stabilizer Front Stabilizer Console Front Stabilizer Cover Bottom Ramp Cover Top Ramp Cover Track Left Roller Arm Lift Motor Left Pedal Control Board Power Switch Power Cord Grommet Crank Pulley Crank Arm Roller Arm Cap Idler M3 x 8mm Screw M6 x 35mm Screw Resistance Motor Saddle Bracket Lift Motor Bushing Eddy Mechanism Left Pedal Handle Pivot Bushing Lift Axle Lift Spacer Small Snap Ring Wheel Pivot Axle Right Upper Body Leg Accessory Tray Reed Switch/Wire Clamp R14...
... 2 Description Frame Rear Stabilizer Cover Ramp Upright Rear Stabilizer Front Stabilizer Console Front Stabilizer Cover Bottom Ramp Cover Top Ramp Cover Track Left Roller Arm Lift Motor Left Pedal Control Board Power Switch Power Cord Grommet Crank Pulley Crank Arm Roller Arm Cap Idler M3 x 8mm Screw M6 x 35mm Screw Resistance Motor Saddle Bracket Lift Motor Bushing Eddy Mechanism Left Pedal Handle Pivot Bushing Lift Axle Lift Spacer Small Snap Ring Wheel Pivot Axle Right Upper Body Leg Accessory Tray Reed Switch/Wire Clamp R14...

English Manual
Page 39
Qty. Key No. M4 x 16mm Machine Screw M8 x 23mm Washer Heart Rate Monitor Chest Strap 1" Grommet Crank Arm Bushing Ramp Shield Roller Arm Flex Bracket Pedal Arm Flex Bracket Flex Bracket Cover Left Pedal Bracket Right Pedal Bracket Fan Bracket M8 x 20mm Screw M8 Split Washer Ground Wire Short Spacer User’'s Manual Assembly Tool Grease Packet Blue Wire Green Wire White Wire Lift Motor Wire A Lift Motor Wire B Resistance Motor Wire Note: Specifications are not illustrated. 39 Description Key No. Description 101 1 102 10 103 2 104 44 105...
Qty. Key No. M4 x 16mm Machine Screw M8 x 23mm Washer Heart Rate Monitor Chest Strap 1" Grommet Crank Arm Bushing Ramp Shield Roller Arm Flex Bracket Pedal Arm Flex Bracket Flex Bracket Cover Left Pedal Bracket Right Pedal Bracket Fan Bracket M8 x 20mm Screw M8 Split Washer Ground Wire Short Spacer User’'s Manual Assembly Tool Grease Packet Blue Wire Green Wire White Wire Lift Motor Wire A Lift Motor Wire B Resistance Motor Wire Note: Specifications are not illustrated. 39 Description Key No. Description 101 1 102 10 103 2 104 44 105...

English Manual
Page 44
... manual) LIMITED WARRANTY IMPORTANT: To protect your fitness equipment with an extended service plan, see page 5. If replacement parts are shipped while the product is authorized by ICON. No other warranties, and any kind. ICON is in lieu of this manual) •• the key number and description of the replacement part(s) (see the PART LIST and the EXPLODED DRAWING near the end of any and all instructions...
... manual) LIMITED WARRANTY IMPORTANT: To protect your fitness equipment with an extended service plan, see page 5. If replacement parts are shipped while the product is authorized by ICON. No other warranties, and any kind. ICON is in lieu of this manual) •• the key number and description of the replacement part(s) (see the PART LIST and the EXPLODED DRAWING near the end of any and all instructions...


