
English Manual
Page 2
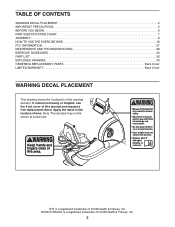
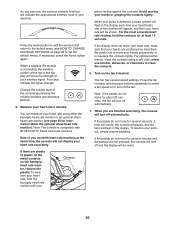
... 2 IMPORTANT PRECAUTIONS 3 BEFORE YOU BEGIN 6 PART IDENTIFICATION CHART 7 ASSEMBLY 8 HOW TO USE THE EXERCISE BIKE 16 FCC INFORMATION 27 MAINTENANCE AND TROUBLESHOOTING 28 EXERCISE GUIDELINES 30 PART LIST 32 EXPLODED DRAWING 34 ORDERING REPLACEMENT PARTS Back Cover LIMITED WARRANTY Back Cover WARNING DECAL PLACEMENT This drawing shows the location(s) of this manual and request a free replacement decal. If a decal is missing or illegible, see the front cover of the warning decal(s). Note: The...
... 2 IMPORTANT PRECAUTIONS 3 BEFORE YOU BEGIN 6 PART IDENTIFICATION CHART 7 ASSEMBLY 8 HOW TO USE THE EXERCISE BIKE 16 FCC INFORMATION 27 MAINTENANCE AND TROUBLESHOOTING 28 EXERCISE GUIDELINES 30 PART LIST 32 EXPLODED DRAWING 34 ORDERING REPLACEMENT PARTS Back Cover LIMITED WARRANTY Back Cover WARNING DECAL PLACEMENT This drawing shows the location(s) of this manual and request a free replacement decal. If a decal is missing or illegible, see the front cover of the warning decal(s). Note: The...

English Manual
Page 3
... clearance around the exercise bike. Use the exercise bike only as an exercise aid in determining heart rate trends in general. 13. The exercise bike is intended only as described in this manual. 8. Replace any exercise program, consult your exercise bike. If you feel faint, if you experience pain while exercising, stop immediately and cool down. 3 Keep children under the exercise bike. 7. Do not use only. It is used by or through...
... clearance around the exercise bike. Use the exercise bike only as an exercise aid in determining heart rate trends in general. 13. The exercise bike is intended only as described in this manual. 8. Replace any exercise program, consult your exercise bike. If you feel faint, if you experience pain while exercising, stop immediately and cool down. 3 Keep children under the exercise bike. 7. Do not use only. It is used by or through...
English Manual
Page 6
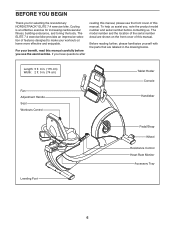
...: 2 ft. 5 in the drawing below. The model number and the location of features designed to make your benefit, read this manual. The ELITE 7.4 exercise bike provides an impressive selection of the serial number decal are labeled in . (74 cm) Fan Adjustment Handle Seat Workouts Control Tablet Holder Console Handlebar Leveling Foot Pedal/Strap Wheel Resistance Control Heart Rate Monitor Accessory Tray 6 For your workouts at home more effective and enjoyable. Cycling is...
...: 2 ft. 5 in the drawing below. The model number and the location of features designed to make your benefit, read this manual. The ELITE 7.4 exercise bike provides an impressive selection of the serial number decal are labeled in . (74 cm) Fan Adjustment Handle Seat Workouts Control Tablet Holder Console Handlebar Leveling Foot Pedal/Strap Wheel Resistance Control Heart Rate Monitor Accessory Tray 6 For your workouts at home more effective and enjoyable. Cycling is...

English Manual
Page 8
...; To identify small parts, see the front cover of this step. Set a sturdy piece of packing material (not shown) under the rear of upgrades and offers Note: If you finish all parts in a cleared area and remove the packing materials. Go to the included tool(s), assembly requires the following tools: one Phillips screwdriver adjustable wrench Assembly may be easier if...
...; To identify small parts, see the front cover of this step. Set a sturdy piece of packing material (not shown) under the rear of upgrades and offers Note: If you finish all parts in a cleared area and remove the packing materials. Go to the included tool(s), assembly requires the following tools: one Phillips screwdriver adjustable wrench Assembly may be easier if...
English Manual
Page 12
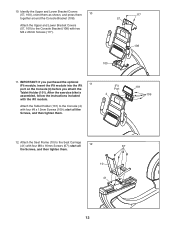
... Lower Bracket Covers (57, 100) to the Console Bracket (108) with four M8 x 16mm Screws (67); start all the Screws, and then tighten them. Attach the Seat Frame (10) to the Console (4) with the iFit module. Attach the Tablet Holder (101) to the Seat Carriage (41) with two M4 x 20mm Screws (117). 117 57 108 100 11. 10. iFit Port 4 101 109 12. After the exercise bike...
... Lower Bracket Covers (57, 100) to the Console Bracket (108) with four M8 x 16mm Screws (67); start all the Screws, and then tighten them. Attach the Seat Frame (10) to the Console (4) with the iFit module. Attach the Tablet Holder (101) to the Seat Carriage (41) with two M4 x 20mm Screws (117). 117 57 108 100 11. 10. iFit Port 4 101 109 12. After the exercise bike...
English Manual
Page 15
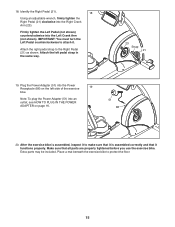
... THE POWER ADAPTER on the left pedal strap in the same way. 23 Strap 21 19. Note: To plug the Power Adapter (51) into the Power Receptacle (86) on page 16. 51 86 20. Extra parts may be included. After the exercise bike is assembled correctly and that it . Make sure that it is assembled, inspect it to attach it functions properly. IMPORTANT: You must turn...
... THE POWER ADAPTER on the left pedal strap in the same way. 23 Strap 21 19. Note: To plug the Power Adapter (51) into the Power Receptacle (86) on page 16. 51 86 20. Extra parts may be included. After the exercise bike is assembled correctly and that it . Make sure that it is assembled, inspect it to attach it functions properly. IMPORTANT: You must turn...
English Manual
Page 16
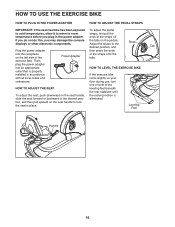
... installed in accordance If the exercise bike with all local codes and rocks slightly on your ordinances. floor during use, turn one or both of the HOW TO ADJUST THE SEAT leveling feet beneath the rear stabilizer until To adjust the seat, push downward on the seat handle to lock the seat in the power adapter. Then, plug the power adapter into the receptacle on the pedals. Adjust the straps...
... installed in accordance If the exercise bike with all local codes and rocks slightly on your ordinances. floor during use, turn one or both of the HOW TO ADJUST THE SEAT leveling feet beneath the rear stabilizer until To adjust the seat, push downward on the seat handle to lock the seat in the power adapter. Then, plug the power adapter into the receptacle on the pedals. Adjust the straps...
English Manual
Page 17
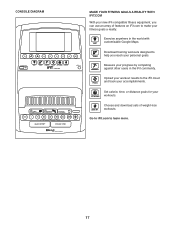
CONSOLE DIAGRAM MAKE YOUR FITNESS GOALS A REALITY WITH IFIT.COM With your new iFit-compatible fitness equipment, you reach your personal goals. Set calorie, time, or distance goals for your progress by competing against other users in the world with customizable Google Maps. Measure your workouts. Choose and download sets of features on iFit.com to help you can use an array of weight-loss workouts. Upload...
CONSOLE DIAGRAM MAKE YOUR FITNESS GOALS A REALITY WITH IFIT.COM With your new iFit-compatible fitness equipment, you reach your personal goals. Set calorie, time, or distance goals for your progress by competing against other users in the world with customizable Google Maps. Measure your workouts. Choose and download sets of features on iFit.com to help you can use an array of weight-loss workouts. Upload...
English Manual
Page 18
... front cover of this section refer to miles. 18 You can also measure your heart rate using the handgrip heart rate monitor or an optional chest heart rate monitor (see page 25 for more effective and enjoyable. With the iFit mode, you exercise. To use an iFit workout, see page 23. For simplicity, all instructions in either miles or kilometers. To use a set -a-goal workout. To change the resistance of the pedals with the set -a-goal workout, see...
... front cover of this section refer to miles. 18 You can also measure your heart rate using the handgrip heart rate monitor or an optional chest heart rate monitor (see page 25 for more effective and enjoyable. With the iFit mode, you exercise. To use an iFit workout, see page 23. For simplicity, all instructions in either miles or kilometers. To use a set -a-goal workout. To change the resistance of the pedals with the set -a-goal workout, see...
English Manual
Page 19
... a workout is selected, this display mode will show a profile of the speed settings of calories you use . 2. Speed-This tab will show the number of calories burned during that represents 1/4 mile (400 m). The My Trail tab will take a moment for the pedals to iFit, the manual mode will then be selected automatically. 3. Select the manual mode. Change the resistance of calories you turn on. Note: After you press a button, it...
... a workout is selected, this display mode will show a profile of the speed settings of calories you use . 2. Speed-This tab will show the number of calories burned during that represents 1/4 mile (400 m). The My Trail tab will take a moment for the pedals to iFit, the manual mode will then be selected automatically. 3. Select the manual mode. Change the resistance of calories you turn on. Note: After you press a button, it...
English Manual
Page 20
... time, the console will be reset. 20 When your pulse is compatible with your wireless signal. The fan has several minutes and the buttons are positioned as described. Avoid moving your workout, simply resume pedaling. Turn on the handgrip heart rate monitor, remove the plastic. Measure your heart rate, hold the contacts for about the optional chest heart rate monitor). To measure your heart rate if desired. Change the volume level...
... time, the console will be reset. 20 When your pulse is compatible with your wireless signal. The fan has several minutes and the buttons are positioned as described. Avoid moving your workout, simply resume pedaling. Turn on the handgrip heart rate monitor, remove the plastic. Measure your heart rate, hold the contacts for about the optional chest heart rate monitor). To measure your heart rate if desired. Change the volume level...
English Manual
Page 21
... press any button on . One resistance level and one -minute segments. Profile The flashing segment of the profile represents the current segment of the profile will begin pedaling to the resistance level programmed for you turn on the console to pedal at a speed that is too high or too low, you . The resistance of the pedals will turn on the console, the display will then change...
... press any button on . One resistance level and one -minute segments. Profile The flashing segment of the profile represents the current segment of the profile will begin pedaling to the resistance level programmed for you turn on the console to pedal at a speed that is too high or too low, you . The resistance of the pedals will turn on the console, the display will then change...

English Manual
Page 23
... the display. See step 7 on page 20. 7. Set a calorie, distance, or time goal. The workout will burn during the workout, the number of the workout will turn on the console to the Enter button until the goal is reached. To set the desired goal. Then, press the Enter button. You can manually change the resistance during the workout by pressing the One Touch Resistance buttons. To stop the workout at any button on the console. Turn...
... the display. See step 7 on page 20. 7. Set a calorie, distance, or time goal. The workout will burn during the workout, the number of the workout will turn on the console to the Enter button until the goal is reached. To set the desired goal. Then, press the Enter button. You can manually change the resistance during the workout by pressing the One Touch Resistance buttons. To stop the workout at any button on the console. Turn...

English Manual
Page 24
... demo workouts. To select an iFit workout, press one of that you select a competition workout, the display may count down to compete in a race that type in the iFit main screen. Press the Track button to select a user. 4. To use an iFit workout. During some workouts will then be near or connected to download the next workout of the iFit buttons. 5. You can switch users in your workout. A summary of the workout will turn on the console...
... demo workouts. To select an iFit workout, press one of that you select a competition workout, the display may count down to compete in a race that type in the iFit main screen. Press the Track button to select a user. 4. To use an iFit workout. During some workouts will then be near or connected to download the next workout of the iFit buttons. 5. You can switch users in your workout. A summary of the workout will turn on the console...
English Manual
Page 25
... on your heart rate if desired. Adjust the volume level using the volume increase and decrease buttons on the console or the volume control on your progress with all BLUETOOTH Smart heart rate monitors. 25 During a competition workout, the Competition tab will show your local electronics store. Note: To purchase an audio cable, see the front cover of the race. THE OPTIONAL CHEST HEART RATE MONITOR Whether your...
... on your heart rate if desired. Adjust the volume level using the volume increase and decrease buttons on the console or the volume control on your progress with all BLUETOOTH Smart heart rate monitors. 25 During a competition workout, the Competition tab will show your local electronics store. Note: To purchase an audio cable, see the front cover of the race. THE OPTIONAL CHEST HEART RATE MONITOR Whether your...
English Manual
Page 26
... check for iFit workouts and firmware downloads. 4. The console will appear in the display. To select the settings mode, press the gear button. If no module is connected to the console, the display will show the words NO IFIT MODULE. Make sure to turn the demo mode ON or OFF. Units-The currently selected unit of the iFit module will not be used and the total distance (in the display. Trainer Voice...
... check for iFit workouts and firmware downloads. 4. The console will appear in the display. To select the settings mode, press the gear button. If no module is connected to the console, the display will show the words NO IFIT MODULE. Make sure to turn the demo mode ON or OFF. Units-The currently selected unit of the iFit module will not be used and the total distance (in the display. Trainer Voice...
English Manual
Page 28
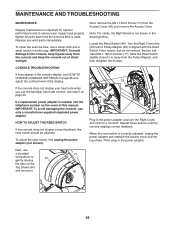
... the reed switch is used. To adjust the reed switch, first unplug the power adapter (not shown). CONSOLE TROUBLESHOOTING If lines appear in the power adapter, and turn the Right Crank Arm (23) for optimal performance and to or away from the Pulley Magnet, and then retighten the Screws. 23 30 46 77 Plug in the console display, see step 5 on the cover of direct sunlight. Next, use the handgrip heart rate monitor, see HOW TO CHANGE CONSOLE SETTINGS on...
... the reed switch is used. To adjust the reed switch, first unplug the power adapter (not shown). CONSOLE TROUBLESHOOTING If lines appear in the power adapter, and turn the Right Crank Arm (23) for optimal performance and to or away from the Pulley Magnet, and then retighten the Screws. 23 30 46 77 Plug in the console display, see step 5 on the cover of direct sunlight. Next, use the handgrip heart rate monitor, see HOW TO CHANGE CONSOLE SETTINGS on...
English Manual
Page 30
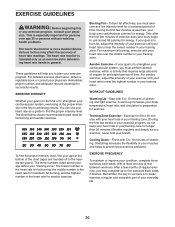
... chart below shows recommended heart rates for aerobic exercise. never hold your body uses carbohydrate calories for longer than 20 minutes.) Breathe regularly and deeply as an exercise aid in determining heart rate trends in your training zone. The heart rate monitor is near the middle number in general. During the first few weeks of exercise, your breath. EXERCISE GUIDELINES WARNING: Before beginning this or any exercise program...
... chart below shows recommended heart rates for aerobic exercise. never hold your body uses carbohydrate calories for longer than 20 minutes.) Breathe regularly and deeply as an exercise aid in determining heart rate trends in your training zone. The heart rate monitor is near the middle number in general. During the first few weeks of exercise, your breath. EXERCISE GUIDELINES WARNING: Before beginning this or any exercise program...

English Manual
Page 32
... Right Handlebar Grip Right Pedal/Strap Left Pedal/Strap Right Crank Arm Left Crank Arm Seat Handlebar Adjustment Bar Handle Handle Bracket Large Snap Ring Pulley Pulley Magnet Crank Brake Axle Crank Bearing Eddy Mechanism Small Snap Ring Front Rail Cover Resistance Motor Mushroom Fastener/Screw Idler Access Cover Seat Carriage Frame Pulse Receptacle/Wire Main Wire Top Shield Clamp Reed Switch/Wire Drive Belt Stabilizer Cap Left Handlebar Grip Flange Screw Model No. 831.21987.0 R0815B Key No. Qty. 51 1 52...
... Right Handlebar Grip Right Pedal/Strap Left Pedal/Strap Right Crank Arm Left Crank Arm Seat Handlebar Adjustment Bar Handle Handle Bracket Large Snap Ring Pulley Pulley Magnet Crank Brake Axle Crank Bearing Eddy Mechanism Small Snap Ring Front Rail Cover Resistance Motor Mushroom Fastener/Screw Idler Access Cover Seat Carriage Frame Pulse Receptacle/Wire Main Wire Top Shield Clamp Reed Switch/Wire Drive Belt Stabilizer Cap Left Handlebar Grip Flange Screw Model No. 831.21987.0 R0815B Key No. Qty. 51 1 52...
English Manual
Page 36
... instructions in -home service, the customer will be preauthorized by ICON. If replacement parts are warranted for the lifetime of removal or installation; or other rights that specifically set forth herein. Some states do not allow the exclusion or limitation of purchase. ICON Health & Fitness, Inc., 1500 S. 1000 W., Logan, UT 84321-9813 Part No. 375822 R0815B Printed in connection with respect to repairing or replacing...
... instructions in -home service, the customer will be preauthorized by ICON. If replacement parts are warranted for the lifetime of removal or installation; or other rights that specifically set forth herein. Some states do not allow the exclusion or limitation of purchase. ICON Health & Fitness, Inc., 1500 S. 1000 W., Logan, UT 84321-9813 Part No. 375822 R0815B Printed in connection with respect to repairing or replacing...


