
English Manual
Page 2
NordicTrack is a registered trademark of this manual. Remove the PART IDENTIFICATION CHART and PART LIST/EXPLODED DRAWING before beginning assembly. TABLE OF CONTENTS WARNING DECAL PLACEMENT 3 IMPORTANT PRECAUTIONS 4 BEFORE YOU BEGIN 5 ASSEMBLY 6 UPPER CABLE ADJUSTMENT 12 ADJUSTMENTS 13 CONSOLE OPERATION 17 CABLE DIAGRAM 19 TROUBLESHOOTING 20 EXERCISE GUIDELINES 21 ORDERING REPLACEMENT PARTS Back Cover LIMITED WARRANTY Back Cover Note: A PART IDENTIFICATION CHART and a PART LIST/EXPLODED DRAWING are attached in the center of ICON IP, Inc. 2
NordicTrack is a registered trademark of this manual. Remove the PART IDENTIFICATION CHART and PART LIST/EXPLODED DRAWING before beginning assembly. TABLE OF CONTENTS WARNING DECAL PLACEMENT 3 IMPORTANT PRECAUTIONS 4 BEFORE YOU BEGIN 5 ASSEMBLY 6 UPPER CABLE ADJUSTMENT 12 ADJUSTMENTS 13 CONSOLE OPERATION 17 CABLE DIAGRAM 19 TROUBLESHOOTING 20 EXERCISE GUIDELINES 21 ORDERING REPLACEMENT PARTS Back Cover LIMITED WARRANTY Back Cover Note: A PART IDENTIFICATION CHART and a PART LIST/EXPLODED DRAWING are attached in the center of ICON IP, Inc. 2
English Manual
Page 4
... 4. Do not pull on the bench, with the included resistance. Use the resistance system only as you feel pain or dizziness while exercising, stop immediately and make sure that does not require it. 5. The resistance system is not designed to protect the floor. 13.... WARNING: Before beginning this manual before using the resistance system. 1. Read all parts are exercising, stop immediately and begin cooling down. Make sure that all instructions in one of 35 or persons with any commercial, rental, or institutional...
... 4. Do not pull on the bench, with the included resistance. Use the resistance system only as you feel pain or dizziness while exercising, stop immediately and make sure that does not require it. 5. The resistance system is not designed to protect the floor. 13.... WARNING: Before beginning this manual before using the resistance system. 1. Read all parts are exercising, stop immediately and begin cooling down. Make sure that all instructions in one of 35 or persons with any commercial, rental, or institutional...

English Manual
Page 13
... High Cable (101) without the ball to see the correct form for important information about how to the Leg Lever. To perform the leg extension exercise, the indicated Pad Tube (50) should be inserted through the hole in the Leg (5), and attach it to one end of the Lower Cable in... high pulleys when not in use. 37 39 Ball 101 USING THE LEG LEVER To use solvents. Make sure all parts are properly tightened each exercise. Attach the other end of the Lower Cable (120) with a damp cloth and a mild, non-abrasive detergent. ADJUSTMENTS This section explains how to adjust the...
... High Cable (101) without the ball to see the correct form for important information about how to the Leg Lever. To perform the leg extension exercise, the indicated Pad Tube (50) should be inserted through the hole in the Leg (5), and attach it to one end of the Lower Cable in... high pulleys when not in use. 37 39 Ball 101 USING THE LEG LEVER To use solvents. Make sure all parts are properly tightened each exercise. Attach the other end of the Lower Cable (120) with a damp cloth and a mild, non-abrasive detergent. ADJUSTMENTS This section explains how to adjust the...

English Manual
Page 14
... the lower cable (not shown) with a Cable Clip (94). 53 94 56 14 Remove the Curl Pad (43) from the resistance system when performing an exercise that does not require it. 43 42 59 5 ATTACHING THE CURL BAR To use the Curl Bar (53), first attach the leg lever to the...
... the lower cable (not shown) with a Cable Clip (94). 53 94 56 14 Remove the Curl Pad (43) from the resistance system when performing an exercise that does not require it. 43 42 59 5 ATTACHING THE CURL BAR To use the Curl Bar (53), first attach the leg lever to the...

English Manual
Page 15
... in a level position or an inclined position. To use the squat station, first remove the backrest (see ADJUSTING THE SEAT on page 16). For row exercises, remove the Backrest (35) from Squat Carriage (19). Then, insert a Squat Pin (66) into the Squat Carriage. 27 19 ATTACHING THE SQUAT STATION To use...
... in a level position or an inclined position. To use the squat station, first remove the backrest (see ADJUSTING THE SEAT on page 16). For row exercises, remove the Backrest (35) from Squat Carriage (19). Then, insert a Squat Pin (66) into the Squat Carriage. 27 19 ATTACHING THE SQUAT STATION To use...

English Manual
Page 16
... store the resistance system, first remove the Curl Pad (not shown) and the Leg Lever (not shown) from the Row Plate (28). To perform row exercises, the hip strap must be attached to the mech cable (see ADJUSTING THE BACKREST on page 14), and the Seat Carriage (44) must be secured...
... store the resistance system, first remove the Curl Pad (not shown) and the Leg Lever (not shown) from the Row Plate (28). To perform row exercises, the hip strap must be attached to the mech cable (see ADJUSTING THE BACKREST on page 14), and the Seat Carriage (44) must be secured...
English Manual
Page 17
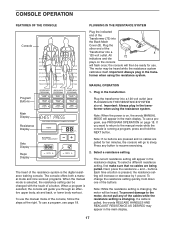
... a manual mode and nine workout programs. When the manual mode is changing. To prevent damage to the motor, do not pull any button to resume exercising. 2. Plug the other end of the cables while the resistance setting is selected, the resistance setting can be ready for ten minutes, the console will...
... a manual mode and nine workout programs. When the manual mode is changing. To prevent damage to the motor, do not pull any button to resume exercising. 2. Plug the other end of the cables while the resistance setting is selected, the resistance setting can be ready for ten minutes, the console will...

English Manual
Page 18
... in the main display. buttons below the main display. PROGRAM OPERATION 1. Important: Always plug in the transformer. After you have completed an exercise in the program, press the NEXT button and the name of sets and repetitions that you complete your workout. 4. Enter the numbers of ... will count down . 6. When a program is on the button you plan to sleep. Note: To see the correct form for the exercise if desired. Adjust the resistance setting and the numbers of repetitions that you plan to the next part of sets and repetitions. The recommended resistance...
... in the main display. buttons below the main display. PROGRAM OPERATION 1. Important: Always plug in the transformer. After you have completed an exercise in the program, press the NEXT button and the name of sets and repetitions that you complete your workout. 4. Enter the numbers of ... will count down . 6. When a program is on the button you plan to sleep. Note: To see the correct form for the exercise if desired. Adjust the resistance setting and the numbers of repetitions that you plan to the next part of sets and repetitions. The recommended resistance...
English Manual
Page 21
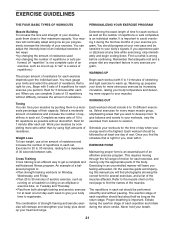
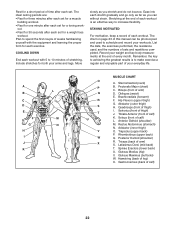
...percentage of resistance. Proper breathing is right for 1 minute after each set . When you find the schedule that is one full day each exercise depends upon the individual user. WORKING OUT Each workout should be followed by increasing circulation, raising your muscles, push them to session. Rest for... least one sit-up prepares your body for each week to give balance and variety to your workouts, vary the exercises from both strength training and aerobic exercise for each set " is an essential part of each repetition should last about half as long as one day of...
...percentage of resistance. Proper breathing is right for 1 minute after each set . When you find the schedule that is one full day each exercise depends upon the individual user. WORKING OUT Each workout should be followed by increasing circulation, raising your muscles, push them to session. Rest for... least one sit-up prepares your body for each week to give balance and variety to your workouts, vary the exercises from both strength training and aerobic exercise for each set " is an essential part of each repetition should last about half as long as one day of...
English Manual
Page 22
... (front of thigh) I J K L M N O P Q R S T U V W X MUSCLE CHART A. Rhomboideus (upper back) Q. Triceps (back of calf) L. COOLING DOWN End each exercise. Ease into each set for a toning work- List the date, the exercises performed, the resistance used to make exercise a regular and enjoyable part of your arms and legs. Sternomastoid (neck) B. Hip Flexors (upper thigh) G. Anterior Deltoid...
... (front of thigh) I J K L M N O P Q R S T U V W X MUSCLE CHART A. Rhomboideus (upper back) Q. Triceps (back of calf) L. COOLING DOWN End each exercise. Ease into each set for a toning work- List the date, the exercises performed, the resistance used to make exercise a regular and enjoyable part of your arms and legs. Sternomastoid (neck) B. Hip Flexors (upper thigh) G. Anterior Deltoid...

English Manual
Page 23
MONDAY Date: / / EXERCISE WEIGHT SETS REPS TUESDAY Date: / / AEROBIC EXERCISE WEDNESDAY Date: / / EXERCISE WEIGHT SETS REPS THURSDAY Date: / / AEROBIC EXERCISE FRIDAY Date: / / EXERCISE WEIGHT SETS REPS Make photocopies of this page for scheduling and recording your workouts. 23
MONDAY Date: / / EXERCISE WEIGHT SETS REPS TUESDAY Date: / / AEROBIC EXERCISE WEDNESDAY Date: / / EXERCISE WEIGHT SETS REPS THURSDAY Date: / / AEROBIC EXERCISE FRIDAY Date: / / EXERCISE WEIGHT SETS REPS Make photocopies of this page for scheduling and recording your workouts. 23
English Manual
Page 24
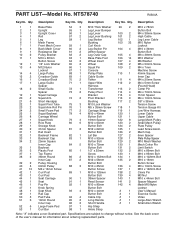
... 1 M10 x 85mm 142 4 Mech M10 Nylon 47 1 Knob Spring Button Bolt Locknut 48 1 Seat Knob 93 4 M10 x 44mm # 1 User's Manual 49 1 Rail Cap Button Bolt # 1 Exercise Guide 50 3 Pad Tube 94 4 Cable Clip # 1 Video 51 6 19mm Round 95 2 Long Handle # 1 Large Allen Wrench Inner Cap 96 2 Short Handle # 1 Small Allen Wrench...
... 1 M10 x 85mm 142 4 Mech M10 Nylon 47 1 Knob Spring Button Bolt Locknut 48 1 Seat Knob 93 4 M10 x 44mm # 1 User's Manual 49 1 Rail Cap Button Bolt # 1 Exercise Guide 50 3 Pad Tube 94 4 Cable Clip # 1 Video 51 6 19mm Round 95 2 Long Handle # 1 Large Allen Wrench Inner Cap 96 2 Short Handle # 1 Small Allen Wrench...

