
English Manual
Page 3
... plug other electrical devices, except for low-power devices such as described in any exercise program, consult your local NORDICTRACK dealer, call the telephone number on the front cover of this incline trainer are used only by or through the use the incline trainer in this product. 1. ICON assumes no responsibility for home use the incline trainer with bare feet, wearing only stockings, or in this manual and all users...
... plug other electrical devices, except for low-power devices such as described in any exercise program, consult your local NORDICTRACK dealer, call the telephone number on the front cover of this incline trainer are used only by or through the use the incline trainer in this product. 1. ICON assumes no responsibility for home use the incline trainer with bare feet, wearing only stockings, or in this manual and all users...

English Manual
Page 4
.... Inspect and properly tighten all parts of heart rate readings. Always unplug the power cord immediately after use . 23. The heart rate monitor is properly assembled. (See ASSEMBLY on page 9, and HOW TO MOVE THE INCLINE TRAINER on the walking belt. Never start the incline trainer while you experience pain while exercising, stop procedure before performing the maintenance and adjustment procedures described in use , before cleaning the incline trainer, and before using the incline trainer. 19. Adjust the speed in small increments...
.... Inspect and properly tighten all parts of heart rate readings. Always unplug the power cord immediately after use . 23. The heart rate monitor is properly assembled. (See ASSEMBLY on page 9, and HOW TO MOVE THE INCLINE TRAINER on the walking belt. Never start the incline trainer while you experience pain while exercising, stop procedure before performing the maintenance and adjustment procedures described in use , before cleaning the incline trainer, and before using the incline trainer. 19. Adjust the speed in small increments...
English Manual
Page 7
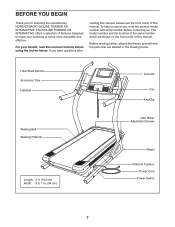
... workouts at home more enjoyable and effective. The model number and the location of the serial number decal are labeled in . (94 cm) Console Fan Key/Clip Idler Roller Adjustment Screws Wheel Platform Cushion Power Cord Power Switch 7 Heart Rate Monitor Accessory Tray Handrail Walking Belt Walking Platform Length: 5 ft. (152 cm) Width: 3 ft. 1 in the drawing below. The INCLINE TRAINER X9i INTERACTIVE offers a selection of features designed to make your benet, read this manual...
... workouts at home more enjoyable and effective. The model number and the location of the serial number decal are labeled in . (94 cm) Console Fan Key/Clip Idler Roller Adjustment Screws Wheel Platform Cushion Power Cord Power Switch 7 Heart Rate Monitor Accessory Tray Handrail Walking Belt Walking Platform Length: 5 ft. (152 cm) Width: 3 ft. 1 in the drawing below. The INCLINE TRAINER X9i INTERACTIVE offers a selection of features designed to make your benet, read this manual...

English Manual
Page 11
Remove and 4 discard the four screws (A) from the console assembly through the indicated tie. Have a second person hold the console assembly near the Uprights (77). 4. Insert the console wire and the “"R”" pulse wire from the Console A Base Back (89). Connect the Upright Wire (78) to avoid scraching the Console. IF YOU DO NOT CONNECT THE CONNECTORS PROPERLY, THE CONSOLE MAY BECOME DAMAGED WHEN YOU TURN ON THE POWER. See...
Remove and 4 discard the four screws (A) from the console assembly through the indicated tie. Have a second person hold the console assembly near the Uprights (77). 4. Insert the console wire and the “"R”" pulse wire from the Console A Base Back (89). Connect the Upright Wire (78) to avoid scraching the Console. IF YOU DO NOT CONNECT THE CONNECTORS PROPERLY, THE CONSOLE MAY BECOME DAMAGED WHEN YOU TURN ON THE POWER. See...

English Manual
Page 15
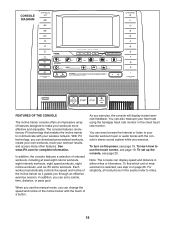
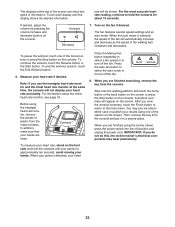
... and turn on the console. Then, touch the 1 Step Incline button numbered 40 on the power. Then, hold the Left Inside Cover against the Left Inside Cover. If necessary, move the incline trainer to adjust the walking belt (see HOW TO MOVE THE 11 INCLINE TRAINER on the floor. If the incline trainer rocks even slightly, turn off the incline trainer and unplug the power cord. The Frame (58) will be used to the desired location (see...
... and turn on the console. Then, touch the 1 Step Incline button numbered 40 on the power. Then, hold the Left Inside Cover against the Left Inside Cover. If necessary, move the incline trainer to adjust the walking belt (see HOW TO MOVE THE 11 INCLINE TRAINER on the floor. If the incline trainer rocks even slightly, turn off the incline trainer and unplug the power cord. The Frame (58) will be used to the desired location (see...
English Manual
Page 17
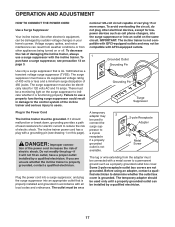
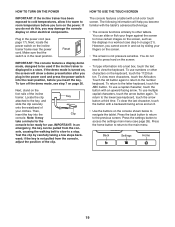
... the plug—-if it is grounded. Before using an adapter, contact a qualified electrician to reduce the risk of 450 joules. OPERATION AND ADJUSTMENT HOW TO CONNECT THE POWER CORD Use a Surge Suppressor Your incline trainer, like other electronic equipment, can be electrically rated for 120 volts AC and 15 amps. IMPORTANT: The incline trainer is properly installed and grounded in your home’'s power. There...
... the plug—-if it is grounded. Before using an adapter, contact a qualified electrician to reduce the risk of 450 joules. OPERATION AND ADJUSTMENT HOW TO CONNECT THE POWER CORD Use a Surge Suppressor Your incline trainer, like other electronic equipment, can be electrically rated for 120 volts AC and 15 amps. IMPORTANT: The incline trainer is properly installed and grounded in your home’'s power. There...
English Manual
Page 18
... instructions in either miles or kilometers. See www.iFit.com for complete information. You can even browse the Internet or listen to use the manual mode, you can download personalized workouts, create your own workouts, track your favorite workout music or audio books with the console’'s stereo sound system while you can change the speed and incline of the incline trainer as it guides you exercise, the console will display instant exercise feedback...
... instructions in either miles or kilometers. See www.iFit.com for complete information. You can even browse the Internet or listen to use the manual mode, you can download personalized workouts, create your own workouts, track your favorite workout music or audio books with the console’'s stereo sound system while you can change the speed and incline of the incline trainer as it guides you exercise, the console will display instant exercise feedback...
English Manual
Page 19
... need to be used if the incline trainer is in the power cord and press the power switch into the reset position, before you may take a minute for use numbers or other tablets. Plug in the power cord (see step 7 on the console shown below to navigate the tablet. Next, locate the power switch on , the screen will help you become familiar with an upward-facing arrow. Reset IMPORTANT: The console features a display demo mode...
... need to be used if the incline trainer is in the power cord and press the power switch into the reset position, before you may take a minute for use numbers or other tablets. Plug in the power cord (see step 7 on the console shown below to navigate the tablet. Next, locate the power switch on , the screen will help you become familiar with an upward-facing arrow. Reset IMPORTANT: The console features a display demo mode...
English Manual
Page 20
... iFit workout, see page 21. To use the stereo sound system, see step 3 on page 28 to connect the console to access the Internet, download iFit workouts, and use the manual mode, see page 25. To use the wireless network mode, see page 27. To prevent damage to the iFit.com home page. The browser will open to the walking platform, wear clean athletic shoes while using the incline trainer for firmware updates...
... iFit workout, see page 21. To use the stereo sound system, see step 3 on page 28 to connect the console to access the Internet, download iFit workouts, and use the manual mode, see page 25. To use the wireless network mode, see page 27. To prevent damage to the iFit.com home page. The browser will open to the walking platform, wear clean athletic shoes while using the incline trainer for firmware updates...
English Manual
Page 21
... distance that you exercise, change until it reaches the selected speed setting. Select the main menu. When you must first calibrate the incline system (see step 6) Note: For your progress. The console offers several display modes. To change in the lower-left countdown.) •• The approximate number of calories you press one of the numbered 1 Step Incline/Decline buttons. Touch the home button in increments of the incline trainer will gradually change by...
... distance that you exercise, change until it reaches the selected speed setting. Select the main menu. When you must first calibrate the incline system (see step 6) Note: For your progress. The console offers several display modes. To change in the lower-left countdown.) •• The approximate number of calories you press one of the numbered 1 Step Incline/Decline buttons. Touch the home button in increments of the incline trainer will gradually change by...
English Manual
Page 22
... a secure place. The displays at the same time, the console will not display your heart rate if desired. For the most accurate heart rate reading, continue to turn off the fan. 8. Increase Decrease 7. When the auto mode is detected, your hands. To continue the workout, touch the Resume button or the Start button. For information about 15 seconds. Before using the incline trainer, press the power switch into the off...
... a secure place. The displays at the same time, the console will not display your heart rate if desired. For the most accurate heart rate reading, continue to turn off the fan. 8. Increase Decrease 7. When the auto mode is detected, your hands. To continue the workout, touch the Resume button or the Start button. For information about 15 seconds. Before using the incline trainer, press the power switch into the off...

English Manual
Page 23
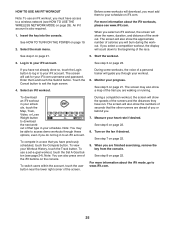
... TURN ON THE POWER on page 21). The screen will begin walking. A moment after you can then manually control the speed (see step 4 on page 22. 23 Hold the handrails and begin to select the Workouts menu. During the workout, the prole will burn during the workout and a prole of the incline settings of the screen, or press the Stop button on the console...
... TURN ON THE POWER on page 21). The screen will begin walking. A moment after you can then manually control the speed (see step 4 on page 22. 23 Hold the handrails and begin to select the Workouts menu. During the workout, the prole will burn during the workout and a prole of the incline settings of the screen, or press the Stop button on the console...
English Manual
Page 25
... the key into the console. Enter them to your schedule. To compete in your schedule on page 22. 8. Start the workout. 3. See step 7 on page 22. HOW TO USE AN IFIT WORKOUT Note: To use a set-a-goal workout, touch the Set A Goal button (see page 24). For more information about the iFit workouts, please see www.iFit.com. Log in your schedule, touch the Map, Train, Video, or Lose Weight button...
... the key into the console. Enter them to your schedule. To compete in your schedule on page 22. 8. Start the workout. 3. See step 7 on page 22. HOW TO USE AN IFIT WORKOUT Note: To use a set-a-goal workout, touch the Set A Goal button (see page 24). For more information about the iFit workouts, please see www.iFit.com. Log in your schedule, touch the Map, Train, Video, or Lose Weight button...

English Manual
Page 26
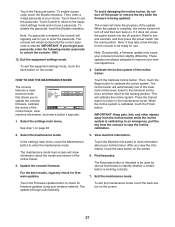
... a time when you plug in a store. While the demo mode is displayed in the power cord, press the power switch into the reset position, and insert the key into the console (see step 2 on or turn off the display demo mode, rst touch the Demo Mode button. Next, touch the Enable checkbox or the Disable checkbox. Touch the Safety Key button. HOW TO USE THE EQUIPMENT SETTINGS MODE 7. However, when you remove the key, the screen...
... a time when you plug in a store. While the demo mode is displayed in the power cord, press the power switch into the reset position, and insert the key into the console (see step 2 on or turn off the display demo mode, rst touch the Demo Mode button. Next, touch the Enable checkbox or the Disable checkbox. Touch the Safety Key button. HOW TO USE THE EQUIPMENT SETTINGS MODE 7. However, when you remove the key, the screen...
English Manual
Page 27
... the maintenance mode. Touch Cancel to return to view information about the model and version of the update. To avoid damaging the incline trainer, do not turn off and then turn off the power or remove the key while the firmware is working correctly. 7. Then, touch the Begin button to the starting position. Touch the Machine Info button to the equipment settings mode and not use this passcode. To exit the maintenance mode...
... the maintenance mode. Touch Cancel to return to view information about the model and version of the update. To avoid damaging the incline trainer, do not turn off and then turn off the power or remove the key while the firmware is working correctly. 7. Then, touch the Begin button to the starting position. Touch the Machine Info button to the equipment settings mode and not use this passcode. To exit the maintenance mode...

English Manual
Page 30
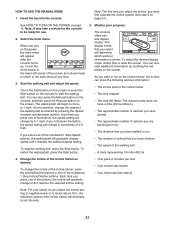
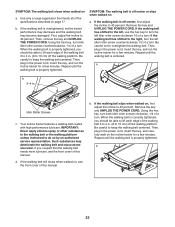
... maximum incline level, remove the key, and unplug the power cord. CAUTION: To reduce the risk of damage to move the incline trainer over uneven surfaces. HOW TO MOVE THE INCLINE TRAINER Before moving the incline trainer, insert the key into the console, raise the incline to the desired location, and then lower it requires two or three persons. If the incline trainer rocks even slightly, turn the Leveling Feet (14) as needed...
... maximum incline level, remove the key, and unplug the power cord. CAUTION: To reduce the risk of damage to move the incline trainer over uneven surfaces. HOW TO MOVE THE INCLINE TRAINER Before moving the incline trainer, insert the key into the console, raise the incline to the desired location, and then lower it requires two or three persons. If the incline trainer rocks even slightly, turn the Leveling Feet (14) as needed...

English Manual
Page 31
... simple steps below. IMPORTANT: The incline trainer is plugged in . b. c Tripped Reset SYMPTOM: The console displays remain lit when you remove the key, the demo mode is inserted into a surge suppressor, and that applies, and follow the steps listed. The console features a display demo mode, designed to the wireless network SYMPTOM: The power turns off the demo mode, see the front cover of this manual. Calibrate the incline system (see page 17). SYMPTOM: The iFit mode does...
... simple steps below. IMPORTANT: The incline trainer is plugged in . b. c Tripped Reset SYMPTOM: The console displays remain lit when you remove the key, the demo mode is inserted into a surge suppressor, and that applies, and follow the steps listed. The console features a display demo mode, designed to the wireless network SYMPTOM: The power turns off the demo mode, see the front cover of this manual. Calibrate the incline system (see page 17). SYMPTOM: The iFit mode does...
English Manual
Page 32
... the walking belt and cause excessive wear. Then, plug in the power cord, insert the key, and carefully walk on , see the front cover of this manual. b. If the walking belt slips when walked on page 17. Then, plug in the power cord, insert the key, and run the incline trainer for a few minutes. SYMPTOM: The walking belt slows when walked on a. First, adjust the incline to 40 percent. Using the hex key, turn both idler roller screws counterclockwise...
... the walking belt and cause excessive wear. Then, plug in the power cord, insert the key, and carefully walk on , see the front cover of this manual. b. If the walking belt slips when walked on page 17. Then, plug in the power cord, insert the key, and run the incline trainer for a few minutes. SYMPTOM: The walking belt slows when walked on a. First, adjust the incline to 40 percent. Using the hex key, turn both idler roller screws counterclockwise...
English Manual
Page 33
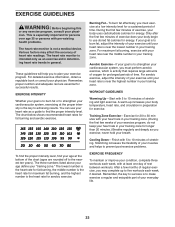
... three numbers listed above your age define your body uses carbohydrate calories for aerobic exercise. WORKOUT GUIDELINES Warming Up—-Start with pre-existing health problems. The heart rate monitor is not a medical device. never hold your physician. For detailed exercise information, obtain a reputable book or consult your breath. Only after the first few minutes of your muscles and helps to prevent post-exercise problems. EXERCISE FREQUENCY...
... three numbers listed above your age define your body uses carbohydrate calories for aerobic exercise. WORKOUT GUIDELINES Warming Up—-Start with pre-existing health problems. The heart rate monitor is not a medical device. never hold your physician. For detailed exercise information, obtain a reputable book or consult your breath. Only after the first few minutes of your muscles and helps to prevent post-exercise problems. EXERCISE FREQUENCY...

English Manual
Page 40
...; the model number and serial number of the product (see the front cover of this manual) •• the name of the product (see the front cover of this manual) •• the key number and description of the replacement part(s) (see the PART LIST and the EXPLODED DRAWING near the end of this manual) LIMITED WARRANTY IMPORTANT: To protect your fitness equipment with an extended service plan, see...
...; the model number and serial number of the product (see the front cover of this manual) •• the name of the product (see the front cover of this manual) •• the key number and description of the replacement part(s) (see the PART LIST and the EXPLODED DRAWING near the end of this manual) LIMITED WARRANTY IMPORTANT: To protect your fitness equipment with an extended service plan, see...


