

English Manual
Page 2
Table of Contents Important Precautions 3 Before You Begin 5 Assembly 6 Treadmill Operation 7 How to Fold and Move the Treadmill 13 Maintenance and Trouble-shooting 15 Conditioning Guidelines 18 Part List 22 Ordering Replacement Parts 23 Limited Warranty Back Cover Note: An Exploded Drawing is attached in the center of this ownerÕs guide. 2
Table of Contents Important Precautions 3 Before You Begin 5 Assembly 6 Treadmill Operation 7 How to Fold and Move the Treadmill 13 Maintenance and Trouble-shooting 15 Conditioning Guidelines 18 Part List 22 Ordering Replacement Parts 23 Limited Warranty Back Cover Note: An Exploded Drawing is attached in the center of this ownerÕs guide. 2
English Manual
Page 3
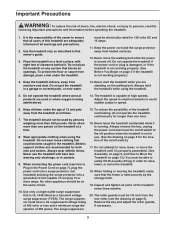
...12. Keep the power cord and the surge protector away from damage, place a mat under the age of 12 and pets away from the treadmill at a time. 8. The treadmill is not working properly.) 4. Never allow more than 250 pounds. The surge suppressor 15. To reduce the possibility of the...of carrying 15 or more amps. Remove the key and adjust the roller guards, if necessary. 3 Adjust the speed in small increments to Move the Treadmill on page 13.) You must be on page 5). Athletic support clothes are adequately informed of all users of this ownerÕs guide. 3. When ...
...12. Keep the power cord and the surge protector away from damage, place a mat under the age of 12 and pets away from the treadmill at a time. 8. The treadmill is not working properly.) 4. Never allow more than 250 pounds. The surge suppressor 15. To reduce the possibility of the...of carrying 15 or more amps. Remove the key and adjust the roller guards, if necessary. 3 Adjust the speed in small increments to Move the Treadmill on page 13.) You must be on page 5). Athletic support clothes are adequately informed of all users of this ownerÕs guide. 3. When ...
English Manual
Page 4
... damage sustained by an authorized service representative only. 23. tenance and adjustment procedures described in this or any exercise program, consult your treadmill. Do not use of 35 or persons with pre-existing health problems. Read all instructions before performing the main- If one of this... treadmill in the location shown. (There is not legible, please call our Customer Service Department toll-free to do so by an authorized service...
... damage sustained by an authorized service representative only. 23. tenance and adjustment procedures described in this or any exercise program, consult your treadmill. Do not use of 35 or persons with pre-existing health problems. Read all instructions before performing the main- If one of this... treadmill in the location shown. (There is not legible, please call our Customer Service Department toll-free to do so by an authorized service...
English Manual
Page 5
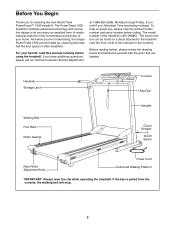
...requiring less than half the floor space of your benefit, read this manual for selecting the new NordicTrack PowerTreadª 1500 treadmill. Mountain Time (excluding holidays). The PowerTread 1500 treadmill combines advanced technology with the parts that are labeled. The model number of this manual carefully ...On/off Switch Rear Roller Adjustment Bolts Power Cord Cushioned Walking Platform *IMPORTANT: Always wear the clip while operating the treadmill. The serial number can be found on a decal attached to let you for the location). Before reading further, please...
...requiring less than half the floor space of your benefit, read this manual for selecting the new NordicTrack PowerTreadª 1500 treadmill. Mountain Time (excluding holidays). The PowerTread 1500 treadmill combines advanced technology with the parts that are labeled. The model number of this manual carefully ...On/off Switch Rear Roller Adjustment Bolts Power Cord Cushioned Walking Platform *IMPORTANT: Always wear the clip while operating the treadmill. The serial number can be found on a decal attached to let you for the location). Before reading further, please...

English Manual
Page 6
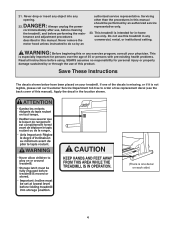
... the Wrench Clip (88). Note: If it is difficult to the left or right Upright (70) in a cleared area and remove all parts of the treadmill are resting flat on the 1 floor. 70 30 2. Remove the backing from the left Upright (70). 2 Attach the Storage Latch (5) and the two ...Latch Spacers (93) to fold or lower the treadmill, remove one or both of a second person, carefully raise the Uprights (70) until the Wheels (30) are properly tightened. Press the Allen Wrench (87) into...
... the Wrench Clip (88). Note: If it is difficult to the left or right Upright (70) in a cleared area and remove all parts of the treadmill are resting flat on the 1 floor. 70 30 2. Remove the backing from the left Upright (70). 2 Attach the Storage Latch (5) and the two ...Latch Spacers (93) to fold or lower the treadmill, remove one or both of a second person, carefully raise the Uprights (70) until the Wheels (30) are properly tightened. Press the Allen Wrench (87) into...

English Manual
Page 7
...it must be held in place by a qualified electrician. The surge suppressor must have a proper outlet installed by sudden voltage changes in your treadmill being turned on a nominal 120-volt circuit, and has a grounding plug that is not available. 1 Grounded Outlet Box Surge Suppressor Grounding Pin...electric current to reduce the risk of 450 joules. Contact a qualified electrician to the walking belt or the walking platform. Check with your treadmill (see drawing 1 at most hardware stores and department stores. This product is for 120 volts AC and 15 amps. A temporary adapter that...
...it must be held in place by a qualified electrician. The surge suppressor must have a proper outlet installed by sudden voltage changes in your treadmill being turned on a nominal 120-volt circuit, and has a grounding plug that is not available. 1 Grounded Outlet Box Surge Suppressor Grounding Pin...electric current to reduce the risk of 450 joules. Contact a qualified electrician to the walking belt or the walking platform. Check with your treadmill (see drawing 1 at most hardware stores and department stores. This product is for 120 volts AC and 15 amps. A temporary adapter that...
English Manual
Page 8
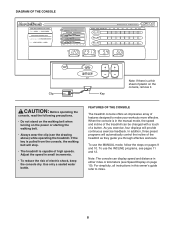
...speed in this ownerÕs guide refer to make your workouts more effective. As you exercise, four displays will automatically control the incline of the treadmill as they guide you through effective workouts. For simplicity, all instructions in small increments. ¥ To reduce the risk of electric shock, keep ... the MANUAL mode, follow the steps on page 10). If the key is pulled from the console, the walking belt will stop. ¥ The treadmill is a thin sheet of plastic on the power or starting the walking belt. ¥ Always wear the clip (see pages 11 and 12. Clip...
...speed in this ownerÕs guide refer to make your workouts more effective. As you exercise, four displays will automatically control the incline of the treadmill as they guide you through effective workouts. For simplicity, all instructions in small increments. ¥ To reduce the risk of electric shock, keep ... the MANUAL mode, follow the steps on page 10). If the key is pulled from the console, the walking belt will stop. ¥ The treadmill is a thin sheet of plastic on the power or starting the walking belt. ¥ Always wear the clip (see pages 11 and 12. Clip...
English Manual
Page 9
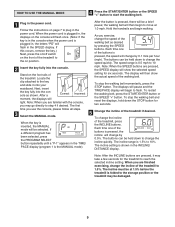
... change by 0.1 mile per hour (mph). The incline range is plugged in, the letters ÒPOÓ will show the actual speed of the treadmill, press the INCLINE buttons. The incline must be damaged. 9 Next, insert the key fully into the console. the walking belt will then show the ... appears in the INCLINE/ DISTANCE display. As you are pressed, the SPEED display will flash in the power cord. Each time one of the treadmill to step 4 if desired. The displays will pause and the TIME/PACE display will change the incline of the walking belt. The incline setting ...
... change by 0.1 mile per hour (mph). The incline range is plugged in, the letters ÒPOÓ will show the actual speed of the treadmill, press the INCLINE buttons. The incline must be damaged. 9 Next, insert the key fully into the console. the walking belt will then show the ... appears in the INCLINE/ DISTANCE display. As you are pressed, the SPEED display will flash in the power cord. Each time one of the treadmill to step 4 if desired. The displays will pause and the TIME/PACE display will change the incline of the walking belt. The incline setting ...
English Manual
Page 10
...: When an INCLINE program is currently shown. *For your heart rate to the storage position or the treadmill may be at 1.5% before the treadmill is measured in minutes per hour (kph). INCLINE/DISTANCE display This display shows the distance that the walking belt has been moving and your workout. ... in kilometers. 7 When you have burned during your current pace (pace is folded to be shown, you must be damaged. Change the incline of the treadmill to the off position. (See the drawing near the top of page 9.) 10 Store the key in the PULSE/CALORIES display. SPEED display This display...
...: When an INCLINE program is currently shown. *For your heart rate to the storage position or the treadmill may be at 1.5% before the treadmill is measured in minutes per hour (kph). INCLINE/DISTANCE display This display shows the distance that the walking belt has been moving and your workout. ... in kilometers. 7 When you have burned during your current pace (pace is folded to be shown, you must be damaged. Change the incline of the treadmill to the off position. (See the drawing near the top of page 9.) 10 Store the key in the PULSE/CALORIES display. SPEED display This display...
English Manual
Page 11
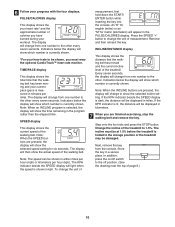
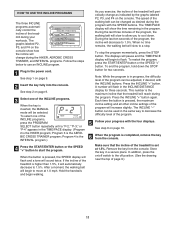
... Plug in the TIME/PACE display. (Program 2 is pressed, the SPEED display will flash and a tone will slow to 1.5%. The speed of the treadmill will automatically decrease to flash. To stop . To restart the program, press the START/ENTER button or the SPEED Ò+Ó button. Press the INCLINE... twice. Hold the handrails and begin to 1.5%. Program 3 is inserted, the MANUAL mode will slow to decrease the difficulty level of the treadmill during the program with the SPEED buttons. This number is the maximum incline that the incline of the INCLINE programs. When the key is...
... Plug in the TIME/PACE display. (Program 2 is pressed, the SPEED display will flash and a tone will slow to 1.5%. The speed of the treadmill will automatically decrease to flash. To stop . To restart the program, press the START/ENTER button or the SPEED Ò+Ó button. Press the INCLINE... twice. Hold the handrails and begin to 1.5%. Program 3 is inserted, the MANUAL mode will slow to decrease the difficulty level of the treadmill during the program with the SPEED buttons. This number is the maximum incline that the incline of the INCLINE programs. When the key is...

English Manual
Page 13
...injury, bend your legs and keep your hands in the indicated location. 2. Do not attempt to the storage position as shown. Raise the treadmill until it back, or the base pads may come off. Make sure that the storage latch is inserted into the slot in temperatures above ... Storage Latch Base Front Wheels To protect the floor or carpet from damage, place a mat under the treadmill. Keep the treadmill out of injury, use extreme caution while moving the treadmill, convert the treadmill to move the treadmill without tipping it is resting in order to raise, lower, or move the...
...injury, bend your legs and keep your hands in the indicated location. 2. Do not attempt to the storage position as shown. Raise the treadmill until it back, or the base pads may come off. Make sure that the storage latch is inserted into the slot in temperatures above ... Storage Latch Base Front Wheels To protect the floor or carpet from damage, place a mat under the treadmill. Keep the treadmill out of injury, use extreme caution while moving the treadmill, convert the treadmill to move the treadmill without tipping it is resting in order to raise, lower, or move the...

English Manual
Page 14
Hold the treadmill firmly with your right hand as shown. HOW TO LOWER THE TREADMILL FOR USE 1. Hold the upper end of injury, bend your legs and keep your left thumb, press the storage latch to the floor. To decrease the possibility of the treadmill with both hands, and lower the treadmill to the left. Pivot the treadmill until the frame and foot rails are past the storage latch. 2. Storage Latch 14 Using your back straight.
Hold the treadmill firmly with your right hand as shown. HOW TO LOWER THE TREADMILL FOR USE 1. Hold the upper end of injury, bend your legs and keep your left thumb, press the storage latch to the floor. To decrease the possibility of the treadmill with both hands, and lower the treadmill to the left. Pivot the treadmill until the frame and foot rails are past the storage latch. 2. Storage Latch 14 Using your back straight.
English Manual
Page 15
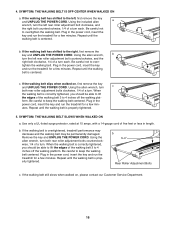
... key from the console, wait for ten seconds, and then reinsert the key. until the problem is plugged in the Power Cord on the treadmill frame near the power cord. Mountain Time (excluding holidays). 1. The surge suppressor must have a UL suppressed voltage rating of 400 volts or...; may appear in , make sure that applies, and follow the steps listed. b. SYMPTOM: THE POWER TURNS OFF DURING USE a. Do not operate the treadmill until 6 p.m. above .) c. d. Reinsert the key fully into a surge suppressor, and that the key is in the INCLINE/DISTANCE display when the INCLINE...
... key from the console, wait for ten seconds, and then reinsert the key. until the problem is plugged in the Power Cord on the treadmill frame near the power cord. Mountain Time (excluding holidays). 1. The surge suppressor must have a UL suppressed voltage rating of 400 volts or...; may appear in , make sure that applies, and follow the steps listed. b. SYMPTOM: THE POWER TURNS OFF DURING USE a. Do not operate the treadmill until 6 p.m. above .) c. d. Reinsert the key fully into a surge suppressor, and that the key is in the INCLINE/DISTANCE display when the INCLINE...
English Manual
Page 16
... correctly tightened, you should be able to lift the edges of five feet or less in the power cord, insert the key and run the treadmill for a few minutes. If the walking belt has shifted to over- Be careful not to the left rear roller adjustment bolt counterclockwise, and the... belt has shifted to overtighten the walking belt. form. b. Be careful to keep the walking belt centered. Repeat until the walking belt is overtightened, treadmill performance may decrease and the walking belt may be able to lift the edges of a turn . If the walking belt still slows when walked on...
... correctly tightened, you should be able to lift the edges of five feet or less in the power cord, insert the key and run the treadmill for a few minutes. If the walking belt has shifted to over- Be careful not to the left rear roller adjustment bolt counterclockwise, and the... belt has shifted to overtighten the walking belt. form. b. Be careful to keep the walking belt centered. Repeat until the walking belt is overtightened, treadmill performance may decrease and the walking belt may be able to lift the edges of a turn . If the walking belt still slows when walked on...

English Manual
Page 17
... Magnet is a 1/8Ógap between 90 17 the Magnet and the Reed Switch. Retighten the 74 95 Screw. Re-attach the hood, and run the treadmill for a correct speed reading. Remove the screws from the hood. Locate the Reed Switch (74) and the Magnet (95) on the left side of the...
... Magnet is a 1/8Ógap between 90 17 the Magnet and the Reed Switch. Retighten the 74 95 Screw. Re-attach the hood, and run the treadmill for a correct speed reading. Remove the screws from the hood. Locate the Reed Switch (74) and the Magnet (95) on the left side of the...

English Manual
Page 20
... mass and strength, you can't go the full 20 minutes from the start with the PowerTread 1500. This will receive the full benefits of an exercise program. Fitness is common, try to feel. 2. See step 5 on the treadmill at a slower pace for 20 to decrease slowly after exercise reduces muscle soreness. Those in...
... mass and strength, you can't go the full 20 minutes from the start with the PowerTread 1500. This will receive the full benefits of an exercise program. Fitness is common, try to feel. 2. See step 5 on the treadmill at a slower pace for 20 to decrease slowly after exercise reduces muscle soreness. Those in...
English Manual
Page 23
...). ¥ The NAME OF THE PRODUCT (NordicTrack PowerTreadª 1500). ¥ The SERIAL NUMBER OF THE PRODUCT (see the front cover of this manual). ¥ The KEY NUMBER AND DESCRIPTION OF THE PART(S) (see the EXPLODED DRAWING attached to change without notice. If possible, place the treadmill near your telephone for easy reference when...
...). ¥ The NAME OF THE PRODUCT (NordicTrack PowerTreadª 1500). ¥ The SERIAL NUMBER OF THE PRODUCT (see the front cover of this manual). ¥ The KEY NUMBER AND DESCRIPTION OF THE PART(S) (see the EXPLODED DRAWING attached to change without notice. If possible, place the treadmill near your telephone for easy reference when...


