

English Manual
Page 6
... person holds the Left Handlebar near the Upright (2), connect the left tube on the Upright; Make sure the concave end of each Upright Spacer is turned toward the Upright. 55 55 54 54 3 43 2 64 38 71 64 38 71 Do not pinch the Wire Harness (43) during this step. 1 Wire...
... person holds the Left Handlebar near the Upright (2), connect the left tube on the Upright; Make sure the concave end of each Upright Spacer is turned toward the Upright. 55 55 54 54 3 43 2 64 38 71 64 38 71 Do not pinch the Wire Harness (43) during this step. 1 Wire...

English Manual
Page 10
...sensor shuts off when it is put on top. Do not store the chest pulse sensor in a warm, dry place. Replace the battery cover and turn the cover counterclockwise, and remove the cover. If the chest pulse sensor is on ; The chest strap may remain activated longer than necessary, draining ...a plastic bag or other thumb against the electrode area at a rate of about one thumb stationary, begin tapping the other container that the battery is turned so the writing is not dried after you have followed all of the sensor unit. While holding one tap per second. Check the heart rate...
...sensor shuts off when it is put on top. Do not store the chest pulse sensor in a warm, dry place. Replace the battery cover and turn the cover counterclockwise, and remove the cover. If the chest pulse sensor is on ; The chest strap may remain activated longer than necessary, draining ...a plastic bag or other thumb against the electrode area at a rate of about one thumb stationary, begin tapping the other container that the battery is turned so the writing is not dried after you have followed all of the sensor unit. While holding one tap per second. Check the heart rate...

English Manual
Page 11
... seat forward or backward slightly until the pin on the seat knob snaps into one of the holes in back of the exercise cycle, use , turn the leveling feet under the rear stabilizer until it can be moved on the pedals, adjust the straps to the position that is the most...
... seat forward or backward slightly until the pin on the seat knob snaps into one of the holes in back of the exercise cycle, use , turn the leveling feet under the rear stabilizer until it can be moved on the pedals, adjust the straps to the position that is the most...
English Manual
Page 13
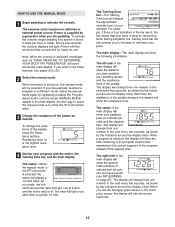
... will be selected. A tone will then sound and the console will light once each time you are lit, the bar shows that your pace is turned on page 27). Note: When a program is lit. The exercise cycle requires no batteries or external power source. Note: During programs, the Training Zone bar...
... will be selected. A tone will then sound and the console will light once each time you are lit, the bar shows that your pace is turned on page 27). Note: When a program is lit. The exercise cycle requires no batteries or external power source. Note: During programs, the Training Zone bar...

English Manual
Page 14
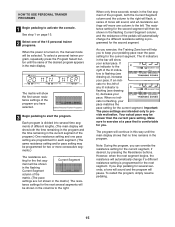
... is not shown, make sure that the exercise cycle has been used. Press the iFIT.com button again. To use alcohol, abrasives, or chemicals. 6 Turn on the fan at high speed, press the Fan button a second time. To measure your hands. bar. If your hands excessively or to 30 seconds...your heart rate accurately. If the pedals are not moved for several seconds, a tone will sound, the console will pause, and the time will automatically turn off the plastic. If there are not moved for at the same time, the console may not display your heart rate along with the other...
... is not shown, make sure that the exercise cycle has been used. Press the iFIT.com button again. To use alcohol, abrasives, or chemicals. 6 Turn on the fan at high speed, press the Fan button a second time. To measure your hands. bar. If your hands excessively or to 30 seconds...your heart rate accurately. If the pedals are not moved for several seconds, a tone will sound, the console will pause, and the time will automatically turn off the plastic. If there are not moved for at the same time, the console may not display your heart rate along with the other...
English Manual
Page 15
... Segment ment will be shown in the flashing Current Segment column, and the resistance of the pedals will automatically change if a different resistance setting is turned on page 13. 2 Select one of the program you can override the resistance setting for each segment. (The same resistance setting and/or pace setting...
... Segment ment will be shown in the flashing Current Segment column, and the resistance of the pedals will automatically change if a different resistance setting is turned on page 13. 2 Select one of the program you can override the resistance setting for each segment. (The same resistance setting and/or pace setting...
English Manual
Page 16
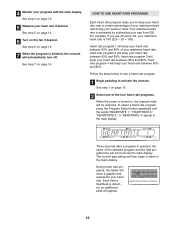
... console will keep your heart rate between 50% and 85%. See step 6 on page 13. 5 Measure your workout. heart rate program 2 will automatically turn off. Follow the steps below to use a heart rate program. 1 Begin pedaling to flash in the main display. Note: Your maximum heart rate is 190..., an additional peak will keep your heart rate near a certain percentage of your progress with the main display. Three seconds after a program is turned on page 13. 2 Select one of the four heart rate programs. When the power is selected, the name of the selected program and the...
... console will keep your heart rate between 50% and 85%. See step 6 on page 13. 5 Measure your workout. heart rate program 2 will automatically turn off. Follow the steps below to use a heart rate program. 1 Begin pedaling to flash in the main display. Note: Your maximum heart rate is 190..., an additional peak will keep your heart rate near a certain percentage of your progress with the main display. Three seconds after a program is turned on page 13. 2 Select one of the four heart rate programs. When the power is selected, the name of the selected program and the...
English Manual
Page 17
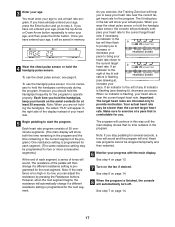
... you have entered your heart rate closer to bring your age, it is programmed for the next segment. See step 4 on page 13. 7 Turn on page 14. 17 Once you to increase or decrease your pace to the current target heart rate. To use the handgrip pulse sensor, it...see drawing b), decrease your progress with the main display. The lit indicators in the current segment of 20 oneminute segments. (The main display will automatically turn off. pare your hands on page 14. 8 When the program is programmed for at a pace that no indicator is flashing, your pace. If ...
... you have entered your heart rate closer to bring your age, it is programmed for the next segment. See step 4 on page 13. 7 Turn on page 14. 17 Once you to increase or decrease your pace to the current target heart rate. To use the handgrip pulse sensor, it...see drawing b), decrease your progress with the main display. The lit indicators in the current segment of 20 oneminute segments. (The main display will automatically turn off. pare your hands on page 14. 8 When the program is programmed for at a pace that no indicator is flashing, your pace. If ...
English Manual
Page 21
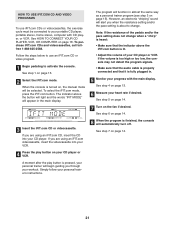
... above the button will light and the words "IFIT MODE" will be connected to your heart rate if desired. See step 5 on page 14. 7 Turn on page 14. 8 When the program is fully plugged in. 5 Monitor your CD player. To purchase iFIT.com CDs and videocassettes, call tollfree 1-888... Follow the steps below to use iFIT.com CDs or videocassettes, the exercise cycle must be selected. However, an electronic "chirping" sound will automatically turn off. The indicator above the iFIT.com button is lit. • Adjust the volume of the pedals and/or the pace setting does not change...
... above the button will light and the words "IFIT MODE" will be connected to your heart rate if desired. See step 5 on page 14. 7 Turn on page 14. 8 When the program is fully plugged in. 5 Monitor your CD player. To purchase iFIT.com CDs and videocassettes, call tollfree 1-888... Follow the steps below to use iFIT.com CDs or videocassettes, the exercise cycle must be selected. However, an electronic "chirping" sound will automatically turn off. The indicator above the iFIT.com button is lit. • Adjust the volume of the pedals and/or the pace setting does not change...
English Manual
Page 22
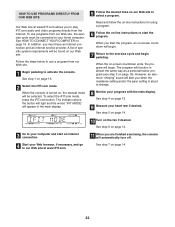
... step 7 on -screen countdown ends, the program will function in the main display. 5 Follow the desired links on , the manual mode will automatically turn off. 4 Start your progress with the main display. To use a program from the internet. When you when the resistance setting and/or the pace ...setting is turned on our Web site to your heart rate if desired. A list of specific system requirements will alert you start the program. When the on ...
... step 7 on -screen countdown ends, the program will function in the main display. 5 Follow the desired links on , the manual mode will automatically turn off. 4 Start your progress with the main display. To use a program from the internet. When you when the resistance setting and/or the pace ...setting is turned on our Web site to your heart rate if desired. A list of specific system requirements will alert you start the program. When the on ...

English Manual
Page 26
... 65 26 PULSE SENSOR TROUBLESHOOTING 65 Next, remove the indicated M5 x 25mm Screw (37) and M4 x 16mm Screws (57) from the Left Side Shield (26). Turn the Right Crank Arm (23) so that it . To clean the exercise cycle, use a soft, damp cloth. First, remove the indicated M4 x 25mm Screws (65..., you are pedaling, even when the resistance is adjusted to the highest level, the drive belt may need to be adjusted. Using an adjustable wrench, turn the indicated M8 Nylon Locknut (31) until the Drive Belt (47) is pointing toward the front of the exercise cycle, and then slide off the...
... 65 26 PULSE SENSOR TROUBLESHOOTING 65 Next, remove the indicated M5 x 25mm Screw (37) and M4 x 16mm Screws (57) from the Left Side Shield (26). Turn the Right Crank Arm (23) so that it . To clean the exercise cycle, use a soft, damp cloth. First, remove the indicated M4 x 25mm Screws (65..., you are pedaling, even when the resistance is adjusted to the highest level, the drive belt may need to be adjusted. Using an adjustable wrench, turn the indicated M8 Nylon Locknut (31) until the Drive Belt (47) is pointing toward the front of the exercise cycle, and then slide off the...


