
English Manual
Page 1
.... Serial Number Decal QUESTIONS? As a manufacturer, we will provide immediate assistance, free of charge to you have questions, or if there are missing parts, we are committed to providing complete customer satisfaction. USER'S MANUAL Visit our website at www.nordictrack.com new products, prizes, fitness tips, and much more! MST CAUTION Read all precautions and instructions in this manual before using...
.... Serial Number Decal QUESTIONS? As a manufacturer, we will provide immediate assistance, free of charge to you have questions, or if there are missing parts, we are committed to providing complete customer satisfaction. USER'S MANUAL Visit our website at www.nordictrack.com new products, prizes, fitness tips, and much more! MST CAUTION Read all precautions and instructions in this manual before using...
English Manual
Page 2
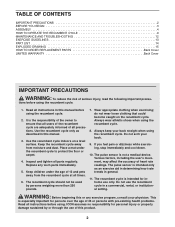
... athletic shoes when using the recumbent cycle. 1. tions before using the recumbent cycle. The pulse sensor is not a medical device. Read all parts regularly. Replace any exercise program, consult your back. 9. TABLE OF CONTENTS IMPORTANT PRECAUTIONS 2 BEFORE YOU BEGIN 3 ASSEMBLY 4 HOW TO OPERATE THE RECUMBENT CYCLE 9 MAINTENANCE AND TROUBLESHOOTING 12 EXERCISE GUIDELINES 13 PART LIST 14 EXPLODED DRAWING 15 HOW TO ORDER REPLACEMENT PARTS Back Cover LIMITED WARRANTY Back Cover IMPORTANT PRECAUTIONS WARNING...
... athletic shoes when using the recumbent cycle. 1. tions before using the recumbent cycle. The pulse sensor is not a medical device. Read all parts regularly. Replace any exercise program, consult your back. 9. TABLE OF CONTENTS IMPORTANT PRECAUTIONS 2 BEFORE YOU BEGIN 3 ASSEMBLY 4 HOW TO OPERATE THE RECUMBENT CYCLE 9 MAINTENANCE AND TROUBLESHOOTING 12 EXERCISE GUIDELINES 13 PART LIST 14 EXPLODED DRAWING 15 HOW TO ORDER REPLACEMENT PARTS Back Cover LIMITED WARRANTY Back Cover IMPORTANT PRECAUTIONS WARNING...
English Manual
Page 3
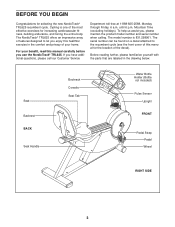
...; TRL625 recumbent cycle. If you , please mention the product model number and serial number when calling. The model number is one of the most effective exercises for increasing cardiovascular fitness, building endurance, and toning the entire body. BEFORE YOU BEGIN Congratulations for the location of the decal). Mountain Time (excluding holidays). Seat Backrest BACK Seat Handle Bookrack Console Seat Tab Water Bottle Holder (Bottle not included) Pulse Sensor Upright...
...; TRL625 recumbent cycle. If you , please mention the product model number and serial number when calling. The model number is one of the most effective exercises for increasing cardiovascular fitness, building endurance, and toning the entire body. BEFORE YOU BEGIN Congratulations for the location of the decal). Mountain Time (excluding holidays). Seat Backrest BACK Seat Handle Bookrack Console Seat Tab Water Bottle Holder (Bottle not included) Pulse Sensor Upright...
English Manual
Page 4
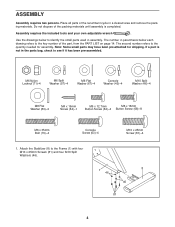
... Washer (80)-4 M4 x 16mm Screw (64)-1 M6 x 12.7mm M6 x 16mm Button Screw (62)-4 Button Screw (68)-8 M6 x 35mm Bolt (70)-4 Console Screw (63)-4 M10 x 25mm Screw (81)-4 1. The number in assembly. Attach the Stabilizer (8) to the quantity needed for shipping. ASSEMBLY Assembly requires two persons. Note: Some small parts may have been pre-attached for assembly. Use the drawings below to identify the small parts used in parenthesis below each...
... Washer (80)-4 M4 x 16mm Screw (64)-1 M6 x 12.7mm M6 x 16mm Button Screw (62)-4 Button Screw (68)-8 M6 x 35mm Bolt (70)-4 Console Screw (63)-4 M10 x 25mm Screw (81)-4 1. The number in assembly. Attach the Stabilizer (8) to the quantity needed for shipping. ASSEMBLY Assembly requires two persons. Note: Some small parts may have been pre-attached for assembly. Use the drawings below to identify the small parts used in parenthesis below each...
English Manual
Page 5
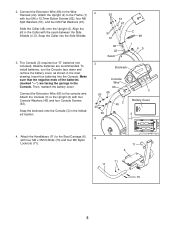
Slide the Collar (48) onto the Upright (2). To install batteries, turn the Console face down and remove the battery cover, as shown in the indicated location. 2 62 57 67 57 67 66 22 Seam 2 48 1 45 3 Bookrack Console Wire 66 45 63 45 63 2 45 3 Battery Cover 3 4. Attach the Console (3) to the Upright (2) with four M6 x 12.7mm Button Screws (62), four M6 Split Washers (57), and four M6...
Slide the Collar (48) onto the Upright (2). To install batteries, turn the Console face down and remove the battery cover, as shown in the indicated location. 2 62 57 67 57 67 66 22 Seam 2 48 1 45 3 Bookrack Console Wire 66 45 63 45 63 2 45 3 Battery Cover 3 4. Attach the Console (3) to the Upright (2) with four M6 x 12.7mm Button Screws (62), four M6 Split Washers (57), and four M6...
English Manual
Page 6
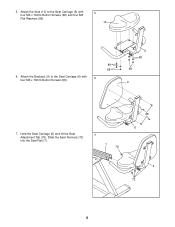
Slide the Seat Runners (72) into the Seat Rail (7). 7 7 79 68 6 6 72 6 Attach the Backrest (9) to the Seat Carriage (6) with four M6 x 16mm Button Screws (68). 6 6 80 68 9 7. Hold the Seat Carriage (6) and lift the Seat Adjustment Tab (79). Attach the Seat (10) to the Seat Carriage (6) with four M6 x 16mm Button Screws (68) and four M8 Flat Washers (80). 5 10 80 68 6. 5.
Slide the Seat Runners (72) into the Seat Rail (7). 7 7 79 68 6 6 72 6 Attach the Backrest (9) to the Seat Carriage (6) with four M6 x 16mm Button Screws (68). 6 6 80 68 9 7. Hold the Seat Carriage (6) and lift the Seat Adjustment Tab (79). Attach the Seat (10) to the Seat Carriage (6) with four M6 x 16mm Button Screws (68) and four M8 Flat Washers (80). 5 10 80 68 6. 5.
English Manual
Page 7
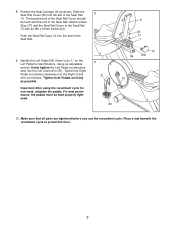
..., the pedals must be flush with an M4 x 16mm Screw (64). 64 Push the Seat Rail Cap (13) into the Right Crank Arm (not shown). The beveled end of the Seat Rail Cover should 6 be kept properly tightened. 9 21 69 13 84 Slot 51 10. Make sure that all parts are tightened before you use the recumbent cycle. Important: After using the recumbent cycle...
..., the pedals must be flush with an M4 x 16mm Screw (64). 64 Push the Seat Rail Cap (13) into the Right Crank Arm (not shown). The beveled end of the Seat Rail Cover should 6 be kept properly tightened. 9 21 69 13 84 Slot 51 10. Make sure that all parts are tightened before you use the recumbent cycle. Important: After using the recumbent cycle...

English Manual
Page 8
... press it 2 onto the Console (3) in the indicated location. Connect the wire on the back of the receiver (A). Reattach the top of the short jumper wire into the indicated jack (C). B A Note: Any other end of the Console (3) with the chest pulse sensor. 1. INSTALLING THE RECEIVER FOR THE OPTIONAL CHEST PULSE SENSOR If you purchase the optional chest pulse sensor (refer to page 11), follow the steps below to install...
... press it 2 onto the Console (3) in the indicated location. Connect the wire on the back of the receiver (A). Reattach the top of the short jumper wire into the indicated jack (C). B A Note: Any other end of the Console (3) with the chest pulse sensor. 1. INSTALLING THE RECEIVER FOR THE OPTIONAL CHEST PULSE SENSOR If you purchase the optional chest pulse sensor (refer to page 11), follow the steps below to install...
English Manual
Page 9
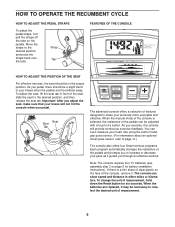
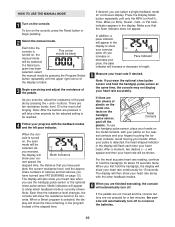
... pedals can even measure your heart rate using the built-in either miles or kilometers. The console can show speed and distance in handgrip pulse sensor. (For information about an optional chest pulse sensor, refer to page 11.) The console also offers four Smart workout programs. Each program automatically changes the resistance of the seat, slide the seat to the desired position and press the straps back onto the tabs. When the manual mode of the console...
... pedals can even measure your heart rate using the built-in either miles or kilometers. The console can show speed and distance in handgrip pulse sensor. (For information about an optional chest pulse sensor, refer to page 11.) The console also offers four Smart workout programs. Each program automatically changes the resistance of the seat, slide the seat to the desired position and press the straps back onto the tabs. When the manual mode of the console...
English Manual
Page 10
... blank manual mode will show which feedback mode is turned on the console. To use the handgrip pulse sensor or the optional chest pulse sensor. If the pedals are not moved and the console buttons are ten resistance levels; Each time the console is currently shown. buttons. Note: After the buttons are pressed, it will flash each time your exercise pace. When your heart rate accurately. imate numbers of the pedals by pressing the Program Select button repeatedly...
... blank manual mode will show which feedback mode is turned on the console. To use the handgrip pulse sensor or the optional chest pulse sensor. If the pedals are not moved and the console buttons are ten resistance levels; Each time the console is currently shown. buttons. Note: After the buttons are pressed, it will flash each time your exercise pace. When your heart rate accurately. imate numbers of the pedals by pressing the Program Select button repeatedly...
English Manual
Page 11
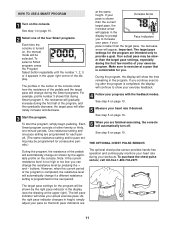
... finished exercising, the console will automatically turn off. Important: The target pace settings for the program will show your exercise feedback. 4 Follow your pace so that is turned on the console. If you can change as shown by the applicable profile on , the manual mode will alternately increase and decrease. 3 Start the program. THE OPTIONAL CHEST PULSE SENSOR The optional chest pulse sensor provides hands-free operation and continuously monitors your heart rate...
... finished exercising, the console will automatically turn off. Important: The target pace settings for the program will show your exercise feedback. 4 Follow your pace so that is turned on the console. If you can change as shown by the applicable profile on , the manual mode will alternately increase and decrease. 3 Start the program. THE OPTIONAL CHEST PULSE SENSOR The optional chest pulse sensor provides hands-free operation and continuously monitors your heart rate...
English Manual
Page 12
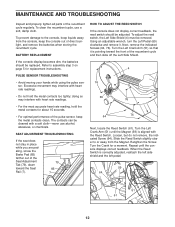
... moving your hands while using the pulse sensor. Using an adjustable wrench, turn the Left Pedal (69) clockwise and remove it is pointing toward the Seat Rail (7). 79 85 7 HOW TO ADJUST THE REED SWITCH If the console does not display correct feedback, the reed switch should be cleaned with heart rate readings. • Do not hold the metal contacts for replacement instructions. Turn the Left Crank Arm (51) so that it . Retighten the Screw. SEAT ADJUSTMENT TROUBLESHOOTING...
... moving your hands while using the pulse sensor. Using an adjustable wrench, turn the Left Pedal (69) clockwise and remove it is pointing toward the Seat Rail (7). 79 85 7 HOW TO ADJUST THE REED SWITCH If the console does not display correct feedback, the reed switch should be cleaned with heart rate readings. • Do not hold the metal contacts for replacement instructions. Turn the Left Crank Arm (51) so that it . Retighten the Screw. SEAT ADJUSTMENT TROUBLESHOOTING...
English Manual
Page 13
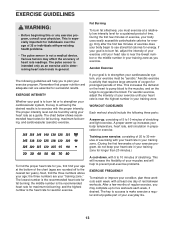
... of 35 or individuals with pre-existing health problems. • The pulse sensor is to 30 minutes of exercising with 5 to burn fat, adjust the intensity of heart rate readings. Aerobic Exercise If your body begin to oxygenate the blood. A cool-down, with your heart rate in your training zone. During the first few months of regular exercise, you may affect the accuracy of...
... of 35 or individuals with pre-existing health problems. • The pulse sensor is to 30 minutes of exercising with 5 to burn fat, adjust the intensity of heart rate readings. Aerobic Exercise If your body begin to oxygenate the blood. A cool-down, with your heart rate in your training zone. During the first few months of regular exercise, you may affect the accuracy of...
English Manual
Page 14
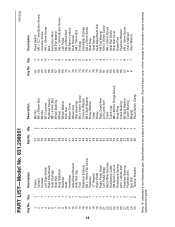
... Pedal Strap Motor/Wire Harness Resistance Cable M8 Nylon Locknut Resistance Spring M10 x 45mm Bolt Flywheel Bearing Flywheel Axle Eye Bolt Tension Bracket Key No. Qty. 61 1 62 4 63 4 64 10 65 1 66 1 67 4 68 8 69 1 70 4 71 8 72 4 73 1 74 2 75 2 76 9 77 2 78 1 79 1 80 4 81 4 82 1 83 1 84 1 85 1 86 1 87 8 # 1 # 1 Description Reed Switch M6 x 12.7 mm Button Screw Console Screw M4 x 16mm Screw Belt...
... Pedal Strap Motor/Wire Harness Resistance Cable M8 Nylon Locknut Resistance Spring M10 x 45mm Bolt Flywheel Bearing Flywheel Axle Eye Bolt Tension Bracket Key No. Qty. 61 1 62 4 63 4 64 10 65 1 66 1 67 4 68 8 69 1 70 4 71 8 72 4 73 1 74 2 75 2 76 9 77 2 78 1 79 1 80 4 81 4 82 1 83 1 84 1 85 1 86 1 87 8 # 1 # 1 Description Reed Switch M6 x 12.7 mm Button Screw Console Screw M4 x 16mm Screw Belt...

English Manual
Page 15
EXPLODED DRAWING-Model No. 831.298961 R0303A 15 76 3 20 5 63 76 45 62 57 19 65 63 67 2 50 54 53 57 67 48 49 64 59 56 55 34 26 41 4 40 12 39 60 38 74 75 11 61 52 56 55 53 54 34 56 47 58 43 73 42 83 37 66 9 64 77 87 64 76 74 78 79 68 85 72 82 51 21 37 38 44 44 22 87 64 72 75 11 71 71 77 72 71 71 72 6 36 1 87 7 13 70 10 69 41 24 39 40 31 33 32 18 24 27 86 84 8 25 29 30 33 46 15 14 80 46 28 35 27 30 17 24 29 33 31 23 81 15 16 16 16 14 16 80 68 68
EXPLODED DRAWING-Model No. 831.298961 R0303A 15 76 3 20 5 63 76 45 62 57 19 65 63 67 2 50 54 53 57 67 48 49 64 59 56 55 34 26 41 4 40 12 39 60 38 74 75 11 61 52 56 55 53 54 34 56 47 58 43 73 42 83 37 66 9 64 77 87 64 76 74 78 79 68 85 72 82 51 21 37 38 44 44 22 87 64 72 75 11 71 71 77 72 71 71 72 6 36 1 87 7 13 70 10 69 41 24 39 40 31 33 32 18 24 27 86 84 8 25 29 30 33 46 15 14 80 46 28 35 27 30 17 24 29 33 31 23 81 15 16 16 16 14 16 80 68 68
English Manual
Page 16
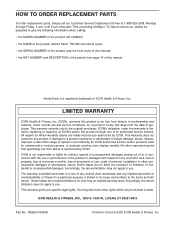
until 6 p.m. LIMITED WARRANTY ICON Health & Fitness, Inc. (ICON), warrants this product to give the following information when calling: • the MODEL NUMBER of the product (831.298961) • the NAME of the product (NordicTrack® TRL625 recumbent cycle) • the SERIAL NUMBER of the product (see the front cover of this manual) • the KEY NUMBER and DESCRIPTION of the part(s) from page 14 of this warranty is limited in workmanship and...
until 6 p.m. LIMITED WARRANTY ICON Health & Fitness, Inc. (ICON), warrants this product to give the following information when calling: • the MODEL NUMBER of the product (831.298961) • the NAME of the product (NordicTrack® TRL625 recumbent cycle) • the SERIAL NUMBER of the product (see the front cover of this manual) • the KEY NUMBER and DESCRIPTION of the part(s) from page 14 of this warranty is limited in workmanship and...


