
PT340/PT341 Users Guide
Page 4
... Thermal Paper 9 4. Connecting the Interface Cable (to the PC 13 4-3. Opening the Top Cover 26 5-2. Paper Width Setting (Width: 58mm / 80mm 28 5-3. Special Mode (Test Print, Setup Menu 42 9-1. Paper Width 8 3-2. Installing the Printer 20 4-7. Control Panel 33 6-2. Paper Jam Prevention and Removal 36 7-1. Test Print 42 3 Table of Components 5 1-1. Preparation 10 4-1. Connecting the Drawer Kick Cable 15 4-4. Power On 24 4-8. Installing the Printer Software 25 5. Setting the Paper 30 5-4. Error Indications 34 7. Paper Jam Removal 36 7-3. Connecting the...
... Thermal Paper 9 4. Connecting the Interface Cable (to the PC 13 4-3. Opening the Top Cover 26 5-2. Paper Width Setting (Width: 58mm / 80mm 28 5-3. Special Mode (Test Print, Setup Menu 42 9-1. Paper Width 8 3-2. Installing the Printer 20 4-7. Control Panel 33 6-2. Paper Jam Prevention and Removal 36 7-1. Test Print 42 3 Table of Components 5 1-1. Preparation 10 4-1. Connecting the Drawer Kick Cable 15 4-4. Power On 24 4-8. Installing the Printer Software 25 5. Setting the Paper 30 5-4. Error Indications 34 7. Paper Jam Removal 36 7-3. Connecting the...

PT340/PT341 Users Guide
Page 5
... Setup Settings (Printer with triple interface model 60 9-5. Drawer Kick Connector 76 11-5. Cutter Related Precautions 86 13-3. Installation Precautions 88 13-7. HEX Dump 62 9-6. Sample Print 64 10. LAN Interface 75 11-4. Specifications 79 12-1. Setup Settings 54 9-4. Power Specifications 78 12. Cutter Specifications 82 12-3. Usage Precautions 85 13-1. Serial Interface 72 11-2. Reliability Specifications 84 13. Barcode/2D Code Printing Precautions 86 13-4. Cleaning...
... Setup Settings (Printer with triple interface model 60 9-5. Drawer Kick Connector 76 11-5. Cutter Related Precautions 86 13-3. Installation Precautions 88 13-7. HEX Dump 62 9-6. Sample Print 64 10. LAN Interface 75 11-4. Specifications 79 12-1. Setup Settings 54 9-4. Power Specifications 78 12. Cutter Specifications 82 12-3. Usage Precautions 85 13-1. Serial Interface 72 11-2. Reliability Specifications 84 13. Barcode/2D Code Printing Precautions 86 13-4. Cleaning...
PT340/PT341 Users Guide
Page 6
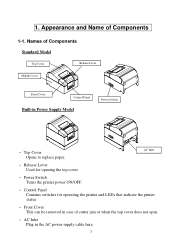
... open. • AC Inlet Plug in Power Supply Model Power Switch • Top Cover Opens to replace paper. Names of Components Standard Model Top Cover Release Lever Middle Cover Front Cover Control Panel Built-in the AC power supply cable here. 5 AC Inlet • Release Lever Used for opening the top cover. • Power Switch Turns the printer power ON/OFF. • Control Panel Contains switches for operating the printer and LEDs that indicate the printer status. • Front Cover This can be removed...
... open. • AC Inlet Plug in Power Supply Model Power Switch • Top Cover Opens to replace paper. Names of Components Standard Model Top Cover Release Lever Middle Cover Front Cover Control Panel Built-in the AC power supply cable here. 5 AC Inlet • Release Lever Used for opening the top cover. • Power Switch Turns the printer power ON/OFF. • Control Panel Contains switches for operating the printer and LEDs that indicate the printer status. • Front Cover This can be removed...
PT340/PT341 Users Guide
Page 13
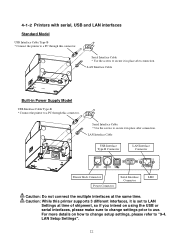
... using the USB or serial interfaces, please make sure to change setup settings, please refer to "9-4. Serial Interface Cable * Use the screws to secure it is set to LAN Settings at the same time. LAN Setup Settings". 12 Caution: While this connector. 4-1-2 Printers with serial, USB and LAN interfaces Standard Model USB Interface Cable Type-B * Connect the printer to a PC through this connector. LAN Interface Cable Built-in Power Supply Model USB Interface Cable Type-B * Connect the printer to a PC through this printer supports...
... using the USB or serial interfaces, please make sure to change setup settings, please refer to "9-4. Serial Interface Cable * Use the screws to secure it is set to LAN Settings at the same time. LAN Setup Settings". 12 Caution: While this connector. 4-1-2 Printers with serial, USB and LAN interfaces Standard Model USB Interface Cable Type-B * Connect the printer to a PC through this connector. LAN Interface Cable Built-in Power Supply Model USB Interface Cable Type-B * Connect the printer to a PC through this printer supports...
PT340/PT341 Users Guide
Page 21
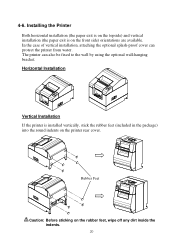
... printer can protect the printer from water. Horizontal Installation Vertical Installation If the printer is on the rubber feet, wipe off any dirt inside the indents. 20 Rubber Feet Caution: Before sticking on the front side) orientations are available. 4-6. In the case of vertical installation, attaching the optional splash-proof cover can also be fixed to the wall by using...
... printer can protect the printer from water. Horizontal Installation Vertical Installation If the printer is on the rubber feet, wipe off any dirt inside the indents. 20 Rubber Feet Caution: Before sticking on the front side) orientations are available. 4-6. In the case of vertical installation, attaching the optional splash-proof cover can also be fixed to the wall by using...

PT340/PT341 Users Guide
Page 26
4-8. Installing the Printer Software Refer to the "Installation Guide"(*1) in the enclosed CD for instructions on installing the printer driver and utility software. *1: \Manuals\PT340-341_InstallGuide_en.pdf The "Installation Guide" can also be viewed by loading the CD in your PC's CD drive and selecting "Manuals" on the "Setup" screen that appears. 25
4-8. Installing the Printer Software Refer to the "Installation Guide"(*1) in the enclosed CD for instructions on installing the printer driver and utility software. *1: \Manuals\PT340-341_InstallGuide_en.pdf The "Installation Guide" can also be viewed by loading the CD in your PC's CD drive and selecting "Manuals" on the "Setup" screen that appears. 25
PT340/PT341 Users Guide
Page 29
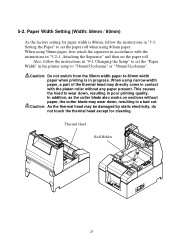
... printer setup to set the paper roll when using 80mm paper. Caution: Do not switch from the 58mm width paper to wear down , resulting in a bad cut. Changing the Setup" to set the paper roll. Thermal Head Roll Holder 28 5-2. Setting the Paper" to "58mm/35columns" or "58mm/32columns". This causes the head to 80mm width paper when printing is 80mm, follow the instructions in progress. When using narrow-width paper, a part...
... printer setup to set the paper roll when using 80mm paper. Caution: Do not switch from the 58mm width paper to wear down , resulting in a bad cut. Changing the Setup" to set the paper roll. Thermal Head Roll Holder 28 5-2. Setting the Paper" to "58mm/35columns" or "58mm/32columns". This causes the head to 80mm width paper when printing is 80mm, follow the instructions in progress. When using narrow-width paper, a part...
PT340/PT341 Users Guide
Page 37
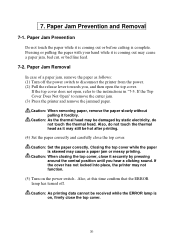
... the power switch . Caution: When closing the top cover, close the top cover. If the cover has not locked into place, the printer may cause a paper jam or messy printing. 7. If the Top Cover Does Not Open" to the instructions in "7-3. Also, do not touch the thermal head. Paper Jam Prevention and Removal 7-1. Paper Jam Prevention Do not touch the paper while it may cause a paper jam, bad cut, or bad line feed. 7-2. Paper Jam Removal...
... the power switch . Caution: When closing the top cover, close the top cover. If the cover has not locked into place, the printer may cause a paper jam or messy printing. 7. If the Top Cover Does Not Open" to the instructions in "7-3. Also, do not touch the thermal head. Paper Jam Prevention and Removal 7-1. Paper Jam Prevention Do not touch the paper while it may cause a paper jam, bad cut, or bad line feed. 7-2. Paper Jam Removal...
PT340/PT341 Users Guide
Page 40
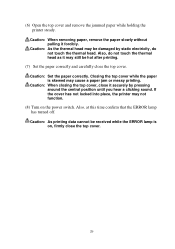
... may be hot after printing. (7) Set the paper correctly and carefully close the top cover. (6) Open the top cover and remove the jammed paper while holding the printer steady. Caution: When removing paper, remove the paper slowly without pulling it securely by static electricity, do not touch the thermal head. Caution: As printing data cannot be received while the ERROR lamp is skewed may not function. (8) Turn on , firmly close...
... may be hot after printing. (7) Set the paper correctly and carefully close the top cover. (6) Open the top cover and remove the jammed paper while holding the printer steady. Caution: When removing paper, remove the paper slowly without pulling it securely by static electricity, do not touch the thermal head. Caution: As printing data cannot be received while the ERROR lamp is skewed may not function. (8) Turn on , firmly close...
PT340/PT341 Users Guide
Page 41
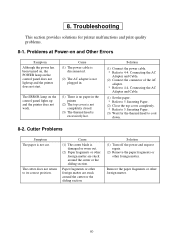
... thermal head is no paper in . Inserting Paper. (2) Close the top cover completely. * Refer to 4-4. The ERROR lamp on the control panel does not light up and the printer does not work. (1) There is excessively hot. Cause (1) The cutter blade is not cut. Solution (1) Turn off the power and request repair. (2) Remove the paper fragments or other foreign matter. 40 Connecting the AC Adapter and Cable. (2) Connect the...
... thermal head is no paper in . Inserting Paper. (2) Close the top cover completely. * Refer to 4-4. The ERROR lamp on the control panel does not light up and the printer does not work. (1) There is excessively hot. Cause (1) The cutter blade is not cut. Solution (1) Turn off the power and request repair. (2) Remove the paper fragments or other foreign matter. 40 Connecting the AC Adapter and Cable. (2) Connect the...
PT340/PT341 Users Guide
Page 42
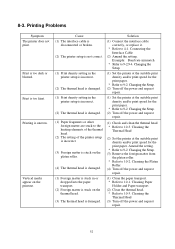
... interface cable correctly, or replace it. * Refer to 9-2. Changing the Setup. (1) Set the printer at the suitable print density and/or print speed for the print paper. * Refer to 9-2. Changing the Setup. (2) Turn off the power and request repair. (1) Clean the paper transport. * Refer to 10-2. Print is uneven. Printing is too faint. Amend the setting. * Refer to 4-1. Changing the Setup. (3) Remove the foreign matter from the platen roller. * Refer to 10-1. Cleaning the Thermal Head (3) Turn...
... interface cable correctly, or replace it. * Refer to 9-2. Changing the Setup. (1) Set the printer at the suitable print density and/or print speed for the print paper. * Refer to 9-2. Changing the Setup. (2) Turn off the power and request repair. (1) Clean the paper transport. * Refer to 10-2. Print is uneven. Printing is too faint. Amend the setting. * Refer to 4-1. Changing the Setup. (3) Remove the foreign matter from the platen roller. * Refer to 10-1. Cleaning the Thermal Head (3) Turn...

PT340/PT341 Users Guide
Page 45
9-2. Check the printer state prior to setup the printer without using the utility software on the "Setup" screen that appears. Changing the Setup This section explains how to setting. (1) The power is off. (2) The paper roll is set. (3) The cover is connected to the "Installation Guide" and "Utility User's Guide" located in your PC's CD drive and selecting "Manuals" on the enclosed CD. For instructions on installing and using the utility software, refer to a Windows PC, the settings can...
9-2. Check the printer state prior to setup the printer without using the utility software on the "Setup" screen that appears. Changing the Setup This section explains how to setting. (1) The power is off. (2) The paper roll is set. (3) The cover is connected to the "Installation Guide" and "Utility User's Guide" located in your PC's CD drive and selecting "Manuals" on the enclosed CD. For instructions on installing and using the utility software, refer to a Windows PC, the settings can...
PT340/PT341 Users Guide
Page 55
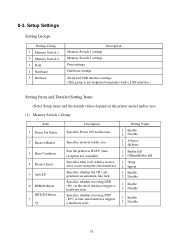
...) Setup items and the default values depend on the printer model and/or area. (1) Memory Switch 1 Group Item 1 Power On Status 2 Receive Buffer 3 Busy Condition 4 Receive Error 5 Auto LF 6 DSR(#6)Reset INIT(#25)Reset 7 *1 Description Setting Value Specifies Power ON notification. 1 Enable 2 Disable Specifies receiver buffer size. 1 45bytes 2 4Kbytes Sets the printer as BUSY (data reception not available). 1 Buffer full 2 Offline/Buffer full Specifies what to do when a receive 1 ?Print error occurs using the serial...
...) Setup items and the default values depend on the printer model and/or area. (1) Memory Switch 1 Group Item 1 Power On Status 2 Receive Buffer 3 Busy Condition 4 Receive Error 5 Auto LF 6 DSR(#6)Reset INIT(#25)Reset 7 *1 Description Setting Value Specifies Power ON notification. 1 Enable 2 Disable Specifies receiver buffer size. 1 45bytes 2 4Kbytes Sets the printer as BUSY (data reception not available). 1 Buffer full 2 Offline/Buffer full Specifies what to do when a receive 1 ?Print error occurs using the serial...

PT340/PT341 Users Guide
Page 56
... 1 Enable 2 Disable 1 Enable 2 Disable 1 Enable 2 Disable 1 Enable 2 Disable 1 Mode1 2 Mode2 55 Specifies whether to use batch printing for the USB or LAN interface Specifies iSerial Number notification for USB "Disable": Returns "0" as the iSerial Number Specifies whether to enable the automatic status transmission function (ASB: Automatic Status Back) Specifies the number of columns for the serial interface Specifies whether to enable data reception. Setting Value 1 Enable 2 Disable *1 " INIT(#25)Reset " Only Dual interface model. (2) Memory Switch 2 Group Item 1 Cover Open Error...
... 1 Enable 2 Disable 1 Enable 2 Disable 1 Enable 2 Disable 1 Enable 2 Disable 1 Mode1 2 Mode2 55 Specifies whether to use batch printing for the USB or LAN interface Specifies iSerial Number notification for USB "Disable": Returns "0" as the iSerial Number Specifies whether to enable the automatic status transmission function (ASB: Automatic Status Back) Specifies the number of columns for the serial interface Specifies whether to enable data reception. Setting Value 1 Enable 2 Disable *1 " INIT(#25)Reset " Only Dual interface model. (2) Memory Switch 2 Group Item 1 Cover Open Error...
PT340/PT341 Users Guide
Page 87
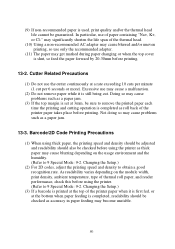
... paper, and reader performance, check this before using the printer as thick paper may cause problems such as a paper jam. 13-3. Barcode/2D Code Printing Precautions (1) When using thick paper, the printing speed and density should be adjusted and readability should be checked as accuracy in paper feeding may become unstable. 86 As readability varies depending on the usage environment and the humidity. (Refer to 9 Special Mode: 9-2. Changing the Setup...
... paper, and reader performance, check this before using the printer as thick paper may cause problems such as a paper jam. 13-3. Barcode/2D Code Printing Precautions (1) When using thick paper, the printing speed and density should be adjusted and readability should be checked as accuracy in paper feeding may become unstable. 86 As readability varies depending on the usage environment and the humidity. (Refer to 9 Special Mode: 9-2. Changing the Setup...
PT340/PT341 Users Guide
Page 88
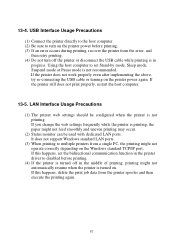
... mode, Sleep mode, Suspend mode or Pause mode is not recommended. If the printer still does not print properly, restart the host computer. 13-5. If this happens, delete the print job data from the error, and then retry printing. (4) Do not turn on the printer power again. It does not support Windows standard LAN ports. (3) When printing to turn off in progress. If you change the web settings frequently while the printer is printing, the paper...
... mode, Sleep mode, Suspend mode or Pause mode is not recommended. If the printer still does not print properly, restart the host computer. 13-5. If this happens, delete the print job data from the error, and then retry printing. (4) Do not turn on the printer power again. It does not support Windows standard LAN ports. (3) When printing to turn off in progress. If you change the web settings frequently while the printer is printing, the paper...
PT340/341 Safety/Warranty/Regulatory Guide
Page 2
...-OKI-DATA. • Your product has a grounded, three-prong plug as a radiator or heat register). Contact an electrician to the paper trays. Do not use an adapter to defeat the grounding. • Install the product near a swimming pool. • Avoid using an extension cord or power strip with local codes for adequate ventilation and easy access to have the outlet replaced...
...-OKI-DATA. • Your product has a grounded, three-prong plug as a radiator or heat register). Contact an electrician to the paper trays. Do not use an adapter to defeat the grounding. • Install the product near a swimming pool. • Avoid using an extension cord or power strip with local codes for adequate ventilation and easy access to have the outlet replaced...
PT340/341 Safety/Warranty/Regulatory Guide
Page 3
... of electric shock, fire and/or injury. After installing additional memory, hard disk drive, or any other cables only as you may cause a fire. Using a power cable not intended for use the power cable supplied with your dealer. If any covers open , do not use , to opening covers; Switch the product off prior to prevent risk of fire. If a scanner, finisher etc. is fitted, exercise care when moving...
... of electric shock, fire and/or injury. After installing additional memory, hard disk drive, or any other cables only as you may cause a fire. Using a power cable not intended for use the power cable supplied with your dealer. If any covers open , do not use , to opening covers; Switch the product off prior to prevent risk of fire. If a scanner, finisher etc. is fitted, exercise care when moving...
PT340/341 Safety/Warranty/Regulatory Guide
Page 4
... use our Overnight Exchange service, call 1-800-654-3282 (1-800-OKI-DATA): our trained personnel will be warranted for this Limited Warranty contact your problem over the phone. and Canada is used, the returned machine becomes the property of Oki Data, once it does not include the replacement or repair of this Limited Warranty. Laurel, NJ 08054 Phone: 1-800-654-3282 Fax...
... use our Overnight Exchange service, call 1-800-654-3282 (1-800-OKI-DATA): our trained personnel will be warranted for this Limited Warranty contact your problem over the phone. and Canada is used, the returned machine becomes the property of Oki Data, once it does not include the replacement or repair of this Limited Warranty. Laurel, NJ 08054 Phone: 1-800-654-3282 Fax...
PT340/341 Safety/Warranty/Regulatory Guide
Page 5
... the listed sources for the location of commercial software packages. This warranty gives you specific legal rights, and you have a problem that you can answer your questions regarding: • Locations of sales and service dealers • Installation of your machine • Usage/normal maintenance of your machine • Error message interpretation/solutions • Parts and supplies identification • Consumer relations Note: Customer Support Representatives are...
... the listed sources for the location of commercial software packages. This warranty gives you specific legal rights, and you have a problem that you can answer your questions regarding: • Locations of sales and service dealers • Installation of your machine • Usage/normal maintenance of your machine • Error message interpretation/solutions • Parts and supplies identification • Consumer relations Note: Customer Support Representatives are...


