
Instruction Manual
Page 2
TABLE OF CONTENTS Before Using the Monitor Introduction 3 Important Safety Information 4 Operating The Device 4 Care And Maintenance 5 Operating Instructions Know Your Unit 6 Stride Length Measurement 8 Settings 9 Using The Unit 11 Reading The Current Display 12 Memory Function 14 Transferring Data To The Online Solution 16 Battery Life 17 Battery Replacement 18 Deleting All Results And Settings 20 Care and maintenance Care And Maintenance 21 Troubleshooting Tips 22 Specifications 24 Fcc Statement 25 Limited Warranty 27 2
TABLE OF CONTENTS Before Using the Monitor Introduction 3 Important Safety Information 4 Operating The Device 4 Care And Maintenance 5 Operating Instructions Know Your Unit 6 Stride Length Measurement 8 Settings 9 Using The Unit 11 Reading The Current Display 12 Memory Function 14 Transferring Data To The Online Solution 16 Battery Life 17 Battery Replacement 18 Deleting All Results And Settings 20 Care and maintenance Care And Maintenance 21 Troubleshooting Tips 22 Specifications 24 Fcc Statement 25 Limited Warranty 27 2

Instruction Manual
Page 3
... the OMRON® HJ-322U Pedometer. so it knows exactly when you for future reference. 3 Your Pedometer comes with the following components: Pedometer Battery (CR2032 installed) Screwdriver Holder Instruction Manual Please read this in for future reference DATE PURCHASED • Staple your purchase receipt here • Register your hip for added convenience. Use this unit everyday to your fitness achievements! Use this instruction manual...
... the OMRON® HJ-322U Pedometer. so it knows exactly when you for future reference. 3 Your Pedometer comes with the following components: Pedometer Battery (CR2032 installed) Screwdriver Holder Instruction Manual Please read this in for future reference DATE PURCHASED • Staple your purchase receipt here • Register your hip for added convenience. Use this unit everyday to your fitness achievements! Use this instruction manual...
Instruction Manual
Page 4
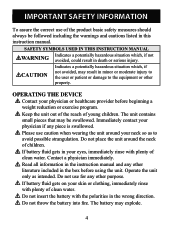
...user or patient or damage to avoid possible strangulation. Do not place the unit around your eyes, immediately rinse with plenty of clean water. Operate the unit only as to the equipment or other literature included in death or serious injury. Do not throw the battery into fire. SAFETY SYMBOLS USED IN THIS INSTRUCTION MANUAL... WARNING Indicates a potentially hazardous situation which , if not avoided, may result in this instruction manual. Immediately contact your physician if any ...
...user or patient or damage to avoid possible strangulation. Do not place the unit around your eyes, immediately rinse with plenty of clean water. Operate the unit only as to the equipment or other literature included in death or serious injury. Do not throw the battery into fire. SAFETY SYMBOLS USED IN THIS INSTRUCTION MANUAL... WARNING Indicates a potentially hazardous situation which , if not avoided, may result in this instruction manual. Immediately contact your physician if any ...
Instruction Manual
Page 5
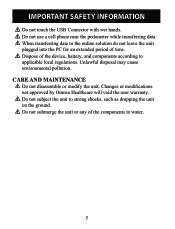
... user warranty. Do not subject the unit to applicable local regulations. Dispose of the device, battery, and components according to strong shocks, such as dropping the unit on the ground. CARE AND MAINTENANCE Do not disassemble or modify the unit. Unlawful disposal may cause environmental pollution. Do not use a cell phone near the pedometer...
... user warranty. Do not subject the unit to applicable local regulations. Dispose of the device, battery, and components according to strong shocks, such as dropping the unit on the ground. CARE AND MAINTENANCE Do not disassemble or modify the unit. Unlawful disposal may cause environmental pollution. Do not use a cell phone near the pedometer...
Instruction Manual
Page 6
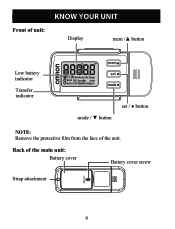
Operating Instructions KNOW YOUR UNIT Front of unit: Display mem /▲ button Low battery indicator Transfer indicator mode / ▼ button set / ● button NOTE: Remove the protective film from the face of the main unit: Battery cover Battery cover screw Strap attachment 6 Back of the unit.
Operating Instructions KNOW YOUR UNIT Front of unit: Display mem /▲ button Low battery indicator Transfer indicator mode / ▼ button set / ● button NOTE: Remove the protective film from the face of the main unit: Battery cover Battery cover screw Strap attachment 6 Back of the unit.
Instruction Manual
Page 8
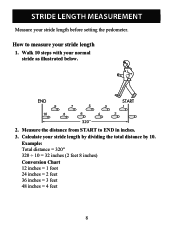
How to END in inches. 3. Measure the distance from START to measure your stride length before setting the pedometer. Calculate your normal stride as illustrated below. 2. Example: Total distance = 320'' 320 ÷ 10 = 32 inches (2 feet 8 inches) Conversion Chart 12 inches = 1 foot 24 inches = 2 feet 36 inches = 3 feet 48 inches = 4 feet 8 Walk 10 steps with your stride length by dividing the total distance by 10. STRIDE LENGTH MEASUREMENT Measure your stride length 1.
How to END in inches. 3. Measure the distance from START to measure your stride length before setting the pedometer. Calculate your normal stride as illustrated below. 2. Example: Total distance = 320'' 320 ÷ 10 = 32 inches (2 feet 8 inches) Conversion Chart 12 inches = 1 foot 24 inches = 2 feet 36 inches = 3 feet 48 inches = 4 feet 8 Walk 10 steps with your stride length by dividing the total distance by 10. STRIDE LENGTH MEASUREMENT Measure your stride length 1.
Instruction Manual
Page 9
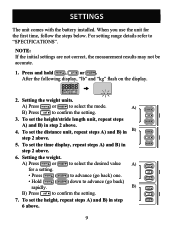
... 1. Setting the weight units. A) Press or to "SPECIFICATIONS". Setting the weight. When you use the unit for a setting. • Press ( ) to advance (go back) one. • Hold ( rapidly. ) down to advance (go back) B) B) Press to confirm the setting. 3. For setting range details... 2 above . 9 To set the distance unit, repeat steps A) and B) in step 6 above . 5. A) B) Press to confirm the setting. 7. A) Press or to select the desired value A) for the first time, follow the steps below. SETTINGS The unit comes with the battery installed. Press and hold , or...
... 1. Setting the weight units. A) Press or to "SPECIFICATIONS". Setting the weight. When you use the unit for a setting. • Press ( ) to advance (go back) one. • Hold ( rapidly. ) down to advance (go back) B) B) Press to confirm the setting. 3. For setting range details... 2 above . 9 To set the distance unit, repeat steps A) and B) in step 6 above . 5. A) B) Press to confirm the setting. 7. A) Press or to select the desired value A) for the first time, follow the steps below. SETTINGS The unit comes with the battery installed. Press and hold , or...
Instruction Manual
Page 10
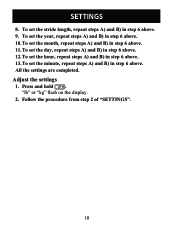
To set the stride length, repeat steps A) and B) in step 6 above . 9. Adjust the settings 1. Press and hold . "lb" or "kg" flash on the display. 2. All the settings are completed. SETTINGS 8. To set the day, repeat steps A) and B) in step 6 above . 12. To set the minute, repeat steps A) and B) in step 6 above . To set the month, repeat steps A) and B) in step 6 above . 11. To set the hour, repeat steps A) and B) in step 6 above . 13. To set the year, repeat steps A) and B) in step 6 above . 10. Follow the procedure from step 2 of "SETTINGS". 10
To set the stride length, repeat steps A) and B) in step 6 above . 9. Adjust the settings 1. Press and hold . "lb" or "kg" flash on the display. 2. All the settings are completed. SETTINGS 8. To set the day, repeat steps A) and B) in step 6 above . 12. To set the minute, repeat steps A) and B) in step 6 above . To set the month, repeat steps A) and B) in step 6 above . 11. To set the hour, repeat steps A) and B) in step 6 above . 13. To set the year, repeat steps A) and B) in step 6 above . 10. Follow the procedure from step 2 of "SETTINGS". 10
Instruction Manual
Page 14
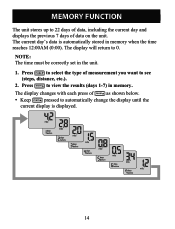
Press to see (steps, distance, etc.). 2. NOTE: The time must be correctly set in memory when the time reaches 12:00AM (0:00). Press to select the type of measurement you want to view the results (days 1-7) in memory. ...
Press to see (steps, distance, etc.). 2. NOTE: The time must be correctly set in memory when the time reaches 12:00AM (0:00). Press to select the type of measurement you want to view the results (days 1-7) in memory. ...

Instruction Manual
Page 16
TRANSFERRING DATA TO THE ONLINE SOLUTION To begin using the software for the first time, please visit www.omronfitness.com for the initial set-up instructions. 16
TRANSFERRING DATA TO THE ONLINE SOLUTION To begin using the software for the first time, please visit www.omronfitness.com for the initial set-up instructions. 16
Instruction Manual
Page 17
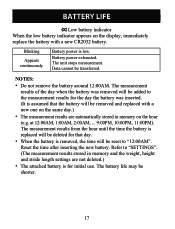
... the battery is replaced will be deleted for initial use. Blinking Appears continuously Battery power is assumed that day. • When the battery is for that the battery will be removed and replaced with a new one on the same day.) • The measurement results are not deleted.) • The attached battery is removed, the time will be reset to "SETTINGS...
... the battery is replaced will be deleted for initial use. Blinking Appears continuously Battery power is assumed that day. • When the battery is for that the battery will be removed and replaced with a new one on the same day.) • The measurement results are not deleted.) • The attached battery is removed, the time will be reset to "SETTINGS...
Instruction Manual
Page 20
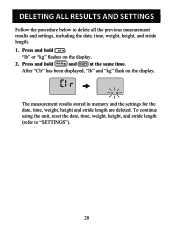
After "Clr" has been displayed, "lb" and "kg" flash on the display. 2. To continue using the unit, reset the date, time, weight, height, and stride length (refer to delete all the previous measurement results and settings, including the date, time, weight, height, and stride length. 1. Press and hold and at the same time. DELETING...
After "Clr" has been displayed, "lb" and "kg" flash on the display. 2. To continue using the unit, reset the date, time, weight, height, and stride length (refer to delete all the previous measurement results and settings, including the date, time, weight, height, and stride length. 1. Press and hold and at the same time. DELETING...
Instruction Manual
Page 21
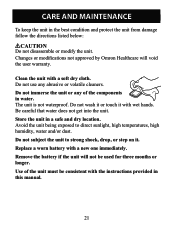
... or touch it . Replace a worn battery with the instructions provided in water. Changes or modifications not approved by Omron Healthcare will not be consistent with a new one immediately. Avoid the unit being exposed to strong shock, drop, or step on it with a soft dry cloth. Use of the components in this manual. 21 Do not subject... in the best condition and protect the unit from damage follow the directions listed below: CAUTION Do not disassemble or modify the unit. Remove the battery if the unit will void the user warranty.
... or touch it . Replace a worn battery with the instructions provided in water. Changes or modifications not approved by Omron Healthcare will not be consistent with a new one immediately. Avoid the unit being exposed to strong shock, drop, or step on it with a soft dry cloth. Use of the components in this manual. 21 Do not subject... in the best condition and protect the unit from damage follow the directions listed below: CAUTION Do not disassemble or modify the unit. Remove the battery if the unit will void the user warranty.
Instruction Manual
Page 22
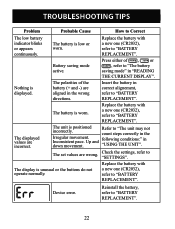
...), refer to "BATTERY REPLACEMENT". Insert the battery in "READING THE CURRENT DISPLAY". Replace the battery with a new one (CR2032), refer to "BATTERY REPLACEMENT". 22 The set values are incorrect. Check the settings, refer to Correct The low battery indicator blinks or appears continuously. TROUBLESHOOTING TIPS Problem Probable Cause How to "SETTINGS". The unit is low or worn. Reinstall the battery, refer to "BATTERY REPLACEMENT". Press either...
...), refer to "BATTERY REPLACEMENT". Insert the battery in "READING THE CURRENT DISPLAY". Replace the battery with a new one (CR2032), refer to "BATTERY REPLACEMENT". 22 The set values are incorrect. Check the settings, refer to Correct The low battery indicator blinks or appears continuously. TROUBLESHOOTING TIPS Problem Probable Cause How to "SETTINGS". The unit is low or worn. Reinstall the battery, refer to "BATTERY REPLACEMENT". Press either...

Instruction Manual
Page 23
TROUBLESHOOTING TIPS Problem Probable Cause Communication Communication error. NOTE: If a malfunction has occurred and you record measurement results. 23 indicator How to repair your PC and follow the instruction provided. We recommend that you need to Correct Check the display on your unit, all settings and measurement results are deleted. Or plug in the USB Connector once more and try again. NOTE: If the error still occurs after trying the above, contact Omron's Customer Support.
TROUBLESHOOTING TIPS Problem Probable Cause Communication Communication error. NOTE: If a malfunction has occurred and you record measurement results. 23 indicator How to repair your PC and follow the instruction provided. We recommend that you need to Correct Check the display on your unit, all settings and measurement results are deleted. Or plug in the USB Connector once more and try again. NOTE: If the error still occurs after trying the above, contact Omron's Customer Support.
Instruction Manual
Page 24
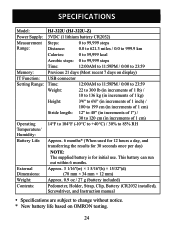
...: Approx. 0.9 oz / 27 g (battery included) Contents: Pedometer, Holder, Strap, Clip, Battery (CR2032 installed), Screwdriver, and Instruction manual • Specifications are subject to change without notice. * New battery life based on display) IT Function: USB connector Setting Range: Time: 12:00AM to 11:59PM... +40°C) / 30% to 23:59 Memory: Previous 21 days (Most recent 7 days on OMRON testing. 24 SPECIFICATIONS Model: HJ-322U (HJ-322U-Z) Power Supply: 3VDC (1 lithium battery CR2032) Measurement Steps: 0 to 99,999 steps Range: Distance: 0.0 to 621.3 miles / 0.0...
...: Approx. 0.9 oz / 27 g (battery included) Contents: Pedometer, Holder, Strap, Clip, Battery (CR2032 installed), Screwdriver, and Instruction manual • Specifications are subject to change without notice. * New battery life based on display) IT Function: USB connector Setting Range: Time: 12:00AM to 11:59PM... +40°C) / 30% to 23:59 Memory: Previous 21 days (Most recent 7 days on OMRON testing. 24 SPECIFICATIONS Model: HJ-322U (HJ-322U-Z) Power Supply: 3VDC (1 lithium battery CR2032) Measurement Steps: 0 to 99,999 steps Range: Distance: 0.0 to 621.3 miles / 0.0...
Instruction Manual
Page 25
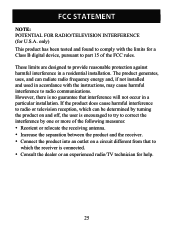
... by one or more of the FCC rules. only) This product has been tested and found to comply with the instructions, may cause harmful interference to part 15 of the following measures: • Reorient or relocate the receiving antenna. • Increase the separation between the ... the product into an outlet on and off, the user is encouraged to try to radio or television reception, which the receiver is no guarantee that to which can radiate radio frequency energy and, if not installed and used in a residential installation. However, there is connected. • Consult the ...
... by one or more of the FCC rules. only) This product has been tested and found to comply with the instructions, may cause harmful interference to part 15 of the following measures: • Reorient or relocate the receiving antenna. • Increase the separation between the ... the product into an outlet on and off, the user is encouraged to try to radio or television reception, which the receiver is no guarantee that to which can radiate radio frequency energy and, if not installed and used in a residential installation. However, there is connected. • Consult the ...
Instruction Manual
Page 26
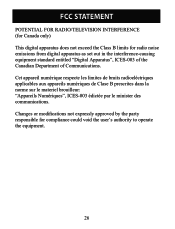
...POTENTIAL FOR RADIO/TELEVISION INTERFERENCE (for Canada only) This digital apparatus does not exceed the Class B limits for compliance could void the user's authority to operate the equipment. 26 Cet appareil numérique respecte les limites de bruits radioeléctriques applicables aux appareils num... des communications. Changes or modifications not expressly approved by the party responsible for radio noise emissions from digital apparatus as set out in the interference-causing equipment standard entitled "Digital Apparatus", ICES-003 of the Canadian Department of Communications.
...POTENTIAL FOR RADIO/TELEVISION INTERFERENCE (for Canada only) This digital apparatus does not exceed the Class B limits for compliance could void the user's authority to operate the equipment. 26 Cet appareil numérique respecte les limites de bruits radioeléctriques applicables aux appareils num... des communications. Changes or modifications not expressly approved by the party responsible for radio noise emissions from digital apparatus as set out in the interference-causing equipment standard entitled "Digital Apparatus", ICES-003 of the Canadian Department of Communications.
Instruction Manual
Page 27
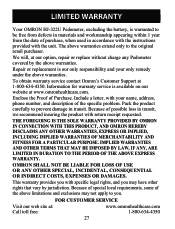
... OMRON HJ-322U Pedometer, excluding the battery, is warranted to be free from defects in materials and workmanship appearing within 1 year from the date of purchase, when used in accordance with the instructions provided with your only remedy under the above warranties. We will, at 1-800-634-4350. To obtain warranty service contact Omron's Customer Support at our option, repair or replace...
... OMRON HJ-322U Pedometer, excluding the battery, is warranted to be free from defects in materials and workmanship appearing within 1 year from the date of purchase, when used in accordance with the instructions provided with your only remedy under the above warranties. We will, at 1-800-634-4350. To obtain warranty service contact Omron's Customer Support at our option, repair or replace...

Instruction Manual
Page 28
Made in China HJ-322U-Z 5337927-8B www.omronhealthcare.com © 2012 OMRON HEALTHCARE, INC. OMRON HEALTHCARE, INC. 1925 West Field Court Lake Forest, IL 60045 U.S.A.
Made in China HJ-322U-Z 5337927-8B www.omronhealthcare.com © 2012 OMRON HEALTHCARE, INC. OMRON HEALTHCARE, INC. 1925 West Field Court Lake Forest, IL 60045 U.S.A.


