SmartFIT Installation Guide
Page 4
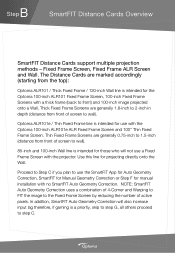
...ALR Screen and Wall. In addition, SmartFIT Auto Geometry Correction will not use a Fixed Frame Screen with no SmartFIT Auto Geometry Correction. Optoma ALR101e / Thin Fixed Frame line is a priority, skip to step G, all others proceed to front) and 100-inch image projected ...increase input lag therefore, if gaming is intended for use the SmartFIT App for Auto Geometry Correction, SmartFIT for Manual Geometry Correction or Step F for manual installation with the projector. B Step SmartFIT Distance Cards Overview SmartFIT Distance Cards support multiple projection methods - The...
...ALR Screen and Wall. In addition, SmartFIT Auto Geometry Correction will not use a Fixed Frame Screen with no SmartFIT Auto Geometry Correction. Optoma ALR101e / Thin Fixed Frame line is a priority, skip to step G, all others proceed to front) and 100-inch image projected ...increase input lag therefore, if gaming is intended for use the SmartFIT App for Auto Geometry Correction, SmartFIT for Manual Geometry Correction or Step F for manual installation with the projector. B Step SmartFIT Distance Cards Overview SmartFIT Distance Cards support multiple projection methods - The...
SmartFIT Installation Guide
Page 9
..., follow the onscreen instructions and then select "auto" (recommended). NOTE: In some minor adjustments. For large adjustments use 1 or 4. Tips on using manual feature, there are on the screen. Ensure the photo is complete, saved the result by select "Finished" or select "Fine Tune" to your 2. Ensure... human eye. 2. Once the SmartFIT Auto Geometry Correction is "square" before taking the photo. 3. In this case we recommend using the "manual" feature in the center calibration page. Crosshair must over the star in SmartFIT instead of the screen or lighting in the room. No Wi-...
..., follow the onscreen instructions and then select "auto" (recommended). NOTE: In some minor adjustments. For large adjustments use 1 or 4. Tips on using manual feature, there are on the screen. Ensure the photo is complete, saved the result by select "Finished" or select "Fine Tune" to your 2. Ensure... human eye. 2. Once the SmartFIT Auto Geometry Correction is "square" before taking the photo. 3. In this case we recommend using the "manual" feature in the center calibration page. Crosshair must over the star in SmartFIT instead of the screen or lighting in the room. No Wi-...
SmartFIT Installation Guide
Page 11
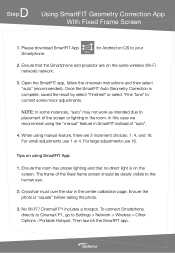
... or select "Fine Tune" to commit some instances, "auto" may not work as possible. NOTE: In some minor adjustments. When using the "manual" feature in the room. Ensure the room has proper lighting and that the Smartphone and projector are 3 increment choices: 1, 4, and 16. Open ... the onscreen instructions and then select "auto" (recommended). Please ensure that frame created on the screen. 2. In this case we recommend using manual feature, there are on using SmartFIT App: 1. For large adjustments use 1 or 4. For small adjustments use 16. for Android or iOS to...
... or select "Fine Tune" to commit some instances, "auto" may not work as possible. NOTE: In some minor adjustments. When using the "manual" feature in the room. Ensure the room has proper lighting and that the Smartphone and projector are 3 increment choices: 1, 4, and 16. Open ... the onscreen instructions and then select "auto" (recommended). Please ensure that frame created on the screen. 2. In this case we recommend using manual feature, there are on using SmartFIT App: 1. For large adjustments use 1 or 4. For small adjustments use 16. for Android or iOS to...
SmartFIT Installation Guide
Page 12
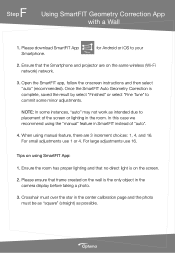
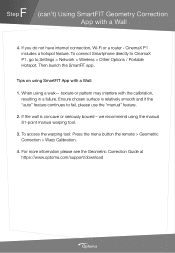
... have internet connection, Wi-Fi or a router - When using SmartFIT App with a Wall: 1. To connect Smartphone directly to CinemaX P1, go to fail, please use the "manual" feature. 2. To access the warping tool: Press the menu button the remote > Geometric Correction > Warp Calibration. 4. Then ... > Network > Wireless > Other Options / Portable Hotspot. For more information please see the Geometric Correction Guide at https://www.optoma.com/support/download Tips on using a walx- CinemaX P1 includes a hotspot feature. we recommend using the manual 81-point manual warping tool. 3.
... have internet connection, Wi-Fi or a router - When using SmartFIT App with a Wall: 1. To connect Smartphone directly to CinemaX P1, go to fail, please use the "manual" feature. 2. To access the warping tool: Press the menu button the remote > Geometric Correction > Warp Calibration. 4. Then ... > Network > Wireless > Other Options / Portable Hotspot. For more information please see the Geometric Correction Guide at https://www.optoma.com/support/download Tips on using a walx- CinemaX P1 includes a hotspot feature. we recommend using the manual 81-point manual warping tool. 3.
SmartFIT Installation Guide
Page 13
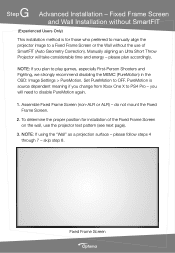
...Wall Installation without SmartFIT (Experienced Users Only) This installation method is source dependent meaning if you will take considerable time and energy - Manually aligning an Ultra Short Throw Projector will need to disable PureMotion again. 1. PureMotion is for installation of the Fixed Frame Screen on the... the MEMC (PureMotion) in the OSD: Image Settings > PureMotion. To determine the proper position for those who preferred to manually align the projector image to PS4 Pro - skip step 8. G Step Advanced Installation - please plan accordingly. Fixed Frame Screen
...Wall Installation without SmartFIT (Experienced Users Only) This installation method is source dependent meaning if you will take considerable time and energy - Manually aligning an Ultra Short Throw Projector will need to disable PureMotion again. 1. PureMotion is for installation of the Fixed Frame Screen on the... the MEMC (PureMotion) in the OSD: Image Settings > PureMotion. To determine the proper position for those who preferred to manually align the projector image to PS4 Pro - skip step 8. G Step Advanced Installation - please plan accordingly. Fixed Frame Screen

User Manual
Page 1
DLP® Projector User manual
DLP® Projector User manual

User Manual
Page 8
...not occur in accordance with the limits for a Class B digital device pursuant to Part 15 of the FCC rules. Neither this manual, nor any of the material contained herein, may cause harmful interference to radio communications. This device generates, uses and can be reproduced... warranties with all related logos are registered trademarks of Texas Instruments and BrilliantColorTM is a trademark of HDMI Licensing LLC in this manual are the properties of their respective owners and are trademarks or registered trademarks of Texas Instruments. Amazon, Alexa and all rights ...
...not occur in accordance with the limits for a Class B digital device pursuant to Part 15 of the FCC rules. Neither this manual, nor any of the material contained herein, may cause harmful interference to radio communications. This device generates, uses and can be reproduced... warranties with all related logos are registered trademarks of Texas Instruments and BrilliantColorTM is a trademark of HDMI Licensing LLC in this manual are the properties of their respective owners and are trademarks or registered trademarks of Texas Instruments. Amazon, Alexa and all rights ...
User Manual
Page 10
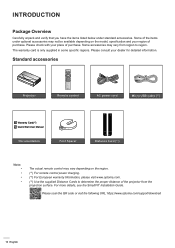
...regions. Standard accessories Projector Remote control AC power cord Micro USB cable (*1) Warranty Card(*2) Quick Start User Manual Documentation Foot Spacer Distance Card (*3) Note The actual remote control may vary depending on the model, specification and your dealer for ...not be available depending on the region. (*1) For remote control power charging. (*2) For European warranty Information, please visit www.optoma.com. (*3) Use the supplied Distance Cards to region. Some accessories may vary from region to determine the proper distance of purchase...
...regions. Standard accessories Projector Remote control AC power cord Micro USB cable (*1) Warranty Card(*2) Quick Start User Manual Documentation Foot Spacer Distance Card (*3) Note The actual remote control may vary depending on the model, specification and your dealer for ...not be available depending on the region. (*1) For remote control power charging. (*2) For European warranty Information, please visit www.optoma.com. (*3) Use the supplied Distance Cards to region. Some accessories may vary from region to determine the proper distance of purchase...

User Manual
Page 38
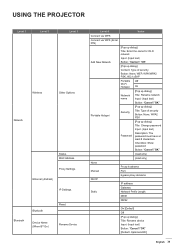
...: Enter a valid hostname. Checkbox: Show password - Button: "Cancel"/ "OK" 38 English Subtitle: Password - Button: "Cancel"/ "OK" None Manual [Pop up dialog] Hint: [Wi-Fi name] Title: Forget network Content: Your device will no longer join this Wi-Fi network. USING THE PROJECTOR... System settings menu tree Level 1 Level 2 Wallpaper Home Shortcut Personalize Input Source Network Wireless Level 3 Optoma style... Title: Enter password for [WiFi name] (When entering password) Internet Connection IP Address MAC Address Signal Strength Proxy ...
...: Enter a valid hostname. Checkbox: Show password - Button: "Cancel"/ "OK" 38 English Subtitle: Password - Button: "Cancel"/ "OK" None Manual [Pop up dialog] Hint: [Wi-Fi name] Title: Forget network Content: Your device will no longer join this Wi-Fi network. USING THE PROJECTOR... System settings menu tree Level 1 Level 2 Wallpaper Home Shortcut Personalize Input Source Network Wireless Level 3 Optoma style... Title: Enter password for [WiFi name] (When entering password) Internet Connection IP Address MAC Address Signal Strength Proxy ...
User Manual
Page 39
... Bluetooth Bluetooth Device Name (When BT On) Reset Rename Device Level 4 Connect via WPS Connect via WPS (Enter PIN) Add New Network Portable Hotspot None Manual DHCP Static Value [Pop up dialog] Title: Enter the name for Wi-Fi network Input: (Input text) Button: "Cancel"/ "OK" [Pop up dialog] Content: Type... [Pop up dialog] Title: Type of security Button: None, WPA2 PSK Password [Pop up dialog] Title: Rename device Input: (Input text) Button: "Cancel"/"OK" [Default: Optoma-UHD] English 39
... Bluetooth Bluetooth Device Name (When BT On) Reset Rename Device Level 4 Connect via WPS Connect via WPS (Enter PIN) Add New Network Portable Hotspot None Manual DHCP Static Value [Pop up dialog] Title: Enter the name for Wi-Fi network Input: (Input text) Button: "Cancel"/ "OK" [Pop up dialog] Content: Type... [Pop up dialog] Title: Type of security Button: None, WPA2 PSK Password [Pop up dialog] Title: Rename device Input: (Input text) Button: "Cancel"/"OK" [Default: Optoma-UHD] English 39
User Manual
Page 42
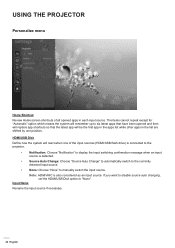
... detected. ‡‡ Source Auto Change: Choose "Source Auto Change" to automatically switch to the currently detected input source. ‡‡ None: Choose "None" to manually switch the input source. HDMI/USB Disk Define how the system will be the first app in the apps list while other apps in the...
... detected. ‡‡ Source Auto Change: Choose "Source Auto Change" to automatically switch to the currently detected input source. ‡‡ None: Choose "None" to manually switch the input source. HDMI/USB Disk Define how the system will be the first app in the apps list while other apps in the...
User Manual
Page 43
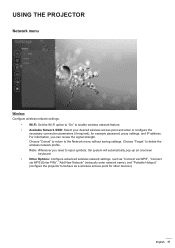
... an onscreen keyboard. ‡‡ Other Options: Configure advanced wireless network settings, such as "Connect via WPS", "Connect via WPS (Enter PIN)", "Add New Network" (manually enter network name), and "Portable Hotspot" (configure the projector to behave as a wireless access point for example password, proxy settings, and IP address.
... an onscreen keyboard. ‡‡ Other Options: Configure advanced wireless network settings, such as "Connect via WPS", "Connect via WPS (Enter PIN)", "Add New Network" (manually enter network name), and "Portable Hotspot" (configure the projector to behave as a wireless access point for example password, proxy settings, and IP address.
User Manual
Page 44
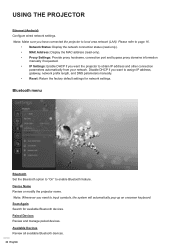
...Review or modify the projector name. Disable DHCP if you want to assign IP address, gateway, network prefix length, and DNS parameters manually. ‡‡ Reset: Return the factory default settings for available Bluetooth devices. Note: Whenever you have connected the projector to ...MAC Address: Display the MAC address (read-only). ‡‡ Proxy Settings: Provide proxy hostname, connection port and bypass proxy domains information manually if requested. ‡‡ IP Settings: Enable DHCP if you want the projector to enable Bluetooth feature. Paired Devices Review and manage ...
...Review or modify the projector name. Disable DHCP if you want to assign IP address, gateway, network prefix length, and DNS parameters manually. ‡‡ Reset: Return the factory default settings for available Bluetooth devices. Note: Whenever you have connected the projector to ...MAC Address: Display the MAC address (read-only). ‡‡ Proxy Settings: Provide proxy hostname, connection port and bypass proxy domains information manually if requested. ‡‡ IP Settings: Enable DHCP if you want the projector to enable Bluetooth feature. Paired Devices Review and manage ...
User Manual
Page 48
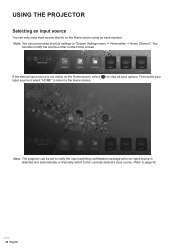
If the desired input source is detected and automatically or manually switch to the currently detected input source. Note: You can select any input source directly on the Home screen using an input shortcut. USING THE ...
If the desired input source is detected and automatically or manually switch to the currently detected input source. Note: You can select any input source directly on the Home screen using an input shortcut. USING THE ...
CinemaX P2 Datasheet
Page 2
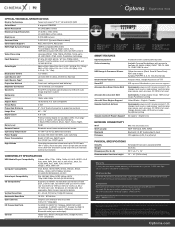
..., pause, next, previous, FF, REW, start user manual, Bluetooth smart home remote with Airmouse (rechargeable), power cable Accessories Bluetooth smart home remote with Airmouse (replacement): BR-3074R CinemaX P2 distance cards (replacement): BD-25120 4K UHD Casting and mirroring... (power) 9. HDMI 1.4a 10. Kengsington Lock 11. Bluetooth remote SMART FEATURES Operating System Android 8.0 with customizable launcher Video streaming Available Optoma Marketplace with access to projection surface) Image Size 85" - 120" Digital Zoom 0.8 - 2.0x Audio Premium Dolby Digital 2.0 soundbar (...
..., pause, next, previous, FF, REW, start user manual, Bluetooth smart home remote with Airmouse (rechargeable), power cable Accessories Bluetooth smart home remote with Airmouse (replacement): BR-3074R CinemaX P2 distance cards (replacement): BD-25120 4K UHD Casting and mirroring... (power) 9. HDMI 1.4a 10. Kengsington Lock 11. Bluetooth remote SMART FEATURES Operating System Android 8.0 with customizable launcher Video streaming Available Optoma Marketplace with access to projection surface) Image Size 85" - 120" Digital Zoom 0.8 - 2.0x Audio Premium Dolby Digital 2.0 soundbar (...


