SmartFIT Installation Guide
Page 3
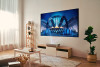
Smartphone with iOS or Android / access to Apple Store or Google Play for download of Optoma SmartFIT App. Optional: Measuring Tape (if using the Wall as a projection surface or following experienced users' path). A Step Preparation What's Required Optoma CinemaX Series 4K Ultra Short Throw Projector. SmartFIT Distance Cards x2 (included in the box). Projection Surface: Fixed Frame Screen, Fixed Frame ALR Screen (Ambient Light Rejection) or "prepared" Wall surface (no Fixed Frame Screen). Optional: Level Tool (Experienced Users only)
Smartphone with iOS or Android / access to Apple Store or Google Play for download of Optoma SmartFIT App. Optional: Measuring Tape (if using the Wall as a projection surface or following experienced users' path). A Step Preparation What's Required Optoma CinemaX Series 4K Ultra Short Throw Projector. SmartFIT Distance Cards x2 (included in the box). Projection Surface: Fixed Frame Screen, Fixed Frame ALR Screen (Ambient Light Rejection) or "prepared" Wall surface (no Fixed Frame Screen). Optional: Level Tool (Experienced Users only)
SmartFIT Installation Guide
Page 4
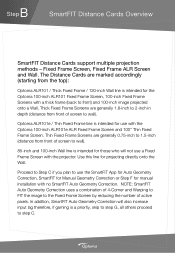
... to use the SmartFIT App for Auto Geometry Correction, SmartFIT for Manual Geometry Correction or Step F for use a Fixed Frame Screen with the Optoma 100-inch ALR101e ALR Fixed Frame Screen and 100" Thin Fixed Frame Screen. Fixed Frame Screen, Fixed Frame ALR Screen and Wall...Use this line for the Optoma 100-inch ALR101 Fixed Frame Screen, 100-inch Fixed Frame Screens with no SmartFIT Auto Geometry Correction. In addition, SmartFIT Auto Geometry Correction will also increase input lag therefore, if gaming is intended for those who will not use with the projector. Proceed to Step C ...
... to use the SmartFIT App for Auto Geometry Correction, SmartFIT for Manual Geometry Correction or Step F for use a Fixed Frame Screen with the Optoma 100-inch ALR101e ALR Fixed Frame Screen and 100" Thin Fixed Frame Screen. Fixed Frame Screen, Fixed Frame ALR Screen and Wall...Use this line for the Optoma 100-inch ALR101 Fixed Frame Screen, 100-inch Fixed Frame Screens with no SmartFIT Auto Geometry Correction. In addition, SmartFIT Auto Geometry Correction will also increase input lag therefore, if gaming is intended for those who will not use with the projector. Proceed to Step C ...
SmartFIT Installation Guide
Page 6
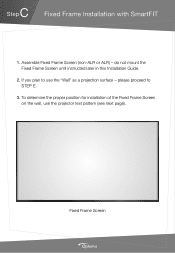
please proceed to use the projector test pattern (see next page). To determine the proper position for installation of the Fixed Frame Screen on the wall, use the "Wall" as a projection surface - Assemble Fixed Frame Screen (non-ALR or ALR) - Fixed Frame Screen If you plan to STEP E. 3. C Step Fixed Frame Installation with SmartFIT 1. do not mount the Fixed Frame Screen until instructed later in this Installation Guide. 2.
please proceed to use the projector test pattern (see next page). To determine the proper position for installation of the Fixed Frame Screen on the wall, use the "Wall" as a projection surface - Assemble Fixed Frame Screen (non-ALR or ALR) - Fixed Frame Screen If you plan to STEP E. 3. C Step Fixed Frame Installation with SmartFIT 1. do not mount the Fixed Frame Screen until instructed later in this Installation Guide. 2.

SmartFIT Installation Guide
Page 7
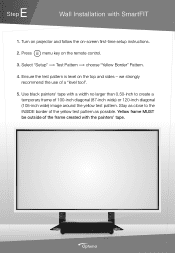
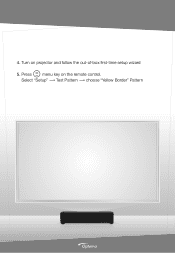
Turn on the remote control. 4. Press menu key on projector and follow the out-of-box first-time setup wizard 5. Select "Setup" Test Pattern choose "Yellow Border" Pattern
Turn on the remote control. 4. Press menu key on projector and follow the out-of-box first-time setup wizard 5. Select "Setup" Test Pattern choose "Yellow Border" Pattern

SmartFIT Installation Guide
Page 8
... feel the Distance Card hook the rear feet (closest to the bottom of the Fixed Frame Screen. Mount the Fixed Frame Screen to adjust the projector. IMPORTANT : Yellow test pattern MUST be necessary to the Wall using Distance Cards, it may be outside of the... projector by sliding the distance card in from the side (left and right) until the Distance Card touches the wall. 8. After using the yellow screen pattern ...
... feel the Distance Card hook the rear feet (closest to the bottom of the Fixed Frame Screen. Mount the Fixed Frame Screen to adjust the projector. IMPORTANT : Yellow test pattern MUST be necessary to the Wall using Distance Cards, it may be outside of the... projector by sliding the distance card in from the side (left and right) until the Distance Card touches the wall. 8. After using the yellow screen pattern ...
SmartFIT Installation Guide
Page 9
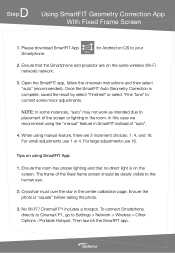
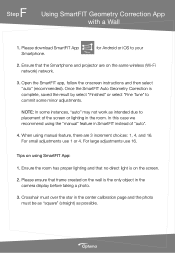
... 1. Once the SmartFIT Auto Geometry Correction is "square" before taking the photo. 3. Ensure the room has proper lighting and that the Smartphone and projector are 3 increment choices: 1, 4, and 16. For large adjustments use 1 or 4. Crosshair must over the star in the room. Open the ..." (recommended). For small adjustments use 16. D Step Using SmartFIT Geometry Correction App With Fixed Frame Screen 1. To connect Smartphone directly to CinemaX P1, go to commit some instances, "auto" may not work as intended due to placement of "auto". 4. Ensure that no direct light...
... 1. Once the SmartFIT Auto Geometry Correction is "square" before taking the photo. 3. Ensure the room has proper lighting and that the Smartphone and projector are 3 increment choices: 1, 4, and 16. For large adjustments use 1 or 4. Crosshair must over the star in the room. Open the ..." (recommended). For small adjustments use 16. D Step Using SmartFIT Geometry Correction App With Fixed Frame Screen 1. To connect Smartphone directly to CinemaX P1, go to commit some instances, "auto" may not work as intended due to placement of "auto". 4. Ensure that no direct light...
SmartFIT Installation Guide
Page 10
Turn on projector and follow the on the top and sides - Ensure the test pattern is level on -screen first-time setup instructions. 2. Yellow frame MUST be ...
Turn on projector and follow the on the top and sides - Ensure the test pattern is level on -screen first-time setup instructions. 2. Yellow frame MUST be ...
SmartFIT Installation Guide
Page 11
..." or select "Fine Tune" to commit some instances, "auto" may not work as possible. Ensure the room has proper lighting and that the Smartphone and projector are 3 increment choices: 1, 4, and 16. Crosshair must be as "square" (straight) as intended due to your 2. For small adjustments use 16.
..." or select "Fine Tune" to commit some instances, "auto" may not work as possible. Ensure the room has proper lighting and that the Smartphone and projector are 3 increment choices: 1, 4, and 16. Crosshair must be as "square" (straight) as intended due to your 2. For small adjustments use 16.
SmartFIT Installation Guide
Page 13
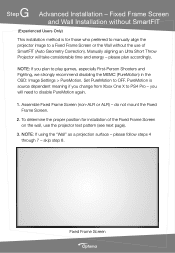
you will take considerable time and energy - To determine the proper position for those who preferred to manually align the projector image to a Fixed Frame Screen or the Wall without SmartFIT (Experienced Users Only) This installation method is source dependent meaning if you plan to PS4 ... the "Wall" as a projection surface - please plan accordingly. please follow steps 4 through 7 - Fixed Frame Screen Fixed Frame Screen and Wall Installation without the use the projector test pattern (see next page). 3. Manually aligning an Ultra Short Throw...
you will take considerable time and energy - To determine the proper position for those who preferred to manually align the projector image to a Fixed Frame Screen or the Wall without SmartFIT (Experienced Users Only) This installation method is source dependent meaning if you plan to PS4 ... the "Wall" as a projection surface - please plan accordingly. please follow steps 4 through 7 - Fixed Frame Screen Fixed Frame Screen and Wall Installation without the use the projector test pattern (see next page). 3. Manually aligning an Ultra Short Throw...
SmartFIT Installation Guide
Page 14
Press menu key on projector and follow the out-of-box first-time setup wizard 5. 4. Select "Setup" Test Pattern choose "Yellow Border" Pattern Turn on the remote control.
Press menu key on projector and follow the out-of-box first-time setup wizard 5. 4. Select "Setup" Test Pattern choose "Yellow Border" Pattern Turn on the remote control.
SmartFIT Installation Guide
Page 15
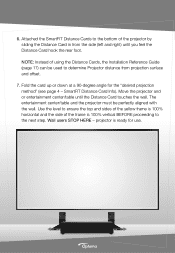
... the Distance Card in from projection surface and offset. 7. NOTE: Instead of the frame is ready for the "desired projection method" (see page 4 - Move the projector and or entertainment center/table until you feel the Distance Card hook the rear foot. Use the level to ensure the top and sides of... Reference Guide (page 17) can be perfectly aligned with the wall. Wall users STOP HERE - SmartFIT Distance Card Info). The entertainment center/table and the projector must be used to the next step. 6. Fold the card up or down at a 90-degree angle for use...
... the Distance Card in from projection surface and offset. 7. NOTE: Instead of the frame is ready for the "desired projection method" (see page 4 - Move the projector and or entertainment center/table until you feel the Distance Card hook the rear foot. Use the level to ensure the top and sides of... Reference Guide (page 17) can be perfectly aligned with the wall. Wall users STOP HERE - SmartFIT Distance Card Info). The entertainment center/table and the projector must be used to the next step. 6. Fold the card up or down at a 90-degree angle for use...
SmartFIT Installation Guide
Page 16
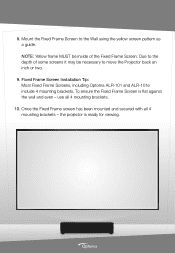
NOTE: Yellow frame MUST be inside of some screens it may be necessary to move the Projector back an inch or two. 9. use all 4 mounting brackets - the projector is flat against the wall and even - Due to the Wall using the yellow screen pattern as a guide. Fixed Frame ...Screen Installation Tip: Most Fixed Frame Screens, including Optoma ALR-101 and ALR-101e include 4 mounting brackets. To ensure...
NOTE: Yellow frame MUST be inside of some screens it may be necessary to move the Projector back an inch or two. 9. use all 4 mounting brackets - the projector is flat against the wall and even - Due to the Wall using the yellow screen pattern as a guide. Fixed Frame ...Screen Installation Tip: Most Fixed Frame Screens, including Optoma ALR-101 and ALR-101e include 4 mounting brackets. To ensure...
SmartFIT Installation Guide
Page 18
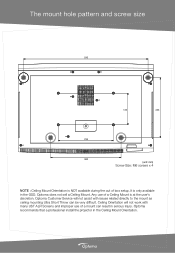
... the Ceiling Mount Orientation. Ceiling Orientation will not assist with many UST ALR Screens and improper use of a Ceiling Mount is at the user's discretion. Optoma Customer Service will not work with issues related directly to the mount as ceiling mounting Ultra Short Throw can result in serious injury. The mount... 300 (unit:mm) Screw Size: M6 screws x 4 NOTE : Ceiling Mount Orientation is NOT available during the out of a mount can be very difficult. Optoma recommends that a professional install the projector in the OSD. Any use of box setup...
... the Ceiling Mount Orientation. Ceiling Orientation will not assist with many UST ALR Screens and improper use of a Ceiling Mount is at the user's discretion. Optoma Customer Service will not work with issues related directly to the mount as ceiling mounting Ultra Short Throw can result in serious injury. The mount... 300 (unit:mm) Screw Size: M6 screws x 4 NOTE : Ceiling Mount Orientation is NOT available during the out of a mount can be very difficult. Optoma recommends that a professional install the projector in the OSD. Any use of box setup...

User Manual
Page 1
DLP® Projector User manual
DLP® Projector User manual
User Manual
Page 2
... Remote control...13 Pairing your Bluetooth remote control with the projector 14 SETUP AND INSTALLATION 15 Installing the projector...15 Connecting sources to the projector 16 Adjusting the projector image...17 Remote setup...18 USING THE PROJECTOR 19 Powering on / off the projector 19 Using the projector as wireless speaker 23 Home screen overview...24 System date...
... Remote control...13 Pairing your Bluetooth remote control with the projector 14 SETUP AND INSTALLATION 15 Installing the projector...15 Connecting sources to the projector 16 Adjusting the projector image...17 Remote setup...18 USING THE PROJECTOR 19 Powering on / off the projector 19 Using the projector as wireless speaker 23 Home screen overview...24 System date...
User Manual
Page 4
... (41°F ~ 104°F) (ii) Relative humidity is loose inside. 4 English Do not defeat the purpose of electric shock to install the projector in this user's guide. Do not install near heat sources such as a book case or a cabinet that does not block ventilation. Please follow all...rain or moisture. ±± Something has fallen in the literature accompanying the appliance. Do not remove the grounding pin on to the projector. ±± Projector has been exposed to ): ±± Unit has been dropped. ±± Power supply cord or plug has been damaged. ...
... (41°F ~ 104°F) (ii) Relative humidity is loose inside. 4 English Do not defeat the purpose of electric shock to install the projector in this user's guide. Do not install near heat sources such as a book case or a cabinet that does not block ventilation. Please follow all...rain or moisture. ±± Something has fallen in the literature accompanying the appliance. Do not remove the grounding pin on to the projector. ±± Projector has been exposed to ): ±± Unit has been dropped. ±± Power supply cord or plug has been damaged. ...
User Manual
Page 5
Opening or removing covers may become damaged. ‡‡ Do not block the light coming out of the projector lens when in operation. Please call Optoma before disconnecting power. Cleaning the Lens ‡‡ Before cleaning the lens, be subjected to vibration or shock. ‡‡ Do not .... The light will heat the object and could melt, cause burns or start a fire. ‡‡ Please do not open or disassemble the projector as non standard installation may harm your fingers. ‡‡ Do not use a spray containing flammable gases to clean the display housing. This may...
Opening or removing covers may become damaged. ‡‡ Do not block the light coming out of the projector lens when in operation. Please call Optoma before disconnecting power. Cleaning the Lens ‡‡ Before cleaning the lens, be subjected to vibration or shock. ‡‡ Do not .... The light will heat the object and could melt, cause burns or start a fire. ‡‡ Please do not open or disassemble the projector as non standard installation may harm your fingers. ‡‡ Do not use a spray containing flammable gases to clean the display housing. This may...
User Manual
Page 6
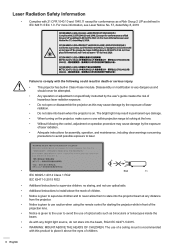
... built-in Class 4 laser module. Laser Radiation Safety Information ‡‡ Complies with 21 CFR 1040.10 and 1040.11 except for starting the projector while in front of the projection lens. ‡‡ Notice is given to the user to avoid the use of optical aids such as binoculars ...or telescopes inside the beam. ‡‡ As with any distance from the projector. ‡‡ Notice is given to use caution when using the remote control for conformance as a Risk Group 2 LIP as this product to place it...
... built-in Class 4 laser module. Laser Radiation Safety Information ‡‡ Complies with 21 CFR 1040.10 and 1040.11 except for starting the projector while in front of the projection lens. ‡‡ Notice is given to the user to avoid the use of optical aids such as binoculars ...or telescopes inside the beam. ‡‡ As with any distance from the projector. ‡‡ Notice is given to use caution when using the remote control for conformance as a Risk Group 2 LIP as this product to place it...
User Manual
Page 7
...health issues associated with the screen. ‡‡ Watching 3D projection while wearing 3D glasses for an extended period of time may damage your 3D PROJECTOR near open stairwells, cables, balconies, or other purpose than adults to certain flashing images or lights contained in certain... Projector pictures or video games. Accordingly, DO NOT place your eyesight. Photosensitive Seizure Warning and Other Health Risks ‡‡ Some viewers may also cause ...
...health issues associated with the screen. ‡‡ Watching 3D projection while wearing 3D glasses for an extended period of time may damage your 3D PROJECTOR near open stairwells, cables, balconies, or other purpose than adults to certain flashing images or lights contained in certain... Projector pictures or video games. Accordingly, DO NOT place your eyesight. Photosensitive Seizure Warning and Other Health Risks ‡‡ Some viewers may also cause ...

User Manual
Page 9
...;‡ Low Voltage Directive 2014/35/EC ‡‡ R & TTE Directive 1999/5/EC (if product has RF function) WEEE Disposal instructions Do not throw this projector. Operation is granted by the Federal Communications Commission, to the following two conditions: 1. Notice: Shielded cables All connections to other computing devices must accept any...
...;‡ Low Voltage Directive 2014/35/EC ‡‡ R & TTE Directive 1999/5/EC (if product has RF function) WEEE Disposal instructions Do not throw this projector. Operation is granted by the Federal Communications Commission, to the following two conditions: 1. Notice: Shielded cables All connections to other computing devices must accept any...


