User's Manual
Page 1
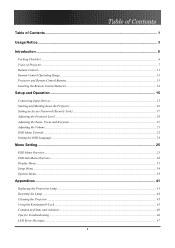
Table of Contents Table of Contents Table of Contents ...1 Usage Notice...3 Introduction ...6 Packing Checklist ...6 Views of Projector ...7 Remote Control...11 Remote Control Operating Range ...13 Projector and Remote Control Buttons...13 Inserting the Remote Control Batteries ...14 Setup and Operation ...15 Connecting Input Devices...15 Starting and Shutting down the Projector ...16 Setting an Access...
Table of Contents Table of Contents Table of Contents ...1 Usage Notice...3 Introduction ...6 Packing Checklist ...6 Views of Projector ...7 Remote Control...11 Remote Control Operating Range ...13 Projector and Remote Control Buttons...13 Inserting the Remote Control Batteries ...14 Setup and Operation ...15 Connecting Input Devices...15 Starting and Shutting down the Projector ...16 Setting an Access...
User's Manual
Page 2
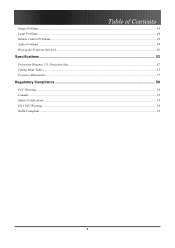
Table of Contents Image Problems ...48 Lamp Problems...48 Remote Control Problems...49 Audio Problems ...49 Having the Projector Serviced...50 Specifications ...52 Projection Distance V.S. Projection Size...52 Timing Mode Table...53 Projector Dimensions ...57 Regulatory Compliance ...58 FCC Warning...58 Canada...58 Safety Certifications...58 EN 55022 Warning ...58 RoHS Compliant ...58 2
Table of Contents Image Problems ...48 Lamp Problems...48 Remote Control Problems...49 Audio Problems ...49 Having the Projector Serviced...50 Specifications ...52 Projection Distance V.S. Projection Size...52 Timing Mode Table...53 Projector Dimensions ...57 Regulatory Compliance ...58 FCC Warning...58 Canada...58 Safety Certifications...58 EN 55022 Warning ...58 RoHS Compliant ...58 2
User's Manual
Page 3
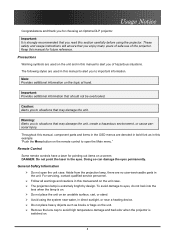
...not look into the lens when the lamp is strongly recommended that you read this manual to alert you to alert you for choosing an Optoma DLP projector. Do not place the unit on . 3 Avoid using the projector. The projection lamp is switched on an unstable surface,...damage and bad odor when the projector is extremely bright by design. Precautions Warning symbols are no user-serviceable parts in the unit. Remote Control Some remote controls have a laser for future reference. Note: Provides additional information on a screen. Aside from the projection lamp, there are used...
...not look into the lens when the lamp is strongly recommended that you read this manual to alert you to alert you for choosing an Optoma DLP projector. Do not place the unit on . 3 Avoid using the projector. The projection lamp is switched on an unstable surface,...damage and bad odor when the projector is extremely bright by design. Precautions Warning symbols are no user-serviceable parts in the unit. Remote Control Some remote controls have a laser for future reference. Note: Provides additional information on a screen. Aside from the projection lamp, there are used...

User's Manual
Page 4
... the lamp: Unplug the power cord. Recycle or dispose in the European Union. If you wish to dispose of properly. Remove the batteries from the remote control when storing or not in use the supplied power cord. Important Recycle Instructions: Lamp(s) inside this product is only valid in accordance with local...
... the lamp: Unplug the power cord. Recycle or dispose in the European Union. If you wish to dispose of properly. Remove the batteries from the remote control when storing or not in use the supplied power cord. Important Recycle Instructions: Lamp(s) inside this product is only valid in accordance with local...
User's Manual
Page 6
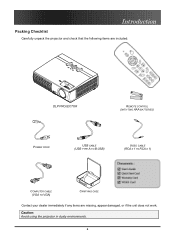
Packing Checklist Introduction Introduction Carefully unpack the projector and check that the following items are included: DLP PROJECTOR REMOTE CONTROL (WITH TWO AAA BATTERIES) POWER CORD USB CABLE (USB TYPE A TO B USB) VIDEO CABLE (RCA X 1 TO RCA X 1) COMPUTER CABLE (VGA TO VGA) CARRYING CASE Contact your dealer immediately if any items are missing, appear damaged, or if the unit does not work. Caution: Avoid using the projector in dusty environments. 6
Packing Checklist Introduction Introduction Carefully unpack the projector and check that the following items are included: DLP PROJECTOR REMOTE CONTROL (WITH TWO AAA BATTERIES) POWER CORD USB CABLE (USB TYPE A TO B USB) VIDEO CABLE (RCA X 1 TO RCA X 1) COMPUTER CABLE (VGA TO VGA) CARRYING CASE Contact your dealer immediately if any items are missing, appear damaged, or if the unit does not work. Caution: Avoid using the projector in dusty environments. 6

User's Manual
Page 7
Ventilation opening 7. Lens Adjust focus/zoom on the projector allow for IR signal from remote control 6. Focus Focuses the projected image 8. Zoom Enlarges the projected image 9. See "Top view-OSD buttons and LEDs" SEE PAGE: 20 11 21 8 Important: Ventilation ...
Ventilation opening 7. Lens Adjust focus/zoom on the projector allow for IR signal from remote control 6. Focus Focuses the projected image 8. Zoom Enlarges the projected image 9. See "Top view-OSD buttons and LEDs" SEE PAGE: 20 11 21 8 Important: Ventilation ...

User's Manual
Page 11
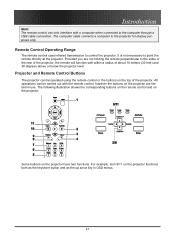
...high-frequency fluorescent lights can bounce the signal off certain reflective surfaces such as the corresponding buttons on the remote control. If the path between the remote control and the projector. LABEL IR transmitter DESCRIPTION Transmits signals to a PC 11 Up Up arrow when...2. This user's manual describes the functions based on the remote control. Status LED Lights when the remote control is obstructed, you can disrupt remote control operation. 2. Be sure nothing obstructs the path between the remote control and the projector is used 3. The buttons and keys...
...high-frequency fluorescent lights can bounce the signal off certain reflective surfaces such as the corresponding buttons on the remote control. If the path between the remote control and the projector. LABEL IR transmitter DESCRIPTION Transmits signals to a PC 11 Up Up arrow when...2. This user's manual describes the functions based on the remote control. Status LED Lights when the remote control is obstructed, you can disrupt remote control operation. 2. Be sure nothing obstructs the path between the remote control and the projector is used 3. The buttons and keys...
User's Manual
Page 13
...The projector can be carried out with a computer when connected to the computer through a USB cable connection. All operations can be operated using the remote control or the buttons on the top of about 10 meters (33 feet) and 30 degrees above or below the projector level. The computer cable...and as the up arrow key in use. Provided you are limited in OSD menus. 13 The following illustration shows the corresponding buttons on the remote control and on the projector have two functions. Some buttons on the projector. It is not necessary to the projector for display purposes only....
...The projector can be carried out with a computer when connected to the computer through a USB cable connection. All operations can be operated using the remote control or the buttons on the top of about 10 meters (33 feet) and 30 degrees above or below the projector level. The computer cable...and as the up arrow key in use. Provided you are limited in OSD menus. 13 The following illustration shows the corresponding buttons on the remote control and on the projector have two functions. Some buttons on the projector. It is not necessary to the projector for display purposes only....
User's Manual
Page 14
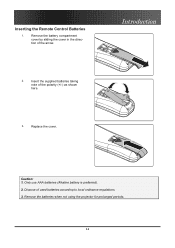
Only use AAA batteries (Alkaline battery is preferred). 2. Introduction 2. Remove the battery compartment cover by sliding the cover in the direction of used batteries according to local ordinance regulations. 3. Remove the batteries when not using the projector for prolonged periods. 14 Dispose of the arrow. Caution: 1. Insert the supplied batteries taking note of the polarity (+/-) as shown here. 3. Replace the cover. Inserting the Remote Control Batteries 1.
Only use AAA batteries (Alkaline battery is preferred). 2. Introduction 2. Remove the battery compartment cover by sliding the cover in the direction of used batteries according to local ordinance regulations. 3. Remove the batteries when not using the projector for prolonged periods. 14 Dispose of the arrow. Caution: 1. Insert the supplied batteries taking note of the polarity (+/-) as shown here. 3. Replace the cover. Inserting the Remote Control Batteries 1.
User's Manual
Page 21
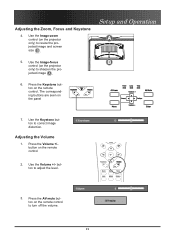
... correct image distortion. Press the Keystone button on the panel 7. button to sharpen the pro- Setup and Operation 5. The corresponding buttons are seen on the remote control. Press the Volume +/button on the projector only) to resize the projected image and screen size B . Press the AV mute button on the projector... adjust the level. 3. jected image A . 6. Use the Keystone button to turn off the volume. 21 Adjusting the Volume 1. Use the Image-zoom control (on the remote control 2. Adjusting the Zoom, Focus and Keystone 4. Use the Volume +/-
... correct image distortion. Press the Keystone button on the panel 7. button to sharpen the pro- Setup and Operation 5. The corresponding buttons are seen on the remote control. Press the Volume +/button on the projector only) to resize the projected image and screen size B . Press the AV mute button on the projector... adjust the level. 3. jected image A . 6. Use the Keystone button to turn off the volume. 21 Adjusting the Volume 1. Use the Image-zoom control (on the remote control 2. Adjusting the Zoom, Focus and Keystone 4. Use the Volume +/-

User's Manual
Page 22
...make changes to the OSD. Press to change the settings. For example, the Horizontal/Vertical Position items in the Setup menu can use the remote control arrow buttons or the buttons on the top of the projector to navigate and make image adjustments and change values for settings, and ... Press to close the OSD or exit a submenu. Press Menu to navigate through the menus. 3. The following illustration shows the corresponding buttons on the remote control and on the video source not all items in a menu. 4. Setup and Operation OSD Menu Controls The projector has an OSD that are not...
...make changes to the OSD. Press to change the settings. For example, the Horizontal/Vertical Position items in the Setup menu can use the remote control arrow buttons or the buttons on the top of the projector to navigate and make image adjustments and change values for settings, and ... Press to close the OSD or exit a submenu. Press Menu to navigate through the menus. 3. The following illustration shows the corresponding buttons on the remote control and on the video source not all items in a menu. 4. Setup and Operation OSD Menu Controls The projector has an OSD that are not...
User's Manual
Page 30
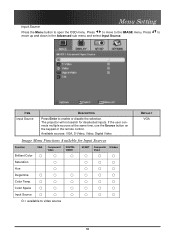
... to move to the IMAGE menu. If the user connects multiple sources at the same time, use the Source button on the keypad or the remote control. ITEM Input Source DESCRIPTION Press Enter to move up and down in the Advanced sub menu and select Input Source. Press to enable or...
... to move to the IMAGE menu. If the user connects multiple sources at the same time, use the Source button on the keypad or the remote control. ITEM Input Source DESCRIPTION Press Enter to move up and down in the Advanced sub menu and select Input Source. Press to enable or...
User's Manual
Page 48
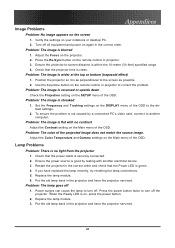
...Check the Projection setting on the projector. 2. Adjust the Focus on the SETUP menu of the OSD. Press the Re-Sync button on the remote control or projector to correct the problem. Problem: The image is blurred 1. Check that the power cable is streaked 1. If you have the... projector serviced. Problem: The lamp goes off the projector. Replace the lamp module. 3. Use the Keystone button on the remote control or projector. 3. To ensure the problem is within the 10-meter (33-feet) specified range. 4. Adjust the Color Temperature and Gamma settings ...
...Check the Projection setting on the projector. 2. Adjust the Focus on the SETUP menu of the OSD. Press the Re-Sync button on the remote control or projector to correct the problem. Problem: The image is blurred 1. Check that the power cable is streaked 1. If you have the... projector serviced. Problem: The lamp goes off the projector. Replace the lamp module. 3. Use the Keystone button on the remote control or projector. 3. To ensure the problem is within the 10-meter (33-feet) specified range. 4. Adjust the Color Temperature and Gamma settings ...
User's Manual
Page 49
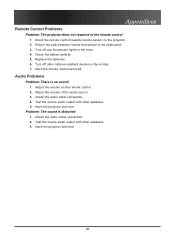
... 4. Replace the batteries. 6. Check the audio cable connection. 2. Appendices Remote Control Problems Problem: The projector does not respond to the remote control 1. Direct the remote control towards remote sensor on the remote control. 2. Test the source audio output with other speakers. 5. Turn ...off any fluorescent lights in the vicinity. 7. Have the remote control serviced. Audio Problems Problem: There is not obstructed. 3. Have the projector serviced. Ensure the path between remote and sensor is no sound 1. Adjust the volume on the projector. ...
... 4. Replace the batteries. 6. Check the audio cable connection. 2. Appendices Remote Control Problems Problem: The projector does not respond to the remote control 1. Direct the remote control towards remote sensor on the remote control. 2. Test the source audio output with other speakers. 5. Turn ...off any fluorescent lights in the vicinity. 7. Have the remote control serviced. Audio Problems Problem: There is not obstructed. 3. Have the projector serviced. Ensure the path between remote and sensor is no sound 1. Adjust the volume on the projector. ...
Datasheet
Page 1
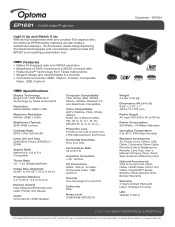
... 1.5 - 1.8:1 (Distance/Width) Image Size (Diagonal) 30.95" to 371.42" (.79 to 9.43 m) Projection Distance 3.9' to 39.4' (1.2 to 12.0 m) Remote Control Fully Featured IR Remote with today's widescreen laptops. PAL (B, D, G, H, I /O Connectors HDMI, VGA-In, S-Video, Composite Video, USB, Audio-In Security One Kensington® Lock Port... Multimedia Projector Light It Up and Match It Up With its high brightness level and a native 16:9 aspect ratio, the Optoma EP1691 easily matches up with Laser Pointer and Mouse Audio One Internal 1-Watt Speaker Computer Compatibility VGA, SVGA, XGA, WXGA, SXGA...
... 1.5 - 1.8:1 (Distance/Width) Image Size (Diagonal) 30.95" to 371.42" (.79 to 9.43 m) Projection Distance 3.9' to 39.4' (1.2 to 12.0 m) Remote Control Fully Featured IR Remote with today's widescreen laptops. PAL (B, D, G, H, I /O Connectors HDMI, VGA-In, S-Video, Composite Video, USB, Audio-In Security One Kensington® Lock Port... Multimedia Projector Light It Up and Match It Up With its high brightness level and a native 16:9 aspect ratio, the Optoma EP1691 easily matches up with Laser Pointer and Mouse Audio One Internal 1-Watt Speaker Computer Compatibility VGA, SVGA, XGA, WXGA, SXGA...
Brochure
Page 2
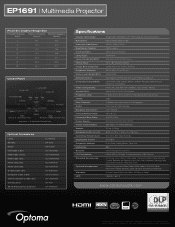
EP1691 | Multimedia Projector Projection Distance/Image Size Projection Distance (Feet) Maximum Diagonal (Inches) Minimum Diagonal (Inches) 6 55.1 45.9 8 73.4 61.2 10 91.8 76.5 12 110...: Maximum Resolution: Brightness (Typical): Contrast Ratio: Lamp Type: Lamp Life (Bright/STD): Throw Ratio: Image Size (Diagonal): Projection Distance: Noise Level (Bright/STD): Remote Control: Computer Compatibility: Video Compatibility: Aspect Ratio: Projection Lens: Offset: User Controls: Audio: Keystone Correction: Vertical Refresh Rate: Horizontal Scan Rate: Power Supply: Power Consumption...
EP1691 | Multimedia Projector Projection Distance/Image Size Projection Distance (Feet) Maximum Diagonal (Inches) Minimum Diagonal (Inches) 6 55.1 45.9 8 73.4 61.2 10 91.8 76.5 12 110...: Maximum Resolution: Brightness (Typical): Contrast Ratio: Lamp Type: Lamp Life (Bright/STD): Throw Ratio: Image Size (Diagonal): Projection Distance: Noise Level (Bright/STD): Remote Control: Computer Compatibility: Video Compatibility: Aspect Ratio: Projection Lens: Offset: User Controls: Audio: Keystone Correction: Vertical Refresh Rate: Horizontal Scan Rate: Power Supply: Power Consumption...


