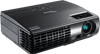
User's Manual
Page 1
... Menu Setting ...25 OSD Menu Overview ...25 OSD Sub-Menu Overview...26 Display Menu...31 Setup Menu ...34 Options Menu...38 Appendices ...41 Replacing the Projection Lamp ...41 Resetting the Lamp ...44 Cleaning the Projector ...45 Using the Kensington® Lock ...45 Common problems and solutions...46 Tips for Troubleshooting ...46 LED Error...
... Menu Setting ...25 OSD Menu Overview ...25 OSD Sub-Menu Overview...26 Display Menu...31 Setup Menu ...34 Options Menu...38 Appendices ...41 Replacing the Projection Lamp ...41 Resetting the Lamp ...44 Cleaning the Projector ...45 Using the Kensington® Lock ...45 Common problems and solutions...46 Tips for Troubleshooting ...46 LED Error...

User's Manual
Page 4
... local, state, or federal Laws. The recycling of foot traffic. Usage Notice Power Safety Only use for this procedure. Replacing the Lamp Replacing the lamp can be caused by inappropriate disposal of properly. If you wish to the environment and human health, which could otherwise be... period. Place the power cord where it will help prevent potential negative consequences to dispose of disposal. Before replacing the lamp: Unplug the power cord. Refer to "Replacing the Projection Lamp" on page 45. Do not place anything on page 58. 4 Important Recycle Instructions...
... local, state, or federal Laws. The recycling of foot traffic. Usage Notice Power Safety Only use for this procedure. Replacing the Lamp Replacing the lamp can be caused by inappropriate disposal of properly. If you wish to the environment and human health, which could otherwise be... period. Place the power cord where it will help prevent potential negative consequences to dispose of disposal. Before replacing the lamp: Unplug the power cord. Refer to "Replacing the Projection Lamp" on page 45. Do not place anything on page 58. 4 Important Recycle Instructions...
User's Manual
Page 40
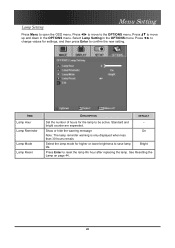
...lamp mode for the lamp to save lamp life. ITEM Lamp Hour Lamp Reminder Lamp Mode Lamp Reset DESCRIPTION DEFAULT Set the number of hours for higher or lower brightness to be active. Press to change values for settings, and then press Enter to reset the lamp life hour after replacing the lamp. Select Lamp... Setting in the OPTIONS menu. Standard and - Bright Press Enter to confirm the new setting. Lamp Setting Menu Setting Press Menu to the OPTIONS menu. Show or...
...lamp mode for the lamp to save lamp life. ITEM Lamp Hour Lamp Reminder Lamp Mode Lamp Reset DESCRIPTION DEFAULT Set the number of hours for higher or lower brightness to be active. Press to change values for settings, and then press Enter to reset the lamp life hour after replacing the lamp. Select Lamp... Setting in the OPTIONS menu. Standard and - Bright Press Enter to confirm the new setting. Lamp Setting Menu Setting Press Menu to the OPTIONS menu. Show or...
User's Manual
Page 41
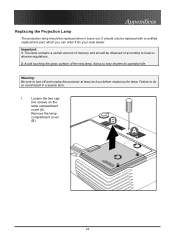
...in a severe burn. 1. Remove the lamp compartment cover (B). 41 Loosen the two captive screws on the lamp compartment cover (A). Failure to turn off and unplug the projector at least an hour before replacing the lamp. It should only be disposed of ...according to local ordinance regulations. 2. Important: 1. The lamp contains a certain amount of the new lamp, doing so may shorten its operation life. Replacing the Projection Lamp Appendices Appendices The projection lamp should be replaced with a certified replacement...
...in a severe burn. 1. Remove the lamp compartment cover (B). 41 Loosen the two captive screws on the lamp compartment cover (A). Failure to turn off and unplug the projector at least an hour before replacing the lamp. It should only be disposed of ...according to local ordinance regulations. 2. Important: 1. The lamp contains a certain amount of the new lamp, doing so may shorten its operation life. Replacing the Projection Lamp Appendices Appendices The projection lamp should be replaced with a certified replacement...

User's Manual
Page 43
Appendices 5. 4. Pull firmly on the module handle to replace the new lamp module. 43 Reverse steps 1 to 5 to remove the lamp module.
Appendices 5. 4. Pull firmly on the module handle to replace the new lamp module. 43 Reverse steps 1 to 5 to remove the lamp module.
User's Manual
Page 44
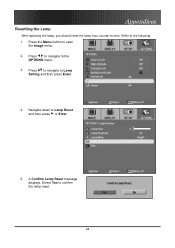
Press the Menu button to the OPTIONS menu. 3. Press to navigate to open the Image menu. 2. Select Yes to zero. A Confirm Lamp Reset message displays. Appendices Resetting the Lamp After replacing the lamp, you should reset the lamp hour counter to confirm the lamp reset. 44 Refer to Lamp Reset and then press or Enter. 5. Navigate down to the following: 1. Press to navigate to Lamp Setting and then press Enter. 4.
Press the Menu button to the OPTIONS menu. 3. Press to navigate to open the Image menu. 2. Select Yes to zero. A Confirm Lamp Reset message displays. Appendices Resetting the Lamp After replacing the lamp, you should reset the lamp hour counter to confirm the lamp reset. 44 Refer to Lamp Reset and then press or Enter. 5. Navigate down to the following: 1. Press to navigate to Lamp Setting and then press Enter. 4.
User's Manual
Page 48
... by a connected PC's video card, connect to another electrical device. 3. Restart the projector in the projector and have replaced the lamp recently, try resetting the lamp connections. 5. If you have the projector serviced. Press the Re-Sync button on the Main menu of the OSD. ...default settings. 2. Appendices Image Problems Problem: No image appears on the projector. 2. Position the projector so it is securely connected. 2. Replace the lamp module. 3. Use the Keystone button on the SETUP menu of the OSD. Check that the Power LED is streaked 1. Verify the ...
... by a connected PC's video card, connect to another electrical device. 3. Restart the projector in the projector and have replaced the lamp recently, try resetting the lamp connections. 5. If you have the projector serviced. Press the Re-Sync button on the Main menu of the OSD. ...default settings. 2. Appendices Image Problems Problem: No image appears on the projector. 2. Position the projector so it is securely connected. 2. Replace the lamp module. 3. Use the Keystone button on the SETUP menu of the OSD. Check that the Power LED is streaked 1. Verify the ...


