
User's Manual
Page 1
... Installation 11 Connecting the Projector 11 Connect to Computer/Notebook 11 Connect to Video Sources 12 Powering On/Off the Projector 13 Powering On the Projector 13 Powering Off the projector 14 Warning Indicator 14 ...Adjusting the Projected Image 15 Adjusting the Projector's Height 15 Adjusting the Projector's Zoom /... 38 Image Problems 38 Other Problems 39 Projector Status Indication 40 Remote Control Problems 41 Replacing the Lamp 42 Compatibility Modes 44 ...
... Installation 11 Connecting the Projector 11 Connect to Computer/Notebook 11 Connect to Video Sources 12 Powering On/Off the Projector 13 Powering On the Projector 13 Powering Off the projector 14 Warning Indicator 14 ...Adjusting the Projected Image 15 Adjusting the Projector's Height 15 Adjusting the Projector's Zoom /... 38 Image Problems 38 Other Problems 39 Projector Status Indication 40 Remote Control Problems 41 Replacing the Lamp 42 Compatibility Modes 44 ...
User's Manual
Page 2
...emissions limits This Class B digital apparatus meets all requirements of fire and/or electric shock, do not place the projector on to the projector. Projector has been exposed to constitute a risk of important operating and maintenance (servicing) instructions in the literature accompanying the appliance. To... from over heating, it has been physically damaged or abused. Do not use the projector near heat sources such as a book case or a cabinet that emits heat. 4. Please call Optoma before you to service the unit yourself. WARNING: TO REDUCE THE RISK OF FIRE ...
...emissions limits This Class B digital apparatus meets all requirements of fire and/or electric shock, do not place the projector on to the projector. Projector has been exposed to constitute a risk of important operating and maintenance (servicing) instructions in the literature accompanying the appliance. To... from over heating, it has been physically damaged or abused. Do not use the projector near heat sources such as a book case or a cabinet that emits heat. 4. Please call Optoma before you to service the unit yourself. WARNING: TO REDUCE THE RISK OF FIRE ...

User's Manual
Page 3
...described on the screen. Please contact your eyes. ▀■ Warning- Please do not expose this projector to cool down . ▀■ Warning- When switching the projector off, please ensure the cooling cycle has been completed before disconnecting power. The bright light may cause ...To replace the lamp, follow all warnings, precautions and maintenance as recommended in operation. ▀■ Warning- Allow 90 seconds for the projector to change the lamp when it shows warning messages. Noottee When the lamp reaches the end of its lifetime, the message "...
...described on the screen. Please contact your eyes. ▀■ Warning- Please do not expose this projector to cool down . ▀■ Warning- When switching the projector off, please ensure the cooling cycle has been completed before disconnecting power. The bright light may cause ...To replace the lamp, follow all warnings, precautions and maintenance as recommended in operation. ▀■ Warning- Allow 90 seconds for the projector to change the lamp when it shows warning messages. Noottee When the lamp reaches the end of its lifetime, the message "...

User's Manual
Page 5
Keep your back to the beam as much as possible. ▀■ When projector is used in a classroom, adequately supervise students when they are asked to point out something on the screen. ▀■ In order to minimize the lamp power, use room blinds to reduce ambient light levels. 5 English sage otice Eye Safety Warnings ▀■ Avoid staring/facing directly into the projector beam at all times.
Keep your back to the beam as much as possible. ▀■ When projector is used in a classroom, adequately supervise students when they are asked to point out something on the screen. ▀■ In order to minimize the lamp power, use room blinds to reduce ambient light levels. 5 English sage otice Eye Safety Warnings ▀■ Avoid staring/facing directly into the projector beam at all times.

User's Manual
Page 6
POWER SOURCE Noottee Due to ensure all parts listed below are in each country, some regions may have different accessories. 6 Projector with lens cap Power Cord 1.8m Lamp 2 × AAA Batteries IR Remote Control Documentation : User's Manual Warranty Card Quick Start Card WEEE Card (for EMEA only) ntroduction Package Overview Unpack and inspect the box contents to different applications in the box. If something is missing, please contact your nearest customer service center.
POWER SOURCE Noottee Due to ensure all parts listed below are in each country, some regions may have different accessories. 6 Projector with lens cap Power Cord 1.8m Lamp 2 × AAA Batteries IR Remote Control Documentation : User's Manual Warranty Card Quick Start Card WEEE Card (for EMEA only) ntroduction Package Overview Unpack and inspect the box contents to different applications in the box. If something is missing, please contact your nearest customer service center.
User's Manual
Page 9
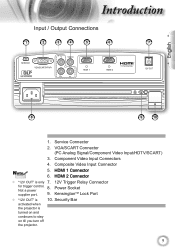
... Socket supplier port. 9. HDMI 2 Connector "12V OUT" is turned on and continues to stay on till you turn off the projector. 9 Not a power 8. Security Bar activated when the projector is only 7. 12V Trigger Relay Connector for trigger control. Component Video Input Connectors 4. KensingtonTM Lock Port "12V OUT" is 10. ntroduction...
... Socket supplier port. 9. HDMI 2 Connector "12V OUT" is turned on and continues to stay on till you turn off the projector. 9 Not a power 8. Security Bar activated when the projector is only 7. 12V Trigger Relay Connector for trigger control. Component Video Input Connectors 4. KensingtonTM Lock Port "12V OUT" is 10. ntroduction...
User's Manual
Page 11
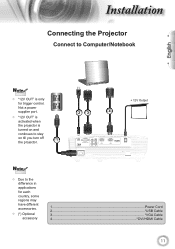
... to Computer/Notebook English Noottee "12V OUT" is turned on and continues to stay on till you turn off the projector. 1 MOLEX + 12V Output 23 4 SERVICE VGA/SCART/YPbPr Y VIDEO Pb Pr HDMI 1 HDMI 2 12V OUT E62405SP R Noottee Due ...to the difference in applications for trigger control. Not a power supplier port. "12V OUT" is activated when the projector is only for each country, some regions may have different accessories. (*) Optional accessory 1...Power Cord 2...*USB Cable 3 VGA Cable 4 DVI/HDMI Cable ...
... to Computer/Notebook English Noottee "12V OUT" is turned on and continues to stay on till you turn off the projector. 1 MOLEX + 12V Output 23 4 SERVICE VGA/SCART/YPbPr Y VIDEO Pb Pr HDMI 1 HDMI 2 12V OUT E62405SP R Noottee Due ...to the difference in applications for trigger control. Not a power supplier port. "12V OUT" is activated when the projector is only for each country, some regions may have different accessories. (*) Optional accessory 1...Power Cord 2...*USB Cable 3 VGA Cable 4 DVI/HDMI Cable ...
User's Manual
Page 12
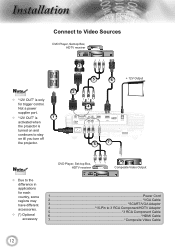
Not a power supplier port. "12V OUT" is 1 activated when the projector is only for each country, some regions may have different accessories. (*) Optional accessory DVD Player, Set-top Box, HDTV receiver Composite Video Output 1...Power ... Sources DVD Player, Set-top Box, HDTV receiver Noottee "12V OUT" is turned on and continues to stay on till you turn off the projector.
Not a power supplier port. "12V OUT" is 1 activated when the projector is only for each country, some regions may have different accessories. (*) Optional accessory DVD Player, Set-top Box, HDTV receiver Composite Video Output 1...Power ... Sources DVD Player, Set-top Box, HDTV receiver Noottee "12V OUT" is turned on and continues to stay on till you turn off the projector.

User's Manual
Page 13
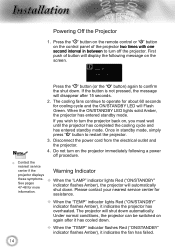
.... The ON/STANDBY LED will detect the source automatically. English nstallation Powering On/Off the Projector Powering On the Projector 1. Turn on the lamp by pressing " " button either on the top of the projector or on the projector first and then select the signal sources. 1 Lens Cap 13 The... projector will now turn Amber. 3. The first time you use the projector, you want to switch between inputs. Make sure that you ...
.... The ON/STANDBY LED will detect the source automatically. English nstallation Powering On/Off the Projector Powering On the Projector 1. Turn on the lamp by pressing " " button either on the top of the projector or on the projector first and then select the signal sources. 1 Lens Cap 13 The... projector will now turn Amber. 3. The first time you use the projector, you want to switch between inputs. Make sure that you ...
User's Manual
Page 14
... button is not pressed, the message will Flash Green. Do not turn off procedure. Contact the nearest service center if the projector displays Warning Indicator these symptoms. See pages 47-48 for more information. When the "LAMP" indicator lights Red ("ON/STANDBY"... indicator flashes Amber), the projector will shut down . The projector will automatically shut down . When the "TEMP" indicator flashes Red ("ON/STANDBY" indicator flashes Amber), it...
... button is not pressed, the message will Flash Green. Do not turn off procedure. Contact the nearest service center if the projector displays Warning Indicator these symptoms. See pages 47-48 for more information. When the "LAMP" indicator lights Red ("ON/STANDBY"... indicator flashes Amber), the projector will shut down . The projector will automatically shut down . When the "TEMP" indicator flashes Red ("ON/STANDBY" indicator flashes Amber), it...

User's Manual
Page 15
Tilt-Adjustment Feet Tilt-Adjustment Ring 15 Repeat with elevator feet for adjusting the image height. 1. English nstallation Adjusting the Projected Image Adjusting the Projector's Height The projector is equipped with the remaining feet as needed. Locate the adjustable foot you wish to lower it. Rotate the adjustable ring counter clockwise to raise the projector or clockwise to modify on the underside of the projector. 2.
Tilt-Adjustment Feet Tilt-Adjustment Ring 15 Repeat with elevator feet for adjusting the image height. 1. English nstallation Adjusting the Projected Image Adjusting the Projector's Height The projector is equipped with the remaining feet as needed. Locate the adjustable foot you wish to lower it. Rotate the adjustable ring counter clockwise to raise the projector or clockwise to modify on the underside of the projector. 2.
User's Manual
Page 16
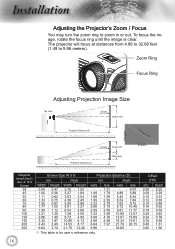
... 0.25 0.09 0.29 0.10 0.33 0.12 0.39 0.14 0.46 0.16 0.52 0.18 0.59 0.20 0.65 0.24 0.78 0.30 0.98 0.40 1.31 0.60 1.96 16 The projector will focus at distances from 4.89 to 32.68 feet (1.49 to zoom in or out. POWER nstallation Adjusting the...
... 0.25 0.09 0.29 0.10 0.33 0.12 0.39 0.14 0.46 0.16 0.52 0.18 0.59 0.20 0.65 0.24 0.78 0.30 0.98 0.40 1.31 0.60 1.96 16 The projector will focus at distances from 4.89 to 32.68 feet (1.49 to zoom in or out. POWER nstallation Adjusting the...

User's Manual
Page 17
RE-SYNC Automatically synchronize the projector to select an input signal. Enter Confirm your selection. Menu Press "Menu" to your item selection. Four Directional Select Keys Lamp LED Use ..., Press "Menu" again. Control Panel English SOURCE POWER Using the Control Panel Power Refer to control the functions: Control Panel and Remote Control. Indicate the projector's lamp status. ser ontrols Control Panel & Remote Control There are two ways for you to the "Power On/Off the...
RE-SYNC Automatically synchronize the projector to select an input signal. Enter Confirm your selection. Menu Press "Menu" to your item selection. Four Directional Select Keys Lamp LED Use ..., Press "Menu" again. Control Panel English SOURCE POWER Using the Control Panel Power Refer to control the functions: Control Panel and Remote Control. Indicate the projector's lamp status. ser ontrols Control Panel & Remote Control There are two ways for you to the "Power On/Off the...
User's Manual
Page 18
... parts of the image. Increase the brightness of the image to be displayed. Power Off Lamp Mode Mode 4:3 Refer to the "Power On/Off the Projector" section on page 13.
... parts of the image. Increase the brightness of the image to be displayed. Power Off Lamp Mode Mode 4:3 Refer to the "Power On/Off the Projector" section on page 13.

User's Manual
Page 19
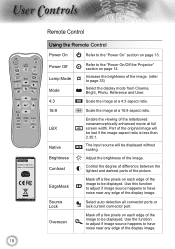
...to choose Component video source. Press "YPbPr" to choose source from HDMI 1 connector. Display or exit the on-screen display menus for projector. Press "Video" to your item selection. Four Directional Select Keys Use to select items or make adjustments to choose Composite video source.... Re-sync Menu HDMI 1 HDMI 2 D-Sub YPbPr Video Automatically synchronizes the projector to choose source from HDMI 2 connector. Press "HDMI 1" to the input source. English ser ontrols Remote Control Using the Remote ...
...to choose Component video source. Press "YPbPr" to choose source from HDMI 1 connector. Display or exit the on-screen display menus for projector. Press "Video" to your item selection. Four Directional Select Keys Use to select items or make adjustments to choose Composite video source.... Re-sync Menu HDMI 1 HDMI 2 D-Sub YPbPr Video Automatically synchronizes the projector to choose source from HDMI 2 connector. Press "HDMI 1" to the input source. English ser ontrols Remote Control Using the Remote ...
User's Manual
Page 20
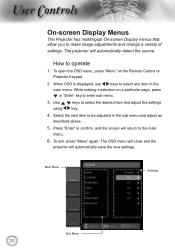
...select the desired item and adjust the settings key. 4. The OSD menu will close and the projector will automatically detect the source. ser ontrols On-screen Display Menus The Projector has multilingual On-screen Display menus that allow you to operate 1. Main Menu Settings Sub Menu ...20 How to make image adjustments and change a variety of settings. Select the next item to enter sub menu. 3. The projector will automatically save the new settings. To exit, press "Menu" again. To open the OSD menu, press "Menu" on a particular page, press...
...select the desired item and adjust the settings key. 4. The OSD menu will close and the projector will automatically detect the source. ser ontrols On-screen Display Menus The Projector has multilingual On-screen Display menus that allow you to operate 1. Main Menu Settings Sub Menu ...20 How to make image adjustments and change a variety of settings. Select the next item to enter sub menu. 3. The projector will automatically save the new settings. To exit, press "Menu" again. To open the OSD menu, press "Menu" on a particular page, press...
User's Manual
Page 29
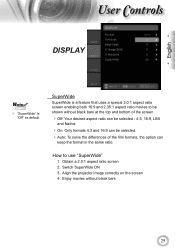
... be selected - 4:3, 16:9, LBX and Native. On: Only formats 4:3 and 16:9 can be shown without black bars 29 Obtain a 2.0:1 aspect ratio screen 2. Align the projector image correctly on the screen 4. English ser ontrols DISPLAY Noottee "SuperWide" is a feature that uses a special 2.0:1 aspect ratio screen enabling both 16:9 and 2.35...
... be selected - 4:3, 16:9, LBX and Native. On: Only formats 4:3 and 16:9 can be shown without black bars 29 Obtain a 2.0:1 aspect ratio screen 2. Align the projector image correctly on the screen 4. English ser ontrols DISPLAY Noottee "SuperWide" is a feature that uses a special 2.0:1 aspect ratio screen enabling both 16:9 and 2.35...
User's Manual
Page 32
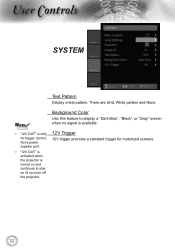
Not a power supplier port. "12V OUT" is activated when the projector is turned on till you turn off the projector. Background Color Use this feature to stay on and continues to display a "Dark Blue", "Black", or "Gray" screen when no signal is only for motorized screens. 32 There are Grid, White pattern and None. Noottee "12V OUT" is available. 12V Trigger 12V trigger provides a standard trigger for trigger control. ser ontrols SYSTEM Test Pattern Display a test pattern.
Not a power supplier port. "12V OUT" is activated when the projector is turned on till you turn off the projector. Background Color Use this feature to stay on and continues to display a "Dark Blue", "Black", or "Gray" screen when no signal is only for motorized screens. 32 There are Grid, White pattern and None. Noottee "12V OUT" is available. 12V Trigger 12V trigger provides a standard trigger for trigger control. ser ontrols SYSTEM Test Pattern Display a test pattern.
User's Manual
Page 34
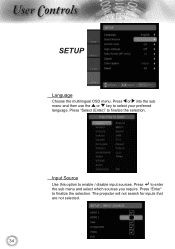
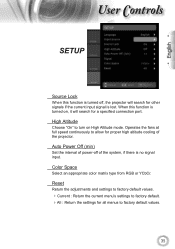
Press "Select (Enter)" to enter the sub menu and select which sources you require. Press to finalize the selection. Press "Enter" to select your preferred language. ser ontrols SETUP Language Choose the multilingual OSD menu. The projector will not search for inputs that are not selected. 34 Press or into the sub menu and then use the or key to finalize the selection. Input Source Use this option to enable / disable input sources.
Press "Select (Enter)" to enter the sub menu and select which sources you require. Press to finalize the selection. Press "Enter" to select your preferred language. ser ontrols SETUP Language Choose the multilingual OSD menu. The projector will not search for inputs that are not selected. 34 Press or into the sub menu and then use the or key to finalize the selection. Input Source Use this option to enable / disable input sources.
User's Manual
Page 35
..." to turn on , it will search for a specified connection port. Auto Power Off (min) Set the interval of power-off , the projector will search for other signals if the current input signal is lost. Operates the fans at full speed continuously to allow for all menus to... factory default. All : Return the settings for proper high altitude cooling of the projector. Reset Return the adjustments and settings to factory default values. Current : Return the current menu's settings to factory default values. 35 When...
..." to turn on , it will search for a specified connection port. Auto Power Off (min) Set the interval of power-off , the projector will search for other signals if the current input signal is lost. Operates the fans at full speed continuously to allow for all menus to... factory default. All : Return the settings for proper high altitude cooling of the projector. Reset Return the adjustments and settings to factory default values. Current : Return the current menu's settings to factory default values. 35 When...


