User's Manual
Page 1
... Projector 11 Connect to Computer/Notebook......... 11 Connect to Video Sources 12 Powering the projector On / Off.........13 Powering On the Projector 13 Powering off the projector... 14 Warning Indicator 14 Adjusting the Projected Image..........15 Adjusting the Projector's Height ........ 15 Adjusting the Projector... OPTIONS 38 OPTIONS | Advanced 39 OPTIONS | Lamp Settings 40 Appendices 41 Troubleshooting 41 Replacing the lamp 46 Compatibility Modes 48 Computer Compatibility 48 Video Compatibility...
... Projector 11 Connect to Computer/Notebook......... 11 Connect to Video Sources 12 Powering the projector On / Off.........13 Powering On the Projector 13 Powering off the projector... 14 Warning Indicator 14 Adjusting the Projected Image..........15 Adjusting the Projector's Height ........ 15 Adjusting the Projector... OPTIONS 38 OPTIONS | Advanced 39 OPTIONS | Lamp Settings 40 Appendices 41 Troubleshooting 41 Replacing the lamp 46 Compatibility Modes 48 Computer Compatibility 48 Video Compatibility...
User's Manual
Page 3
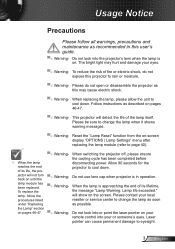
... been replaced. will detect the life of fire or electric shock, do not open or disassemble the projector as described on until the ▀■ Warning- Reset the "Lamp Reset" function from the on pages 46-47. ▀■ Warning- Allow 90 seconds for the... or someone's eyes. Usage Notice Precautions Please follow the procedures listed ▀■ Warning- This projector will show on your remote control into the projector's lens when the lamp is in this projector to rain or moisture. ▀■ Warning- Please be sure to eyesight. 3 English jector will...
... been replaced. will detect the life of fire or electric shock, do not open or disassemble the projector as described on until the ▀■ Warning- Reset the "Lamp Reset" function from the on pages 46-47. ▀■ Warning- Allow 90 seconds for the... or someone's eyes. Usage Notice Precautions Please follow the procedures listed ▀■ Warning- This projector will show on your remote control into the projector's lens when the lamp is in this projector to rain or moisture. ▀■ Warning- Please be sure to eyesight. 3 English jector will...

User's Manual
Page 5
Usage Notice Eye Safety Warnings ▀■ Avoid staring/facing directly into the projector beam at all times. Product Features Monitor loop through only support in VGA-In/ SCART/YPbPr. ▀■ SVGA (800x600) Native resolution / XGA (1024x768) ... to point out something on the screen. ▀■ In order to minimize the lamp power, use room blinds to reduce ambient light levels. Keep your back to the beam as much as possible. ▀■ When projector is used in speaker with 2 Watt amplifier ▀■ HDMI interface ▀■ Increase...
Usage Notice Eye Safety Warnings ▀■ Avoid staring/facing directly into the projector beam at all times. Product Features Monitor loop through only support in VGA-In/ SCART/YPbPr. ▀■ SVGA (800x600) Native resolution / XGA (1024x768) ... to point out something on the screen. ▀■ In order to minimize the lamp power, use room blinds to reduce ambient light levels. Keep your back to the beam as much as possible. ▀■ When projector is used in speaker with 2 Watt amplifier ▀■ HDMI interface ▀■ Increase...

User's Manual
Page 13
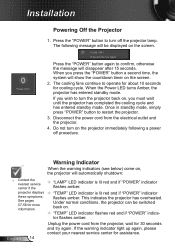
Remove the lens cap. 2. Securely connect the power cord and signal cable. Installation Powering the projector On / Off Powering On the Projector 1. When connected, the Power LED will turn Amber. 3. Turn on the lamp by pressing "POWER" button either on the When Power mode (Standby) is set to Eco (
Remove the lens cap. 2. Securely connect the power cord and signal cable. Installation Powering the projector On / Off Powering On the Projector 1. When connected, the Power LED will turn Amber. 3. Turn on the lamp by pressing "POWER" button either on the When Power mode (Standby) is set to Eco (
User's Manual
Page 14
...after 15 seconds. If you must wait until the projector has completed the cooling cycle and has entered standby mode. Disconnect the power cord from the projector, wait for cooling cycle. Do not turn off the projector lamp. English 14 Unplug the power cord from the electrical... outlet and the projector. 4. The following a power off the projector 1. If the warning indicator light up again, ...
...after 15 seconds. If you must wait until the projector has completed the cooling cycle and has entered standby mode. Disconnect the power cord from the projector, wait for cooling cycle. Do not turn off the projector lamp. English 14 Unplug the power cord from the electrical... outlet and the projector. 4. The following a power off the projector 1. If the warning indicator light up again, ...
User's Manual
Page 18
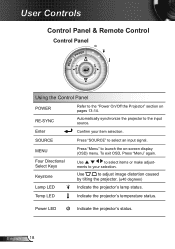
... to your item selection. English 18 Enter Confirm your selection. ments to adjust image distortion caused by tilting the projector. (±40 degrees) Indicate the projector's lamp status. MENU Four Directional Select Keys Keystone Lamp LED Press "Menu" to select an input signal. SOURCE Press "SOURCE" to launch the on pages 13-14. User...
... to your item selection. English 18 Enter Confirm your selection. ments to adjust image distortion caused by tilting the projector. (±40 degrees) Indicate the projector's lamp status. MENU Four Directional Select Keys Keystone Lamp LED Press "Menu" to select an input signal. SOURCE Press "SOURCE" to launch the on pages 13-14. User...

User's Manual
Page 23
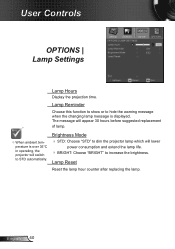
...Projector ID Mute Volume Advanced Source Lock High Altitude Information Hide Keypad Lock Background Color Test Pattern Advanced Lamp Settings Reset Logo Logo Capture Closed Captioning Exit Direct Power On Auto Power Off (min.) Sleep Timer (min.) Power Mode (Standby) Exit Lamp Hours Lamp Reminder Brightness Mode Lamp Reset Exit Settings 0~99 On / Off 0~10 Optoma... / No Please note that the on-screen display (OSD) menus vary according to the signal type selected and the projector model you are using. (#1) "Color" and "Tint" are only supported in Video mode. (#2) For ...
...Projector ID Mute Volume Advanced Source Lock High Altitude Information Hide Keypad Lock Background Color Test Pattern Advanced Lamp Settings Reset Logo Logo Capture Closed Captioning Exit Direct Power On Auto Power Off (min.) Sleep Timer (min.) Power Mode (Standby) Exit Lamp Hours Lamp Reminder Brightness Mode Lamp Reset Exit Settings 0~99 On / Off 0~10 Optoma... / No Please note that the on-screen display (OSD) menus vary according to the signal type selected and the projector model you are using. (#1) "Color" and "Tint" are only supported in Video mode. (#2) For ...
User's Manual
Page 40
... counter after replacing the lamp. Brightness Mode STD: Choose "STD" to dim the projector lamp which will switch to STD automatically. User Controls OPTIONS | Lamp Settings Lamp Hours Display the projection time. Lamp Reminder Choose this function to show or to increase ...the brightness. English 40 The message will appear 30 hours before suggested replacement of lamp. &#...
... counter after replacing the lamp. Brightness Mode STD: Choose "STD" to dim the projector lamp which will switch to STD automatically. User Controls OPTIONS | Lamp Settings Lamp Hours Display the projection time. Lamp Reminder Choose this function to show or to increase ...the brightness. English 40 The message will appear 30 hours before suggested replacement of lamp. &#...
User's Manual
Page 41
...the "Installation" section. Ensure all the pins of connectors are using a PC: For Windows 95, 98, 2000, XP, Windows 7: 1. If the projector is lower than or equal to the following information. Refer to UXGA (1600 × 1200). 6. Select the "Settings" tab. 3. Click on the "Display" ...icon. 2. Please refer to the "Replacing the lamp" section. Make sure you have removed the lens cap and the projector is switched on . Open the "My Computer" icon, the "Control Panel" folder, and then double click on the ...
...the "Installation" section. Ensure all the pins of connectors are using a PC: For Windows 95, 98, 2000, XP, Windows 7: 1. If the projector is lower than or equal to the following information. Refer to UXGA (1600 × 1200). 6. Select the "Settings" tab. 3. Click on the "Display" ...icon. 2. Please refer to the "Replacing the lamp" section. Make sure you have removed the lens cap and the projector is switched on . Open the "My Computer" icon, the "Control Panel" folder, and then double click on the ...

User's Manual
Page 44
...(Input power cord) Power on until the lamp module has been replaced. Appendices The projector stops responding to all controls If possible, turn on (Warming) Power LED (Green/Amber) Amber Flashing Green Lamp lighting Green Power off the projector, then unplug the power cord and wait ... by trying to control the projector with the remote control. If this happens, the projector will burn out and may make a loud popping sound. To replace the lamp, follow the procedures in the "Replacing the Lamp" section on pages 46-47. English 44 Lamp burns out or makes a popping...
...(Input power cord) Power on until the lamp module has been replaced. Appendices The projector stops responding to all controls If possible, turn on (Warming) Power LED (Green/Amber) Amber Flashing Green Lamp lighting Green Power off the projector, then unplug the power cord and wait ... by trying to control the projector with the remote control. If this happens, the projector will burn out and may make a loud popping sound. To replace the lamp, follow the procedures in the "Replacing the Lamp" section on pages 46-47. English 44 Lamp burns out or makes a popping...
User's Manual
Page 45
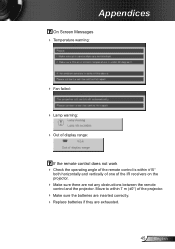
...Temperature warning: Fan failed: Lamp warning: Out of display range: If the remote control does not work Check the operating angle of the remote control is within 7 m (±0°) of the IR receivers on the projector. Make sure there are exhausted. 45... English Move to within ±15° both horizontally and vertically of one of the projector. Make sure the batteries are inserted correctly. Replace ...
...Temperature warning: Fan failed: Lamp warning: Out of display range: If the remote control does not work Check the operating angle of the remote control is within 7 m (±0°) of the IR receivers on the projector. Make sure there are exhausted. 45... English Move to within ±15° both horizontally and vertically of one of the projector. Make sure the batteries are inserted correctly. Replace ...

User's Manual
Page 46
... be used to wear safety glasses if changing the bulb when ceiling mounted. Make sure the projector has been cooled down before changing the lamp. Warning: To reduce the risk of use caution when opening the lamp access panel. When the lamp life is nearing the end of personal injury, do not drop the...
... be used to wear safety glasses if changing the bulb when ceiling mounted. Make sure the projector has been cooled down before changing the lamp. Warning: To reduce the risk of use caution when opening the lamp access panel. When the lamp life is nearing the end of personal injury, do not drop the...

User's Manual
Page 47
... the two screws on the projector and use "Lamp Reset" after the lamp module is replaced. Turn on the lamp module. 3 7. The screws on the lamp cover and the lamp cannot be removed. The projector cannot be turned on if the lamp cover has not been placed back on the cover. 1 5. Appendices 1 2 3 4 Lamp Replacement Procedure: 1. Disconnect the...
... the two screws on the projector and use "Lamp Reset" after the lamp module is replaced. Turn on the lamp module. 3 7. The screws on the lamp cover and the lamp cannot be removed. The projector cannot be turned on if the lamp cover has not been placed back on the cover. 1 5. Appendices 1 2 3 4 Lamp Replacement Procedure: 1. Disconnect the...

User's Manual
Page 54
Appendices ~XX100 1 7E 30 30 31 30 30 20 31 0D Source Lock On ~XX100 0 7E 30 30 31 30 30 20 30 0D Off ~XX100 3 7E 30 30 31 30 30 20 33 0D Next Source ~XX101 1 7E 30 30 31 30 31 20 31 0D High Altitude On ~XX101 0 7E 30 30 31 30 31 20 30 0D Off ~XX102 1 7E 30 30 31 30 32 20 31 0D Information Hide On ~XX102 0 7E 30 30 31 30 32 20 30 0D Off ~XX103 1 7E 30 30 31 30 33 20 31 0D Keypad Lock On ~XX103 0 7E 30 30 31 30 33 20 30 0D Off ~XX104 1 7E 30 30 31 30 34 20 31 0D Background Color Blue ~XX104 2 7E 30 30 31 30 34 20 32 0D Black ~XX104 3 7E 30 30 31 30 34 ...
Appendices ~XX100 1 7E 30 30 31 30 30 20 31 0D Source Lock On ~XX100 0 7E 30 30 31 30 30 20 30 0D Off ~XX100 3 7E 30 30 31 30 30 20 33 0D Next Source ~XX101 1 7E 30 30 31 30 31 20 31 0D High Altitude On ~XX101 0 7E 30 30 31 30 31 20 30 0D Off ~XX102 1 7E 30 30 31 30 32 20 31 0D Information Hide On ~XX102 0 7E 30 30 31 30 32 20 30 0D Off ~XX103 1 7E 30 30 31 30 33 20 31 0D Keypad Lock On ~XX103 0 7E 30 30 31 30 33 20 30 0D Off ~XX104 1 7E 30 30 31 30 34 20 31 0D Background Color Blue ~XX104 2 7E 30 30 31 30 34 20 32 0D Black ~XX104 3 7E 30 30 31 30 34 ...

Protocol Function
Page 4
Appendices ~XX100 1 7E 30 30 31 30 30 20 31 0D Source Lock On ~XX100 0 7E 30 30 31 30 30 20 30 0D Off ~XX100 3 7E 30 30 31 30 30 20 33 0D Next Source ~XX101 1 7E 30 30 31 30 31 20 31 0D High Altitude On ~XX101 0 7E 30 30 31 30 31 20 30 0D Off ~XX102 1 7E 30 30 31 30 32 20 31 0D Information Hide On ~XX102 0 7E 30 30 31 30 32 20 30 0D Off ~XX103 1 7E 30 30 31 30 33 20 31 0D Keypad Lock On ~XX103 0 7E 30 30 31 30 33 20 30 0D Off ~XX104 1 7E 30 30 31 30 34 20 31 0D Background Color Blue ~XX104 2 7E 30 30 31 30 34 20 32 0D Black ~XX104 3 7E 30 30 31 30 34 ...
Appendices ~XX100 1 7E 30 30 31 30 30 20 31 0D Source Lock On ~XX100 0 7E 30 30 31 30 30 20 30 0D Off ~XX100 3 7E 30 30 31 30 30 20 33 0D Next Source ~XX101 1 7E 30 30 31 30 31 20 31 0D High Altitude On ~XX101 0 7E 30 30 31 30 31 20 30 0D Off ~XX102 1 7E 30 30 31 30 32 20 31 0D Information Hide On ~XX102 0 7E 30 30 31 30 32 20 30 0D Off ~XX103 1 7E 30 30 31 30 33 20 31 0D Keypad Lock On ~XX103 0 7E 30 30 31 30 33 20 30 0D Off ~XX104 1 7E 30 30 31 30 34 20 31 0D Background Color Blue ~XX104 2 7E 30 30 31 30 34 20 32 0D Black ~XX104 3 7E 30 30 31 30 34 ...
Datasheet
Page 1
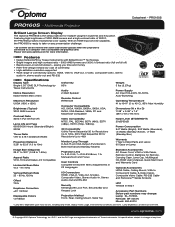
... (800 x 600) Maximum Resolution UXGA (1600 x 1200) Brightness (Typical) 3000 ANSI Lumens Contrast Ratio 3000:1 (Full On/Full Off) Lamp Life and Type 6000/3000 Hours (Standard/Bright) 200W Throw Ratio 1.95 to 2.15:1 (Distance/Width) Projection Distance 3.28' to 32....8-23.98mm, 1.1x Manual Zoom and Focus User Controls Complete On-Screen Menu Adjustments in business and education. PRO160S PRO160S − Multimedia Projector Brilliant Large Screen Display The Optoma PRO160S is ready to take on any presentation challenge. * 3D content can be viewed with BrilliantColor™ Technology ...
... (800 x 600) Maximum Resolution UXGA (1600 x 1200) Brightness (Typical) 3000 ANSI Lumens Contrast Ratio 3000:1 (Full On/Full Off) Lamp Life and Type 6000/3000 Hours (Standard/Bright) 200W Throw Ratio 1.95 to 2.15:1 (Distance/Width) Projection Distance 3.28' to 32....8-23.98mm, 1.1x Manual Zoom and Focus User Controls Complete On-Screen Menu Adjustments in business and education. PRO160S PRO160S − Multimedia Projector Brilliant Large Screen Display The Optoma PRO160S is ready to take on any presentation challenge. * 3D content can be viewed with BrilliantColor™ Technology ...
Brochure
Page 2
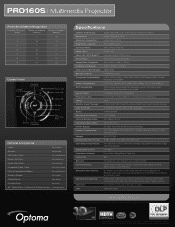
PRO160S | Multimedia Projector Projection Distance/Image Size Projection Distance (Feet) Maximum Diagonal (Inches) Minimum Diagonal (Inches) 6 42 38 8 56 51 10 71 64 12 85 77 14 99 90 16 113 102 18 127 115 Control Panel Power/ Standby Menu Keystone Correction Source Keystone Correction Power LED Lamp... Pull-Down Screen: DS-3084PMG+ Specifications Display Technology: Resolution: Maximum Resolution: Brightness (Typical): Contrast Ratio: Lamp Type: Lamp Life (STD/Bright)*: Throw Ratio: Image Size (Diagonal): Projection Distance: Noise Level (STD/Bright): Remote ...
PRO160S | Multimedia Projector Projection Distance/Image Size Projection Distance (Feet) Maximum Diagonal (Inches) Minimum Diagonal (Inches) 6 42 38 8 56 51 10 71 64 12 85 77 14 99 90 16 113 102 18 127 115 Control Panel Power/ Standby Menu Keystone Correction Source Keystone Correction Power LED Lamp... Pull-Down Screen: DS-3084PMG+ Specifications Display Technology: Resolution: Maximum Resolution: Brightness (Typical): Contrast Ratio: Lamp Type: Lamp Life (STD/Bright)*: Throw Ratio: Image Size (Diagonal): Projection Distance: Noise Level (STD/Bright): Remote ...


