
User's Manual
Page 3
... Safety Instructions GB2-3 Your Projector GB-4 About Your Projector GB-4 Connecting Your Projector GB4-5 Connecting a Computer GB-5 Connecting a DVD Player GB-5 Using Your Projector GB6-11 Turning Your Projector ON GB-6 Turning Your Projector OFF GB-6 Adjusting the Projector Focus GB-6 Adjusting Projection Image Size GB-7 Adjusting the Angle GB-7 Using the Control Panel GB-8 Using the On-Screen Display GB-8 Menu Operation GB9-11 Audio GB-11 Troubleshooting Your Projector GB-12 PACKAGE CONTENTS Your projector comes with all the items. 1. AC Adapter 3.
... Safety Instructions GB2-3 Your Projector GB-4 About Your Projector GB-4 Connecting Your Projector GB4-5 Connecting a Computer GB-5 Connecting a DVD Player GB-5 Using Your Projector GB6-11 Turning Your Projector ON GB-6 Turning Your Projector OFF GB-6 Adjusting the Projector Focus GB-6 Adjusting Projection Image Size GB-7 Adjusting the Angle GB-7 Using the Control Panel GB-8 Using the On-Screen Display GB-8 Menu Operation GB9-11 Audio GB-11 Troubleshooting Your Projector GB-12 PACKAGE CONTENTS Your projector comes with all the items. 1. AC Adapter 3.

User's Manual
Page 4
... all warnings. 4. IMPORTANT SAFETY INSTRUCTIONS WARNING TO PREVENT ELECTRIC SHOCK, IF THE UNIT IS PROVIDED WITH A POLARIZED PLUG, DO NOT CONNECT THE PLUG INTO AN EXTENSION CORD, RECEPTACLE, OR OTHER OUTLETS UNLESS THE PLUG CAN BE FULLY INSERTED WITH NO PART OF THE BLADES EXPOSED. The power rating of electric shock, do not remove cover (or back). No user serviceable parts inside...
... all warnings. 4. IMPORTANT SAFETY INSTRUCTIONS WARNING TO PREVENT ELECTRIC SHOCK, IF THE UNIT IS PROVIDED WITH A POLARIZED PLUG, DO NOT CONNECT THE PLUG INTO AN EXTENSION CORD, RECEPTACLE, OR OTHER OUTLETS UNLESS THE PLUG CAN BE FULLY INSERTED WITH NO PART OF THE BLADES EXPOSED. The power rating of electric shock, do not remove cover (or back). No user serviceable parts inside...

User's Manual
Page 5
... class B digital apparatus complies with Part 15 of the FCC Rules. Warning: Changes and modifications to this equipment does cause harmful interference to radio or television, which the receiver is connected. • Consult the dealer or an experienced radio / TV technician for help. NOTE : This equipment has been tested and found to comply with the instructions, may...
... class B digital apparatus complies with Part 15 of the FCC Rules. Warning: Changes and modifications to this equipment does cause harmful interference to radio or television, which the receiver is connected. • Consult the dealer or an experienced radio / TV technician for help. NOTE : This equipment has been tested and found to comply with the instructions, may...
User's Manual
Page 6
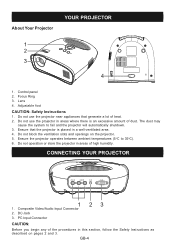
... this section, follow the Safety Instructions as described on the projector. 5. About Your Projector YOUR PROJECTOR 4 1. Composite Video/Audio Input Connector 2. Do not use the projector near appliances that the projector is an excessive amount of heat. 2. CONNECTING YOUR PROJECTOR 1. Lens 4. PC Input Connector CAUTION: Before you begin any of high humidity. Focus Ring 3. Do not block the ventilation slots and openings on pages 2 and 3. DC Jack 3. Control panel 2.
... this section, follow the Safety Instructions as described on the projector. 5. About Your Projector YOUR PROJECTOR 4 1. Composite Video/Audio Input Connector 2. Do not use the projector near appliances that the projector is an excessive amount of heat. 2. CONNECTING YOUR PROJECTOR 1. Lens 4. PC Input Connector CAUTION: Before you begin any of high humidity. Focus Ring 3. Do not block the ventilation slots and openings on pages 2 and 3. DC Jack 3. Control panel 2.
User's Manual
Page 8
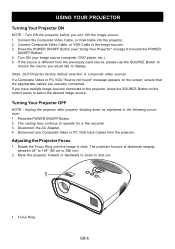
... fans continue to the image sources. 3. Rotate the Focus Ring until the image is different from the projector. Connect Composite Video Cable, or VGA Cable to operate for a few seconds. 3. If a Composite Video or PC VGA "Source not found" message appears on page 8 to locate the POWER ON/OFF Button). 4. Move the projector forward or backward to zoom in the following procedure. 1. USING YOUR PROJECTOR Turning Your Projector ON NOTE : Turn ON the projector before you have multiple image sources connected...
... fans continue to the image sources. 3. Rotate the Focus Ring until the image is different from the projector. Connect Composite Video Cable, or VGA Cable to operate for a few seconds. 3. If a Composite Video or PC VGA "Source not found" message appears on page 8 to locate the POWER ON/OFF Button). 4. Move the projector forward or backward to zoom in the following procedure. 1. USING YOUR PROJECTOR Turning Your Projector ON NOTE : Turn ON the projector before you have multiple image sources connected...
User's Manual
Page 9
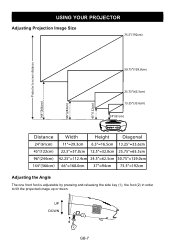
USING YOUR PROJECTOR Adjusting Projection Image Size Adjusting the Angle The one front foot is adjustable by pressing and releasing the side key (1), the foot (2) in order to tilt the projected image up or down. 1 2 GB-7
USING YOUR PROJECTOR Adjusting Projection Image Size Adjusting the Angle The one front foot is adjustable by pressing and releasing the side key (1), the foot (2) in order to tilt the projected image up or down. 1 2 GB-7
User's Manual
Page 10
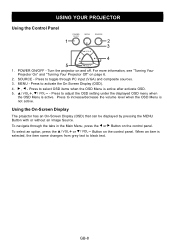
... 6. 2. For more information, see "Turning Your Projector On" and "Turning Your Projector Off" on and off. To navigate through PC input (VGA) and composite sources. 3. Using the On-Screen Display The projector has an On-Screen Display (OSD) that can be displayed by pressing the MENU Button with or without an Image Source. To select an option, press the or Button on the control panel. USING YOUR PROJECTOR Using the Control Panel 1. Press to select OSD...
... 6. 2. For more information, see "Turning Your Projector On" and "Turning Your Projector Off" on and off. To navigate through PC input (VGA) and composite sources. 3. Using the On-Screen Display The projector has an On-Screen Display (OSD) that can be displayed by pressing the MENU Button with or without an Image Source. To select an option, press the or Button on the control panel. USING YOUR PROJECTOR Using the Control Panel 1. Press to select OSD...
User's Manual
Page 11
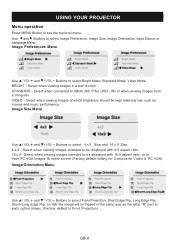
... / Wii or when viewing images from a computer. Image Preferences Menu Use and Buttons to be flipped in a well lit room. BRIGHT - Select when viewing images intended to select Bright Mode, Standard Mode, Video Mode. USING YOUR PROJECTOR Menu operation Press MENU Button to select Image Preference, Image Size, Image Orientation, Input Source, or Language Menu. Use and Buttons to see the top level menu. Select when connected to have PC VGA images fill entire screen (Factory default setting for Composite Video & PC VGA). Select when viewing images intended to be...
... / Wii or when viewing images from a computer. Image Preferences Menu Use and Buttons to be flipped in a well lit room. BRIGHT - Select when viewing images intended to select Bright Mode, Standard Mode, Video Mode. USING YOUR PROJECTOR Menu operation Press MENU Button to select Image Preference, Image Size, Image Orientation, Input Source, or Language Menu. Use and Buttons to see the top level menu. Select when connected to have PC VGA images fill entire screen (Factory default setting for Composite Video & PC VGA). Select when viewing images intended to be...
User's Manual
Page 12
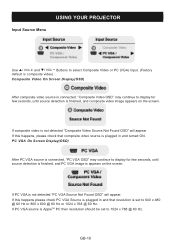
..., please check that resolution is finished, and composite video image appears on the screen. Input Source Menu USING YOUR PROJECTOR Use and Buttons to select Composite Video or PC (VGA) Input. (Factory default is composite video) Composite Video On Screen Display(OSD) After composite video source is connected, "Composite Video OSD" may continue to display for few seconds, until source detection is set to 1024 x 768 @ 60 Hz. GB-10 If PC VGA source is not detected "PC VGA Source Not Found...
..., please check that resolution is finished, and composite video image appears on the screen. Input Source Menu USING YOUR PROJECTOR Use and Buttons to select Composite Video or PC (VGA) Input. (Factory default is composite video) Composite Video On Screen Display(OSD) After composite video source is connected, "Composite Video OSD" may continue to display for few seconds, until source detection is set to 1024 x 768 @ 60 Hz. GB-10 If PC VGA source is not detected "PC VGA Source Not Found...
User's Manual
Page 13
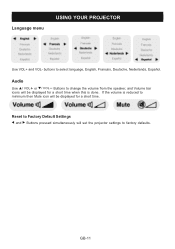
If the volume is reduced to Factory Default Settings and Buttons pressed simultaneously will be displayed for a short time when this is done. Reset to minimum then Mute icon will be displayed for a short time. GB-11 Audio Use or Buttons to change the volume from the speaker, and Volume bar icons will set the projector settings to select language, English, Francais, Deutsche, Nederlands, Español. buttons to factory defaults. Language menu USING YOUR PROJECTOR Use VOL+ and VOL-
If the volume is reduced to Factory Default Settings and Buttons pressed simultaneously will be displayed for a short time when this is done. Reset to minimum then Mute icon will be displayed for a short time. GB-11 Audio Use or Buttons to change the volume from the speaker, and Volume bar icons will set the projector settings to select language, English, Francais, Deutsche, Nederlands, Español. buttons to factory defaults. Language menu USING YOUR PROJECTOR Use VOL+ and VOL-
User's Manual
Page 14
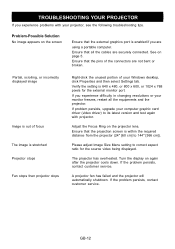
... the projector cools down. Please adjust Image Size Menu setting to correct aspect ratio for the external monitor port. A projector fan has failed and the projector will automatically shutdown. GB-12 Ensure that all the equipments and the projector. If problem persists, upgrade your computer graphic card driver (video driver) to 144" [366 cm]). Turn the display on page 5. Partial, scrolling, or incorrectly displayed image Image is out of focus The image is...
... the projector cools down. Please adjust Image Size Menu setting to correct aspect ratio for the external monitor port. A projector fan has failed and the projector will automatically shutdown. GB-12 Ensure that all the equipments and the projector. If problem persists, upgrade your computer graphic card driver (video driver) to 144" [366 cm]). Turn the display on page 5. Partial, scrolling, or incorrectly displayed image Image is out of focus The image is...
Datasheet
Page 1
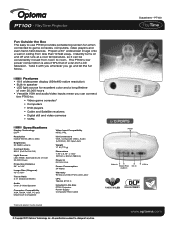
... Cable I/O PORTS Power Video-In Stereo RCA Audio-In DC-In VGA-In POWERED BY LED *Cable and adapters may be conveniently moved from less than 10 feet away. PlayTime Projector Datasheet - Take it can connect the PT100 to game consoles, computers, video players and even hand-held devices. www.optoma.com PT100 - Estimated Life of Over 20,000 Hours Projection Distance 24" to 144" Image Size (Diagonal) 10" to change at a cool temperature...
... Cable I/O PORTS Power Video-In Stereo RCA Audio-In DC-In VGA-In POWERED BY LED *Cable and adapters may be conveniently moved from less than 10 feet away. PlayTime Projector Datasheet - Take it can connect the PT100 to game consoles, computers, video players and even hand-held devices. www.optoma.com PT100 - Estimated Life of Over 20,000 Hours Projection Distance 24" to 144" Image Size (Diagonal) 10" to change at a cool temperature...


