

User Manual
Page 1
... Powering On the Projector 13 Powering Off the projector 14 Warning Indicator...14 Adjusting the Projected Image 15 Adjusting the Projector Image Height 15 Adjusting the Projector Zoom / Focus 16 Adjusting Projected Image Size 16 User Controls 17 Control Panel & Remote Control 17 On-Screen Display Menus 20 How to operate ...20 Menu Tree...21 Language...22 Management I...23 Management II...25 Image-I ...26 Image-II (Computer Mode / Video Mode 28 Colour Setting ...30 Appendices 31 Troubleshooting 31 Replacing the lamp 35 Compatibility Modes 36 Ceiling Mount Installation 37 Optoma...
... Powering On the Projector 13 Powering Off the projector 14 Warning Indicator...14 Adjusting the Projected Image 15 Adjusting the Projector Image Height 15 Adjusting the Projector Zoom / Focus 16 Adjusting Projected Image Size 16 User Controls 17 Control Panel & Remote Control 17 On-Screen Display Menus 20 How to operate ...20 Menu Tree...21 Language...22 Management I...23 Management II...25 Image-I ...26 Image-II (Computer Mode / Video Mode 28 Colour Setting ...30 Appendices 31 Troubleshooting 31 Replacing the lamp 35 Compatibility Modes 36 Ceiling Mount Installation 37 Optoma...

User Manual
Page 2
... the appliance. Opening or removing covers may block the ventilation openings. REFER SERVICING TO QUALIFIED PERSONNEL ONLY. Class B emissions limits This Class B digital apparatus meets all requirements of the Canadian Interference-Causing Equipment Regulations. Do not put the projector in any heat sources, such as they may touch dangerous voltage points or short-out parts that may keep air from overheating, put...
... the appliance. Opening or removing covers may block the ventilation openings. REFER SERVICING TO QUALIFIED PERSONNEL ONLY. Class B emissions limits This Class B digital apparatus meets all requirements of the Canadian Interference-Causing Equipment Regulations. Do not put the projector in any heat sources, such as they may touch dangerous voltage points or short-out parts that may keep air from overheating, put...

User Manual
Page 3
... bright light may make a loud popping sound. Do not use lens cap when projector is on the projector first and then the signal sources. Warning - To replace the lamp, follow all warnings, precautions and maintenance as this product to maximize the life of the lamp itself. This product will detect the life of your eyes. Warning - Reset the "Reset Lamp Hours" function from the On Screen Display "Management II" menu after replacing the lamp module...
... bright light may make a loud popping sound. Do not use lens cap when projector is on the projector first and then the signal sources. Warning - To replace the lamp, follow all warnings, precautions and maintenance as this product to maximize the life of the lamp itself. This product will detect the life of your eyes. Warning - Reset the "Reset Lamp Hours" function from the On Screen Display "Management II" menu after replacing the lamp module...

User Manual
Page 5
...-mounting the projector. ▀■ When projector is recommended to avoid the need for the user to enter the beam. ▀■ Ensure that , when presenters look at the audience, they are located out of the line of sight from the screen to stare at all times. ▀■ Minimize standing facing into the projector beam at the projector lamp...
...-mounting the projector. ▀■ When projector is recommended to avoid the need for the user to enter the beam. ▀■ Ensure that , when presenters look at the audience, they are located out of the line of sight from the screen to stare at all times. ▀■ Minimize standing facing into the projector beam at the projector lamp...

User Manual
Page 6
... chip Dark Chip2TM DLPTM technology NTSC/NTSC4.43/PAL/PAL-M/PAL-N/SECAM and HDTV compatible (480i/p, 576i/p, 720p, 1080i) Multi-Auto functions: Auto detection, Auto image and Auto saving the adjustments Full function remote control User friendly multilingual on screen display menu Advanced digital keystone correction and high quality full screen image re-scaling User friendly control panel SXGA compression and VGA, SVGA re-sizing Mac...
... chip Dark Chip2TM DLPTM technology NTSC/NTSC4.43/PAL/PAL-M/PAL-N/SECAM and HDTV compatible (480i/p, 576i/p, 720p, 1080i) Multi-Auto functions: Auto detection, Auto image and Auto saving the adjustments Full function remote control User friendly multilingual on screen display menu Advanced digital keystone correction and high quality full screen image re-scaling User friendly control panel SXGA compression and VGA, SVGA re-sizing Mac...

User Manual
Page 11
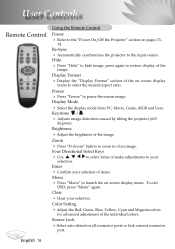
Re-Sync 2 4. Brightness 18. Zoom 19. Clear 18 5 8. Sleep Timer 17 9. Enter 13 8 16. S-Video Source 16 11. Color Setting 14. Four Directional Select Keys 12 9 17. Number Buttons 4 7. Source Lock 12. Hide 21. Keystone Correction 19 6. Video 10. Menu 14 7 15. Introduction Wireless Remote Control 1 21 1. Power 3. VGA Source 15 6 13. Display Format 20. IR LED 2. Freeze 11 10 11 English Display Mode 20 3 5.
Re-Sync 2 4. Brightness 18. Zoom 19. Clear 18 5 8. Sleep Timer 17 9. Enter 13 8 16. S-Video Source 16 11. Color Setting 14. Four Directional Select Keys 12 9 17. Number Buttons 4 7. Source Lock 12. Hide 21. Keystone Correction 19 6. Video 10. Menu 14 7 15. Introduction Wireless Remote Control 1 21 1. Power 3. VGA Source 15 6 13. Display Format 20. IR LED 2. Freeze 11 10 11 English Display Mode 20 3 5.
User Manual
Page 12
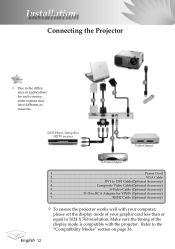
..., HDTV receiver RGB 7 32 6 4 5 1 Video Output S-Video Output 1...Power Cord 2...VGA Cable 3 DVI to DVI Cable(Optional Accessory) 4 Composite Video Cable(Optional Accessory) 5 S-Video Cable (Optional Accessory) 6 D-15 to 1024 X 768 resolution. Make sure the timing of your graphic card less than or equal to RCA Adapter for each country, some regions may have different accessories. English 12 Installation Connecting the Projector Due to the "Compatibility...
..., HDTV receiver RGB 7 32 6 4 5 1 Video Output S-Video Output 1...Power Cord 2...VGA Cable 3 DVI to DVI Cable(Optional Accessory) 4 Composite Video Cable(Optional Accessory) 5 S-Video Cable (Optional Accessory) 6 D-15 to 1024 X 768 resolution. Make sure the timing of your graphic card less than or equal to RCA Adapter for each country, some regions may have different accessories. English 12 Installation Connecting the Projector Due to the "Compatibility...

User Manual
Page 13
... you connect multiple sources at the same time, use the projector, you use the "Source" button on the control panel or remote control to switch. 2 Power/Standby Turn on your preferred language from quick menu after the startup screen display. 4. The projector will turn Green. The Power LED will Flash Green. 3. The first time you can select your source (computer, notebook, video player,etc.). Ensure that the power cord and signal cable are securely connected. Turn on the projector first and then the signal sources. Remove the lens cap...
... you connect multiple sources at the same time, use the projector, you use the "Source" button on the control panel or remote control to switch. 2 Power/Standby Turn on your preferred language from quick menu after the startup screen display. 4. The projector will turn Green. The Power LED will Flash Green. 3. The first time you can select your source (computer, notebook, video player,etc.). Ensure that the power cord and signal cable are securely connected. Turn on the projector first and then the signal sources. Remove the lens cap...

User Manual
Page 14
... the message will automatically shut itself down . Installation Powering off the projector lamp, you will see a message " " displayed on the projector's screen. Press the "Power/Standby" button to restart the projector. 3. Once in standby mode, simply press "Power/Standby" button to turn green. Warning Indicator When the "LAMP" indicator lights solid red, the projector will disappear after it indicates the fan failed. See page 38. When the "TEMP" indicator lights solid red for cooling cycle and the Power LED will turn off the projector 1. See...
... the message will automatically shut itself down . Installation Powering off the projector lamp, you will see a message " " displayed on the projector's screen. Press the "Power/Standby" button to restart the projector. 3. Once in standby mode, simply press "Power/Standby" button to turn green. Warning Indicator When the "LAMP" indicator lights solid red, the projector will disappear after it indicates the fan failed. See page 38. When the "TEMP" indicator lights solid red for cooling cycle and the Power LED will turn off the projector 1. See...

User Manual
Page 16
...) (563.5 x 422.6cm) Distance 4.9'(1.5m) 9.8'(3.0m) 16.4'(5.0m) 23.0'(7.0m) 26.3'(8.0m) 39.4'(12.0m) This graph is clear. English 16 To focus the image, rotate the focus ring until the image is for user's reference only. The projector will focus at distances from 4.9 to 39.4 feet (1.5 to zoom in or out. Installation Adjusting the Projector Zoom / Focus You may turn the zoom lever to 12.0 meters...
...) (563.5 x 422.6cm) Distance 4.9'(1.5m) 9.8'(3.0m) 16.4'(5.0m) 23.0'(7.0m) 26.3'(8.0m) 39.4'(12.0m) This graph is clear. English 16 To focus the image, rotate the focus ring until the image is for user's reference only. The projector will focus at distances from 4.9 to 39.4 feet (1.5 to zoom in or out. Installation Adjusting the Projector Zoom / Focus You may turn the zoom lever to 12.0 meters...

User Manual
Page 17
... to choose RGB, Component-p, Component-i, S- Source Press "Source" to control the functions: Remote Control and Control Panel. Keystone / Adjusts image distortion caused by tilting the projector (±15 degrees). Control Panel Using the Control Panel Power/Standby Refer to the "Power On/Off the Projector" section on screen display (OSD) menu. Enter Confirm your selection. To exit OSD, press "Menu" again. Menu Press "Menu" to the input source. 17 English Four Directional Select...
... to choose RGB, Component-p, Component-i, S- Source Press "Source" to control the functions: Remote Control and Control Panel. Keystone / Adjusts image distortion caused by tilting the projector (±15 degrees). Control Panel Using the Control Panel Power/Standby Refer to the "Power On/Off the Projector" section on screen display (OSD) menu. Enter Confirm your selection. To exit OSD, press "Menu" again. Menu Press "Menu" to the input source. 17 English Four Directional Select...
User Manual
Page 18
.... Four Directional Select Keys Use to select items or make adjustments to pause the screen image. Color Setting Adjust the Red, Green, Blue, Yellow, Cyan and Magenta colors for advanced adjustment of an image. Re-Sync Automatically synchronizes the projector to select the desired aspect ratio. Display Mode Select the display mode from PC, Movie, Game, sRGB and User. To exit OSD, press "Menu" again. Enter Confirm...
.... Four Directional Select Keys Use to select items or make adjustments to pause the screen image. Color Setting Adjust the Red, Green, Blue, Yellow, Cyan and Magenta colors for advanced adjustment of an image. Re-Sync Automatically synchronizes the projector to select the desired aspect ratio. Display Mode Select the display mode from PC, Movie, Game, sRGB and User. To exit OSD, press "Menu" again. Enter Confirm...

User Manual
Page 20
... displayed, use keys to enter sub menu. 3. Press "Menu " to operate 1. User Controls On Screen Display Menus The Projector has multilingual On Screen Display menus that allow you to select the desired item and adjust the settings by key. 4. While making a selection on the Remote Control or Control Panel. 2. The OSD menu will close and the projector will automatically save the new settings. Main Menu English 20 Sub Menu Setting How to confirm, and the screen...
... displayed, use keys to enter sub menu. 3. Press "Menu " to operate 1. User Controls On Screen Display Menus The Projector has multilingual On Screen Display menus that allow you to select the desired item and adjust the settings by key. 4. While making a selection on the Remote Control or Control Panel. 2. The OSD menu will close and the projector will automatically save the new settings. Main Menu English 20 Sub Menu Setting How to confirm, and the screen...

User Manual
Page 23
... be operated by the remote control. User Controls Management I Menu Location Choose the menu location on , the control panel will search for ceiling-mounted projection. Rear-Ceiling When you select this function is turned off . 23 English You can project from behind a translucent screen. Front-Ceiling When you can still be locked, but the projector can project behind a translucent screen with ceiling mounted projection. When this function, the projector reverses and turns the image upside down at same time. Source Lock...
... be operated by the remote control. User Controls Management I Menu Location Choose the menu location on , the control panel will search for ceiling-mounted projection. Rear-Ceiling When you select this function is turned off . 23 English You can project from behind a translucent screen. Front-Ceiling When you can still be locked, but the projector can project behind a translucent screen with ceiling mounted projection. When this function, the projector reverses and turns the image upside down at same time. Source Lock...
User Manual
Page 24
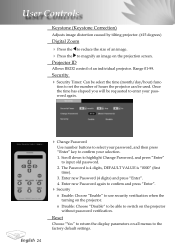
... password verification. Enter new Password (4 digits) and press "Enter". 4. The Password is 4 digits, DEFAULT VALUE is "0000" (first time). 3. Reset Choose "Yes" to return the display parameters on all menus to switch on the projector. ■ Disable: Choose "Disable" to be able to the factory default settings. User Controls Keystone (Keystone Correction) Adjusts image distortion caused by tilting projector. (±15 degrees) Digital Zoom Press the to reduce the size of hours the projector can be used...
... password verification. Enter new Password (4 digits) and press "Enter". 4. The Password is 4 digits, DEFAULT VALUE is "0000" (first time). 3. Reset Choose "Yes" to return the display parameters on all menus to switch on the projector. ■ Disable: Choose "Disable" to be able to the factory default settings. User Controls Keystone (Keystone Correction) Adjusts image distortion caused by tilting projector. (±15 degrees) Digital Zoom Press the to reduce the size of hours the projector can be used...

User Manual
Page 25
... high altitude cooling of life. Operates the fans at full speed continuously to hide the warning message when the changing lamp message is no signal being sent to turn on without a signal input. Then the projector will automatically power off then the sleep timer countdown has finished. 25 English Lamp Hours Displays the cumulative lamp operating time. The countdown timer will automatically power on Direct Power On mode. Sleep Timer Sets the countdown timer interval. Reset Lamp Hours Resets the lamp life hour counter after replacing the lamp. Then projector...
... high altitude cooling of life. Operates the fans at full speed continuously to hide the warning message when the changing lamp message is no signal being sent to turn on without a signal input. Then the projector will automatically power off then the sleep timer countdown has finished. 25 English Lamp Hours Displays the cumulative lamp operating time. The countdown timer will automatically power on Direct Power On mode. Sleep Timer Sets the countdown timer interval. Reset Lamp Hours Resets the lamp life hour counter after replacing the lamp. Then projector...

User Manual
Page 26
.... Movie: For home theater. sRGB: For standard color. User: Memorize user's settings. Adjust the color temperature. If you prefer a brighter image, adjust towards the minimum setting. User Controls Image-I (Computer Mode / Video Mode) Display Mode There are many factory presets optimized for various types of DMD chip. 0 stands for minimal peaking, and 10 stands for maximum peaking. At higher temperature, the screen looks colder; White Peaking Use the white peaking control to increase the contrast...
.... Movie: For home theater. sRGB: For standard color. User: Memorize user's settings. Adjust the color temperature. If you prefer a brighter image, adjust towards the minimum setting. User Controls Image-I (Computer Mode / Video Mode) Display Mode There are many factory presets optimized for various types of DMD chip. 0 stands for minimal peaking, and 10 stands for maximum peaking. At higher temperature, the screen looks colder; White Peaking Use the white peaking control to increase the contrast...

User Manual
Page 31
... projection lamp has been securely installed. Refer to change the monitor display you have removed the lens cap and the projector is switched on screen Ensure all the cables and power connections are correctly and securely connected as described in the Main group. 2. Verify the resolution setting is still not projecting the whole image, you will also need to the following information. Open the "My Computer" icon, the "Control Panel...
... projection lamp has been securely installed. Refer to change the monitor display you have removed the lens cap and the projector is switched on screen Ensure all the cables and power connections are correctly and securely connected as described in the Main group. 2. Verify the resolution setting is still not projecting the whole image, you will also need to the following information. Open the "My Computer" icon, the "Control Panel...
User Manual
Page 32
... focus Adjusts the Focus Ring on "Show all equipment including the projector. Each has a different way to correct it compatible with the product. Problem: Image has vertical flickering bar Use "Frequency" to make it . Change the monitor color setting from your computer's documentation for detailed information. Select the "Change" button under the SP box; choose the resolution mode you need under the "Models...
... focus Adjusts the Focus Ring on "Show all equipment including the projector. Each has a different way to correct it compatible with the product. Problem: Image has vertical flickering bar Use "Frequency" to make it . Change the monitor color setting from your computer's documentation for detailed information. Select the "Change" button under the SP box; choose the resolution mode you need under the "Models...

User Manual
Page 33
... will also need to adjust the aspect ratio by digitizing to full screen with 4:3 default setting. Problem: Image is still stretched, you can't select 4:3 aspect ratio type on screen menu. Problem: LED lighting message Message Standby State (Input power cord) Power-LED (GREEN/RED/ORANGE) Red Lamp lighting Flash Green Power on until the lamp module has been replaced. Appendices Steady light => No light => Make sure the projection screen is stretched when displaying 16:9 DVD The projector automatically detects 16:9 DVD and adjusts the aspect ratio by...
... will also need to adjust the aspect ratio by digitizing to full screen with 4:3 default setting. Problem: Image is still stretched, you can't select 4:3 aspect ratio type on screen menu. Problem: LED lighting message Message Standby State (Input power cord) Power-LED (GREEN/RED/ORANGE) Red Lamp lighting Flash Green Power on until the lamp module has been replaced. Appendices Steady light => No light => Make sure the projection screen is stretched when displaying 16:9 DVD The projector automatically detects 16:9 DVD and adjusts the aspect ratio by...


