
User Manual
Page 1
Table of Contents Table of Contents Table of Contents ...1 Usage Notice ...3 Introduction...6 Packing Checklist ...6 Views of Projector ...7 Remote Control...13 Remote Control Operating Range ...15 Projector and Remote Control Buttons...15 Inserting the Remote Control Batteries ...16 Setup and Operation...17 Connecting Input Devices...17 Starting and Shutting down the Projector ...19 Setting an Access Password (Security Lock) ...21...
Table of Contents Table of Contents Table of Contents ...1 Usage Notice ...3 Introduction...6 Packing Checklist ...6 Views of Projector ...7 Remote Control...13 Remote Control Operating Range ...15 Projector and Remote Control Buttons...15 Inserting the Remote Control Batteries ...16 Setup and Operation...17 Connecting Input Devices...17 Starting and Shutting down the Projector ...19 Setting an Access Password (Security Lock) ...21...

User Manual
Page 2
Table of Contents LED Error Messages ...45 Image Problems ...46 Lamp Problems...46 Remote Control Problems...47 Audio Problems ...47 Having the Projector Serviced...48 Specifications...49 Projection Distance V.S. Projection Size...49 Timing Mode Table...50 Projector Dimensions ...51 Regulatory Compliance...52 FCC Warning...52 Canada...52 Safety Certifications...52 EN 55022 Warning ...52 RoHS Compliant ...52 2
Table of Contents LED Error Messages ...45 Image Problems ...46 Lamp Problems...46 Remote Control Problems...47 Audio Problems ...47 Having the Projector Serviced...48 Specifications...49 Projection Distance V.S. Projection Size...49 Timing Mode Table...50 Projector Dimensions ...51 Regulatory Compliance...52 FCC Warning...52 Canada...52 Safety Certifications...52 EN 55022 Warning ...52 RoHS Compliant ...52 2

User Manual
Page 3
... parts in the unit. Important: Provides additional information that you read this manual and on the unit case. Remote Control Some remote controls have a laser for choosing an EP771 projector, an on Optoma product. Do not place the unit on the topic at hand. Aside from the projection lamp, there are ...are denoted in this manual for future reference. Do not place heavy objects such as in bold font as books or bags on the remote control to eyes, do not look into the lens when the lamp is strongly recommended that should not be overlooked. Note: Provides additional ...
... parts in the unit. Important: Provides additional information that you read this manual and on the unit case. Remote Control Some remote controls have a laser for choosing an EP771 projector, an on Optoma product. Do not place the unit on the topic at hand. Aside from the projection lamp, there are ...are denoted in this manual for future reference. Do not place heavy objects such as in bold font as books or bags on the remote control to eyes, do not look into the lens when the lamp is strongly recommended that should not be overlooked. Note: Provides additional ...

User Manual
Page 4
This product may contain other electronic waste that can be hazardous if done incorrectly. Remove the batteries from the remote control when storing or not in the way of properly. Before replacing the lamp: Unplug the power cord. Replacing the Lamp Replacing the lamp can be ...
This product may contain other electronic waste that can be hazardous if done incorrectly. Remove the batteries from the remote control when storing or not in the way of properly. Before replacing the lamp: Unplug the power cord. Replacing the Lamp Replacing the lamp can be ...

User Manual
Page 6
Caution: Avoid using the projector in dusty environments. 6 Introduction Packing Checklist Introduction Carefully unpack the projector and check that the following items are missing, appear damaged, or if the unit does not work. DB15) CARRYING CASE Contact your dealer immediately if any items are included: EP771 PROJECTOR REMOTE CONTROL (WITH TWO AAA BATTERIES) POWER CORD USB CABLE (USB TYPE A TO B USB) VIDEO CABLE (RCA X 1TO RCA X 1) Documents: User's Guide Quick Start Card Warranty Card COMPUTER CABLE (DB15 -
Caution: Avoid using the projector in dusty environments. 6 Introduction Packing Checklist Introduction Carefully unpack the projector and check that the following items are missing, appear damaged, or if the unit does not work. DB15) CARRYING CASE Contact your dealer immediately if any items are included: EP771 PROJECTOR REMOTE CONTROL (WITH TWO AAA BATTERIES) POWER CORD USB CABLE (USB TYPE A TO B USB) VIDEO CABLE (RCA X 1TO RCA X 1) Documents: User's Guide Quick Start Card Warranty Card COMPUTER CABLE (DB15 -

User Manual
Page 7
... Lens zoom Enlarges the projected image Screws Holds lamp to projector See "Top view-OSD buttons and LEDs" IR receiver Receiver for IR signal from remote control Lens Remove lens cap before use Height-adjuster but- Push to protect lens when not in use Lens cover Slide across to release height adjuster...
... Lens zoom Enlarges the projected image Screws Holds lamp to projector See "Top view-OSD buttons and LEDs" IR receiver Receiver for IR signal from remote control Lens Remove lens cap before use Height-adjuster but- Push to protect lens when not in use Lens cover Slide across to release height adjuster...
User Manual
Page 10
... computer's audio-out connector. Connect an audio cable (not supplied) from a computer 12V Connector Connect the 12V power outlet RS-232 Installation control 10 DVI-D Connect the computer cable from remote control. VGA IN Connect a VGA cable (supplied) from a computer VGA OUT Connect to a monitor S-video Connect the composite or S-video cable (supplied...
... computer's audio-out connector. Connect an audio cable (not supplied) from a computer 12V Connector Connect the 12V power outlet RS-232 Installation control 10 DVI-D Connect the computer cable from remote control. VGA IN Connect a VGA cable (supplied) from a computer VGA OUT Connect to a monitor S-video Connect the composite or S-video cable (supplied...

User Manual
Page 13
... the projector is used SEE PAGE: 13 This user's manual describes the functions based on . The buttons and keys on the remote control. Remote Control Introduction Important: 1. ITEM 1. 2. Certain high-frequency fluorescent lights can bounce the signal off certain reflective surfaces such as the corresponding buttons on the projector have ...
... the projector is used SEE PAGE: 13 This user's manual describes the functions based on . The buttons and keys on the remote control. Remote Control Introduction Important: 1. ITEM 1. 2. Certain high-frequency fluorescent lights can bounce the signal off certain reflective surfaces such as the corresponding buttons on the projector have ...

User Manual
Page 15
... above or below the projector level. however the buttons on -screen pointer. The following illustration shows the corresponding buttons on the remote control and on the projector have two functions. Some buttons on the projector. LABEL Left Enter Power Laser DESCRIPTION SEE PAGE: Left arrow... when connected through USB to a PC Enter key when connected through a USB cable connection. Projector and Remote Control Buttons The projector can only interface with the remote control; Provided you are limited in OSD menus. 15 DO NOT POINT IN EYES. For example, item 9/12 on...
... above or below the projector level. however the buttons on -screen pointer. The following illustration shows the corresponding buttons on the remote control and on the projector have two functions. Some buttons on the projector. LABEL Left Enter Power Laser DESCRIPTION SEE PAGE: Left arrow... when connected through USB to a PC Enter key when connected through a USB cable connection. Projector and Remote Control Buttons The projector can only interface with the remote control; Provided you are limited in OSD menus. 15 DO NOT POINT IN EYES. For example, item 9/12 on...

User Manual
Page 16
Only use AAA batteries.(Alkaline battery is better). 2. Insert the supplied batteries taking note of used batteries according to local ordinance regulations. 3. Introduction Caution: 1. Dispose of the polarity (+/-) as shown here. 3. Inserting the Remote Control Batteries 1. Remove the battery compartment cover by sliding the cover in the direction of the arrow. 2. Replace the cover. Remove the batteries when not using the projector for prolonged periods. 16
Only use AAA batteries.(Alkaline battery is better). 2. Insert the supplied batteries taking note of used batteries according to local ordinance regulations. 3. Introduction Caution: 1. Dispose of the polarity (+/-) as shown here. 3. Inserting the Remote Control Batteries 1. Remove the battery compartment cover by sliding the cover in the direction of the arrow. 2. Replace the cover. Remove the batteries when not using the projector for prolonged periods. 16

User Manual
Page 17
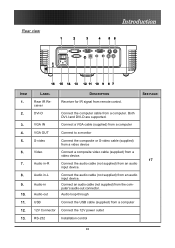
.... Audio-out Audio loop-through 17 Check the user manual of the connecting device to a monitor. Audio-in -L Connect the audio cable (not supplied) from remote control. Both DVI-I LABEL DESCRIPTION Rear IR Receiver for IR signal from an audio input device. VGA out Connect a VGA cable (supplied) to confirm it has...
.... Audio-out Audio loop-through 17 Check the user manual of the connecting device to a monitor. Audio-in -L Connect the audio cable (not supplied) from remote control. Both DVI-I LABEL DESCRIPTION Rear IR Receiver for IR signal from an audio input device. VGA out Connect a VGA cable (supplied) to confirm it has...

User Manual
Page 24
...to sharpen the projected image. Use the Image-focus control (on the projector only) to correct image distortion. Press the Volume +/button on the display. 2. Setup and Operation 4. The volume control appears on the remote control. Adjusting the Zoom, Focus and Keystone 1. Use... the Volume +/button to turn off the volume. 24 The keystone control appears on the remote control. A 3. Adjusting the Volume 1. Press the Mute button to...
...to sharpen the projected image. Use the Image-focus control (on the projector only) to correct image distortion. Press the Volume +/button on the display. 2. Setup and Operation 4. The volume control appears on the remote control. Adjusting the Zoom, Focus and Keystone 1. Use... the Volume +/button to turn off the volume. 24 The keystone control appears on the remote control. A 3. Adjusting the Volume 1. Press the Mute button to...

User Manual
Page 25
...through the menus. 3. Press Menu to the OSD. Press to change various settings. The following illustration shows the corresponding buttons on the remote control and on the top of the projector to navigate and make changes to close the OSD or leave a submenu. There are available. For... then press Enter or to move up and down in the Setup menu can use the remote control cursor buttons or the buttons on the projector. 2 5 6 41 6 5 1 4 2 3 3 1. Setup and Operation OSD Menu Controls The projector has an OSD that are not available cannot be modified when connected to a ...
...through the menus. 3. Press Menu to the OSD. Press to change various settings. The following illustration shows the corresponding buttons on the remote control and on the top of the projector to navigate and make changes to close the OSD or leave a submenu. There are available. For... then press Enter or to move up and down in the Setup menu can use the remote control cursor buttons or the buttons on the projector. 2 5 6 41 6 5 1 4 2 3 3 1. Setup and Operation OSD Menu Controls The projector has an OSD that are not available cannot be modified when connected to a ...

User Manual
Page 46
... problem is blurred 1. If you have the projector serviced. Replace the lamp module. 3. Appendices Image Problems Problem: No image appears on the remote control or projector to correct the problem. Problem: The image is not caused by testing with no light from the projector 1. Problem: The image is... 2. Verify the settings on the Main menu of the OSD. Press the power button twice to turn off 1. Adjust the Focus on the remote control or projector. 3. Press the Auto button on the projector. 2. Ensure the projector-to the screen as possible. 2. Check that the power ...
... problem is blurred 1. If you have the projector serviced. Replace the lamp module. 3. Appendices Image Problems Problem: No image appears on the remote control or projector to correct the problem. Problem: The image is not caused by testing with no light from the projector 1. Problem: The image is... 2. Verify the settings on the Main menu of the OSD. Press the power button twice to turn off 1. Adjust the Focus on the remote control or projector. 3. Press the Auto button on the projector. 2. Ensure the projector-to the screen as possible. 2. Check that the power ...

User Manual
Page 47
... batteries. 6. Adjust the volume of the audio source. 3. Check the battery polarity. 5. Have the projector serviced. 47 Have the remote control serviced. Problem: The sound is distorted 1. Direct the remote control towards remote sensor on the remote control. 2. Test the source audio output with other speakers. 3. Turn off any fluorescent lights in the vicinity. 7. Test the source...
... batteries. 6. Adjust the volume of the audio source. 3. Check the battery polarity. 5. Have the projector serviced. 47 Have the remote control serviced. Problem: The sound is distorted 1. Direct the remote control towards remote sensor on the remote control. 2. Test the source audio output with other speakers. 3. Turn off any fluorescent lights in the vicinity. 7. Test the source...


