User Manual
Page 1
... the Projector...16 Warning Indicator...16 Adjusting the Projected Image 17 Adjusting the Projector's Height...17 Adjusting the Zoom / Focus...18 User Controls...19 Control Panel...19 Remote Control...20 On-screen Display Menus...22 How to operate...22 Menu Tree...23 Image...24 Display...30 Setup...34 Options...42 Appendices...49 Troubleshooting...49 Image Problems...49 Intermission Problems...51 Projector Status Indication...52 Remote Control Problems...53 Audio Problems...53 Replacing the Lamp...54 Cleaning the Projector...55 Compatibility Modes...56 Ceiling Installation...59 Optoma Global...
... the Projector...16 Warning Indicator...16 Adjusting the Projected Image 17 Adjusting the Projector's Height...17 Adjusting the Zoom / Focus...18 User Controls...19 Control Panel...19 Remote Control...20 On-screen Display Menus...22 How to operate...22 Menu Tree...23 Image...24 Display...30 Setup...34 Options...42 Appendices...49 Troubleshooting...49 Image Problems...49 Intermission Problems...51 Projector Status Indication...52 Remote Control Problems...53 Audio Problems...53 Replacing the Lamp...54 Cleaning the Projector...55 Compatibility Modes...56 Ceiling Installation...59 Optoma Global...
User Manual
Page 2
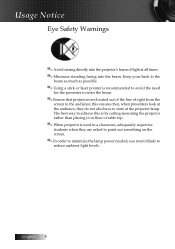
... projector has been damaged in a position and location that will not interfere with its ventilation openings. C. Do not install near water or moisture. To ensure reliable operation of import operating and maintenance (servicing) instructions in an enclosure, such as radiators, heaters, stoves or other apparatus (including amplifiers) that may keep air from overheating, put it from flowing through its proper ventilation. Clean...
... projector has been damaged in a position and location that will not interfere with its ventilation openings. C. Do not install near water or moisture. To ensure reliable operation of import operating and maintenance (servicing) instructions in an enclosure, such as radiators, heaters, stoves or other apparatus (including amplifiers) that may keep air from overheating, put it from flowing through its proper ventilation. Clean...
User Manual
Page 4
...; Warning - lamp, follow ▀■ Warning - Allow 90 seconds for the projector to rain or moisture. ▀■ Warning - Usage Notice Precautions Please follow all replacement instructions. When replacing the lamp, please allow unit to change the lamp when it shows warning ™™When the messages. Use the "Lamp Reset" function from the on the remote control and do not open or disassemble the projector as recommended in operation. Please...
...; Warning - lamp, follow ▀■ Warning - Allow 90 seconds for the projector to rain or moisture. ▀■ Warning - Usage Notice Precautions Please follow all replacement instructions. When replacing the lamp, please allow unit to change the lamp when it shows warning ™™When the messages. Use the "Lamp Reset" function from the on the remote control and do not open or disassemble the projector as recommended in operation. Please...
User Manual
Page 6
... table top. ▀■ When projector is by ceiling-mounting the projector rather than placing it on the screen. ▀■ In order to minimize the lamp power needed, use room blinds to reduce ambient light levels. this is used in a classroom, adequately supervise students when they do not also have to stare at all times. ▀■ Minimize standing facing...
... table top. ▀■ When projector is by ceiling-mounting the projector rather than placing it on the screen. ▀■ In order to minimize the lamp power needed, use room blinds to reduce ambient light levels. this is used in a classroom, adequately supervise students when they do not also have to stare at all times. ▀■ Minimize standing facing...
User Manual
Page 7
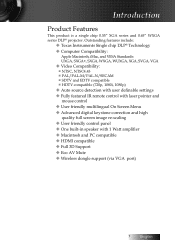
... remote control with laser pointer and mouse control u User friendly multilingual On Screen Menu u Advanced digital keystone correction and high quality full screen image re-scaling u User friendly control panel u One built-in speaker with 1 Watt amplifier u Macintosh and PC compatible u HDMI compatible u Full 3D Support u Eco AV Mute u Wireless dongle support (via VGA port) 7 English Introduction Product Features This product is a single chip 0.55" XGA series and 0.65" WXGA series DLP® projector...
... remote control with laser pointer and mouse control u User friendly multilingual On Screen Menu u Advanced digital keystone correction and high quality full screen image re-scaling u User friendly control panel u One built-in speaker with 1 Watt amplifier u Macintosh and PC compatible u HDMI compatible u Full 3D Support u Eco AV Mute u Wireless dongle support (via VGA port) 7 English Introduction Product Features This product is a single chip 0.55" XGA series and 0.65" WXGA series DLP® projector...
User Manual
Page 15
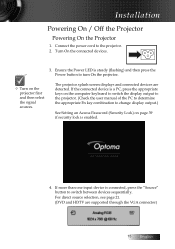
... to change display output.) See Setting an Access Password (Security Lock) on the projector first and then select the signal sources. For direct source selection, see page 21. (DVD and HDTV are detected. Turn On the connected devices. 3. Connect the power cord to turn On the projector. ™™Turn on page 39 if security lock is connected, press the "Source" button to switch between devices sequentially. Installation Powering On / Off the Projector Powering On the Projector...
... to change display output.) See Setting an Access Password (Security Lock) on the projector first and then select the signal sources. For direct source selection, see page 21. (DVD and HDTV are detected. Turn On the connected devices. 3. Connect the power cord to turn On the projector. ™™Turn on page 39 if security lock is connected, press the "Source" button to switch between devices sequentially. Installation Powering On / Off the Projector Powering On the Projector...

User Manual
Page 16
... blinks four (4) times, the projector will automatically shut itself down . Please contact your local dealer or our service center. v When the TEMP LED is on a steady (not flashing) red, the projector will automatically shut itself down. v When the LAMP LED is on a steady RED (not flashing), it has cooled down . Disconnect the power cord from the electrical outlet and the projector. 5. See pages 52. Do not turn off the projector lamp, a message displays...
... blinks four (4) times, the projector will automatically shut itself down . Please contact your local dealer or our service center. v When the TEMP LED is on a steady (not flashing) red, the projector will automatically shut itself down. v When the LAMP LED is on a steady RED (not flashing), it has cooled down . Disconnect the power cord from the electrical outlet and the projector. 5. See pages 52. Do not turn off the projector lamp, a message displays...

User Manual
Page 17
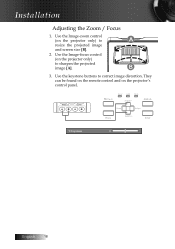
... setting up the projector: • The projector table or stand should be level and sturdy. • Position the projector so that it is perpendicular to the screen. • Ensure the cables are in a safe location. Installation Adjusting the Projected Image Adjusting the Projector's Height Take note of the picture, turn the tilt adjuster [D] right or left until desired angle achieved. 17 English A Enter M enu Pow er Source Keystone...
... setting up the projector: • The projector table or stand should be level and sturdy. • Position the projector so that it is perpendicular to the screen. • Ensure the cables are in a safe location. Installation Adjusting the Projected Image Adjusting the Projector's Height Take note of the picture, turn the tilt adjuster [D] right or left until desired angle achieved. 17 English A Enter M enu Pow er Source Keystone...
User Manual
Page 18
Use the Image-zoom control (on the projector only) to correct image distortion. B 3. Pow er Pow er Lamp Tem p Keystone + AV-M ute Source Re-Sync M enu Keystone - Use the keystone buttons to A resize the projected image and screen size [B]. 2. They can be found on the remote control and on the projector only) to sharpen the projected image [A]. Installation Adjusting the Zoom / Focus 1. Enter English 18 Use the Image-focus control (on the projector's control panel.
Use the Image-zoom control (on the projector only) to correct image distortion. B 3. Pow er Pow er Lamp Tem p Keystone + AV-M ute Source Re-Sync M enu Keystone - Use the keystone buttons to A resize the projected image and screen size [B]. 2. They can be found on the remote control and on the projector only) to sharpen the projected image [A]. Installation Adjusting the Zoom / Focus 1. Enter English 18 Use the Image-focus control (on the projector's control panel.
User Manual
Page 19
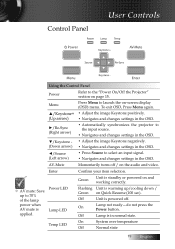
... the input source. • Navigates and changes settings in the OSD. ▼/Keystone - • Adjust the image Keystone negatively. (Down arrow) • Navigates and changes settings in the OSD. Control Panel User Controls Using the Control Panel Power Refer to the "Power On/Off the Projector" section on the audio and video. Enter Confirm your item selection. AV-Mute Momentarily turns off . On Lamp not ready-do not press the Power button. Menu Press Menu to select an input signal...
... the input source. • Navigates and changes settings in the OSD. ▼/Keystone - • Adjust the image Keystone negatively. (Down arrow) • Navigates and changes settings in the OSD. Control Panel User Controls Using the Control Panel Power Refer to the "Power On/Off the Projector" section on the audio and video. Enter Confirm your item selection. AV-Mute Momentarily turns off . On Lamp not ready-do not press the Power button. Menu Press Menu to select an input signal...
User Manual
Page 20
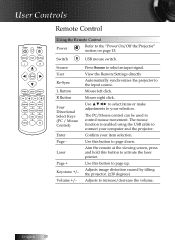
... the remote at the viewing screen, press and hold this button to connect your item selection. Adjusts image distortion caused by tilting the projector. (±30 degrees) Adjusts to the input source. Source User Re-Sync L Button R Button Four Directional Select Keys (PC / Mouse Control) Enter Page - Laser Page + Keystone +/- The mouse function is enabled using the USB cable to page down. Confirm your computer and the projector. Use this button to the "Power On...
... the remote at the viewing screen, press and hold this button to connect your item selection. Adjusts image distortion caused by tilting the projector. (±30 degrees) Adjusts to the input source. Source User Re-Sync L Button R Button Four Directional Select Keys (PC / Mouse Control) Enter Page - Laser Page + Keystone +/- The mouse function is enabled using the USB cable to page down. Confirm your computer and the projector. Use this button to the "Power On...
User Manual
Page 23
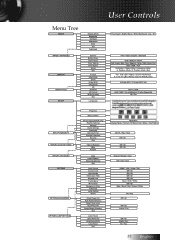
... Space Signal Exit Format Edge Mask Zoom Image Shift V Keystone 3D 3D Mode 3D Format 3D Sync Invert Exit Languange Presentation / Bright / Movie / sRGB / Blackboard / User / 3D Film / Video / Graphic / Standard Cold / Medium / Warm Red / Greem / Blue / Cyan / Magenta / Yellow / White / Reset / Exit Auto / RGB / YUV Automatic / Phase (VGA) / Frequency (VGA) / H. Position (VGA) / V. User Controls Menu Tree IMAGE IMAGE I ADVANCED DISPLAY DISPLAY I LAMP SETTINGS Projection Menu location Screen Type (WXGA only) Remote Settings Security Audio Settings Advanced Security Timer Change Password...
... Space Signal Exit Format Edge Mask Zoom Image Shift V Keystone 3D 3D Mode 3D Format 3D Sync Invert Exit Languange Presentation / Bright / Movie / sRGB / Blackboard / User / 3D Film / Video / Graphic / Standard Cold / Medium / Warm Red / Greem / Blue / Cyan / Magenta / Yellow / White / Reset / Exit Auto / RGB / YUV Automatic / Phase (VGA) / Frequency (VGA) / H. Position (VGA) / V. User Controls Menu Tree IMAGE IMAGE I ADVANCED DISPLAY DISPLAY I LAMP SETTINGS Projection Menu location Screen Type (WXGA only) Remote Settings Security Audio Settings Advanced Security Timer Change Password...

User Manual
Page 26
Color Temp Adjust the color temperature. Color Settings Enter the Color Settings menu. See page 27 for PC or computer source. English 26 The range is from AUTO, RGB, YUV. For a smoother, more vibrant colors in picture. If you to choose a gamma table that has been finetuned to 10. Cold temperature, the screen looks colder; User Controls Image | Advanced Gamma This allows you prefer a stronger enhanced image, adjust toward the minimum setting. Color Space...
Color Temp Adjust the color temperature. Color Settings Enter the Color Settings menu. See page 27 for PC or computer source. English 26 The range is from AUTO, RGB, YUV. For a smoother, more vibrant colors in picture. If you to choose a gamma table that has been finetuned to 10. Cold temperature, the screen looks colder; User Controls Image | Advanced Gamma This allows you prefer a stronger enhanced image, adjust toward the minimum setting. Color Space...

User Manual
Page 34
Menu Location Choose the menu location on the display screen. You can project behind a translucent screen with ceiling mounted projection. English 34 Projection Select projection method: 4 Front Desktop The factory default setting. 4 Rear Desktop When you select this function, the projector reverses the image so you can project from behind a translucent screen. 4 Front Ceiling When you select this function, the projector reverses and turns the image upside down at same time. Select the multilingual OSD menu. User Controls Setup Language Enter...
Menu Location Choose the menu location on the display screen. You can project behind a translucent screen with ceiling mounted projection. English 34 Projection Select projection method: 4 Front Desktop The factory default setting. 4 Rear Desktop When you select this function, the projector reverses the image so you can project from behind a translucent screen. 4 Front Ceiling When you select this function, the projector reverses and turns the image upside down at same time. Select the multilingual OSD menu. User Controls Setup Language Enter...

User Manual
Page 37
Once activated, the projector requires a password on the specified dates and times to allow power on and access to the Setup menu activates the Security Timer. Enter the Months, Days, and hours that the projector can be used without entering the password. If the projector is in use and the Security Timer is active, the following screen displays 60 seconds before the password is required. 37 English Exiting to the security menu. User Controls Setup | Security Security Timer Enter the Security Timer sub menu.
Once activated, the projector requires a password on the specified dates and times to allow power on and access to the Setup menu activates the Security Timer. Enter the Months, Days, and hours that the projector can be used without entering the password. If the projector is in use and the Security Timer is active, the following screen displays 60 seconds before the password is required. 37 English Exiting to the security menu. User Controls Setup | Security Security Timer Enter the Security Timer sub menu.
User Manual
Page 48
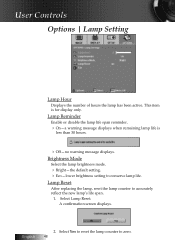
... warning message displays when remaining lamp life is for display only. Lamp Reset After replacing the lamp, reset the lamp counter to zero. 48 English 2. Select Lamp Reset. User Controls Options | Lamp Setting Lamp Hour Displays the number of hours the lamp has been active. Select Yes to reset the lamp counter to accurately reflect the new lamp's life span. 1. This item is less than 30 hours. 4Off-no warning message displays. Brightness Mode Select the lamp brightness mode. 4Bright-the default setting. 4Eco-lower brightness setting to conserve lamp life. A confirmation screen...
... warning message displays when remaining lamp life is for display only. Lamp Reset After replacing the lamp, reset the lamp counter to zero. 48 English 2. Select Lamp Reset. User Controls Options | Lamp Setting Lamp Hour Displays the number of hours the lamp has been active. Select Yes to reset the lamp counter to accurately reflect the new lamp's life span. 1. This item is less than 30 hours. 4Off-no warning message displays. Brightness Mode Select the lamp brightness mode. 4Bright-the default setting. 4Eco-lower brightness setting to conserve lamp life. A confirmation screen...
User Manual
Page 49
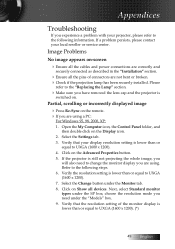
Appendices Troubleshooting If you are using . Partial, scrolling or incorrectly displayed image 4Press Re-Sync on -screen 4Ensure all the cables and power connections are not bent or broken. 4Check if the projection lamp has been securely installed. Click on Show all the pins of the monitor display is lower than or equal to UXGA (1600 x 1200). 7. choose the resolution mode you need to the following...
Appendices Troubleshooting If you are using . Partial, scrolling or incorrectly displayed image 4Press Re-Sync on -screen 4Ensure all the cables and power connections are not bent or broken. 4Check if the projection lamp has been securely installed. Click on Show all the pins of the monitor display is lower than or equal to UXGA (1600 x 1200). 7. choose the resolution mode you need to the following...

User Manual
Page 50
...]+[F7] [Fn]+[F4] [Fn]+[F3] [Fn]+[F5] Mac Apple: System Preference display Display Arrangement Mirror If you experience difficulty changing resolutions or your computer. Image is in use. Image is unstable or flickering 4Use Phase to adjust resolution of focus 4Make sure the lens cap is between the required distances from the projector. Appendices 4If you are using a Notebook: 1. Each has a different way to make it...
...]+[F7] [Fn]+[F4] [Fn]+[F3] [Fn]+[F5] Mac Apple: System Preference display Display Arrangement Mirror If you experience difficulty changing resolutions or your computer. Image is in use. Image is unstable or flickering 4Use Phase to adjust resolution of focus 4Make sure the lens cap is between the required distances from the projector. Appendices 4If you are using a Notebook: 1. Each has a different way to make it...
User Manual
Page 51
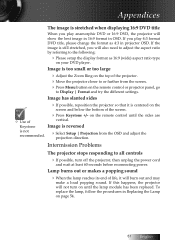
... format as 16:9 (wide) aspect ratio type on your DVD player. Intermission Problems The projector stops responding to Display | Format and try the different settings. If the image is not recommended. 4Select Setup | Projection from the screen. 4Press Menu button on the remote control until the lamp module has been replaced. on the remote control or projector panel, go to all controls 4If possible, turn on page 54. 51 English
... format as 16:9 (wide) aspect ratio type on your DVD player. Intermission Problems The projector stops responding to Display | Format and try the different settings. If the image is not recommended. 4Select Setup | Projection from the screen. 4Press Menu button on the remote control until the lamp module has been replaced. on the remote control or projector panel, go to all controls 4If possible, turn on page 54. 51 English
User Manual
Page 52
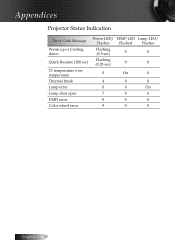
Appendices Projector Status Indication Error Code Message Warm up or Cooling down Quick Resume (100 sec) T1 temperature over temperature Thermal break Lamp error Lamp door open DMD error Color wheel error Power LED/ TEMP LED Lamp LED/ Flashes Flashed Flashes Flashing (0.5 sec) 0 0 Flashing (0.25 sec) 0 0 0 On 0 4 0 0 0 0 On 7 0 0 8 0 0 9 0 0 English 52
Appendices Projector Status Indication Error Code Message Warm up or Cooling down Quick Resume (100 sec) T1 temperature over temperature Thermal break Lamp error Lamp door open DMD error Color wheel error Power LED/ TEMP LED Lamp LED/ Flashes Flashed Flashes Flashing (0.5 sec) 0 0 Flashing (0.25 sec) 0 0 0 On 0 4 0 0 0 0 On 7 0 0 8 0 0 9 0 0 English 52


