User Manual
Page 1
... Options...42 Appendices...49 Troubleshooting...49 Image Problems...49 Intermission Problems...51 Projector Status Indication...52 Remote Control Problems...53 Audio Problems...53 Replacing the Lamp...54 Cleaning the Projector...55 Compatibility Modes...56 Ceiling Installation...59 Optoma Global Offices...60 Regulation & Safety notices...62 Operation conditions...63 1 English
... Options...42 Appendices...49 Troubleshooting...49 Image Problems...49 Intermission Problems...51 Projector Status Indication...52 Remote Control Problems...53 Audio Problems...53 Replacing the Lamp...54 Cleaning the Projector...55 Compatibility Modes...56 Ceiling Installation...59 Optoma Global Offices...60 Regulation & Safety notices...62 Operation conditions...63 1 English
User Manual
Page 4
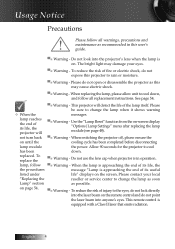
...Please follow all replacement instructions. To reduce the risk of its life, the projector will detect the life of injury to change the lamp as soon Lamp" section as possible. Please do not point the laser beam into anyone's eyes. Please be sure to the eyes, do not...;■ Warning - Please contact your eyes. ▀■ Warning - This remote control is approaching the end of its life, the the procedures message "Lamp is equipped with a Class II laser that emits radiation. The bright light may cause electric shock. ▀■ Warning - See page 54. ▀&#...
...Please follow all replacement instructions. To reduce the risk of its life, the projector will detect the life of injury to change the lamp as soon Lamp" section as possible. Please do not point the laser beam into anyone's eyes. Please be sure to the eyes, do not...;■ Warning - Please contact your eyes. ▀■ Warning - This remote control is approaching the end of its life, the the procedures message "Lamp is equipped with a Class II laser that emits radiation. The bright light may cause electric shock. ▀■ Warning - See page 54. ▀&#...
User Manual
Page 6
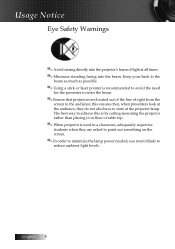
... is by ceiling-mounting the projector rather than placing it on the screen. ▀■ In order to minimize the lamp power needed, use room blinds to stare at the projector lamp. The best way to achieve this ensures that projectors are asked to point out something on floor or table top...
... is by ceiling-mounting the projector rather than placing it on the screen. ▀■ In order to minimize the lamp power needed, use room blinds to stare at the projector lamp. The best way to achieve this ensures that projectors are asked to point out something on floor or table top...

User Manual
Page 16
...must wait until the projector has completed the cooling cycle and has entered standby mode. See pages 52. Do not turn off the projector lamp, a message displays on the projector immediately following a power off the main power switch. Please contact your local dealer or our service ...center. See pages 52. Press Power to confirm, otherwise the message disappears after it indicates the lamp system failed. v When the TEMP LED is on again after 15 seconds. 3. Under normal conditions, the projector can be switched on a...
...must wait until the projector has completed the cooling cycle and has entered standby mode. See pages 52. Do not turn off the projector lamp, a message displays on the projector immediately following a power off the main power switch. Please contact your local dealer or our service ...center. See pages 52. Press Power to confirm, otherwise the message disappears after it indicates the lamp system failed. v When the TEMP LED is on again after 15 seconds. 3. Under normal conditions, the projector can be switched on a...
User Manual
Page 18
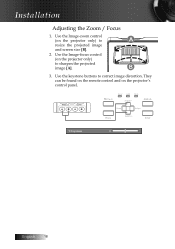
B 3. Enter English 18 Installation Adjusting the Zoom / Focus 1. Use the Image-focus control (on the projector only) to correct image distortion. Use the keystone buttons to sharpen the projected image [A]. Use the Image-zoom control (on the projector's control panel. Pow er Pow er Lamp Tem p Keystone + AV-M ute Source Re-Sync M enu Keystone - They can be found on the remote control and on the projector only) to A resize the projected image and screen size [B]. 2.
B 3. Enter English 18 Installation Adjusting the Zoom / Focus 1. Use the Image-focus control (on the projector only) to correct image distortion. Use the keystone buttons to sharpen the projected image [A]. Use the Image-zoom control (on the projector's control panel. Pow er Pow er Lamp Tem p Keystone + AV-M ute Source Re-Sync M enu Keystone - They can be found on the remote control and on the projector only) to A resize the projected image and screen size [B]. 2.
User Manual
Page 19
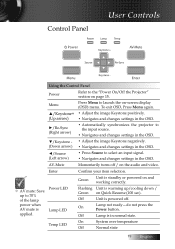
... is standby or powered on and working correctly. ™™AV mute: Save up /cooling down / Green on Quick Resume (100 sec). Off Lamp is applied. On Lamp not ready-do not press the Power button. Control Panel User Controls Using the Control Panel Power Refer to launch the on-screen display...arrow) • Navigates and changes settings in the OSD. ◄/Source (Left arrow) • Press Source to 70% of the lamp power when AV mute is in the OSD. Power LED Lamp LED Flashing Unit is powered off / on the audio and video. Off Unit is warming up to select an input...
... is standby or powered on and working correctly. ™™AV mute: Save up /cooling down / Green on Quick Resume (100 sec). Off Lamp is applied. On Lamp not ready-do not press the Power button. Control Panel User Controls Using the Control Panel Power Refer to launch the on-screen display...arrow) • Navigates and changes settings in the OSD. ◄/Source (Left arrow) • Press Source to 70% of the lamp power when AV mute is in the OSD. Power LED Lamp LED Flashing Unit is powered off / on the audio and video. Off Unit is warming up to select an input...
User Manual
Page 23
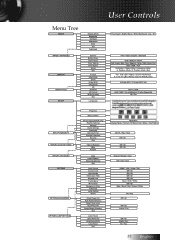
... Auto / RGB / YUV Automatic / Phase (VGA) / Frequency (VGA) / H. Position (VGA) / V. User Controls Menu Tree IMAGE IMAGE I ADVANCED DISPLAY DISPLAY I LAMP SETTINGS Projection Menu location Screen Type (WXGA only) Remote Settings Security Audio Settings Advanced Security Timer Change Password Security Exit Internal Speaker Mute Volume Logo... Reset Direct Power On Auto Power Off (min) Sleep Timer (min) Quick Resume Power Mode (Standby) Exit Lamp Hours Lamp Reminder Brightness Mode Lamp Reset Exit 16:9/16:10 Display Mode / Format / 3D Sync Invert / Mute / Test Pattern Month / Day / Hour Off ...
... Auto / RGB / YUV Automatic / Phase (VGA) / Frequency (VGA) / H. Position (VGA) / V. User Controls Menu Tree IMAGE IMAGE I ADVANCED DISPLAY DISPLAY I LAMP SETTINGS Projection Menu location Screen Type (WXGA only) Remote Settings Security Audio Settings Advanced Security Timer Change Password Security Exit Internal Speaker Mute Volume Logo... Reset Direct Power On Auto Power Off (min) Sleep Timer (min) Quick Resume Power Mode (Standby) Exit Lamp Hours Lamp Reminder Brightness Mode Lamp Reset Exit 16:9/16:10 Display Mode / Format / 3D Sync Invert / Mute / Test Pattern Month / Day / Hour Off ...

User Manual
Page 31
By doing so, lamp power and resolution are not enhanced for 16x9 TVs. If you use an external anamorphic lens, this situation, the image will be black bars around ...
By doing so, lamp power and resolution are not enhanced for 16x9 TVs. If you use an external anamorphic lens, this situation, the image will be black bars around ...

User Manual
Page 44
User Controls Options Advanced Enter the Advanced menu. Reset Reset all Options to default factory settings. Lamp Setting Enter the Lamp Setting menu. See page 46 for more information. English 44 See page 48 for more information.
User Controls Options Advanced Enter the Advanced menu. Reset Reset all Options to default factory settings. Lamp Setting Enter the Lamp Setting menu. See page 46 for more information. English 44 See page 48 for more information.
User Manual
Page 46
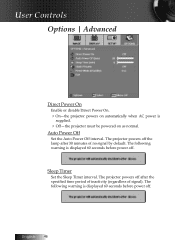
... interval. The following warning is supplied. 4Off-the projector must be powered on automatically when AC power is displayed 60 seconds before power off the lamp after the specified time period of inactivity (regardless of no signal by default. The projector powers off . User Controls Options | Advanced Direct Power On Enable...
... interval. The following warning is supplied. 4Off-the projector must be powered on automatically when AC power is displayed 60 seconds before power off the lamp after the specified time period of inactivity (regardless of no signal by default. The projector powers off . User Controls Options | Advanced Direct Power On Enable...
User Manual
Page 48
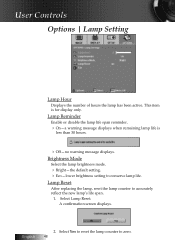
... mode. 4Bright-the default setting. 4Eco-lower brightness setting to accurately reflect the new lamp's life span. 1. English 2. Lamp Reset After replacing the lamp, reset the lamp counter to conserve lamp life. Select Lamp Reset. Select Yes to reset the lamp counter to zero. 48 This item is less than 30 hours. 4Off-no warning message displays...
... mode. 4Bright-the default setting. 4Eco-lower brightness setting to accurately reflect the new lamp's life span. 1. English 2. Lamp Reset After replacing the lamp, reset the lamp counter to conserve lamp life. Select Lamp Reset. Select Yes to reset the lamp counter to zero. 48 This item is less than 30 hours. 4Off-no warning message displays...
User Manual
Page 49
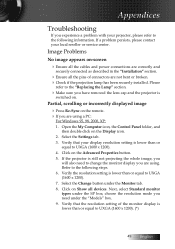
...projector is lower than or equal to UXGA (1600 x 1200). 4. Click on -screen 4Ensure all devices. Please refer to the "Replacing the Lamp" section. 4Make sure you have removed the lens cap and the projector is lower than or equal to UXGA (1600 x 1200). 7. Appendices ... a problem persists, please contact your display resolution setting is switched on the remote. 4If you are not bent or broken. 4Check if the projection lamp has been securely installed. Select the Settings tab. 3. Click on the Display icon. 2. Partial, scrolling or incorrectly displayed image 4Press Re-Sync on...
...projector is lower than or equal to UXGA (1600 x 1200). 4. Click on -screen 4Ensure all devices. Please refer to the "Replacing the Lamp" section. 4Make sure you have removed the lens cap and the projector is lower than or equal to UXGA (1600 x 1200). 7. Appendices ... a problem persists, please contact your display resolution setting is switched on the remote. 4If you are not bent or broken. 4Check if the projection lamp has been securely installed. Select the Settings tab. 3. Click on the Display icon. 2. Partial, scrolling or incorrectly displayed image 4Press Re-Sync on...
User Manual
Page 51
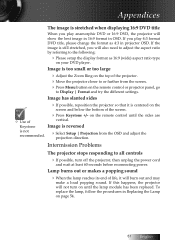
Image is too small or too large 4Adjust the Zoom Ring on the remote control until the lamp module has been replaced. To replace the lamp, follow the procedures in Replacing the Lamp on your DVD player. Appendices The image is stretched when displaying 16:9 DVD title When you play anamorphic DVD...153;™Use of the projector. 4Move the projector closer to or further from the OSD and adjust the projection direction. Lamp burns out or makes a popping sound 4When the lamp reaches its end of life, it is still stretched, you will also need to adjust the aspect ratio by referring ...
Image is too small or too large 4Adjust the Zoom Ring on the remote control until the lamp module has been replaced. To replace the lamp, follow the procedures in Replacing the Lamp on your DVD player. Appendices The image is stretched when displaying 16:9 DVD title When you play anamorphic DVD...153;™Use of the projector. 4Move the projector closer to or further from the OSD and adjust the projection direction. Lamp burns out or makes a popping sound 4When the lamp reaches its end of life, it is still stretched, you will also need to adjust the aspect ratio by referring ...
User Manual
Page 52
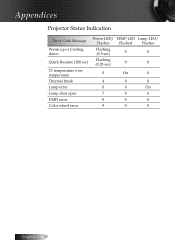
Appendices Projector Status Indication Error Code Message Warm up or Cooling down Quick Resume (100 sec) T1 temperature over temperature Thermal break Lamp error Lamp door open DMD error Color wheel error Power LED/ TEMP LED Lamp LED/ Flashes Flashed Flashes Flashing (0.5 sec) 0 0 Flashing (0.25 sec) 0 0 0 On 0 4 0 0 0 0 On 7 0 0 8 0 0 9 0 0 English 52
Appendices Projector Status Indication Error Code Message Warm up or Cooling down Quick Resume (100 sec) T1 temperature over temperature Thermal break Lamp error Lamp door open DMD error Color wheel error Power LED/ TEMP LED Lamp LED/ Flashes Flashed Flashes Flashing (0.5 sec) 0 0 Flashing (0.25 sec) 0 0 0 On 0 4 0 0 0 0 On 7 0 0 8 0 0 9 0 0 English 52
User Manual
Page 53
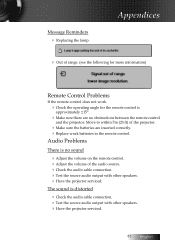
Message Reminders 4 Replacing the lamp: Appendices 4 Out of range: (see the following for more information) Remote Control Problems If the remote control does not work 4Check the operating angle for ...
Message Reminders 4 Replacing the lamp: Appendices 4 Out of range: (see the following for more information) Remote Control Problems If the remote control does not work 4Check the operating angle for ...

User Manual
Page 54
... captive screws on the module handle to turn off and unplug the projector at least an hour before replacing the lamp. It should be replaced when it burns out. Important: 4The lamp contains a certain amount of mercury and should be disposed of according to do so could result in a severe .... 4Avoid touching the glass surface of removal. Remove the lamp compartment cover (B). 2. Pull firmly on the lamp compartment cover (A). Warning: 4Be sure to remove the lamp module. 4. 5 & 6. Insertion is the reverse of the new lamp, doing so may shorten its operation life. Remove the ...
... captive screws on the module handle to turn off and unplug the projector at least an hour before replacing the lamp. It should be replaced when it burns out. Important: 4The lamp contains a certain amount of mercury and should be disposed of according to do so could result in a severe .... 4Avoid touching the glass surface of removal. Remove the lamp compartment cover (B). 2. Pull firmly on the lamp compartment cover (A). Warning: 4Be sure to remove the lamp module. 4. 5 & 6. Insertion is the reverse of the new lamp, doing so may shorten its operation life. Remove the ...


