

ZU1050 Datasheet
Page 1
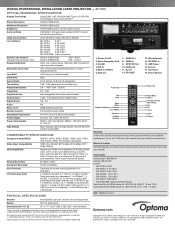
...; operation Robust connectivity, including HDMI, HDBaseT, 3G-SDI and wireless mirroring via USB adapter Multiple interchangeable optical lens options with 360° and portrait operation ensure installation flexibility for professional image projection. WUXGA Professional Installation Laser Projector ZU1050 Spectacular image quality and brightness with low maintenance laser technology Sharp and luminous image with 10,000 lumens DuraCore: maintenance-free laser light source at full brightness up to 30,000 hours...
...; operation Robust connectivity, including HDMI, HDBaseT, 3G-SDI and wireless mirroring via USB adapter Multiple interchangeable optical lens options with 360° and portrait operation ensure installation flexibility for professional image projection. WUXGA Professional Installation Laser Projector ZU1050 Spectacular image quality and brightness with low maintenance laser technology Sharp and luminous image with 10,000 lumens DuraCore: maintenance-free laser light source at full brightness up to 30,000 hours...
ZU1050 Datasheet
Page 2
...) Power On Power Off Image Size 50" - 300" Projection Lens Optical Zoom Digital Zoom Audio Noise Level Remote Control Operating Temperature Power Supply Power Consumption Interchangeable lenses (lens not included) 1.25x - 1.9x (dependent on / full off) (Dynamic Black) 9 10 11 12 13 14 15 16 Lamp Life and Type* Lens Options: Up to change at any time. 05282020 Menu Navigation Pad 3. 3G-SDI 4. HDBaseT 11. Please visit Optoma.com for remote, quick start user manual Accessories Ceiling mount: BM-9011N Remote: BR...
...) Power On Power Off Image Size 50" - 300" Projection Lens Optical Zoom Digital Zoom Audio Noise Level Remote Control Operating Temperature Power Supply Power Consumption Interchangeable lenses (lens not included) 1.25x - 1.9x (dependent on / full off) (Dynamic Black) 9 10 11 12 13 14 15 16 Lamp Life and Type* Lens Options: Up to change at any time. 05282020 Menu Navigation Pad 3. 3G-SDI 4. HDBaseT 11. Please visit Optoma.com for remote, quick start user manual Accessories Ceiling mount: BM-9011N Remote: BR...

ZU1050 Installation Guide
Page 11
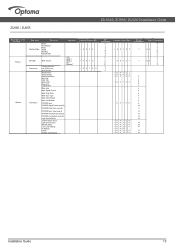
... Ok # 15 Ok # ~XX1 0 8 1 Ok # ~XX1 5 0 16 Ok # ~XX8 7 3 O k ~XX1 5 0 17 Ok # Installation Guide 11 ZU1050 ZU1050/ ZU850/ ZU660 Installation Guide Level 1 Level 2 Display Display Mode Level 3 Presentation Movie Bright REC709 DICOM SIM 2D High Speed 3D Blending User Save to User Level 4 VGA HDMI Output PIP/PBP Settings Main Source DVI-D HDBaseT Network Display 3GSDI Model Name Serial Number Native Resolution Firmware Main Source - Vert Refresh OPTION Information Sub Source - Horz Refresh - Resolution - Horz Refresh -
... Ok # 15 Ok # ~XX1 0 8 1 Ok # ~XX1 5 0 16 Ok # ~XX8 7 3 O k ~XX1 5 0 17 Ok # Installation Guide 11 ZU1050 ZU1050/ ZU850/ ZU660 Installation Guide Level 1 Level 2 Display Display Mode Level 3 Presentation Movie Bright REC709 DICOM SIM 2D High Speed 3D Blending User Save to User Level 4 VGA HDMI Output PIP/PBP Settings Main Source DVI-D HDBaseT Network Display 3GSDI Model Name Serial Number Native Resolution Firmware Main Source - Vert Refresh OPTION Information Sub Source - Horz Refresh - Resolution - Horz Refresh -
ZU1050 Installation Guide
Page 13
... FW ext flash FW Main Input Main Signal Format Main Pixel Clock Main Sync Type Main Horz Refresh Main Vert Refresh PIP/PBP Input PIP/PBP Signal Format (note 9) VGA HDMI-1 HDMI-2 DVI HDBaseT PIP/PBP Pixel Clock (note 9) PIP/PBP Sync Type (note 9) PIP/PBP Horz Refresh (note 9) PIP/PBP Vert Refresh (note 9) Light Source Power Total Projector Hours Light Source Hours Standby Mode Lens Lock Settings IP Address DHCP System Temperature Optoma Write CMD...
... FW ext flash FW Main Input Main Signal Format Main Pixel Clock Main Sync Type Main Horz Refresh Main Vert Refresh PIP/PBP Input PIP/PBP Signal Format (note 9) VGA HDMI-1 HDMI-2 DVI HDBaseT PIP/PBP Pixel Clock (note 9) PIP/PBP Sync Type (note 9) PIP/PBP Horz Refresh (note 9) PIP/PBP Vert Refresh (note 9) Light Source Power Total Projector Hours Light Source Hours Standby Mode Lens Lock Settings IP Address DHCP System Temperature Optoma Write CMD...

ZU1050 User Manual
Page 4
... ventilation openings. Physical damage/abuse would be (but not limited to): ±± Unit has been dropped. ±± Power supply cord or plug has been damaged. ±± Liquid has been spilled on to the projector. ±± Projector has been exposed to the presence of important operating and maintenance (servicing) instructions in a fire. ‡‡ Do not use...
... ventilation openings. Physical damage/abuse would be (but not limited to): ±± Unit has been dropped. ±± Power supply cord or plug has been damaged. ±± Liquid has been spilled on to the projector. ±± Projector has been exposed to the presence of important operating and maintenance (servicing) instructions in a fire. ‡‡ Do not use...

ZU1050 User Manual
Page 5
..., as it might be attempted. ‡‡ Any operation or adjustment not specifically instructed in the user's guide creates the risk of hazardous laser radiation exposure. ‡‡ Do not open or disassemble the projector as non standard installation may affect the projector performance. ‡‡ Use a power strip and or surge protector. The bright light may harm your eyes. ‡‡ This...
..., as it might be attempted. ‡‡ Any operation or adjustment not specifically instructed in the user's guide creates the risk of hazardous laser radiation exposure. ‡‡ Do not open or disassemble the projector as non standard installation may affect the projector performance. ‡‡ Use a power strip and or surge protector. The bright light may harm your eyes. ‡‡ This...
ZU1050 User Manual
Page 10
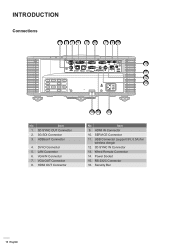
HDBaseT Connector 4. VGA OUT Connector 8. SERVICE Connector 11. Wired Remote Connector 14. Security Bar 10 English USB Connector (support 5V, 0.5A) for wireless dongle 12. 3D SYNC IN Connector 13. VGA IN Connector 7. HDMI IN Connector 10. Power Socket 15. HDMI OUT Connector 16 15 14 No Item 9. RS-232C Connector 16. LAN Connector 6. INTRODUCTION Connections 1 234 5 6 7 89 10 11 12 13 No Item 1. 3D SYNC OUT Connector 2. 3G-SDI Connector 3. DVI-D Connector 5.
HDBaseT Connector 4. VGA OUT Connector 8. SERVICE Connector 11. Wired Remote Connector 14. Security Bar 10 English USB Connector (support 5V, 0.5A) for wireless dongle 12. 3D SYNC IN Connector 13. VGA IN Connector 7. HDMI IN Connector 10. Power Socket 15. HDMI OUT Connector 16 15 14 No Item 9. RS-232C Connector 16. LAN Connector 6. INTRODUCTION Connections 1 234 5 6 7 89 10 11 12 13 No Item 1. 3D SYNC OUT Connector 2. 3G-SDI Connector 3. DVI-D Connector 5.

ZU1050 User Manual
Page 16
RCA Component Cable 5. HDMI Cable 7. HDMI Cable 9. HDMI Dongle 11. VGA-In Cable 4. DVI-D Cable 3. USB Power Cable 12. USB Cable (mouse control) No Item 10. RS-232C Cable 17. Wired Remote-In Cable (~30m) 16. CAT5e/6/6A Cable 8. RJ-45 Cable 18 3D Emitter Cable Power Cord 14. 3D Sync In Cable 15. BNC Cable 2. VGA-Out Cable 6. SETUP AND INSTALLATION Connecting sources to the projector 1 23 4 5 6 78 MOLEX 9 10 14 11 12 18 17 16 15 13 16 English No Item 1. Wireless (Wi-Fi) Dongle 13.
RCA Component Cable 5. HDMI Cable 7. HDMI Cable 9. HDMI Dongle 11. VGA-In Cable 4. DVI-D Cable 3. USB Power Cable 12. USB Cable (mouse control) No Item 10. RS-232C Cable 17. Wired Remote-In Cable (~30m) 16. CAT5e/6/6A Cable 8. RJ-45 Cable 18 3D Emitter Cable Power Cord 14. 3D Sync In Cable 15. BNC Cable 2. VGA-Out Cable 6. SETUP AND INSTALLATION Connecting sources to the projector 1 23 4 5 6 78 MOLEX 9 10 14 11 12 18 17 16 15 13 16 English No Item 1. Wireless (Wi-Fi) Dongle 13.

ZU1050 User Manual
Page 20
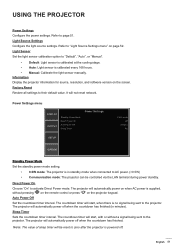
... displayed image. A warning message will appear on the projector keypad. Press OFF key to the "ON" position. When you press " " on the projector keypad or press " " on Gamma Bright Cont. PIP 1. Set the Power switch to select the preferred language, projection orientation, and other settings. USING THE PROJECTOR Powering on / off the projector ON OFF or 1 2 3 4 5 6 7 8 9 Info 0 Mode Auto Input Enter Menu Exit Powering on the remote control for the second time, the projector...
... displayed image. A warning message will appear on the projector keypad. Press OFF key to the "ON" position. When you press " " on the projector keypad or press " " on Gamma Bright Cont. PIP 1. Set the Power switch to select the preferred language, projection orientation, and other settings. USING THE PROJECTOR Powering on / off the projector ON OFF or 1 2 3 4 5 6 7 8 9 Info 0 Mode Auto Input Enter Menu Exit Powering on the remote control for the second time, the projector...

ZU1050 User Manual
Page 21
USING THE PROJECTOR ON OFF Selecting an input source 1 2 3 Turn on the connected source that you want to display on the projector keypad or the remote control to select the desired input. 7 8 9 Info 0 Mode Auto Input or Enter Menu Exit Gamma Bright Cont. PIP Lens H Focus Lens V Keystone H Zoom Keystone V Shutter (AV Mute) Hot Key Pattern English 21 If multiple sources are connected, press the Input button on the screen, such as computer, notebook, video player, etc. The projector will automatically dete4ct the 5source6.
USING THE PROJECTOR ON OFF Selecting an input source 1 2 3 Turn on the connected source that you want to display on the projector keypad or the remote control to select the desired input. 7 8 9 Info 0 Mode Auto Input or Enter Menu Exit Gamma Bright Cont. PIP Lens H Focus Lens V Keystone H Zoom Keystone V Shutter (AV Mute) Hot Key Pattern English 21 If multiple sources are connected, press the Input button on the screen, such as computer, notebook, video player, etc. The projector will automatically dete4ct the 5source6.

ZU1050 User Manual
Page 27
... Lens Settings Lens Memory SETUP Menu Settings Keypad LED Settings Security Lens Lock Menu Transparency Information Hide Off On Password Change Password LAN WLAN Communications Network Serial Port Baud Rate Sub Menu 3 No Yes Apply Position Save Current Position No Yes 0 ~ 9 Off On Off On Sub Menu 4 1 2 3 4 5 1 2 3 4 5 No 0 Off On Off Values Off DHCP On IP Address Subnet Mask Gateway MAC Address Apply Enable Start IP End IP Subnet Mask Gateway MAC Address SSID Projector Name Restart Network Network Factory Reset...
... Lens Settings Lens Memory SETUP Menu Settings Keypad LED Settings Security Lens Lock Menu Transparency Information Hide Off On Password Change Password LAN WLAN Communications Network Serial Port Baud Rate Sub Menu 3 No Yes Apply Position Save Current Position No Yes 0 ~ 9 Off On Off On Sub Menu 4 1 2 3 4 5 1 2 3 4 5 No 0 Off On Off Values Off DHCP On IP Address Subnet Mask Gateway MAC Address Apply Enable Start IP End IP Subnet Mask Gateway MAC Address SSID Projector Name Restart Network Network Factory Reset...

ZU1050 User Manual
Page 29
...Index Error Log Mode Adjustment Reset Projector Hours Light Sensor Calibration ADC Calibration LD Hours UST Lens Install Sub Menu 3 No 2 Hours 4 Hours 6 Hours Constant Power Constant Luminance Eco Mode 0 - 99 Yes/No (Dialog box) Sub Menu 4 Values No Constant Power 99 English 29 Resolution - USING THE PROJECTOR Main Menu Sub Menu Power Settings Light Source Settings Light Sensor OPTION Information Factory Reset Service Sub Menu 2 Sleep Timer Light Source Mode Constant Power Settings Total Projector Hours Default Auto Manual Model Name Serial Number Native Resolution Firmware...
...Index Error Log Mode Adjustment Reset Projector Hours Light Sensor Calibration ADC Calibration LD Hours UST Lens Install Sub Menu 3 No 2 Hours 4 Hours 6 Hours Constant Power Constant Luminance Eco Mode 0 - 99 Yes/No (Dialog box) Sub Menu 4 Values No Constant Power 99 English 29 Resolution - USING THE PROJECTOR Main Menu Sub Menu Power Settings Light Source Settings Light Sensor OPTION Information Factory Reset Service Sub Menu 2 Sleep Timer Light Source Mode Constant Power Settings Total Projector Hours Default Auto Manual Model Name Serial Number Native Resolution Firmware...

ZU1050 User Manual
Page 42
... menu DISPLAY OUTPUT SETUP Communications LAN WLAN Network Serial Port Baud Rate Serial Port Path Projector ID IR Control 19200 RS232 0 OPTION LAN Configure the local area network (LAN) settings. ‡‡ DHCP: Turn the DHCP On/Off. ‡‡ IP Address: Select an IP address. ‡‡ Subnet Mask: Select subnet mask number. ‡‡ Gateway: Select the default gateway of the network connected to password protect your projector. USING THE PROJECTOR Security menu Security DISPLAY Password Off Change Password...
... menu DISPLAY OUTPUT SETUP Communications LAN WLAN Network Serial Port Baud Rate Serial Port Path Projector ID IR Control 19200 RS232 0 OPTION LAN Configure the local area network (LAN) settings. ‡‡ DHCP: Turn the DHCP On/Off. ‡‡ IP Address: Select an IP address. ‡‡ Subnet Mask: Select subnet mask number. ‡‡ Gateway: Select the default gateway of the network connected to password protect your projector. USING THE PROJECTOR Security menu Security DISPLAY Password Off Change Password...
ZU1050 User Manual
Page 45
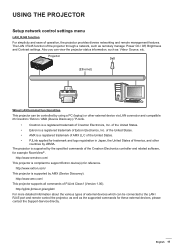
... projector supports all commands of operation, the projector provides diverse networking and remote management features. Source, etc. Also you can be connected to support Extron device(s) for example RoomView®. of Crestron Electronics, Inc. English 45 USING THE PROJECTOR Setup network control settings menu LAN_RJ45 function For simplicity and ease of PJLink Class1 (Version 1.00). Projector (Ethernet) Wired LAN terminal functionalities This projector can view the projector status information, such as remotely manage: Power On...
... projector supports all commands of operation, the projector provides diverse networking and remote management features. Source, etc. Also you can be connected to support Extron device(s) for example RoomView®. of Crestron Electronics, Inc. English 45 USING THE PROJECTOR Setup network control settings menu LAN_RJ45 function For simplicity and ease of PJLink Class1 (Version 1.00). Projector (Ethernet) Wired LAN terminal functionalities This projector can view the projector status information, such as remotely manage: Power On...

ZU1050 User Manual
Page 50
... increase speed. USING THE PROJECTOR OPTION menu DISPLAY OUTPUT SETUP OPTION Auto Source High Altitude Test Pattern Grid Pattern Background Color Hot-Key settings Power Settings Light Source Settings Light Sensor Information OPTION OPTION (1/2) DISPLAY Factory Reset Service OUTPUT OPTION On Off Off Off Logo Blank Screen SETUP OPTION Auto Source Use this feature to display a "Logo", "Blue", "Black", or "White" screen when no signal is available. High Altitude When "On" is selected, the fans will only search current input connection. Background Color Use this option...
... increase speed. USING THE PROJECTOR OPTION menu DISPLAY OUTPUT SETUP OPTION Auto Source High Altitude Test Pattern Grid Pattern Background Color Hot-Key settings Power Settings Light Source Settings Light Sensor Information OPTION OPTION (1/2) DISPLAY Factory Reset Service OUTPUT OPTION On Off Off Off Logo Blank Screen SETUP OPTION Auto Source Use this feature to display a "Logo", "Blue", "Black", or "White" screen when no signal is available. High Altitude When "On" is selected, the fans will only search current input connection. Background Color Use this option...
ZU1050 User Manual
Page 51
...Sleep Timer Power Settings SETUP 0.5W mode Off 20 Mins No OPTION Standby Power Mode Set the standby power mode setting. ‡‡ 0.5W mode: The projector is calibrated every 168 hours. ‡‡ Manual: Calibrate the light sensor manually. Light Sensor Set the light sensor calibration option to "Default", "Auto", or "Manual". ‡‡ Default: Light sensor is calibrated at the cooling stage. ‡‡ Auto: Light sensor is in standby mode when connected to "Light Source Settings menu" on the screen. Light Source Settings Configure the light source settings. USING THE...
...Sleep Timer Power Settings SETUP 0.5W mode Off 20 Mins No OPTION Standby Power Mode Set the standby power mode setting. ‡‡ 0.5W mode: The projector is calibrated every 168 hours. ‡‡ Manual: Calibrate the light sensor manually. Light Sensor Set the light sensor calibration option to "Default", "Auto", or "Manual". ‡‡ Default: Light sensor is calibrated at the cooling stage. ‡‡ Auto: Light sensor is in standby mode when connected to "Light Source Settings menu" on the screen. Light Source Settings Configure the light source settings. USING THE...

ZU1050 User Manual
Page 52
... Eco mode: The factory default brightness is 50%. Total Projector Hours Display the projection time. 52 English USING THE PROJECTOR Light Source Settings menu DISPLAY OUTPUT Light Source Settings Light Source Mode Constant Power Settings Total Projector Hours Constant Power 99 11 SETUP OPTION Light Source Mode Set the light source mode setting. ‡‡ Constant Power: Set the brightness of the projector by changing the value in Constant Power Settings. ‡‡ Constant Luminance: Set the value in Constant Power and change the Light Source Mode to Constant Luminance to lock...
... Eco mode: The factory default brightness is 50%. Total Projector Hours Display the projection time. 52 English USING THE PROJECTOR Light Source Settings menu DISPLAY OUTPUT Light Source Settings Light Source Mode Constant Power Settings Total Projector Hours Constant Power 99 11 SETUP OPTION Light Source Mode Set the light source mode setting. ‡‡ Constant Power: Set the brightness of the projector by changing the value in Constant Power Settings. ‡‡ Constant Luminance: Set the value in Constant Power and change the Light Source Mode to Constant Luminance to lock...

ZU1050 User Manual
Page 63
... Focus ▼ button on the remote control to adjust the focus until the image is sharp and legible. ‡‡ Make sure the projection screen is too small or too large ‡‡ Press the Zoom ▲ or Zoom ▼ button on the remote control to increase or decrease the projected image size. ‡‡ Move the projector closer to or further from the screen. ‡‡ Press "Menu" on projector...
... Focus ▼ button on the remote control to adjust the focus until the image is sharp and legible. ‡‡ Make sure the projection screen is too small or too large ‡‡ Press the Zoom ▲ or Zoom ▼ button on the remote control to increase or decrease the projected image size. ‡‡ Move the projector closer to or further from the screen. ‡‡ Press "Menu" on projector...

ZU1050 User Manual
Page 64
... to all controls ‡‡ If possible, turn off (Image is displayed) AV mute is on (Image is defined below. Each LED is black) Projector communication Firmware upgrade Laser diode time has expired Unit loses over 60% initial luminance Error (Over temperature) Error (Fan failure) Light LED Green Orange Red - - - - - - Steady - Flashing - - Steady Steady - - - - - - - Steady - - Warning indicators LED status indicators The LED status indicators are not any obstructions between the remote control and the projector. Status LED Green Orange Red...
... to all controls ‡‡ If possible, turn off (Image is displayed) AV mute is on (Image is defined below. Each LED is black) Projector communication Firmware upgrade Laser diode time has expired Unit loses over 60% initial luminance Error (Over temperature) Error (Fan failure) Light LED Green Orange Red - - - - - - Steady - Flashing - - Steady Steady - - - - - - - Steady - - Warning indicators LED status indicators The LED status indicators are not any obstructions between the remote control and the projector. Status LED Green Orange Red...
ZU1050 User Manual
Page 66
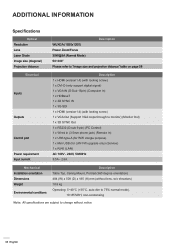
ADDITIONAL INFORMATION Specifications Optical Resolution Lens Laser Diode Image size (diagonal) Projection distance Description WUXGA (1920x1200) Power Zoom/Focus 35W@3A (Normal Mode) 50~300" Please refer to "Image size and projection distance" table on page 58 Electrical Inputs Outputs Control port Power requirement Input current Description 1 x HDMI (version1.4) (with locking screw) 1 x DVI-D (only support digital signal) 1 x VGA IN (D-Sub 15pin) (Computer In) 1 x HDBaseT 1 x 3D SYNC IN 1 x 3G-SDI 1 x HDMI (version1.4) (with locking screw) 1 x VGA Out (Support VGA loops through to ...
ADDITIONAL INFORMATION Specifications Optical Resolution Lens Laser Diode Image size (diagonal) Projection distance Description WUXGA (1920x1200) Power Zoom/Focus 35W@3A (Normal Mode) 50~300" Please refer to "Image size and projection distance" table on page 58 Electrical Inputs Outputs Control port Power requirement Input current Description 1 x HDMI (version1.4) (with locking screw) 1 x DVI-D (only support digital signal) 1 x VGA IN (D-Sub 15pin) (Computer In) 1 x HDBaseT 1 x 3D SYNC IN 1 x 3G-SDI 1 x HDMI (version1.4) (with locking screw) 1 x VGA Out (Support VGA loops through to ...


