
AJHPM100 User Guide
Page 6
... DISCONNECT THIS EQUIPMENT FROM THE AC MAINS, DISCONNECT THE POWER CORD PLUG FROM THE AC RECEPTACLE. If this unit in a bookcase, built-in the video and audio signals. To reduce the risk of electric shock, do not install or place this should not throw them in the product and remote controller. Refer servicing to maintain adequate ventilation, do not remove the...
... DISCONNECT THIS EQUIPMENT FROM THE AC MAINS, DISCONNECT THE POWER CORD PLUG FROM THE AC RECEPTACLE. If this unit in a bookcase, built-in the video and audio signals. To reduce the risk of electric shock, do not install or place this should not throw them in the product and remote controller. Refer servicing to maintain adequate ventilation, do not remove the...
AJHPM100 User Guide
Page 7
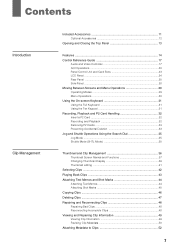
... Clip Management Included Accessories 11 Optional Accessories 12 Opening and Closing the Top Panel 13 Features ...14 Control Reference Guide 17 Audio and Video Controller 17 GUI Operations 20 Panel Control Unit and Card Slots 23 LCD Panel ...24 Rear Panel ...25 Side Panel ...28 Moving Between Screens and Menu Operations 29 Operating Modes 29 Menu Operations 30 Using the On-screen Keyboard 31 Using the Full Keyboard 31 Using the Ten...
... Clip Management Included Accessories 11 Optional Accessories 12 Opening and Closing the Top Panel 13 Features ...14 Control Reference Guide 17 Audio and Video Controller 17 GUI Operations 20 Panel Control Unit and Card Slots 23 LCD Panel ...24 Rear Panel ...25 Side Panel ...28 Moving Between Screens and Menu Operations 29 Operating Modes 29 Menu Operations 30 Using the On-screen Keyboard 31 Using the Full Keyboard 31 Using the Ten...
AJHPM100 User Guide
Page 9
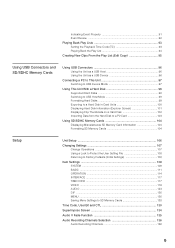
... Cards 104 Displaying Miscellaneous SD Memory Card Information 104 Formatting SD Memory Cards 104 Setup Unit Setup 106 Changing Settings 107 Change Operations 107 Using a Lock to Protect the User Setting File 108 Returning to Factory Defaults (Initial Settings 108 Item Settings 109 SYSTEM ...109 BASIC ...111 OPERATION 114 INTERFACE 117 TIME CODE 117 VIDEO ...119 AUDIO ...123 DIF ...126 MENU ...126 Saving Menu Settings to SD Memory Cards 128 Time Code, User Bit and CTL 130 Superimpose Screen 134 Audio V Fade Function 135 Audio Recording Channels...
... Cards 104 Displaying Miscellaneous SD Memory Card Information 104 Formatting SD Memory Cards 104 Setup Unit Setup 106 Changing Settings 107 Change Operations 107 Using a Lock to Protect the User Setting File 108 Returning to Factory Defaults (Initial Settings 108 Item Settings 109 SYSTEM ...109 BASIC ...111 OPERATION 114 INTERFACE 117 TIME CODE 117 VIDEO ...119 AUDIO ...123 DIF ...126 MENU ...126 Saving Menu Settings to SD Memory Cards 128 Time Code, User Bit and CTL 130 Superimpose Screen 134 Audio V Fade Function 135 Audio Recording Channels...
AJHPM100 User Guide
Page 11
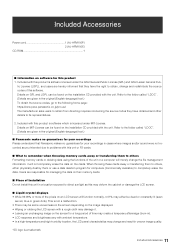
... cards. ■ Place of Installation Do not install this product is software which is software licensed under MIT-License. When throwing these cards away or transferring them to direct sunlight as this unit or P2 cards. ■ What to remember when throwing memory cards away or transferring them or use a data deletion program for computers (commercially available) to obtain, change and redistribute the source codes...
... cards. ■ Place of Installation Do not install this product is software which is software licensed under MIT-License. When throwing these cards away or transferring them to direct sunlight as this unit or P2 cards. ■ What to remember when throwing memory cards away or transferring them or use a data deletion program for computers (commercially available) to obtain, change and redistribute the source codes...
AJHPM100 User Guide
Page 15
... start of that records only active frames. (For details, refer to the Operating Instructions supplied with a PC allows you to use . Data stored on this unit as IEEE1394 input and output. * Native clips Native clips are viewed at rates between -1.0 to the video IN point. • Voice-over: Separately recorded audio data can be used : 1) Model Number DVCPRO/DV (Audio 2ch) DVCPRO50 (Audio 4ch) AVC-Intra50 (Audio 8ch)* DVCPRO HD (Audio 8ch) AVC-Intra100 (Audio...
... start of that records only active frames. (For details, refer to the Operating Instructions supplied with a PC allows you to use . Data stored on this unit as IEEE1394 input and output. * Native clips Native clips are viewed at rates between -1.0 to the video IN point. • Voice-over: Separately recorded audio data can be used : 1) Model Number DVCPRO/DV (Audio 2ch) DVCPRO50 (Audio 4ch) AVC-Intra50 (Audio 8ch)* DVCPRO HD (Audio 8ch) AVC-Intra100 (Audio...
AJHPM100 User Guide
Page 18
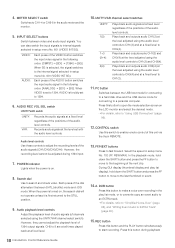
... audio level controls. POWER indicator Lights when the power is on , the search dial will not operate unless it between video and audio input signals. Press this button to open the mode selection screen on the LCD monitor and select the desired mode. ➝For details, refer to "Using USB Connectors" (page 96). 12.CONTROL switch Use this button and the PLAY button simultaneously to the beginning of the dial alternates it is turned...
... audio level controls. POWER indicator Lights when the power is on , the search dial will not operate unless it between video and audio input signals. Press this button to open the mode selection screen on the LCD monitor and select the desired mode. ➝For details, refer to "Using USB Connectors" (page 96). 12.CONTROL switch Use this button and the PLAY button simultaneously to the beginning of the dial alternates it is turned...
AJHPM100 User Guide
Page 21
... PLAY LIST button is in slot 1 results in the play lists. Use the SET button to create play list mode to open the MENU. Shows the unit serial number, the number of hours it has been on, and the number of times it has been switched on the current DIF (the IEEE 1394 interface). 6. Shows various information on and off. ENTRY/CLIP (LIST/PF2 button) Use these functions to switch among...
... PLAY LIST button is in slot 1 results in the play lists. Use the SET button to create play list mode to open the MENU. Shows the unit serial number, the number of hours it has been on, and the number of times it has been switched on the current DIF (the IEEE 1394 interface). 6. Shows various information on and off. ENTRY/CLIP (LIST/PF2 button) Use these functions to switch among...
AJHPM100 User Guide
Page 25
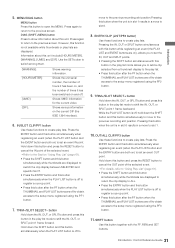
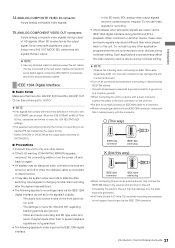
...be switched. Use 6-pin connectors. LINE: MIC: +48 V: Line input for audio input signals from audio device Audio input signal from microphone with internal power supply (this unit. Audio input signal from microphone with external power supply (this unit provides phantom microphone power). 5. IEEE 1394 digital input/output This is an IEEE1394 digital interface. ANALOG AUDIO OUT connectors Output analog audio signals. 6. It inputs/outputs IEEE1394 compressed digital signals that the air vents are not blocked. Install the unit making sure that comply with the video input...
...be switched. Use 6-pin connectors. LINE: MIC: +48 V: Line input for audio input signals from audio device Audio input signal from microphone with internal power supply (this unit. Audio input signal from microphone with external power supply (this unit provides phantom microphone power). 5. IEEE 1394 digital input/output This is an IEEE1394 digital interface. ANALOG AUDIO OUT connectors Output analog audio signals. 6. It inputs/outputs IEEE1394 compressed digital signals that the air vents are not blocked. Install the unit making sure that comply with the video input...
AJHPM100 User Guide
Page 27
... connecting or disconnecting IEEE1394 cables. IEEE 1394 Digital Interface ■ Basic Setup Make sure that menu No. 882 DIF IN CH and No. 883 DIF OUT CH on the front panel do not support input/output via the IEEE 1394 digital interface. - Cables connected to this unit. The audio level control knobs on this unit are set to "AUTO." ◆ NOTE: • Only signals that are ignored. - Video and audio recording...
... connecting or disconnecting IEEE1394 cables. IEEE 1394 Digital Interface ■ Basic Setup Make sure that menu No. 882 DIF IN CH and No. 883 DIF OUT CH on the front panel do not support input/output via the IEEE 1394 digital interface. - Cables connected to this unit. The audio level control knobs on this unit are set to "AUTO." ◆ NOTE: • Only signals that are ignored. - Video and audio recording...
AJHPM100 User Guide
Page 37
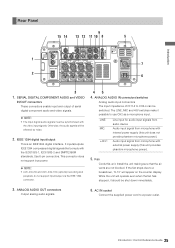
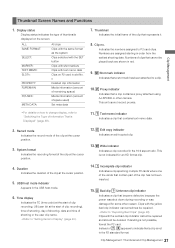
... other reason. Display status Display status indicates the type of space used) Set meta data 7. USB host mode indicator Appears in the 16:9 aspect ratio. Thumbnail Screen Names and Functions Clip Management 1. Clips with text memo data Clips on the screen. Indicates the numbers assigned to "Repairing Bad Clips" (page 48). Duration Indicates the duration of the clip at the start of the...
... other reason. Display status Display status indicates the type of space used) Set meta data 7. USB host mode indicator Appears in the 16:9 aspect ratio. Thumbnail Screen Names and Functions Clip Management 1. Clips with text memo data Clips on the screen. Indicates the numbers assigned to "Repairing Bad Clips" (page 48). Duration Indicates the duration of the clip at the start of the...
AJHPM100 User Guide
Page 93
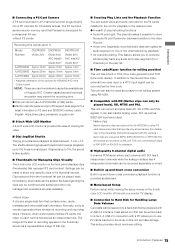
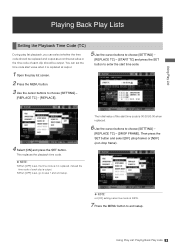
... clip should be made at output. 5 Use the cursor buttons to choose [SETTING] - [REPLACE TC] - [START TC] and press the SET button to enter the start time code is replaced at 24PN. 7 Press the MENU button to end setup. 93 Using Play List: Playing Back Play Lists Using Play List Playing Back Play Lists Setting the Playback Time Code (TC) During play list screen. 2 Press the MENU button. 3 Use the cursor buttons to choose [SETTING] - [REPLACE TC] - [REPLACE]. 4 Select [ON] and press the...
... clip should be made at output. 5 Use the cursor buttons to choose [SETTING] - [REPLACE TC] - [START TC] and press the SET button to enter the start time code is replaced at 24PN. 7 Press the MENU button to end setup. 93 Using Play List: Playing Back Play Lists Using Play List Playing Back Play Lists Setting the Playback Time Code (TC) During play list screen. 2 Press the MENU button. 3 Use the cursor buttons to choose [SETTING] - [REPLACE TC] - [REPLACE]. 4 Select [ON] and press the...
AJHPM100 User Guide
Page 107
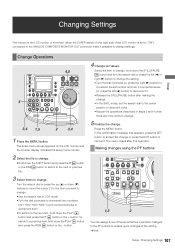
... you want to enable quick changes of the LCD monitor is set number and turn it counterclockwise (or press the left (b) or right (a) button to change the setting. • Turn the dial clockwise (or press the right (a) button) to increment the set to "ON") connected to change. 5 Finalize the change . • In the SHTL mode, set values. Press the MENU button. Setup Change Operations 4,5 5 3,4 1,5 2 3,4 1 Press the MENU button. Setup: Changing Settings 107 To switch to a previous item...
... you want to enable quick changes of the LCD monitor is set number and turn it counterclockwise (or press the left (b) or right (a) button to change the setting. • Turn the dial clockwise (or press the right (a) button) to increment the set to "ON") connected to change. 5 Finalize the change . • In the SHTL mode, set values. Press the MENU button. Setup Change Operations 4,5 5 3,4 1,5 2 3,4 1 Press the MENU button. Setup: Changing Settings 107 To switch to a previous item...
AJHPM100 User Guide
Page 109
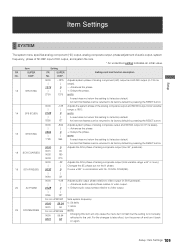
... that flashes can be returned to its factory default. Adjusts audio output phase relative to take effect, turn the power off and turn it back on again. Item Settings Setup SYSTEM The system menu specifies analog component (HD) output, analog composite output, phase adjustment of audio output, system frequency, phase of SD REF input of the analog composite output and SD SDI output (total variable range: ±180°). For the changes to video output...
... that flashes can be returned to its factory default. Adjusts audio output phase relative to take effect, turn the power off and turn it back on again. Item Settings Setup SYSTEM The system menu specifies analog component (HD) output, analog composite output, phase adjustment of audio output, system frequency, phase of SD REF input of the analog composite output and SD SDI output (total variable range: ±180°). For the changes to video output...
AJHPM100 User Guide
Page 111
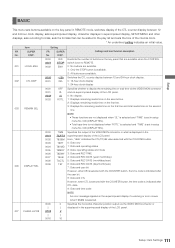
... the play list and sets the time of the internal clock. * An underlined setting indicates an initial value. Specifies the output of the VIDEO MON connector or what is displayed in superimposed display, SETUP-MENU and other displays, sets recording formats, sets the formats that are available when the CONTROL switch is set in the superimposed display of the LCD panel. Setup BASIC This menu sets buttons available on the key panel in REMOTE mode, switches display of...
... the play list and sets the time of the internal clock. * An underlined setting indicates an initial value. Specifies the output of the VIDEO MON connector or what is displayed in superimposed display, SETUP-MENU and other displays, sets recording formats, sets the formats that are available when the CONTROL switch is set in the superimposed display of the LCD panel. Setup BASIC This menu sets buttons available on the key panel in REMOTE mode, switches display of...
AJHPM100 User Guide
Page 118
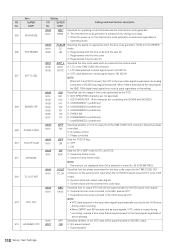
...; VITC data detected in the input video signal is automatically recorded in time code generated by the TIME CODE OUT connector for CTL and TCG. 0: Uses drop frame mode. 1: Uses non-drop frame mode. Settings and brief function description 0000 0001 REC FREE Specifies an operating mode that advances the internal time code generator. 0: The internal time code generator is advanced only during recording, outputs a time code that will be phase controlled. 0: No phase control 1: Phase controlled 0000 0001...
...; VITC data detected in the input video signal is automatically recorded in time code generated by the TIME CODE OUT connector for CTL and TCG. 0: Uses drop frame mode. 1: Uses non-drop frame mode. Settings and brief function description 0000 0001 REC FREE Specifies an operating mode that advances the internal time code generator. 0: The internal time code generator is advanced only during recording, outputs a time code that will be phase controlled. 0: No phase control 1: Phase controlled 0000 0001...
AJHPM100 User Guide
Page 126
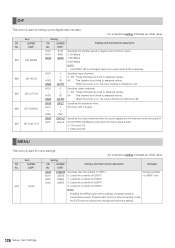
... extension menu. When the power is on , the output channel is initialized to assigned values. 64: This channel is selected. Specifies output channels. 0 - 63: These channels are in 4-channel mode and output in USER 1. 0: Loads the contents of USER 2 1: Loads the contents of USER 3 2: Loads the contents of USER 4 3: Loads the contents of digital video interface output. 0:100 Mbps 1:200 Mbps 2:400 Mbps NOTE: A DVCPRO HD format signal cannot be output...
... extension menu. When the power is on , the output channel is initialized to assigned values. 64: This channel is selected. Specifies output channels. 0 - 63: These channels are in 4-channel mode and output in USER 1. 0: Loads the contents of USER 2 1: Loads the contents of USER 3 2: Loads the contents of USER 4 3: Loads the contents of digital video interface output. 0:100 Mbps 1:200 Mbps 2:400 Mbps NOTE: A DVCPRO HD format signal cannot be output...

AJHPM100 User Guide
Page 130
... step 3. 130 Setup: Time Code, User Bit and CTL The time code starts to PRESET mode. The left-most digit starts flashing. 2. The setting ranges are the figures from the value set the start number of operating mode when the power is on. 4 Set the TCG switch to advance when [FREE] is set the run mode for the time code generator. The time code values are indicated on a P2 card. Press the UP (▲) or DOWN (▼) button or hold...
... step 3. 130 Setup: Time Code, User Bit and CTL The time code starts to PRESET mode. The left-most digit starts flashing. 2. The setting ranges are the figures from the value set the start number of operating mode when the power is on. 4 Set the TCG switch to advance when [FREE] is set the run mode for the time code generator. The time code values are indicated on a P2 card. Press the UP (▲) or DOWN (▼) button or hold...
AJHPM100 User Guide
Page 131
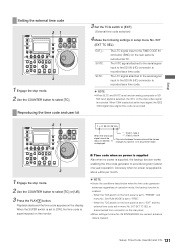
... the TCG switch on the front panel is set to "PRESET" and menu No. 504 RUN MODE is set to the SDI IN (HD) connector is recorded as the input signal, the IEEE 1394 digital input signal time code is recorded. 21 When the time code signal cannot be read, an asterisk (*) is displayed. The LTC signal attached to the serial signal input to "FREE." - Setup Setting the external time code 21 3 1 Engage the stop mode. 2 Use the COUNTER button to the...
... the TCG switch on the front panel is set to "PRESET" and menu No. 504 RUN MODE is set to the SDI IN (HD) connector is recorded as the input signal, the IEEE 1394 digital input signal time code is recorded. 21 When the time code signal cannot be read, an asterisk (*) is displayed. The LTC signal attached to the serial signal input to "FREE." - Setup Setting the external time code 21 3 1 Engage the stop mode. 2 Use the COUNTER button to the...
AJHPM100 User Guide
Page 135
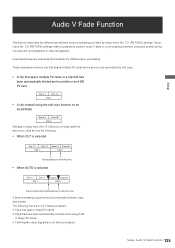
... are not fade processed. Setup menu No. 731 (PB FADE) settings make it possible to remove noise. Setup Audio V Fade Function This section describes the differences between audio processing provided by edit copy. • A clip that spans multiple P2 cards or a clip that have been automatically divided when using 8 GB or larger P2 cards • 1394 digital output signals are not V fade...
... are not fade processed. Setup menu No. 731 (PB FADE) settings make it possible to remove noise. Setup Audio V Fade Function This section describes the differences between audio processing provided by edit copy. • A clip that spans multiple P2 cards or a clip that have been automatically divided when using 8 GB or larger P2 cards • 1394 digital output signals are not V fade...
AJHPM100 User Guide
Page 141
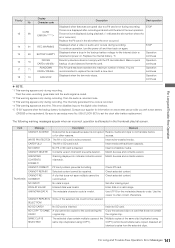
... 15 50 16 70 17 71 18 10 Display Character code CARD ERROR REC WARNING BATTERY EMPTY DIR NG CARD RUNDOWN CARD FAN STOP Description Deck operation Displayed when data was invalid. Then the video recording goes black and the audio signal is full. access. CARD FULL! No P2 or SD card is depleted. Enter data in the thumbnail play list screen. Use the viewer to indicate contents version Match devices...
... 15 50 16 70 17 71 18 10 Display Character code CARD ERROR REC WARNING BATTERY EMPTY DIR NG CARD RUNDOWN CARD FAN STOP Description Deck operation Displayed when data was invalid. Then the video recording goes black and the audio signal is full. access. CARD FULL! No P2 or SD card is depleted. Enter data in the thumbnail play list screen. Use the viewer to indicate contents version Match devices...


