User Manual
Page 1
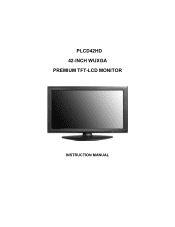
PLCD42HD 42-INCH WUXGA PREMIUM TFT-LCD MONITOR INSTRUCTION MANUAL
PLCD42HD 42-INCH WUXGA PREMIUM TFT-LCD MONITOR INSTRUCTION MANUAL

User Manual
Page 2
Please read this manual thoroughly before use, and keep it handy for future reference.
Please read this manual thoroughly before use, and keep it handy for future reference.
User Manual
Page 4
.... 6. The wide blade or the third prong are provided for your outlet, consult an electrician for replacement of the polarized or grounding-type plug. INSTRUCTION MANUAL 1 Important Safety Instruction 1.
.... 6. The wide blade or the third prong are provided for your outlet, consult an electrician for replacement of the polarized or grounding-type plug. INSTRUCTION MANUAL 1 Important Safety Instruction 1.
User Manual
Page 5
... long periods of fire or electric shock, do not expose the apparatus to rain or moisture does not operate normally or has been dropped. 2 INSTRUCTION MANUAL - "WARNING - To reduce the risk of time. 14. Servicing is damaged, liquid has been spilled or objects have fallen into the apparatus the apparatus has...
... long periods of fire or electric shock, do not expose the apparatus to rain or moisture does not operate normally or has been dropped. 2 INSTRUCTION MANUAL - "WARNING - To reduce the risk of time. 14. Servicing is damaged, liquid has been spilled or objects have fallen into the apparatus the apparatus has...
User Manual
Page 6
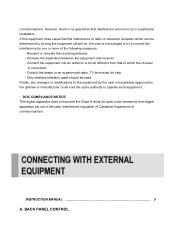
... easily accessible. This symbol is intended to alert the user to the presence of uninsulated : dangerous voltage with in the literature accompanying the appliance. INSTRUCTION MANUAL 3 CAUTION The power supply cord is used as the main disconnect device, ensure that may be of sufficient magnitude to persons.
... easily accessible. This symbol is intended to alert the user to the presence of uninsulated : dangerous voltage with in the literature accompanying the appliance. INSTRUCTION MANUAL 3 CAUTION The power supply cord is used as the main disconnect device, ensure that may be of sufficient magnitude to persons.

User Manual
Page 7
... use the unit against harmful interference in direct sunshine or near a heating appliance. This equipment generates, uses and can cause fire or electrical shock. 4 INSTRUCTION MANUAL NOTE This equipment has been tested and found to comply with the instructions, may cause harmful interference to Part 15 of the back cover should...
... use the unit against harmful interference in direct sunshine or near a heating appliance. This equipment generates, uses and can cause fire or electrical shock. 4 INSTRUCTION MANUAL NOTE This equipment has been tested and found to comply with the instructions, may cause harmful interference to Part 15 of the back cover should...
User Manual
Page 8
... cause harmful interference to correct the interference by turning the equipment off and on a circuit different from digital apparatus set out in a particular installation. INSTRUCTION MANUAL 5 A. BACK PANEL CONTROL Increase the separation between the equipment and receiver. - Consult the dealer or an experienced radio, TV technician for radio noise emissions from...
... cause harmful interference to correct the interference by turning the equipment off and on a circuit different from digital apparatus set out in a particular installation. INSTRUCTION MANUAL 5 A. BACK PANEL CONTROL Increase the separation between the equipment and receiver. - Consult the dealer or an experienced radio, TV technician for radio noise emissions from...
User Manual
Page 9
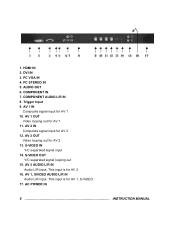
.... S-VIDEO IN Y/C separated signal input 14. 1. COMPONENT IN 7. S-VIDEO OUT Y/C separated signal looping out 15. AV 1, SVIDEO AUDIO L/R IN Audio L/R input. AC POWER IN 6 INSTRUCTION MANUAL COMPONENT AUDIO L/R IN 8. HDMI IN 2. DVI IN 3. PC VGA IN 4. Trigger Input 9. PC STEREO IN 5. AV 2 IN Composite signal input for AV 1 11. AV 2 AUDIO...
.... S-VIDEO IN Y/C separated signal input 14. 1. COMPONENT IN 7. S-VIDEO OUT Y/C separated signal looping out 15. AV 1, SVIDEO AUDIO L/R IN Audio L/R input. AC POWER IN 6 INSTRUCTION MANUAL COMPONENT AUDIO L/R IN 8. HDMI IN 2. DVI IN 3. PC VGA IN 4. Trigger Input 9. PC STEREO IN 5. AV 2 IN Composite signal input for AV 1 11. AV 2 AUDIO...
User Manual
Page 10
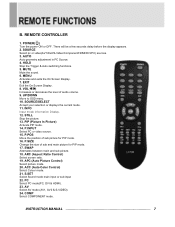
... On Screen Display. 8. STILL Stop the picture. 13. PIP (Picture In Picture) Activate PIP mode. 14. SWAP Alternates between main and sub picture. 18. INSTRUCTION MANUAL 7 REMOTE CONTROLLER 1. POWER( ) Turn the power ON or OFF. HOLD Stop the Trigger & Auto switching functions. 5. PC Select PC mode(PC, DVI & HDMI). 23. AV...
... On Screen Display. 8. STILL Stop the picture. 13. PIP (Picture In Picture) Activate PIP mode. 14. SWAP Alternates between main and sub picture. 18. INSTRUCTION MANUAL 7 REMOTE CONTROLLER 1. POWER( ) Turn the power ON or OFF. HOLD Stop the Trigger & Auto switching functions. 5. PC Select PC mode(PC, DVI & HDMI). 23. AV...
User Manual
Page 11
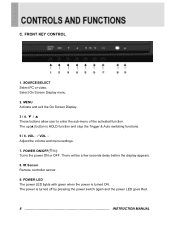
.... 5 / 6. The up(▲) button is turned ON. The power is turned off by pressing the power switch again and the power LED goes Red. 8 INSTRUCTION MANUAL SOURCE/SELECT Select PC or video. FRONT KEY CONTROL 1. POWER ON/OFF( / I ) Turns the power ON or OFF.
.... 5 / 6. The up(▲) button is turned ON. The power is turned off by pressing the power switch again and the power LED goes Red. 8 INSTRUCTION MANUAL SOURCE/SELECT Select PC or video. FRONT KEY CONTROL 1. POWER ON/OFF( / I ) Turns the power ON or OFF.
User Manual
Page 12
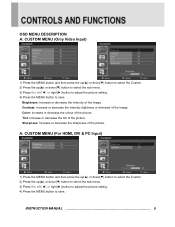
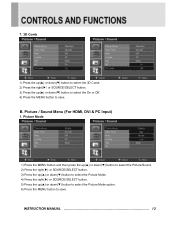
Sharpness: Increase or decrease the sharpness of the image. INSTRUCTION MANUAL 9 A: CUSTOM MENU (For HDMI, DVI & PC Input) 1) Press the MENU button and then press the up(▲) or down(▼) button to select the Custom. 2) ...
Sharpness: Increase or decrease the sharpness of the image. INSTRUCTION MANUAL 9 A: CUSTOM MENU (For HDMI, DVI & PC Input) 1) Press the MENU button and then press the up(▲) or down(▼) button to select the Custom. 2) ...
User Manual
Page 13
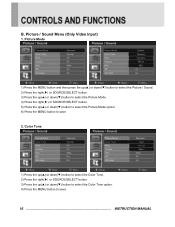
... SOURCE/SELECT button. 3) Press the up (▲) or down (▼) button to select the Color Tone option. 4) Press the MENU button to save . 10 INSTRUCTION MANUAL B. Picture Mode 1) Press the MENU button and then press the up(▲) or down(▼) button to select the Picture / Sound. 2) Press the right(▶...
... SOURCE/SELECT button. 3) Press the up (▲) or down (▼) button to select the Color Tone option. 4) Press the MENU button to save . 10 INSTRUCTION MANUAL B. Picture Mode 1) Press the MENU button and then press the up(▲) or down(▼) button to select the Picture / Sound. 2) Press the right(▶...
User Manual
Page 14
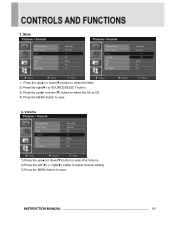
3. Volume 1) Press the up (▲) or down (▼) button to select the Volume 2) Press the left(◀) or right(▶) button to adjust Volume setting. 3) Press the MENU button to save . Mute 1) Press the up(▲) or down(▼) button to select the Mute. 2) Press the right(▶) or SOURCE/SELECT button. 3) Press the up (▲) or down (▼) button to select the On or Off. 4) Press the MENU button to save . 4. INSTRUCTION MANUAL 11
3. Volume 1) Press the up (▲) or down (▼) button to select the Volume 2) Press the left(◀) or right(▶) button to adjust Volume setting. 3) Press the MENU button to save . Mute 1) Press the up(▲) or down(▼) button to select the Mute. 2) Press the right(▶) or SOURCE/SELECT button. 3) Press the up (▲) or down (▼) button to select the On or Off. 4) Press the MENU button to save . 4. INSTRUCTION MANUAL 11

User Manual
Page 15
5. NR 1) Press the up(▲) or down(▼) button to select the NR. 2) Press the right(▶) or SOURCE/SELECT button. 3) Press the up (▲) or down (▼) button to select the On or Off. 4) Press the MENU button to save . 12 INSTRUCTION MANUAL Size 1) Press the up(▲) or down(▼) button to select the Size 2) Press the right(▶) or SOURCE/SELECT button. 3) Press the up (▲) or down (▼) button to select the Size option. 4) Press the MENU button to save . 6.
5. NR 1) Press the up(▲) or down(▼) button to select the NR. 2) Press the right(▶) or SOURCE/SELECT button. 3) Press the up (▲) or down (▼) button to select the On or Off. 4) Press the MENU button to save . 12 INSTRUCTION MANUAL Size 1) Press the up(▲) or down(▼) button to select the Size 2) Press the right(▶) or SOURCE/SELECT button. 3) Press the up (▲) or down (▼) button to select the Size option. 4) Press the MENU button to save . 6.
User Manual
Page 16
...;) or down (▼) button to select the On or Off. 4) Press the MENU button to save . B. Picture / Sound Menu (For HDMI, DVI & PC Input) 1. INSTRUCTION MANUAL 13 Picture Mode 1) Press the MENU button and then press the up(▲) or down(▼) button to select the Picture/Sound. 2) Press the right...
...;) or down (▼) button to select the On or Off. 4) Press the MENU button to save . B. Picture / Sound Menu (For HDMI, DVI & PC Input) 1. INSTRUCTION MANUAL 13 Picture Mode 1) Press the MENU button and then press the up(▲) or down(▼) button to select the Picture/Sound. 2) Press the right...
User Manual
Page 17
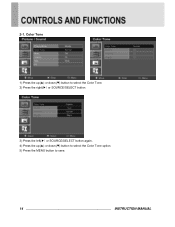
Color Tone 1) Press the up(▲) or down(▼) button to select the Color Tone. 2) Press the right(▶) or SOURCE/SELECT button. 3) Press the left(▶) or SOURCE/SELECT button again. 4) Press the up(▲) or down(▼) button to select the Color Tone option. 5) Press the MENU button to save. 14 INSTRUCTION MANUAL 2-1.
Color Tone 1) Press the up(▲) or down(▼) button to select the Color Tone. 2) Press the right(▶) or SOURCE/SELECT button. 3) Press the left(▶) or SOURCE/SELECT button again. 4) Press the up(▲) or down(▼) button to select the Color Tone option. 5) Press the MENU button to save. 14 INSTRUCTION MANUAL 2-1.

User Manual
Page 18
INSTRUCTION MANUAL 15 2-2. Color Tone (Custom) 1) Press the up(▲) or down(▼) button to select the Custom in the Color Tone. 2) Press the Menu button to save. 3) Press the up(▲) or down(▼) button to select the Red(R), Green(G) or Blue(B). 4) Press the left(◀) or right(▶) button to adjust color density. 5) Press the MENU button to save.
INSTRUCTION MANUAL 15 2-2. Color Tone (Custom) 1) Press the up(▲) or down(▼) button to select the Custom in the Color Tone. 2) Press the Menu button to save. 3) Press the up(▲) or down(▼) button to select the Red(R), Green(G) or Blue(B). 4) Press the left(◀) or right(▶) button to adjust color density. 5) Press the MENU button to save.
User Manual
Page 19
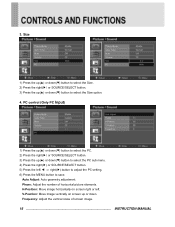
...;) or SOURCE/SELECT button. 5) Press the left . Frequency: Adjust the vertical noise of horizontal picture elements. 3. Phase: Adjust the number of screen image. 16 INSTRUCTION MANUAL Size 1) Press the up(▲) or down(▼) button to select the Size. 2) Press the right(▶) or SOURCE/SELECT button. 3) Press the up or...
...;) or SOURCE/SELECT button. 5) Press the left . Frequency: Adjust the vertical noise of horizontal picture elements. 3. Phase: Adjust the number of screen image. 16 INSTRUCTION MANUAL Size 1) Press the up(▲) or down(▼) button to select the Size. 2) Press the right(▶) or SOURCE/SELECT button. 3) Press the up or...
User Manual
Page 20
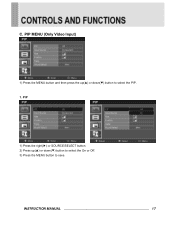
INSTRUCTION MANUAL 17 C. PIP MENU (Only Video Input) 1) Press the MENU button and then press the up (▲) or down (▼) button to save. PIP 1) Press the right(▶) or SOURCE/SELECT button. 2) Press up (▲) or down (▼) button to select the On or Off. 3) Press the MENU button to select the PIP. 1.
INSTRUCTION MANUAL 17 C. PIP MENU (Only Video Input) 1) Press the MENU button and then press the up (▲) or down (▼) button to save. PIP 1) Press the right(▶) or SOURCE/SELECT button. 2) Press up (▲) or down (▼) button to select the On or Off. 3) Press the MENU button to select the PIP. 1.
User Manual
Page 21
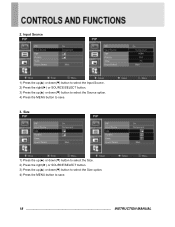
Size 1) Press the up(▲) or down(▼) button to select the Size. 2) Press the right(▶) or SOURCE/SELECT button. 3) Press the up (▲) or down (▼) button to select the Size option. 4) Press the MENU button to save . 18 INSTRUCTION MANUAL Input Source 1) Press the up(▲) or down(▼) button to select the Input Source. 2) Press the right(▶) or SOURCE/SELECT button. 3) Press the up (▲) or down (▼) button to select the Source option. 4) Press the MENU button to save . 3. 2.
Size 1) Press the up(▲) or down(▼) button to select the Size. 2) Press the right(▶) or SOURCE/SELECT button. 3) Press the up (▲) or down (▼) button to select the Size option. 4) Press the MENU button to save . 18 INSTRUCTION MANUAL Input Source 1) Press the up(▲) or down(▼) button to select the Input Source. 2) Press the right(▶) or SOURCE/SELECT button. 3) Press the up (▲) or down (▼) button to select the Source option. 4) Press the MENU button to save . 3. 2.