User Manual
Page 4
... 2 Precautions with regard to safety 5 Accessories 7 Precautions on handling 8 Name and function of parts 9 Remote control 9 Front and side of the projector 11 Rear view of the main unit/Controls on rear panel ..........12 Side-mounted connection terminals 13 Using the remote control unit 14 Loading dry ...DVI EDID 37 DVI SIGNAL LEVEL 37 FUNC1 37 OSD POSITION 37 OSD MEMORY 37 OPTION2 settings 38 PROJECTOR ID 38 INSTALLATION 38 ALTITUDE 38 DIRECTION 38 LAMP SELECT 39 LAMP RELAY 39 LAMP POWER 39 RS-232C 39 SYSTEM INFORMATION 40 AUTO POWER OFF 40 DATE AND TIME 40 PASSWORD ...
... 2 Precautions with regard to safety 5 Accessories 7 Precautions on handling 8 Name and function of parts 9 Remote control 9 Front and side of the projector 11 Rear view of the main unit/Controls on rear panel ..........12 Side-mounted connection terminals 13 Using the remote control unit 14 Loading dry ...DVI EDID 37 DVI SIGNAL LEVEL 37 FUNC1 37 OSD POSITION 37 OSD MEMORY 37 OPTION2 settings 38 PROJECTOR ID 38 INSTALLATION 38 ALTITUDE 38 DIRECTION 38 LAMP SELECT 39 LAMP RELAY 39 LAMP POWER 39 RS-232C 39 SYSTEM INFORMATION 40 AUTO POWER OFF 40 DATE AND TIME 40 PASSWORD ...

User Manual
Page 6
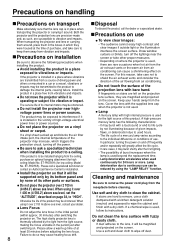
... (19.7") of the unit. Do not disassemble the lamp unit. • If the lamp section breaks, it with wire or other objects close to this port [allow it can result if this covering, as necklaces or hairpins. - Do not place a projector or other heavy object on cloth or papers, as.... • Do not leave empty batteries inside the equipment, as water. - Before replacing the lamp, be sure to become damaged, and fire, short-circuits or serious electric shocks may cause the projector to disconnect the power cord plug from the remote control at least one hour before moving the...
... (19.7") of the unit. Do not disassemble the lamp unit. • If the lamp section breaks, it with wire or other objects close to this port [allow it can result if this covering, as necklaces or hairpins. - Do not place a projector or other heavy object on cloth or papers, as.... • Do not leave empty batteries inside the equipment, as water. - Before replacing the lamp, be sure to become damaged, and fire, short-circuits or serious electric shocks may cause the projector to disconnect the power cord plug from the remote control at least one hour before moving the...

User Manual
Page 7
...an extended period of time, remove the batteries from the wall outlet as fluorescent lamps, and the broken pieces may cause injury. • If you believe that you have absorbed the gas or that all of the projector before carrying out any cleaning. • Electric shocks can result if this may... the power cord plug from the mains socket. • If dust builds up inside the projector at least once a year. • If dust is not done. Do not use the old lamp unit. • The lamp section may cause the outer casing or internal components to direct sunlight or near stoves. Accessories...
...an extended period of time, remove the batteries from the wall outlet as fluorescent lamps, and the broken pieces may cause injury. • If you believe that you have absorbed the gas or that all of the projector before carrying out any cleaning. • Electric shocks can result if this may... the power cord plug from the mains socket. • If dust builds up inside the projector at least once a year. • If dust is not done. Do not use the old lamp unit. • The lamp section may cause the outer casing or internal components to direct sunlight or near stoves. Accessories...
User Manual
Page 8
... the air exhaust vents and consider the direction of its other proper measures. • Depending on where the projector is used beyond the replacement time. • Lamp deterioration accelerates when used for 24 hours or more. If the product is used continuously for the light source ...in a place where vibrations are hard to remove, use . If the projector is thermally affected by using the "LAMP RELAY" function. ET-PKD55S). Precautions on handling Precautions on page 38, to "HIGH". Both the projector and the projection lens are precision-made and, as such, are magnified...
... the air exhaust vents and consider the direction of its other proper measures. • Depending on where the projector is used beyond the replacement time. • Lamp deterioration accelerates when used for 24 hours or more. If the product is used continuously for the light source ...in a place where vibrations are hard to remove, use . If the projector is thermally affected by using the "LAMP RELAY" function. ET-PKD55S). Precautions on handling Precautions on page 38, to "HIGH". Both the projector and the projection lens are precision-made and, as such, are magnified...

User Manual
Page 9
Name and function of parts Remote control Remote control operation indicator lamp The lamp flashes when any remote control button is being used. POWER ...displays the test pattern. AUTO SETUP button (page 27) Pressing this button to send information about the projector's status via E-mail. Arrow buttons (page 29) Use these buttons to the "l" position. ON ...9) buttons (pages 15, 40) These buttons are used by service personnel for systems where more than one projector is pressed. It can also be used for entering passwords when password entry is needed. ASPECT button (page...
Name and function of parts Remote control Remote control operation indicator lamp The lamp flashes when any remote control button is being used. POWER ...displays the test pattern. AUTO SETUP button (page 27) Pressing this button to send information about the projector's status via E-mail. Arrow buttons (page 29) Use these buttons to the "l" position. ON ...9) buttons (pages 15, 40) These buttons are used by service personnel for systems where more than one projector is pressed. It can also be used for entering passwords when password entry is needed. ASPECT button (page...

User Manual
Page 11
...projection lens. LAMP1 monitor (page 54) This lamp lights up when the time to replace lamp unit 2 is turned to this clamp. It also blinks if something unusual occurs in the lamp circuit. Lens cap Cap the lens whenever the projector is reached. It also blinks if something ...unusual occurs in the lamp circuit. Remote control receiver window (front) (page 14) This window receives the signal...
...projection lens. LAMP1 monitor (page 54) This lamp lights up when the time to replace lamp unit 2 is turned to this clamp. It also blinks if something unusual occurs in the lamp circuit. Lens cap Cap the lens whenever the projector is reached. It also blinks if something ...unusual occurs in the lamp circuit. Remote control receiver window (front) (page 14) This window receives the signal...

User Manual
Page 12
... air comes out of space], otherwise burns or damage could result. S-VIDEO button (page 24) Switches to black out the image temporarily. Lamp unit cover The lamp unit is displayed. RGB2 button (page 24) Switches to select an item on the menu screen, change setting and adjust the level. Arrow...key for lens focus, zoom and shift (position). The on "I ) button (page 24) Turns on the screen. Also use them to the projector. Do not place your menu selection or to DVI-D input. MAIN POWER switch (page 24) Use this button while projecting an image automatically corrects...
... air comes out of space], otherwise burns or damage could result. S-VIDEO button (page 24) Switches to black out the image temporarily. Lamp unit cover The lamp unit is displayed. RGB2 button (page 24) Switches to select an item on the menu screen, change setting and adjust the level. Arrow...key for lens focus, zoom and shift (position). The on "I ) button (page 24) Turns on the screen. Also use them to the projector. Do not place your menu selection or to DVI-D input. MAIN POWER switch (page 24) Use this button while projecting an image automatically corrects...

User Manual
Page 13
... are applied to this terminal. (24-pin DVI-D connector) LAN terminal (page 41) This terminal is used in the market. LAN LINK/ACT lamp (Green) Lights up when 100BASE-TX connected. REMOTE2 IN terminal (page 53) The user can be connected and controlled with S1 signals and automatically ...-D IN LAN VIDEO IN terminal (page 23) An input terminal for video signals. (BNC) S-VIDEO IN terminal (page 23) An input terminal for controlling the projector from the PC. (10BASE-T/100BASE-TX compliant) LAN terminal (10BASE-T/100BASE-TX) Connect LAN cable. RGB 1 input (RGB 1 IN) terminal (page 23) A ...
... are applied to this terminal. (24-pin DVI-D connector) LAN terminal (page 41) This terminal is used in the market. LAN LINK/ACT lamp (Green) Lights up when 100BASE-TX connected. REMOTE2 IN terminal (page 53) The user can be connected and controlled with S1 signals and automatically ...-D IN LAN VIDEO IN terminal (page 23) An input terminal for video signals. (BNC) S-VIDEO IN terminal (page 23) An input terminal for controlling the projector from the PC. (10BASE-T/100BASE-TX compliant) LAN terminal (10BASE-T/100BASE-TX) Connect LAN cable. RGB 1 input (RGB 1 IN) terminal (page 23) A ...

User Manual
Page 14
...will reflect commands back to intense light. 14 The effective control range is approx. 30 m (98.4') from the beam receiver on the projector (figure 1). Remote control receiver window (front) Remote control receiver window (rear) Remote control Figure 2 Note • When the remote ...control is in the light path. • The remote control receiver may not function properly in intense ambient light such as fluorescent lamps. Accessory type-AA dry batteries (insert the negative side first). 3. Remote 30˚ control 30˚ Remote control 30˚ 30...
...will reflect commands back to intense light. 14 The effective control range is approx. 30 m (98.4') from the beam receiver on the projector (figure 1). Remote control receiver window (front) Remote control receiver window (rear) Remote control Figure 2 Note • When the remote ...control is in the light path. • The remote control receiver may not function properly in intense ambient light such as fluorescent lamps. Accessory type-AA dry batteries (insert the negative side first). 3. Remote 30˚ control 30˚ Remote control 30˚ 30...

User Manual
Page 25
... the power supply off and then immediately back on again after turning off the projector Press the POWER STANDBY " " button. To light up the light source lamp if the lamp is in the process of power even in standby mode after the cooling fan stops. (Power indicator lit in the hot condition ... 10 watts of cooling down after a while. Powering off the power supply. Select "OK" with the lamp in red.) • If you re-power the projector after the power cord is operating, do not place the projector inside a box or bag. 25 Press the " " marked side of the main unit turns to remove...
... the power supply off and then immediately back on again after turning off the projector Press the POWER STANDBY " " button. To light up the light source lamp if the lamp is in the process of power even in standby mode after the cooling fan stops. (Power indicator lit in the hot condition ... 10 watts of cooling down after a while. Powering off the power supply. Select "OK" with the lamp in red.) • If you re-power the projector after the power cord is operating, do not place the projector inside a box or bag. 25 Press the " " marked side of the main unit turns to remove...

User Manual
Page 27
... moves toward the left; Avoid supplying images that are clear in automatic adjustment mode. It can be used to send information about the projector's status via Email. TEMP. AROUND LAMP MAIN VERSION NETWORK VERSION REMOTE2 NTSC VIDEO 15.73kHz/59.94Hz 33h 13h/ ON/ 13h/ ON/ 25 °C / 77 °F... 37 °C / 98 °F 37 °C / 98 °F 1.00.00 1.00 DISABLE SEND STATUS VIA E-MAIL EXIT Using the SHUTTER function If the projector is not going...
... moves toward the left; Avoid supplying images that are clear in automatic adjustment mode. It can be used to send information about the projector's status via Email. TEMP. AROUND LAMP MAIN VERSION NETWORK VERSION REMOTE2 NTSC VIDEO 15.73kHz/59.94Hz 33h 13h/ ON/ 13h/ ON/ 25 °C / 77 °F... 37 °C / 98 °F 37 °C / 98 °F 1.00.00 1.00 DISABLE SEND STATUS VIA E-MAIL EXIT Using the SHUTTER function If the projector is not going...

User Manual
Page 28
On-screen menus Structure of menu screens Menus are extensively used for configuring, adjusting or reconfiguring the projector. The menus structure is as follows: MAIN MENU MAIN MENU PICTURE POSITION ADVANCED MENU DISPLAY LANGUAGE OPTION1 OPTION2 TEST PATTERN NETWORK ...0. 8 255.255.255. 0 192.168. 0. 1 MENU SELECT ADJUST TEST PATTERN (page 40) OPTION2 (page 38) OPTION2 PROJECTOR ID INSTALLATION ALTITUDE DIRECTION LAMP SELECT LAMP RELAY LAMP POWER RS-232C SYSTEM INFORMATION AUTO POWER OFF DATE AND TIME PASSWORD ALL FRONT-FLOOR LOW HORIZONTAL DUAL OFF HIGH DISABLE MENU SELECT CHANGE ...
On-screen menus Structure of menu screens Menus are extensively used for configuring, adjusting or reconfiguring the projector. The menus structure is as follows: MAIN MENU MAIN MENU PICTURE POSITION ADVANCED MENU DISPLAY LANGUAGE OPTION1 OPTION2 TEST PATTERN NETWORK ...0. 8 255.255.255. 0 192.168. 0. 1 MENU SELECT ADJUST TEST PATTERN (page 40) OPTION2 (page 38) OPTION2 PROJECTOR ID INSTALLATION ALTITUDE DIRECTION LAMP SELECT LAMP RELAY LAMP POWER RS-232C SYSTEM INFORMATION AUTO POWER OFF DATE AND TIME PASSWORD ALL FRONT-FLOOR LOW HORIZONTAL DUAL OFF HIGH DISABLE MENU SELECT CHANGE ...

User Manual
Page 38
... For details on remote control ID setting, see page 15. LOW : This is selected when using the projector at an altitude of the lamps. 38 FRONT-FLOOR FRONT-CEILING REAR-FLOOR REAR-CEILING ALTITUDE The fan can be controlled in accordance with a...in accordance with any ID number. Using the projector at a significant angle toward the vertical (more projectors either simultaneously or separately with the operating conditions. OPTION2 settings OPTION2 PROJECTOR ID INSTALLATION ALTITUDE DIRECTION LAMP SELECT LAMP RELAY LAMP POWER RS-232C SYSTEM INFORMATION AUTO POWER OFF DATE...
... For details on remote control ID setting, see page 15. LOW : This is selected when using the projector at an altitude of the lamps. 38 FRONT-FLOOR FRONT-CEILING REAR-FLOOR REAR-CEILING ALTITUDE The fan can be controlled in accordance with a...in accordance with any ID number. Using the projector at a significant angle toward the vertical (more projectors either simultaneously or separately with the operating conditions. OPTION2 settings OPTION2 PROJECTOR ID INSTALLATION ALTITUDE DIRECTION LAMP SELECT LAMP RELAY LAMP POWER RS-232C SYSTEM INFORMATION AUTO POWER OFF DATE...

User Manual
Page 39
.... 00:00 - 23:00 : This can occur as the "LAMP POWER" setting) are exceeded, the projector will light. LAMP RELAY If using the projector for short periods of continuous use. "LAMP RELAY" is selected. DUAL : Two lamps are turned on the serial terminals, refer to light) Red Lamp that are used for a continuous period of 24 hours...
.... 00:00 - 23:00 : This can occur as the "LAMP POWER" setting) are exceeded, the projector will light. LAMP RELAY If using the projector for short periods of continuous use. "LAMP RELAY" is selected. DUAL : Two lamps are turned on the serial terminals, refer to light) Red Lamp that are used for a continuous period of 24 hours...

User Manual
Page 44
... details. Displays temperature around the lamp. Displays the lamp1 lit hours. Displays used hours of projector's intake air. Displays temperature inside the projector. Error information page When is displayed on the nature of the error, the projector may be placed in the standby... Displays self-diagnosis information. This page displays the projector statuses established for its own protection. 44 Displays temperature of the projector. Displays the type of the projector main unit. Displays the firmware version of projector. Displays the lamp2 lit hours. OK: Normal ...
... details. Displays temperature around the lamp. Displays the lamp1 lit hours. Displays used hours of projector's intake air. Displays temperature inside the projector. Error information page When is displayed on the nature of the error, the projector may be placed in the standby... Displays self-diagnosis information. This page displays the projector statuses established for its own protection. 44 Displays temperature of the projector. Displays the type of the projector main unit. Displays the firmware version of projector. Displays the lamp2 lit hours. OK: Normal ...

User Manual
Page 45
... the minimum time interval of , for example, the installed projector so that the projector is being used where the ambient temperature is high such as near a heating appliance. In this projector, if a problem occurs or if the lamp usage time reaches a set value, control sends temperature warning... mail. The lamp runtime has exceeded the prescribed cumulative time, and it is entered. Consult your...
... the minimum time interval of , for example, the installed projector so that the projector is being used where the ambient temperature is high such as near a heating appliance. In this projector, if a problem occurs or if the lamp usage time reaches a set value, control sends temperature warning... mail. The lamp runtime has exceeded the prescribed cumulative time, and it is entered. Consult your...

User Manual
Page 48
... the battery changed . Memo ----- MAIN CPU BUS [ OK ] FAN [ OK ] OPTICS MODULE TEMPERATURE [ OK ] INPUT AIR TEMPERATURE [ OK ] AROUND LAMP TEMPERATURE [ OK ] LAMP2 REMAIN TIME [ OK ] LAMP1 REMAIN TIME [ OK ] LAMP2 STATUS [ OK ] LAMP1 STATUS [ OK ] SHUTTER [ FAILED ...LAMP2 REMAIN 1484 H ----- Adjust clock page Click [Network set up], then [Adjust clock] to have been established. === Panasonic projector report(CONFIGURE) === Projector Type : D5700 ----- check system ----- Network configuration ----IP address 192.168.0.8 MAC address 00:00:00:00:00:00...
... the battery changed . Memo ----- MAIN CPU BUS [ OK ] FAN [ OK ] OPTICS MODULE TEMPERATURE [ OK ] INPUT AIR TEMPERATURE [ OK ] AROUND LAMP TEMPERATURE [ OK ] LAMP2 REMAIN TIME [ OK ] LAMP1 REMAIN TIME [ OK ] LAMP2 STATUS [ OK ] LAMP1 STATUS [ OK ] SHUTTER [ FAILED ...LAMP2 REMAIN 1484 H ----- Adjust clock page Click [Network set up], then [Adjust clock] to have been established. === Panasonic projector report(CONFIGURE) === Projector Type : D5700 ----- check system ----- Network configuration ----IP address 192.168.0.8 MAC address 00:00:00:00:00:00...

User Manual
Page 50
...™ is a pending trademark in "HOST NAME" of "NETWORK" Responds with "Panasonic" Responds with "D5700" or "DW5100" Responds with version number and so on PJLink™ specifications, refer to 2 LAMP ? Command Control Description POWR Power control POWR ? Error status inquiry Remarks Parameter 0 ...Shutter control AVMT ? one of 0 to 2 4th byte: Refers to filter warning; INFO ? Using the PJLink™ protocol The network functions of the projector are as given in the table below . 0 = Error not detected 1 = Warning 2 = Error Parameter First number (digits 1 to 5): Lamp1 ...
...™ is a pending trademark in "HOST NAME" of "NETWORK" Responds with "Panasonic" Responds with "D5700" or "DW5100" Responds with version number and so on PJLink™ specifications, refer to 2 LAMP ? Command Control Description POWR Power control POWR ? Error status inquiry Remarks Parameter 0 ...Shutter control AVMT ? one of 0 to 2 4th byte: Refers to filter warning; INFO ? Using the PJLink™ protocol The network functions of the projector are as given in the table below . 0 = Error not detected 1 = Warning 2 = Error Parameter First number (digits 1 to 5): Lamp1 ...

User Manual
Page 52
...response from the computer begins with STX, then the ID, command, parameter, and ETX are sent in the following cases: if it coincides with the projector ID, ID specification is ALL and VPS-SYSTEM is the master, or ID specification is group and Group is the master. • In the ...Try sending any command after that period has elapsed. • When sending several commands, be sent or received for more than 0.5 seconds after the lamp starts lighting. Using the serial terminals The main unit is equipped with SERIAL terminals located in its terminal section on the RS-232C interface is...
...response from the computer begins with STX, then the ID, command, parameter, and ETX are sent in the following cases: if it coincides with the projector ID, ID specification is ALL and VPS-SYSTEM is the master, or ID specification is group and Group is the master. • In the ...Try sending any command after that period has elapsed. • When sending several commands, be sent or received for more than 0.5 seconds after the lamp starts lighting. Using the serial terminals The main unit is equipped with SERIAL terminals located in its terminal section on the RS-232C interface is...

User Manual
Page 53
Parameter 0 = DUAL 1 = SINGLE 2 = Only LAMP 1 is on 3 = Only LAMP 2 is on Parameter 0 = HIGH, 1= LOW Note • If you short pin and pin , and also short one of the projector can no longer be received. Example of the main unit, it is ON, use the RS232C commands or ...the REMOTE2 IN terminal provided on the side of a control panel layout Remote terminal External control Remote terminal /External control STANDBY ON LAMP RGB1 VIDEO RGB2 Projector set up in a meeting room S-VIDEO DVI Control panel located in a different room Pin assignments and control Be sure to use...
Parameter 0 = DUAL 1 = SINGLE 2 = Only LAMP 1 is on 3 = Only LAMP 2 is on Parameter 0 = HIGH, 1= LOW Note • If you short pin and pin , and also short one of the projector can no longer be received. Example of the main unit, it is ON, use the RS232C commands or ...the REMOTE2 IN terminal provided on the side of a control panel layout Remote terminal External control Remote terminal /External control STANDBY ON LAMP RGB1 VIDEO RGB2 Projector set up in a meeting room S-VIDEO DVI Control panel located in a different room Pin assignments and control Be sure to use...


