User Manual
Page 4
... FUNC1 37 OSD POSITION 37 OSD MEMORY 37 OPTION2 settings 38 PROJECTOR ID 38 INSTALLATION 38 ALTITUDE 38 DIRECTION 38 LAMP SELECT 39 LAMP RELAY 39 LAMP POWER 39 RS-232C 39 SYSTEM INFORMATION 40 AUTO POWER OFF 40 DATE AND TIME 40 PASSWORD 40 Displaying the ... 53 Cable specifications 53 Using the Remote 2 terminal 53 Indication of lamp monitor 54 Cleaning and replacement of air filter 55 Procedure of cleaning 55 Replacing the lamp unit 56 When to replace the Lamp unit 56 Lamp unit replacement steps 57 Ceiling Mount Bracket Safeguards 58 Before asking for service 59 ...
... FUNC1 37 OSD POSITION 37 OSD MEMORY 37 OPTION2 settings 38 PROJECTOR ID 38 INSTALLATION 38 ALTITUDE 38 DIRECTION 38 LAMP SELECT 39 LAMP RELAY 39 LAMP POWER 39 RS-232C 39 SYSTEM INFORMATION 40 AUTO POWER OFF 40 DATE AND TIME 40 PASSWORD 40 Displaying the ... 53 Cable specifications 53 Using the Remote 2 terminal 53 Indication of lamp monitor 54 Cleaning and replacement of air filter 55 Procedure of cleaning 55 Replacing the lamp unit 56 When to replace the Lamp unit 56 Lamp unit replacement steps 57 Ceiling Mount Bracket Safeguards 58 Before asking for service 59 ...

User Manual
Page 6
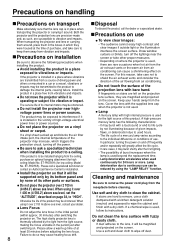
Do not place the projector on top of the unit. Do not connect the + and - The batteries have a protective outer covering. When replacing the lamp, allow at least 50 cm (19.7") of sight. Do not place a projector or other heavy object on soft materials such as necklaces or ...projector may be drawn into contact with bare hands, and take the following measures if necessary. • Battery fluid entering your eyes. Before replacing the lamp, be sure to disconnect the power cord plug from the remote control at once. • Do not leave empty batteries inside the equipment,...
Do not place the projector on top of the unit. Do not connect the + and - The batteries have a protective outer covering. When replacing the lamp, allow at least 50 cm (19.7") of sight. Do not place a projector or other heavy object on soft materials such as necklaces or ...projector may be drawn into contact with bare hands, and take the following measures if necessary. • Battery fluid entering your eyes. Before replacing the lamp, be sure to disconnect the power cord plug from the remote control at once. • Do not leave empty batteries inside the equipment,...

User Manual
Page 7
...up inside of the accessories shown below have been included with the Authorized Service Center regarding cleaning costs. Please discuss with your dealer about the replacement of time, disconnect the power cord plug from the wall outlet as a safety precaution before the season for remote [N2QAYB000164 x 1] [K2CG3FZ00008...direct sunlight or near stoves. Remote control unit Power cord Battery for humid weather arrives. Do not use the old lamp unit. • The lamp section may cause the outer casing or internal components to clean the inside the projector at least once a year. &#...
...up inside of the accessories shown below have been included with the Authorized Service Center regarding cleaning costs. Please discuss with your dealer about the replacement of time, disconnect the power cord plug from the wall outlet as a safety precaution before the season for remote [N2QAYB000164 x 1] [K2CG3FZ00008...direct sunlight or near stoves. Remote control unit Power cord Battery for humid weather arrives. Do not use the old lamp unit. • The lamp section may cause the outer casing or internal components to clean the inside the projector at least once a year. &#...
User Manual
Page 8
... the power. If fingerprints or stains are left on the projection lens surface, they were housed at least 30 minutes before cleaning. Lamp A mercury lamp with the supplied lens cap when the projector is used, there are rare occasions when hot air from the air exhaust vents or ...if outside light or the illumination interferes the screen surface. If the projector is used beyond the replacement time. • Lamp deterioration accelerates when used for 24 hours or more. Keep your dealer. Lamp deterioration due to keep them in the boxes in the initial period (within approx. 30 minutes)...
... the power. If fingerprints or stains are left on the projection lens surface, they were housed at least 30 minutes before cleaning. Lamp A mercury lamp with the supplied lens cap when the projector is used, there are rare occasions when hot air from the air exhaust vents or ...if outside light or the illumination interferes the screen surface. If the projector is used beyond the replacement time. • Lamp deterioration accelerates when used for 24 hours or more. Keep your dealer. Lamp deterioration due to keep them in the boxes in the initial period (within approx. 30 minutes)...

User Manual
Page 11
... when the POWER ON button of this clamp. LAMP1 monitor (page 54) This lamp lights up when the time to replace lamp unit 2 is reached. It also blinks if something unusual occurs in the lamp circuit. conversely, turn it counterclockwise to move the screen to the left /right adjusting... clockwise to move it to the right. Powered focus adjustment is turned to "l" (on). LAMP2 monitor (page 54) This lamp lights up when the time to replace lamp unit 1 is compatible with the Microsaver Security System from the remote control. Air filter (page 55) Burglar lock Attach a commercial...
... when the POWER ON button of this clamp. LAMP1 monitor (page 54) This lamp lights up when the time to replace lamp unit 2 is reached. It also blinks if something unusual occurs in the lamp circuit. conversely, turn it counterclockwise to move the screen to the left /right adjusting... clockwise to move it to the right. Powered focus adjustment is turned to "l" (on). LAMP2 monitor (page 54) This lamp lights up when the time to replace lamp unit 1 is compatible with the Microsaver Security System from the remote control. Air filter (page 55) Burglar lock Attach a commercial...

User Manual
Page 14
... The remote control should normally be directly exposed to the projector's front receiver window as indicated ( , ) in intense ambient light such as fluorescent lamps. Insert the dry cells. Replace the battery compartment lid over the compartment and slide until it may also be aimed at the screen, the effective control range may...
... The remote control should normally be directly exposed to the projector's front receiver window as indicated ( , ) in intense ambient light such as fluorescent lamps. Insert the dry cells. Replace the battery compartment lid over the compartment and slide until it may also be aimed at the screen, the effective control range may...

User Manual
Page 39
... is the standard setting. In "SINGLE" mode, the projector may automatically select either lamps is used (lamp with shorter operating hours is selected as a result of the above settings is selected, it is possible to be replaced more , this setting can be specified. Note • If, in order to... Z is selected. LAMP RELAY If using the projector for a 4-hour period after the ENTER button is pressed. OFF :...
... is the standard setting. In "SINGLE" mode, the projector may automatically select either lamps is used (lamp with shorter operating hours is selected as a result of the above settings is selected, it is possible to be replaced more , this setting can be specified. Note • If, in order to... Z is selected. LAMP RELAY If using the projector for a 4-hour period after the ENTER button is pressed. OFF :...

User Manual
Page 45
... sensor. Something may easily identify the originator of the E-mail. (maximum 63 characters) The user can be sent to replace the lamp. Wait a short while for the lamp to page 55). Turn off the MAIN POWER switch using the procedure on page 25 and clean the air filter (refer...is being used where the ambient temperature is reached again. (Continued on the air filter. Trouble has occurred in the temperature detection sensor around lamps. The user can enter the location of, for 60 minutes after sending previous temperature warning mail even the set up ] to use the...
... sensor. Something may easily identify the originator of the E-mail. (maximum 63 characters) The user can be sent to replace the lamp. Wait a short while for the lamp to page 55). Turn off the MAIN POWER switch using the procedure on page 25 and clean the air filter (refer...is being used where the ambient temperature is reached again. (Continued on the air filter. Trouble has occurred in the temperature detection sensor around lamps. The user can enter the location of, for 60 minutes after sending previous temperature warning mail even the set up ] to use the...

User Manual
Page 54
...), the projector has malfunctioned. switch using the procedure on • Check for replacing the lamp unit. High temperature • Remove the object that the TEMP and LAMP monitor show when a lamp needs replacement or there is equipped with dust? power. • Some error has arisen in...) Warm-up status • Did you notice a "REPLACE THE LAMP" • This lamp monitor lights up to page 55). (Standby condition) Lamp monitor LAMP1 LAMP2 Blinking in red (3 times) Lighting in red Blinking in the lamp • Turn off the MAIN POWER switch using the procedure...
...), the projector has malfunctioned. switch using the procedure on • Check for replacing the lamp unit. High temperature • Remove the object that the TEMP and LAMP monitor show when a lamp needs replacement or there is equipped with dust? power. • Some error has arisen in...) Warm-up status • Did you notice a "REPLACE THE LAMP" • This lamp monitor lights up to page 55). (Standby condition) Lamp monitor LAMP1 LAMP2 Blinking in red (3 times) Lighting in red Blinking in the lamp • Turn off the MAIN POWER switch using the procedure...

User Manual
Page 55
... the air filter fitted inside the main unit will rise, the temperature monitor (TEMP) will blink twice, and the power is pressed. Cleaning and replacement of air filter If too much dust accumulates on the air filter, [CLEAN THE AIR FILTER]* appears at the right. Dismantle the air filter.... Suck off the main power and remove the power plug from the receptacle. In addition, when the lamp unit is replaced, also replace the air filter. • Be absolutely sure to replace the air filter. If even more dust is a sign to use the air filter specifically designed for 30 ...
... the air filter fitted inside the main unit will rise, the temperature monitor (TEMP) will blink twice, and the power is pressed. Cleaning and replacement of air filter If too much dust accumulates on the air filter, [CLEAN THE AIR FILTER]* appears at the right. Dismantle the air filter.... Suck off the main power and remove the power plug from the receptacle. In addition, when the lamp unit is replaced, also replace the air filter. • Be absolutely sure to replace the air filter. If even more dust is a sign to use the air filter specifically designed for 30 ...

User Manual
Page 56
... be 1 800 hours. The indication will not light) before handling it. • The lamp cover gets very hot, and touching it is necessary when replacing a lamp unit. When the lamp has been switched from LAMP POWER "HIGH" to use the specified lamp. If you continue to "LOW", the cumulative operating time from the conversion formula below...
... be 1 800 hours. The indication will not light) before handling it. • The lamp cover gets very hot, and touching it is necessary when replacing a lamp unit. When the lamp has been switched from LAMP POWER "HIGH" to use the specified lamp. If you continue to "LOW", the cumulative operating time from the conversion formula below...

User Manual
Page 57
.... Slide the cover a little toward the left, and remove it has been used. Have a Phillips screwdriver ready ahead of the handles, and remove the lamp units. Lamp unit replacement steps Turn the power off . You might get burned if you touch it while it using the screw for each unit), take hold of...
.... Slide the cover a little toward the left, and remove it has been used. Have a Phillips screwdriver ready ahead of the handles, and remove the lamp units. Lamp unit replacement steps Turn the power off . You might get burned if you touch it while it using the screw for each unit), take hold of...

User Manual
Page 61
... control Power source Operation range Mass Outside dimensions Option Hanging attachment (For high ceiling) Hanging attachment (For low ceiling) Projection lens Replacement lamp unit PT-D5700U PT-D5700UL PT-DW5100U PT-DW5100UL 1 set of beam receiver) 134 (0.31 lb) (including dry cells) Width: 51 mm (2"), Thickness: 23 mm ...(0.9"), Depth: 176 mm (6.9") ET-PKD56H ET-PKD55S PT-D5700U/PT-D5700UL ET-DLE100, ET-DLE200, ET-DLE300, ET-DLE400, ET-DLE050 PT-DW5100U/PT-DW5100UL ET-DLE100, ET-DLE200, ET-DLE310, ET-DLE410, ET-DLE050 ET-LAD57 (single bulb), ET...
... control Power source Operation range Mass Outside dimensions Option Hanging attachment (For high ceiling) Hanging attachment (For low ceiling) Projection lens Replacement lamp unit PT-D5700U PT-D5700UL PT-DW5100U PT-DW5100UL 1 set of beam receiver) 134 (0.31 lb) (including dry cells) Width: 51 mm (2"), Thickness: 23 mm ...(0.9"), Depth: 176 mm (6.9") ET-PKD56H ET-PKD55S PT-D5700U/PT-D5700UL ET-DLE100, ET-DLE200, ET-DLE300, ET-DLE400, ET-DLE050 PT-DW5100U/PT-DW5100UL ET-DLE100, ET-DLE200, ET-DLE310, ET-DLE410, ET-DLE050 ET-LAD57 (single bulb), ET...


