
Operating Instructions
Page 4
... PHASE, ASPECT, RESIZING, FRAME LOCK Changing the display language...48 Option settings ...49 INPUT GUIDE, STARTUP LOGO, POINTER SELECT, PC2 SELECT, LAMP POWER, LAMP RUNTIME, POWER OFF TIMER, DIRECT POWER ON, CONTROL PANEL, AUTO SETUP, SIGNAL SEARCH, INSTALLATION, HIGHLAND, RGB/YPBPR, VOLUME, DETAILED SETUP......34 Displaying the pointer...35 Care and maintenance When the TEMP indicator and the LAMP indicator are illuminated...57 Cleaning and replacing the air filter ...59 Replacing the lamp unit ...60 Before calling for service...63 Cleaning and maintenance ...64 Adjustments and settings...
... PHASE, ASPECT, RESIZING, FRAME LOCK Changing the display language...48 Option settings ...49 INPUT GUIDE, STARTUP LOGO, POINTER SELECT, PC2 SELECT, LAMP POWER, LAMP RUNTIME, POWER OFF TIMER, DIRECT POWER ON, CONTROL PANEL, AUTO SETUP, SIGNAL SEARCH, INSTALLATION, HIGHLAND, RGB/YPBPR, VOLUME, DETAILED SETUP......34 Displaying the pointer...35 Care and maintenance When the TEMP indicator and the LAMP indicator are illuminated...57 Cleaning and replacing the air filter ...59 Replacing the lamp unit ...60 Before calling for service...63 Cleaning and maintenance ...64 Adjustments and settings...

Operating Instructions
Page 7
...such as these materials could result. B Heated air comes out of space], otherwise burns or damage could be drawn into the lens. B The lamp has high internal pressure. ENGLISH-7 Preparation Caution Do not cover the air inlet port or the air outlet port. B Strong light is not done.... projector under such conditions may result. When disconnecting the mains lead, hold the plug, not the lead. Do not place your skin. B The lamp cover gets very hot, and touching it to this is emitted from the projector's lens. B Do not place the projector in places where the ...
...such as these materials could result. B Heated air comes out of space], otherwise burns or damage could be drawn into the lens. B The lamp has high internal pressure. ENGLISH-7 Preparation Caution Do not cover the air inlet port or the air outlet port. B Strong light is not done.... projector under such conditions may result. When disconnecting the mains lead, hold the plug, not the lead. Do not place your skin. B The lamp cover gets very hot, and touching it to this is emitted from the projector's lens. B Do not place the projector in places where the ...

Operating Instructions
Page 8
... other injury may result. If not using the projector for an extended period of mercury as a safety precaution before moving the projector. If the lamp has broken, ventilate the room immediately. B Failure to observe this may explode or leak, and fire, injury or contamination of the projector. When...this projector. B If dust builds up on this is turned off. B This projector continues to absorb the gas which was released when the lamp broke and which could break, and injury may damage the insulation, which contains nearly the same amount of time, disconnect the mains plug from...
... other injury may result. If not using the projector for an extended period of mercury as a safety precaution before moving the projector. If the lamp has broken, ventilate the room immediately. B Failure to observe this may explode or leak, and fire, injury or contamination of the projector. When...this projector. B If dust builds up on this is turned off. B This projector continues to absorb the gas which was released when the lamp broke and which could break, and injury may damage the insulation, which contains nearly the same amount of time, disconnect the mains plug from...
Operating Instructions
Page 10
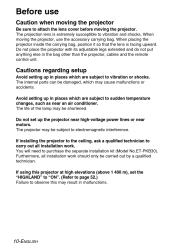
... in places which are subject to carry out all installation work . If using this may be carried out by a qualified technician. The life of the lamp may cause malfunctions or accidents. You will need to observe this projector at high elevations (above 1 400 m), set up in the bag other than the...
... in places which are subject to carry out all installation work . If using this may be carried out by a qualified technician. The life of the lamp may cause malfunctions or accidents. You will need to observe this projector at high elevations (above 1 400 m), set up in the bag other than the...

Operating Instructions
Page 11
... of the lens becomes dirty from shining onto the screen. Occasionally, a few non-active pixels may appear on the screen as individual lamp characteristics, usage conditions and the installation environment, especially when the projector is subjected to variables such as fixed points of the lens with ...to provide fine picture details. Moreover, when not using the projector, retract the lens and then cover it become dirty or damaged. Lamp The lamp may cause discolouration to the screen, and do not let it with very high precision technology to be magnified and projected onto the ...
... of the lens becomes dirty from shining onto the screen. Occasionally, a few non-active pixels may appear on the screen as individual lamp characteristics, usage conditions and the installation environment, especially when the projector is subjected to variables such as fixed points of the lens with ...to provide fine picture details. Moreover, when not using the projector, retract the lens and then cover it become dirty or damaged. Lamp The lamp may cause discolouration to the screen, and do not let it with very high precision technology to be magnified and projected onto the ...

Operating Instructions
Page 13
... outlet port Do not cover this port. % Speaker & Front adjustable legs (L/R) (page 27) ' Air inlet port, Air filter (page 59) Do not cover this port. ( Lamp unit cover (page 60) NOTE: B During projection of an image, the cooling fan will cause this port [allow at least 15 cm (6˝ ) of space... or damage could result. Do not place your hands or other objects close to the air outlet port. B By using the "OPTION" menu to set "LAMP POWER" to "ECO-MODE", the operating sound of the air outlet port. B Heated air comes out of the fan can be reduced. (Refer to page...
... outlet port Do not cover this port. % Speaker & Front adjustable legs (L/R) (page 27) ' Air inlet port, Air filter (page 59) Do not cover this port. ( Lamp unit cover (page 60) NOTE: B During projection of an image, the cooling fan will cause this port [allow at least 15 cm (6˝ ) of space... or damage could result. Do not place your hands or other objects close to the air outlet port. B By using the "OPTION" menu to set "LAMP POWER" to "ECO-MODE", the operating sound of the air outlet port. B Heated air comes out of the fan can be reduced. (Refer to page...
Operating Instructions
Page 15
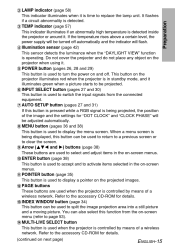
... mode, and it . Do not cover the projector and do not place any object on the projector when using it is time to replace the lamp unit. Refer to the accessory CD-ROM for "DOT CLOCK" and "CLOCK PHASE" will be adjusted automatically. * MENU button (pages 36 and 38) This button... is used to display the menu screen. This button on the projector illuminates red when the projector is in the on-screen menus. - $ LAMP indicator (page 58) This indicator illuminates when it . ' POWER button (pages 26, 28 and 29) This button is used to turn the power on and...
... mode, and it . Do not cover the projector and do not place any object on the projector when using it is time to replace the lamp unit. Refer to the accessory CD-ROM for "DOT CLOCK" and "CLOCK PHASE" will be adjusted automatically. * MENU button (pages 36 and 38) This button... is used to display the menu screen. This button on the projector illuminates red when the projector is in the on-screen menus. - $ LAMP indicator (page 58) This indicator illuminates when it . ' POWER button (pages 26, 28 and 29) This button is used to turn the power on and...

Operating Instructions
Page 26
.... $ Press BThe POWER button on the projector will flash green. BInsert the connector into the mains socket. NOTE: B A tinkling sound may be heard when the lamp unit is turned on the power 1. If you would like the startup logo not to be displayed. Turning on the power Before turning on , but...
.... $ Press BThe POWER button on the projector will flash green. BInsert the connector into the mains socket. NOTE: B A tinkling sound may be heard when the lamp unit is turned on the power 1. If you would like the startup logo not to be displayed. Turning on the power Before turning on , but...

Operating Instructions
Page 28
... IN socket. Turning off the power #$ # $ % AC IN socket Connector the POWER button. # Press BThe "POWER OFF" confirmation screen will disappear in 10 seconds. BThe lamp unit will switch off the power by holding down the POWER button for more than the POWER button to cancel the "POWER OFF" screen. BThe...
... IN socket. Turning off the power #$ # $ % AC IN socket Connector the POWER button. # Press BThe "POWER OFF" confirmation screen will disappear in 10 seconds. BThe lamp unit will switch off the power by holding down the POWER button for more than the POWER button to cancel the "POWER OFF" screen. BThe...

Operating Instructions
Page 29
... extended period of power even when the power is illuminated. The cooling fan will be projected.) A picture is preparing for the lamp to turn back on again compared to when the lamp cools down with the mains lead connected. The projector is being projected. B If dust builds up on the projector POWER...
... extended period of power even when the power is illuminated. The cooling fan will be projected.) A picture is preparing for the lamp to turn back on again compared to when the lamp cools down with the mains lead connected. The projector is being projected. B If dust builds up on the projector POWER...

Operating Instructions
Page 42
... You can adjust the picture quality of the picture if they appear colourised. AI DAYLIGHT VIEW ON The lamp is disabled. NOTE: B "AUTO" may not function correctly if any objects are being input (when "LAMP POWER" is set to "STANDARD", "AI" is set to "OFF", and "DAYLIGHT VIEW" is disabled....projected images when the projector is set to "OFF"). Press the ENTER button to display the "DETAILED SETUP" menu. NOTE: B "AI" is disabled when "LAMP POWER" is set to "ECOMODE". (Refer to page 50.) This adjusts the vividness of the room. OFF "AI" is controlled according to the input signals...
... You can adjust the picture quality of the picture if they appear colourised. AI DAYLIGHT VIEW ON The lamp is disabled. NOTE: B "AUTO" may not function correctly if any objects are being input (when "LAMP POWER" is set to "STANDARD", "AI" is set to "OFF", and "DAYLIGHT VIEW" is disabled....projected images when the projector is set to "OFF"). Press the ENTER button to display the "DETAILED SETUP" menu. NOTE: B "AI" is disabled when "LAMP POWER" is set to "ECOMODE". (Refer to page 50.) This adjusts the vividness of the room. OFF "AI" is controlled according to the input signals...

Operating Instructions
Page 50
...displayed. You can help to page 35). When set to "INPUT", it is currently being input. This setting changes the lamp brightness. A double circle will be displayed. When replacing the lamp unit, follow the instructions on and off). 50-ENGLISH When set to "ECOMODE", the luminance of times the power is ...used . PC2 SELECT This setting is turned on page 61, and reset "LAMP RUNTIME" to select the function of the PC 2 IN/PC 1 OUT connector. When set to "OUTPUT", it is being used to...
...displayed. You can help to page 35). When set to "INPUT", it is currently being input. This setting changes the lamp brightness. A double circle will be displayed. When replacing the lamp unit, follow the instructions on and off). 50-ENGLISH When set to "ECOMODE", the luminance of times the power is ...used . PC2 SELECT This setting is turned on page 61, and reset "LAMP RUNTIME" to select the function of the PC 2 IN/PC 1 OUT connector. When set to "OUTPUT", it is being used to...

Operating Instructions
Page 57
...ambient temperature in the place of use may be blocked. cause B The air filter may be covered. LAMP indicator TEMP indicator TEMP indicator Indicator display Illuminated (red) (Lamp unit on the control panel of the projector which give information about problems that have occurred inside the ... no condensation).] B Disconnect the mains lead by following the procedure on , turn off . When the TEMP indicator and the LAMP indicator are illuminated There are two indicators on ) The surrounding temperature or the temperature inside the projector has become dangerously high, causing the...
...ambient temperature in the place of use may be blocked. cause B The air filter may be covered. LAMP indicator TEMP indicator TEMP indicator Indicator display Illuminated (red) (Lamp unit on the control panel of the projector which give information about problems that have occurred inside the ... no condensation).] B Disconnect the mains lead by following the procedure on , turn off . When the TEMP indicator and the LAMP indicator are illuminated There are two indicators on ) The surrounding temperature or the temperature inside the projector has become dangerously high, causing the...

Operating Instructions
Page 58
...again. off after the procedures in the "Remedy" column have been turned abnormality in the lamp circuit. B This occurs when B Wait for the lamp unit is after it means an abnormality has occurred. LAMP indicator Indicator display Illuminated (red) Flashing (red) An abnormality has been detected in the Possible...on ? Ask your dealer or been set to disconnect the mains lead by for a while B Disconnect the the operation time until the lamp unit mains lead by following the nearing 1 800 turning the power procedure on hours (when back on page 28 before following the procedure ...
...again. off after the procedures in the "Remedy" column have been turned abnormality in the lamp circuit. B This occurs when B Wait for the lamp unit is after it means an abnormality has occurred. LAMP indicator Indicator display Illuminated (red) Flashing (red) An abnormality has been detected in the Possible...on ? Ask your dealer or been set to disconnect the mains lead by for a while B Disconnect the the operation time until the lamp unit mains lead by following the nearing 1 800 turning the power procedure on hours (when back on page 28 before following the procedure ...

Operating Instructions
Page 59
... filter. Air filter cover % Replace the air filter, and then install the air filter cover. Replacement procedure # Turn off any accumulated dust. Furthermore, if the lamp unit is time to install the air filter before using the projector. Air filter NOTE: B Be sure to replace the air filter. Be sure to...
... filter. Air filter cover % Replace the air filter, and then install the air filter cover. Replacement procedure # Turn off any accumulated dust. Furthermore, if the lamp unit is time to install the air filter before using the projector. Air filter NOTE: B Be sure to replace the air filter. Be sure to...

Operating Instructions
Page 60
... shut off after this time. NOTE: B The projector is not supplied with the product number indicated above are for lamp replacement is set to "OFF". Lamp unit product no.: ET-LAB30 CAUTION: B Do not use have been reached because of a much greater chance of ... touching it can be replaced earlier due to variables such as a particular lamp's characteristics, usage conditions and the installation environment. Notes on replacing the lamp unit B The light generating lamp is made of the lamp is a consumable product. Therefore periodic replacement of glass, so dropping it or...
... shut off after this time. NOTE: B The projector is not supplied with the product number indicated above are for lamp replacement is set to "OFF". Lamp unit product no.: ET-LAB30 CAUTION: B Do not use have been reached because of a much greater chance of ... touching it can be replaced earlier due to variables such as a particular lamp's characteristics, usage conditions and the installation environment. Notes on replacing the lamp unit B The light generating lamp is made of the lamp is a consumable product. Therefore periodic replacement of glass, so dropping it or...

Operating Instructions
Page 61
... down. $ Use a Phillips screwdriver to . Then hold the handles of the projector, and then remove the lamp unit cover. % Use a Phillips screwdriver to securely tighten the lamp unit fixing screws. Lamp unit cover fixing screws ENGLISH-61 Care and maintenance More than 1 800 hours button will switch to standby mode...minutes of insertion is pressed. on the next page should thus be sure to push it in at the bottom of the lamp unit and gently pull the lamp unit out from the projector by following the procedure on page 28, and check that the direction of operation. When inserting...
... down. $ Use a Phillips screwdriver to . Then hold the handles of the projector, and then remove the lamp unit cover. % Use a Phillips screwdriver to securely tighten the lamp unit fixing screws. Lamp unit cover fixing screws ENGLISH-61 Care and maintenance More than 1 800 hours button will switch to standby mode...minutes of insertion is pressed. on the next page should thus be sure to push it in at the bottom of the lamp unit and gently pull the lamp unit out from the projector by following the procedure on page 28, and check that the direction of operation. When inserting...

Operating Instructions
Page 62
... the POWER button on . ( Connect the mains lead. ) Press the POWER button so that a picture is connected. Press the POWER button to cancel the "LAMP RUNTIME" screen. - This will be turned on the projector illuminates red. Refer to page 51 for approximately 3 seconds. NOTE: B Be sure to select... press the F or G button to select the "OPTION" menu. + Press the ENTER button, and then press the F or G button to install the lamp unit and the lamp unit cover securely. Disconnect the mains lead after the mains lead is projected onto the screen. If they are not securely installed, it may...
... the POWER button on . ( Connect the mains lead. ) Press the POWER button so that a picture is connected. Press the POWER button to cancel the "LAMP RUNTIME" screen. - This will be turned on the projector illuminates red. Refer to page 51 for approximately 3 seconds. NOTE: B Be sure to select... press the F or G button to select the "OPTION" menu. + Press the ENTER button, and then press the F or G button to install the lamp unit and the lamp unit cover securely. Disconnect the mains lead after the mains lead is projected onto the screen. If they are not securely installed, it may...
Operating Instructions
Page 63
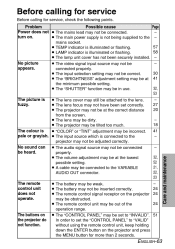
...The video signal input source may still be attached to the projector may not be appears. B The lens cover may not be correct. properly. B LAMP indicator is illuminated or flashing. B The input selection setting may not be dirty. B The input source which is B "COLOR" or "TINT" ...is connected to the lens. No sound can B The audio signal source may be incorrect. The remote control unit does not operate. B The lamp unit cover has not been securely installed. B The projector may not be connected be connected to set correctly. B The battery may be weak....
...The video signal input source may still be attached to the projector may not be appears. B The lens cover may not be correct. properly. B LAMP indicator is illuminated or flashing. B The input selection setting may not be dirty. B The input source which is B "COLOR" or "TINT" ...is connected to the lens. No sound can B The audio signal source may be incorrect. The remote control unit does not operate. B The lamp unit cover has not been securely installed. B The projector may not be connected be connected to set correctly. B The battery may be weak....
Operating Instructions
Page 65
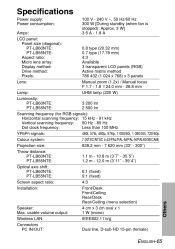
... panels Manual zoom (1.2x) / Manual focus F 1.7 - 1.8 f 24.0 mm - 28.8 mm UHM lamp (220 W) ENGLISH-65 Others Specifications Power supply: Power consumption: Amps: LCD panel: Panel size (diagonal): PT-LB60NTE: PT-LB55NTE: Aspect ratio: Micro lens array: Display method: Drive method: Pixels: Lens: 100 V - 240 V ...~, 50 Hz/60 Hz 300 W [During standby (when fan is stopped): Approx. 3 W] 3.5 A - 1.8 A Lamp: Luminosity: PT-LB60NTE: 3 200 lm PT-LB55NTE: 2 500 lm Scanning frequency (for RGB signals): Horizontal scanning frequency: 15 kHz - 91 kHz Vertical scanning frequency: 50 Hz - 85 Hz ...
... panels Manual zoom (1.2x) / Manual focus F 1.7 - 1.8 f 24.0 mm - 28.8 mm UHM lamp (220 W) ENGLISH-65 Others Specifications Power supply: Power consumption: Amps: LCD panel: Panel size (diagonal): PT-LB60NTE: PT-LB55NTE: Aspect ratio: Micro lens array: Display method: Drive method: Pixels: Lens: 100 V - 240 V ...~, 50 Hz/60 Hz 300 W [During standby (when fan is stopped): Approx. 3 W] 3.5 A - 1.8 A Lamp: Luminosity: PT-LB60NTE: 3 200 lm PT-LB55NTE: 2 500 lm Scanning frequency (for RGB signals): Horizontal scanning frequency: 15 kHz - 91 kHz Vertical scanning frequency: 50 Hz - 85 Hz ...


