
Operating Instructions
Page 1
PT-LB60NTE PT-LB55NTE Before operating this product, please read the instructions carefully and save this manual for future use. R LCD Projector Commercial Use Operating Instructions Model No. TQBJ 0195 ENGLISH
PT-LB60NTE PT-LB55NTE Before operating this product, please read the instructions carefully and save this manual for future use. R LCD Projector Commercial Use Operating Instructions Model No. TQBJ 0195 ENGLISH

Operating Instructions
Page 3
... authority for external control of this product, please contact your local retailer upon the purchase of charge basis. Information on Disposal for incorrect disposal of projector, you must use serial port to designated collection points, where they will be applicable for Users of your dealer or supplier for the correct method...
... authority for external control of this product, please contact your local retailer upon the purchase of charge basis. Information on Disposal for incorrect disposal of projector, you must use serial port to designated collection points, where they will be applicable for Users of your dealer or supplier for the correct method...
Operating Instructions
Page 4
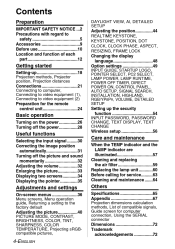
... SETUP Setting up the security function ...54 INPUT PASSWORD, PASSWORD CHANGE, TEXT DISPLAY, TEXT CHANGE Wireless setup ...56 Getting started Setting-up...18 Projection methods, Projector position, Projection distances Connections...21 Connecting to computer, Connecting to video equipment (1), Connecting to video equipment (2) Preparation for the remote control unit...24 Basic operation...
... SETUP Setting up the security function ...54 INPUT PASSWORD, PASSWORD CHANGE, TEXT DISPLAY, TEXT CHANGE Wireless setup ...56 Getting started Setting-up...18 Projection methods, Projector position, Projection distances Connections...21 Connecting to computer, Connecting to video equipment (1), Connecting to video equipment (2) Preparation for the remote control unit...24 Basic operation...

Operating Instructions
Page 5
...B Contact an Authorised Service Centre for example, by a qualified technician. B Check that injury or electric shocks may result. Do not install this projector in a place which could result in this can cause fire or electric shocks. B If installation is not carried out correctly, there is the ...danger that no more smoke is coming from the projector, disconnect the mains plug from becoming covered in such cases, otherwise fire or electric shocks could result. Clean the mains plug regularly ...
...B Contact an Authorised Service Centre for example, by a qualified technician. B Check that injury or electric shocks may result. Do not install this projector in a place which could result in this can cause fire or electric shocks. B If installation is not carried out correctly, there is the ...danger that no more smoke is coming from the projector, disconnect the mains plug from becoming covered in such cases, otherwise fire or electric shocks could result. Clean the mains plug regularly ...

Operating Instructions
Page 6
...that the batteries may have been swallowed, seek medical advice immediately. B Failure to observe this may result. Do not place the projector on top of the projector. Do not place liquid containers on soft materials such as carpets or sponge mats. terminals of infants. Do not use plugs which... and injury or damage could result. B If the batteries are unstable. B Store the batteries in a plastic bag and keep them onto the projector, as necklaces or hairpins. Do not handle the mains plug with metallic objects such as doing so can cause burns, fire or damage to leak...
...that the batteries may have been swallowed, seek medical advice immediately. B Failure to observe this may result. Do not place the projector on top of the projector. Do not place liquid containers on soft materials such as carpets or sponge mats. terminals of infants. Do not use plugs which... and injury or damage could result. B If the batteries are unstable. B Store the batteries in a plastic bag and keep them onto the projector, as necklaces or hairpins. Do not handle the mains plug with metallic objects such as doing so can cause burns, fire or damage to leak...

Operating Instructions
Page 7
.... ENGLISH-7 Preparation If you place directly into this port [allow it to disconnect the mains plug from the projector's lens. B Strong light is emitted from the projector. Replacement of the air outlet port. If improperly handled, explosion might result. Before replacing the lamp, be sure...15 cm (6˝ ) of space], otherwise burns or damage could be carried out by a qualified technician. B Be especially careful not to the projector. B Heated air comes out of the lamp should only be drawn into this is being used . B The lamp can hurt or damage your...
.... ENGLISH-7 Preparation If you place directly into this port [allow it to disconnect the mains plug from the projector's lens. B Strong light is emitted from the projector. Replacement of the air outlet port. If improperly handled, explosion might result. Before replacing the lamp, be sure...15 cm (6˝ ) of space], otherwise burns or damage could be carried out by a qualified technician. B Be especially careful not to the projector. B Heated air comes out of the lamp should only be drawn into this is being used . B The lamp can hurt or damage your...

Operating Instructions
Page 8
...humidity may result. Use only the specified batteries. B If the batteries are inserted incorrectly, they may result. If not using the projector for an extended period of the battery compartment and surrounding area may damage the insulation, which could cause fire or electric shocks to... which contains nearly the same amount of the battery compartment and surrounding area may explode or leak, and fire, injury or contamination of the projector. 8-ENGLISH B Ask your face close to observe this is turned off. When inserting the batteries, make sure the polarities (+ and -) ...
...humidity may result. Use only the specified batteries. B If the batteries are inserted incorrectly, they may result. If not using the projector for an extended period of the battery compartment and surrounding area may damage the insulation, which could cause fire or electric shocks to... which contains nearly the same amount of the battery compartment and surrounding area may explode or leak, and fire, injury or contamination of the projector. 8-ENGLISH B Ask your face close to observe this is turned off. When inserting the batteries, make sure the polarities (+ and -) ...

Operating Instructions
Page 9
... humid weather arrives. Ask your nearest Authorised Service Centre to your projector. Please take non repairable units back to clean the projector when required. B If dust is a good idea to clean inside the projector at least once a year. We are constantly making efforts to ...Centre to clean the inside of the accessories shown below have been included with your dealer or a recycling company. Accessories Check that all of the projector before the season for remote control unit (x2) RGB signal cable [1.8 m (5´10˝), K1HA15DA0002 x1] Mains lead (K2CM3DR00002 x 1) ...
... humid weather arrives. Ask your nearest Authorised Service Centre to your projector. Please take non repairable units back to clean the projector when required. B If dust is a good idea to clean inside the projector at least once a year. We are constantly making efforts to ...Centre to clean the inside of the accessories shown below have been included with your dealer or a recycling company. Accessories Check that all of the projector before the season for remote control unit (x2) RGB signal cable [1.8 m (5´10˝), K1HA15DA0002 x1] Mains lead (K2CM3DR00002 x 1) ...
Operating Instructions
Page 10
... so that the lens is extremely susceptible to observe this may cause malfunctions or accidents. Avoid setting up in the bag other than the projector, cables and the remote control unit. The life of the lamp may be shortened. Cautions regarding setup Avoid setting up the... power lines or near an air conditioner. Do not set the "HIGHLAND" to "ON". (Refer to page 52.) Failure to vibration and shocks. The projector may be subject to vibration or shocks. The internal parts can be carried out by a qualified technician. You will need to sudden temperature changes, such...
... so that the lens is extremely susceptible to observe this may cause malfunctions or accidents. Avoid setting up in the bag other than the projector, cables and the remote control unit. The life of the lamp may be shortened. Cautions regarding setup Avoid setting up the... power lines or near an air conditioner. Do not set the "HIGHLAND" to "ON". (Refer to page 52.) Failure to vibration and shocks. The projector may be subject to vibration or shocks. The internal parts can be carried out by a qualified technician. You will need to sudden temperature changes, such...

Operating Instructions
Page 11
... hours or the power is frequently turned on the screen as individual lamp characteristics, usage conditions and the installation environment, especially when the projector is built with very high precision technology to provide fine picture details. If the surface of your bare hands. Please note that this ... and turn off . Lamp The lamp may need to be magnified and projected onto the screen. Do not touch the surfaces of the projector is subjected to continuous use Liquid crystal panel The liquid crystal panel of the lens with the lens cover. Occasionally, a few non-active...
... hours or the power is frequently turned on the screen as individual lamp characteristics, usage conditions and the installation environment, especially when the projector is built with very high precision technology to provide fine picture details. If the surface of your bare hands. Please note that this ... and turn off . Lamp The lamp may need to be magnified and projected onto the screen. Do not touch the surfaces of the projector is subjected to continuous use Liquid crystal panel The liquid crystal panel of the lens with the lens cover. Occasionally, a few non-active...

Operating Instructions
Page 12
... 27) These buttons are used to connect a commercially-available theft-prevention cable (manufactured by Kensington). Press to adjust the angle of tilt of each part Projector # $ % ' * ) ( & ' # Projector control panel (page 14) $ Zoom ring (page 27) % Focus ring (page 27) & Security lock This can be used to unlock the front adjustable legs. Location...
... 27) These buttons are used to connect a commercially-available theft-prevention cable (manufactured by Kensington). Press to adjust the angle of tilt of each part Projector # $ % ' * ) ( & ' # Projector control panel (page 14) $ Zoom ring (page 27) % Focus ring (page 27) & Security lock This can be used to unlock the front adjustable legs. Location...

Operating Instructions
Page 13
... out of the air outlet port. ENGLISH-13 Preparation This noise may change depending on or off will operate, emitting a small noise as it operates. Projector # $% ( ' & # Connector panel (page 16) $ Air outlet port Do not cover this port. % Speaker & Front adjustable legs (L/R) (page 27) ' Air inlet port, Air filter (page 59...
... out of the air outlet port. ENGLISH-13 Preparation This noise may change depending on or off will operate, emitting a small noise as it operates. Projector # $% ( ' & # Connector panel (page 16) $ Air outlet port Do not cover this port. % Speaker & Front adjustable legs (L/R) (page 27) ' Air inlet port, Air filter (page 59...

Operating Instructions
Page 14
Projector control panel Menu operation * +, Remote control unit ) ' . / 0 1 ( +, 2 * 3 4 5 # PC INPUT indicator This indicator illuminates when a signal is being input to the connector (PC 1 IN or PC 2 IN) selected using the input select buttons. 14-ENGLISH
Projector control panel Menu operation * +, Remote control unit ) ' . / 0 1 ( +, 2 * 3 4 5 # PC INPUT indicator This indicator illuminates when a signal is being input to the connector (PC 1 IN or PC 2 IN) selected using the input select buttons. 14-ENGLISH
Operating Instructions
Page 15
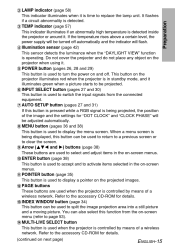
...clear the screen. + Arrow (FGI and H) buttons (page 38) These buttons are used to replace the lamp unit. This button on the projector illuminates red when the projector is in the on-screen menus. - Refer to display the menu screen. When a menu screen is being projected, the position of a wireless...(page 38) This button is used to activate items selected in standby mode, and it illuminates green when a picture starts to be used when the projector is controlled by means of the image and the settings for "DOT CLOCK" and "CLOCK PHASE" will flash. & Illumination sensor (page 42) This...
...clear the screen. + Arrow (FGI and H) buttons (page 38) These buttons are used to replace the lamp unit. This button on the projector illuminates red when the projector is in the on-screen menus. - Refer to display the menu screen. When a menu screen is being projected, the position of a wireless...(page 38) This button is used to activate items selected in standby mode, and it illuminates green when a picture starts to be used when the projector is controlled by means of the image and the settings for "DOT CLOCK" and "CLOCK PHASE" will flash. & Illumination sensor (page 42) This...

Operating Instructions
Page 16
... image. buttons (page 32) These buttons are used to adjust the volume of the sound that is output from the projector's built-in order to control the projector externally. (RS-232C compatible) $ PC 1 IN connector (pages 21 and 22) This connector is used to momentarily ...Connector panel # $ % & ' ( , + * ) # SERIAL connector (pages 21, 22, 23 and 70) This connector is used to connect a personal computer to the projector in speaker and VARIABLE AUDIO OUT connector. (continued from previous page) 1 DIRECT INPUT SELECT buttons (pages 27 and 30) You can also select this function...
... image. buttons (page 32) These buttons are used to adjust the volume of the sound that is output from the projector's built-in order to control the projector externally. (RS-232C compatible) $ PC 1 IN connector (pages 21 and 22) This connector is used to momentarily ...Connector panel # $ % & ' ( , + * ) # SERIAL connector (pages 21, 22, 23 and 70) This connector is used to connect a personal computer to the projector in speaker and VARIABLE AUDIO OUT connector. (continued from previous page) 1 DIRECT INPUT SELECT buttons (pages 27 and 30) You can also select this function...

Operating Instructions
Page 17
... connector is used to input signals from the built-in speakers. + PC 1/2 AUDIO IN connectors (pages 21 and 22) These connectors are input to the projector. If audio equipment is connected to this connector. & S-VIDEO IN connector (pages 23 and 46) This connector is used to output the audio signals which...
... connector is used to input signals from the built-in speakers. + PC 1/2 AUDIO IN connectors (pages 21 and 22) These connectors are input to the projector. If audio equipment is connected to this connector. & S-VIDEO IN connector (pages 23 and 46) This connector is used to output the audio signals which...

Operating Instructions
Page 18
...-ceiling projection (Using a translucent screen) Menu item Setting Menu item Setting INSTALLATION REAR/DESK INSTALLATION REAR/CEILING NOTE: B You will need to the projector. Setting up method. (The projection method can be set from the "OPTION" menu. Select whichever projection method matches the setting-up the...damage to purchase the separate ceiling bracket (ET-PKB30) when using the ceiling installation method. Setting-up Projection methods In way of installing projector, any one of the following four projection methods are tilted at more than ±30° vertically.
...-ceiling projection (Using a translucent screen) Menu item Setting Menu item Setting INSTALLATION REAR/DESK INSTALLATION REAR/CEILING NOTE: B You will need to the projector. Setting up method. (The projection method can be set from the "OPTION" menu. Select whichever projection method matches the setting-up the...damage to purchase the separate ceiling bracket (ET-PKB30) when using the ceiling installation method. Setting-up Projection methods In way of installing projector, any one of the following four projection methods are tilted at more than ±30° vertically.

Operating Instructions
Page 19
Projector position Top edge of screen L Bottom edge of screen SW L Screen 96.2 mm (3-25/32˝) ENGLISH-19 Getting started Screen H1 L: Projection distance SH: Image height SW:Image width H1: Distance from centre of lens to bottom edge of projected image SH
Projector position Top edge of screen L Bottom edge of screen SW L Screen 96.2 mm (3-25/32˝) ENGLISH-19 Getting started Screen H1 L: Projection distance SH: Image height SW:Image width H1: Distance from centre of lens to bottom edge of projected image SH
Operating Instructions
Page 21
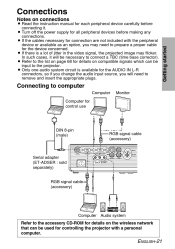
B Refer to the list on page 68 for details on compatible signals which can be input to the projector. Connecting to computer Computer Computer for control use Monitor DIN 8-pin (male) RGB signal cable (accessory) Serial adapter (ET-ADSER : sold separately) RGB signal cable (...accessory) Computer Audio system Refer to the accessory CD-ROM for details on the wireless network that can be used for controlling the projector with the peripheral device or available as an option, you will be necessary to connect a TBC (time base corrector). B If there is available for the...
B Refer to the list on page 68 for details on compatible signals which can be input to the projector. Connecting to computer Computer Computer for control use Monitor DIN 8-pin (male) RGB signal cable (accessory) Serial adapter (ET-ADSER : sold separately) RGB signal cable (...accessory) Computer Audio system Refer to the accessory CD-ROM for details on the wireless network that can be used for controlling the projector with the peripheral device or available as an option, you will be necessary to connect a TBC (time base corrector). B If there is available for the...

Operating Instructions
Page 24
... cover (a click will be consumed rapidly. B If facing the remote control unit toward the screen to shine onto the remote control signal receptor, correct projector operation may not operate correctly. B Keep the remote control unit away from an angle of ±30° to the left or right and &#... held so that the polarities are any obstacles in front of the remote control signal receptor, the operating range is allowed to operate the projector, the operating range of the remote control unit will be limited by the amount of light reflection loss caused by the characteristics of the ...
... cover (a click will be consumed rapidly. B If facing the remote control unit toward the screen to shine onto the remote control signal receptor, correct projector operation may not operate correctly. B Keep the remote control unit away from an angle of ±30° to the left or right and &#... held so that the polarities are any obstacles in front of the remote control signal receptor, the operating range is allowed to operate the projector, the operating range of the remote control unit will be limited by the amount of light reflection loss caused by the characteristics of the ...


