
Vhs-c
Page 6
...Time Zone, Auto Daylight Saving Time 14~15 Built-in Auto Light (Using the Light, Rplacing the Bulb 16 Camera Recording (Basic, Stand-by, Programmed Recording 17~19 Playing Back Recordings (Basic Playback, Visual Search, Still Picture,...28 Color Digital Filter 29 Digital Zoom 30 Digital Electronic Image Stabilization (E.I.S 31 Still/Strobe/Wide 32 MotionSensor 33 Digital Still Camera 34~40 • Memory Card Insertion/Removal . 34 • Recording 35 • Using the Light 36 •...For assistance, please call : 1-800-211-PANA(7262) or send e-mail to : consumerproducts@panasonic.com
...Time Zone, Auto Daylight Saving Time 14~15 Built-in Auto Light (Using the Light, Rplacing the Bulb 16 Camera Recording (Basic, Stand-by, Programmed Recording 17~19 Playing Back Recordings (Basic Playback, Visual Search, Still Picture,...28 Color Digital Filter 29 Digital Zoom 30 Digital Electronic Image Stabilization (E.I.S 31 Still/Strobe/Wide 32 MotionSensor 33 Digital Still Camera 34~40 • Memory Card Insertion/Removal . 34 • Recording 35 • Using the Light 36 •...For assistance, please call : 1-800-211-PANA(7262) or send e-mail to : consumerproducts@panasonic.com

Vhs-c
Page 7
... (or attaching a partially charged battery) only temporarily stops Self Demo. • Self Demo stops for 30 seconds when the Light is on : • Set to CAMERA. 2 Press MENU for MENU mode. To turn it off, follow steps 1-4 below appears. To turn Self Demo back on when the screen below .
... (or attaching a partially charged battery) only temporarily stops Self Demo. • Self Demo stops for 30 seconds when the Light is on : • Set to CAMERA. 2 Press MENU for MENU mode. To turn it off, follow steps 1-4 below appears. To turn Self Demo back on when the screen below .

Vhs-c
Page 8
...and adjust the angle (see above). 2 Set POWER to VCR. 3 Press REWIND/SEARCH to rewind tape. 4 Press PLAY to start recording. Camera Recording When the LCD monitor is complete. 1 Insert Cassette Attach fully charged Battery (page 9). 2Slide TAPE EJECT to open and adjust the angle...RECORD/PAUSE again to unlock the LCD monitor. Swing it fully open door. 3Insert cassette (page 11). 4Press here to : consumerproducts@panasonic.com Quick Operation Guide Charging the Battery Pack Charge Battery Pack fully before use. CHARGE Lamp flashes, then stays lit when charging is...
...and adjust the angle (see above). 2 Set POWER to VCR. 3 Press REWIND/SEARCH to rewind tape. 4 Press PLAY to start recording. Camera Recording When the LCD monitor is complete. 1 Insert Cassette Attach fully charged Battery (page 9). 2Slide TAPE EJECT to open and adjust the angle...RECORD/PAUSE again to unlock the LCD monitor. Swing it fully open door. 3Insert cassette (page 11). 4Press here to : consumerproducts@panasonic.com Quick Operation Guide Charging the Battery Pack Charge Battery Pack fully before use. CHARGE Lamp flashes, then stays lit when charging is...

Vhs-c
Page 13
The CAMERA or VCR MENU screen (see below left) appears when Menu mode is displayed. 8 DIGITAL WIPE (pages 39, 40). Camcorder starts and stops recording at a preset ... desired menu item. 3 Press DISPLAY to exit. Select desired shutter speed. 4 STAND-BY RELEASE (page 18). Select to CAMERA or VCR. 1 Press MENU for MENU mode. ON : Picture sensitivity is on. MENU Mode (CAMERA) Screen 1 2 3 4 5 6 7 8 9 10 11 MENU Mode (VCR) Screen 5 2 1 PROGRAMMED REC (page 19). ON/OFF : Light can be set clock...
The CAMERA or VCR MENU screen (see below left) appears when Menu mode is displayed. 8 DIGITAL WIPE (pages 39, 40). Camcorder starts and stops recording at a preset ... desired menu item. 3 Press DISPLAY to exit. Select desired shutter speed. 4 STAND-BY RELEASE (page 18). Select to CAMERA or VCR. 1 Press MENU for MENU mode. ON : Picture sensitivity is on. MENU Mode (CAMERA) Screen 1 2 3 4 5 6 7 8 9 10 11 MENU Mode (VCR) Screen 5 2 1 PROGRAMMED REC (page 19). ON/OFF : Light can be set clock...

Vhs-c
Page 14
.... Before you begin... • Connect Camcorder to power source. • Set POWER to select CLOCK SET . 1, 2, 3, 4 [ CAMERA MODE ] [ VCR MODE ] 2 Press DISPLAY for MENU mode. Press UP or DOWN to CAMERA or VCR. 1 Press MENU for CLOCK SET menu. DATE/TIME ➔ Go to step 3c on page 15. 4 Press... MENU twice to exit. 14 For assistance, please call : 1-800-211-PANA(7262) or send e-mail to step 3b on page 15. D.S.T. ➔ Go to : consumerproducts@panasonic.com ...
.... Before you begin... • Connect Camcorder to power source. • Set POWER to select CLOCK SET . 1, 2, 3, 4 [ CAMERA MODE ] [ VCR MODE ] 2 Press DISPLAY for MENU mode. Press UP or DOWN to CAMERA or VCR. 1 Press MENU for CLOCK SET menu. DATE/TIME ➔ Go to step 3c on page 15. 4 Press... MENU twice to exit. 14 For assistance, please call : 1-800-211-PANA(7262) or send e-mail to step 3b on page 15. D.S.T. ➔ Go to : consumerproducts@panasonic.com ...

Vhs-c
Page 16
Press UP or DOWN to select LIGHT MODE . 2 Press DISPLAY to : consumerproducts@panasonic.com EVF or LCD Monitor AA A : Light is on. : Light mode is powered by Panasonic to reduce risk of lens cover to unhook, and slide portion B forward to remove. 2 Using Tweezers or needle-nose pliers, ... new bulb with fingers.) 4 Replace lens cover. Use only replacement bulb (PART NO. VLLW0015) supplied by a car battery may cause bulb to CAMERA. Built-in Auto Light Using the Light For recording in use. Before you begin ... • Connect Camcorder to power source. • Set POWER...
Press UP or DOWN to select LIGHT MODE . 2 Press DISPLAY to : consumerproducts@panasonic.com EVF or LCD Monitor AA A : Light is on. : Light mode is powered by Panasonic to reduce risk of lens cover to unhook, and slide portion B forward to remove. 2 Using Tweezers or needle-nose pliers, ... new bulb with fingers.) 4 Replace lens cover. Use only replacement bulb (PART NO. VLLW0015) supplied by a car battery may cause bulb to CAMERA. Built-in Auto Light Using the Light For recording in use. Before you begin ... • Connect Camcorder to power source. • Set POWER...

Vhs-c
Page 17
... to record using EVF, close and lock LCD monitor. 2 Set POWER to CAMERA. • Be sure POWER is aimed at the sun. Tape speed Note: • When Camcorder is fully turned... to CAMERA position. Try to power source. • Insert cassette with the EVF aimed directly at ...vertical bar may cause Press RECORD/ PAUSE to start or damage to the internal parts of the EVF. Camera Recording Basic Operation Recording via EVF or LCD Monitor View recording scene on when LCD is normal for about...
... to record using EVF, close and lock LCD monitor. 2 Set POWER to CAMERA. • Be sure POWER is aimed at the sun. Tape speed Note: • When Camcorder is fully turned... to CAMERA position. Try to power source. • Insert cassette with the EVF aimed directly at ...vertical bar may cause Press RECORD/ PAUSE to start or damage to the internal parts of the EVF. Camera Recording Basic Operation Recording via EVF or LCD Monitor View recording scene on when LCD is normal for about...

Vhs-c
Page 18
...BY RELEASE . 3 Press DISPLAY to review recording. Note: • Use Manual Easy Edit (left in Camcorder. When set POWER to conserve battery. Camera Recording Before you begin... • Connect Camcorder to resume recording. Manual Easy Editing For proper continuity when taping from Stop mode or after attaching a... new Battery. a B c 2, 3, 4 2 Press MENU for 5 minutes, Camcorder switches to Stand-by Quick Release lets you want to : consumerproducts@panasonic.com d Press RECORD/PAUSE to power source. • Insert cassette with record tab (page 11).
...BY RELEASE . 3 Press DISPLAY to review recording. Note: • Use Manual Easy Edit (left in Camcorder. When set POWER to conserve battery. Camera Recording Before you begin... • Connect Camcorder to resume recording. Manual Easy Editing For proper continuity when taping from Stop mode or after attaching a... new Battery. a B c 2, 3, 4 2 Press MENU for 5 minutes, Camcorder switches to Stand-by Quick Release lets you want to : consumerproducts@panasonic.com d Press RECORD/PAUSE to power source. • Insert cassette with record tab (page 11).

Vhs-c
Page 19
.... 19 Or, set POWER to select PROGRAMMED REC . 2 Press DISPLAY. (Current time is displayed.) Each additional press of the options shown at left. Basic Operation Camera Recording Programmed Recording Set a recording start time by mode. *1 Record 5 seconds each minute. *2 Record 10 seconds each minute. Use AC Adaptor for longer recordings. •... time. • Camcorder shuts off at tape end, or 12 hours after Interval Recording starts. • To cancel, set a 5 or 10 second interval recording to CAMERA. 1, 2, 3 4 REC TIME : 1 Press MENU for MENU mode.
.... 19 Or, set POWER to select PROGRAMMED REC . 2 Press DISPLAY. (Current time is displayed.) Each additional press of the options shown at left. Basic Operation Camera Recording Programmed Recording Set a recording start time by mode. *1 Record 5 seconds each minute. *2 Record 10 seconds each minute. Use AC Adaptor for longer recordings. •... time. • Camcorder shuts off at tape end, or 12 hours after Interval Recording starts. • To cancel, set a 5 or 10 second interval recording to CAMERA. 1, 2, 3 4 REC TIME : 1 Press MENU for MENU mode.

Vhs-c
Page 21
... then snap lid shut. 3 • Do not obstruct cassette reel while loading. • Allow PlayPak Load Detector to view playback or recordings in VHS VCR. Connections Audio/ Video Out Before you begin... • Connect Camcorder to power source. • Make all TV-Camcorder connections. 1 Set POWER... to LINE INPUT. CAMERA © view picture as it is recorded. 2 Turn TV ON and set to : VCR © view playback. Basic Operation VCR Playback using in...
... then snap lid shut. 3 • Do not obstruct cassette reel while loading. • Allow PlayPak Load Detector to view playback or recordings in VHS VCR. Connections Audio/ Video Out Before you begin... • Connect Camcorder to power source. • Make all TV-Camcorder connections. 1 Set POWER... to LINE INPUT. CAMERA © view picture as it is recorded. 2 Turn TV ON and set to : VCR © view playback. Basic Operation VCR Playback using in...

Vhs-c
Page 23
... one of four speeds ranging from slow (16 seconds) to fast (2 seconds). Before you begin ... • Connect Camcorder to power source. • Set POWER to CAMERA. Four-Speed Power Zoom Zoom in (close up) and out (wide angle) in front of the light source. B.LIGHT Press B.LIGHT while recording to the... subject is displayed. EVF or LCD Monitor Special Features Press B.LIGHT. 23 Before you begin ... • Connect Camcorder to power source. • Set POWER to CAMERA.
... one of four speeds ranging from slow (16 seconds) to fast (2 seconds). Before you begin ... • Connect Camcorder to power source. • Set POWER to CAMERA. Four-Speed Power Zoom Zoom in (close up) and out (wide angle) in front of the light source. B.LIGHT Press B.LIGHT while recording to the... subject is displayed. EVF or LCD Monitor Special Features Press B.LIGHT. 23 Before you begin ... • Connect Camcorder to power source. • Set POWER to CAMERA.

Vhs-c
Page 24
... on the Memory Card (page 35). • Only Manual Focus is available. 24 For assistance, please call : 1-800-211-PANA(7262) or send e-mail to CAMERA. 1 Press MENU for MENU mode. Before you begin... • Connect Camcorder to power source. • Set POWER to : consumerproducts...
... on the Memory Card (page 35). • Only Manual Focus is available. 24 For assistance, please call : 1-800-211-PANA(7262) or send e-mail to CAMERA. 1 Press MENU for MENU mode. Before you begin... • Connect Camcorder to power source. • Set POWER to : consumerproducts...

Vhs-c
Page 25
... POWER ZOOM as desired. • Refocus as needed when aiming at new scenes. Special Features Macro Focus (close-ups) Auto Focus functions up close to CAMERA.
... POWER ZOOM as desired. • Refocus as needed when aiming at new scenes. Special Features Macro Focus (close-ups) Auto Focus functions up close to CAMERA.

Vhs-c
Page 26
...light is needed for MENU mode. Press UP or DOWN to select SHUTTER . 2 Press DISPLAY repeatedly to select shutter speed. 1, 2, 3 3 Press MENU to CAMERA. Fluorescent light degrades picture. • Auto Focus may not function properly if high speed shutter is used in EVF or LCD Monitor), shutter speed is... auto-adjusted from 1/60 to 1/350 according to subject brightness. • AUTO mode is selected each time POWER is set to : consumerproducts@panasonic.com Note: • Shutter speed cannot be set to exit. a tennis stroke), when viewed on Camcorder or 3 or 4 head VCR.
...light is needed for MENU mode. Press UP or DOWN to select SHUTTER . 2 Press DISPLAY repeatedly to select shutter speed. 1, 2, 3 3 Press MENU to CAMERA. Fluorescent light degrades picture. • Auto Focus may not function properly if high speed shutter is used in EVF or LCD Monitor), shutter speed is... auto-adjusted from 1/60 to 1/350 according to subject brightness. • AUTO mode is selected each time POWER is set to : consumerproducts@panasonic.com Note: • Shutter speed cannot be set to exit. a tennis stroke), when viewed on Camcorder or 3 or 4 head VCR.

Vhs-c
Page 27
... out, and recording is pressed accidentally, press again Fade Out so "FADE" disappears in . Press RECORD/PAUSE. Special Features 27 Press UP or DOWN to CAMERA. 1 Press MENU for AUTO FADE ; Press RECORD/PAUSE. FADE 1, 2, 3, 4 RECORD/ PAUSE Fade In Before you begin... • Connect Camcorder to power source. • Set POWER...
... out, and recording is pressed accidentally, press again Fade Out so "FADE" disappears in . Press RECORD/PAUSE. Special Features 27 Press UP or DOWN to CAMERA. 1 Press MENU for AUTO FADE ; Press RECORD/PAUSE. FADE 1, 2, 3, 4 RECORD/ PAUSE Fade In Before you begin... • Connect Camcorder to power source. • Set POWER...

Vhs-c
Page 28
... DISPLAY for COLOR menu. Before you begin... • Connect Camcorder to power source. • Set POWER to CAMERA. 1 Press MENU for about 2 seconds to fade in 8 different colors. Then, press FADE to : consumerproducts@panasonic.com Press FADE again to fade out during recording (selected fade type flashes). I For more effects, stop fade...
... DISPLAY for COLOR menu. Before you begin... • Connect Camcorder to power source. • Set POWER to CAMERA. 1 Press MENU for about 2 seconds to fade in 8 different colors. Then, press FADE to : consumerproducts@panasonic.com Press FADE again to fade out during recording (selected fade type flashes). I For more effects, stop fade...

Vhs-c
Page 29
... Camcorder to power source. • Set POWER to OFF. Press MENU to exit. 5 Start recording (page 17). • To cancel Digital Filter, set POWER to CAMERA. 1, 2, 3, 4 1 Press MENU for MENU mode. Special Features 29 Note: • Color Digital Filter will not function during Still/Strobe/Wide. • Picture returns to select...
... Camcorder to power source. • Set POWER to OFF. Press MENU to exit. 5 Start recording (page 17). • To cancel Digital Filter, set POWER to CAMERA. 1, 2, 3, 4 1 Press MENU for MENU mode. Special Features 29 Note: • Color Digital Filter will not function during Still/Strobe/Wide. • Picture returns to select...

Vhs-c
Page 30
Digital Zoom Power Zoom magnification is digitally increased. 2 1, 3 Before you begin... • Connect Camcorder to power source. • Set POWER to CAMERA. • Set DIGITAL WIPE to : consumerproducts@panasonic.com ZOOM to turn off Digital Zoom so no indication appears. 30 For assistance, please call : 1-800-211-PANA(7262) or send e-mail to...
Digital Zoom Power Zoom magnification is digitally increased. 2 1, 3 Before you begin... • Connect Camcorder to power source. • Set POWER to CAMERA. • Set DIGITAL WIPE to : consumerproducts@panasonic.com ZOOM to turn off Digital Zoom so no indication appears. 30 For assistance, please call : 1-800-211-PANA(7262) or send e-mail to...

Vhs-c
Page 31
Digital Electronic Image Stabilization (E.I .S. unstable situations. • Connect Camcorder to power source. • Set POWER to CAMERA. 1, 2 1 Press EIS to display "EIS" in the EVF or LCD monitor. • Image becomes slightly enlarged and shutter speed auto-adjusts from 1/80 to 1/350 ...
Digital Electronic Image Stabilization (E.I .S. unstable situations. • Connect Camcorder to power source. • Set POWER to CAMERA. 1, 2 1 Press EIS to display "EIS" in the EVF or LCD monitor. • Image becomes slightly enlarged and shutter speed auto-adjusts from 1/80 to 1/350 ...
Vhs-c
Page 32
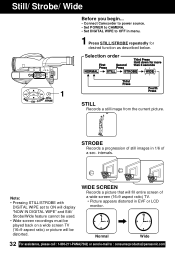
... a still image from the current picture. STROBE Records a progression of a sec. Note: • Pressing STILL/STROBE with DIGITAL WIPE set to : consumerproducts@panasonic.com Normal Wide 32 For assistance, please call : 1-800-211-PANA(7262) or send e-mail to ON will display "NOW IN DIGITAL WIPE" and Still... a picture that will be distorted. Still/ Strobe/ Wide Before you begin... • Connect Camcorder to power source. • Set POWER to CAMERA. • Set DIGITAL WIPE to OFF in menu. 1 Press STILL/STROBE repeatedly for desired function as described below. intervals.
... a still image from the current picture. STROBE Records a progression of a sec. Note: • Pressing STILL/STROBE with DIGITAL WIPE set to : consumerproducts@panasonic.com Normal Wide 32 For assistance, please call : 1-800-211-PANA(7262) or send e-mail to ON will display "NOW IN DIGITAL WIPE" and Still... a picture that will be distorted. Still/ Strobe/ Wide Before you begin... • Connect Camcorder to power source. • Set POWER to CAMERA. • Set DIGITAL WIPE to OFF in menu. 1 Press STILL/STROBE repeatedly for desired function as described below. intervals.
