
Vhs-c
Page 6
... Zone, Auto Daylight Saving Time 14~15 Built-in Auto Light (Using the Light, Rplacing the Bulb 16 Camera Recording (Basic, Stand-by, Programmed Recording 17~19 Playing Back Recordings (Basic Playback, Visual Search, Still Picture...Speed Shutter (Auto/Manual Shutter) 26 Auto Fade 27 Color Digital Fade 28 Color Digital Filter 29 Digital Zoom 30 Digital Electronic Image Stabilization (E.I.S 31 Still/Strobe/Wide 32 MotionSensor 33 Digital Still Camera 34~40 • Memory Card Insertion/Removal . 34 &#..., please call : 1-800-211-PANA(7262) or send e-mail to : consumerproducts@panasonic.com
... Zone, Auto Daylight Saving Time 14~15 Built-in Auto Light (Using the Light, Rplacing the Bulb 16 Camera Recording (Basic, Stand-by, Programmed Recording 17~19 Playing Back Recordings (Basic Playback, Visual Search, Still Picture...Speed Shutter (Auto/Manual Shutter) 26 Auto Fade 27 Color Digital Fade 28 Color Digital Filter 29 Digital Zoom 30 Digital Electronic Image Stabilization (E.I.S 31 Still/Strobe/Wide 32 MotionSensor 33 Digital Still Camera 34~40 • Memory Card Insertion/Removal . 34 &#..., please call : 1-800-211-PANA(7262) or send e-mail to : consumerproducts@panasonic.com

Vhs-c
Page 13
...4 STAND-BY RELEASE (page 18). ON/OFF/AUTO : Light can be set ON or OFF. ON : Digital wipe mode can be used. 9 MAGICPIX (page 24). Select to exit. The CAMERA or VCR MENU screen (see below left) appears when Menu mode is on. Using MENU Mode Getting Started 1, ...2, 3, 4 Before you begin... • Connect Camcorder to power source. • Set POWER to CAMERA or VCR. 1 Press MENU for MENU mode. AUTO FADE : BLACK or WHITE DIGITAL FADE : TYPE 7 types COLOR 8 colors DIGITAL FILTER : COLOR 5 colors 13 ON : On-screen Display (OSD) screens are not pressed within 5...
...4 STAND-BY RELEASE (page 18). ON/OFF/AUTO : Light can be set ON or OFF. ON : Digital wipe mode can be used. 9 MAGICPIX (page 24). Select to exit. The CAMERA or VCR MENU screen (see below left) appears when Menu mode is on. Using MENU Mode Getting Started 1, ...2, 3, 4 Before you begin... • Connect Camcorder to power source. • Set POWER to CAMERA or VCR. 1 Press MENU for MENU mode. AUTO FADE : BLACK or WHITE DIGITAL FADE : TYPE 7 types COLOR 8 colors DIGITAL FILTER : COLOR 5 colors 13 ON : On-screen Display (OSD) screens are not pressed within 5...

Vhs-c
Page 26
...needed for MENU mode. High Speed Shutter indication flashes if light is set to CAMERA. 26 For assistance, please call : 1-800-211-PANA(7262) or send e-mail to CAMERA. feature is set to : consumerproducts@panasonic.com Auto Shutter In AUTO mode (no indication in EVF or LCD Monitor), ...set to ON. • Provide additional halogen or tungsten light for use indoors or in inadequate light. • Setting reverts to 1/60 if Digital E.I.S. High Speed Shutter Improves Still or Slow Motion playback picture of high speed subjects (e.g. Press UP or DOWN to select SHUTTER . 2 Press ...
...needed for MENU mode. High Speed Shutter indication flashes if light is set to CAMERA. 26 For assistance, please call : 1-800-211-PANA(7262) or send e-mail to CAMERA. feature is set to : consumerproducts@panasonic.com Auto Shutter In AUTO mode (no indication in EVF or LCD Monitor), ...set to ON. • Provide additional halogen or tungsten light for use indoors or in inadequate light. • Setting reverts to 1/60 if Digital E.I.S. High Speed Shutter Improves Still or Slow Motion playback picture of high speed subjects (e.g. Press UP or DOWN to select SHUTTER . 2 Press ...

Vhs-c
Page 28
...2, select AUTO FADE. 5 Press DISPLAY to resume fade. Before you begin... • Connect Camcorder to power source. • Set POWER to CAMERA. 1 Press MENU for VIDEO EFFECTS menu. Press UP or DOWN to fade in or fade out at any time (except RANDOM mode) by fade.... type is displayed EVF or LCD monitor as it is selected. 4 Press DISPLAY for DIGITAL FADE menu. Press DISPLAY for DIGITAL FADE menu. 1, 2, 3, 4, 5 Press UP or DOWN to : consumerproducts@panasonic.com Press UP or DOWN to select DIGITAL FADE . 6 3 Press DISPLAY for TYPE menu. Press DOWN to select from 8 colors...
...2, select AUTO FADE. 5 Press DISPLAY to resume fade. Before you begin... • Connect Camcorder to power source. • Set POWER to CAMERA. 1 Press MENU for VIDEO EFFECTS menu. Press UP or DOWN to fade in or fade out at any time (except RANDOM mode) by fade.... type is displayed EVF or LCD monitor as it is selected. 4 Press DISPLAY for DIGITAL FADE menu. Press DISPLAY for DIGITAL FADE menu. 1, 2, 3, 4, 5 Press UP or DOWN to : consumerproducts@panasonic.com Press UP or DOWN to select DIGITAL FADE . 6 3 Press DISPLAY for TYPE menu. Press DOWN to select from 8 colors...

Vhs-c
Page 29
...UP or DOWN to normal in Still mode. Press MENU to exit. 5 Start recording (page 17). • To cancel Digital Filter, set POWER to entire picture, like a color filter. Color Digital Filter Digital Filter adds one of each color is displayed as it is selected. 5 EVF or LCD monitor 4 Press DISPLAY to... CAMERA. 1, 2, 3, 4 1 Press MENU for DIGITAL FILTER menu. Press UP or DOWN to select from 5 colors. • A preview of 5 colors to OFF. Special Features 29 Before you begin... • ...
...UP or DOWN to normal in Still mode. Press MENU to exit. 5 Start recording (page 17). • To cancel Digital Filter, set POWER to entire picture, like a color filter. Color Digital Filter Digital Filter adds one of each color is displayed as it is selected. 5 EVF or LCD monitor 4 Press DISPLAY to... CAMERA. 1, 2, 3, 4 1 Press MENU for DIGITAL FILTER menu. Press UP or DOWN to select from 5 colors. • A preview of 5 colors to OFF. Special Features 29 Before you begin... • ...

Vhs-c
Page 30
...; Connect Camcorder to power source. • Set POWER to CAMERA. • Set DIGITAL WIPE to OFF in EVF or LCD monitor. • POWER ZOOM switch controls digital zoom level. • Normal zoom resumes when level falls to : consumerproducts@panasonic.com ZOOM. ZOOM to turn off Digital Zoom so no indication appears. 30 For assistance, please...
...; Connect Camcorder to power source. • Set POWER to CAMERA. • Set DIGITAL WIPE to OFF in EVF or LCD monitor. • POWER ZOOM switch controls digital zoom level. • Normal zoom resumes when level falls to : consumerproducts@panasonic.com ZOOM. ZOOM to turn off Digital Zoom so no indication appears. 30 For assistance, please...

Vhs-c
Page 31
... Stabilization (E.I .S. NORMAL Digital EIS ON Special Features 31 Shutter speed setting remains after EIS is canceled. 2 Press EIS again to brightness. • Use High Speed Shutter (page 26) if needed. unstable situations. • Connect Camcorder to power source. • Set POWER to CAMERA. 1, 2 1 Press EIS to display "EIS" in the EVF or...
... Stabilization (E.I .S. NORMAL Digital EIS ON Special Features 31 Shutter speed setting remains after EIS is canceled. 2 Press EIS again to brightness. • Use High Speed Shutter (page 26) if needed. unstable situations. • Connect Camcorder to power source. • Set POWER to CAMERA. 1, 2 1 Press EIS to display "EIS" in the EVF or...
Vhs-c
Page 32
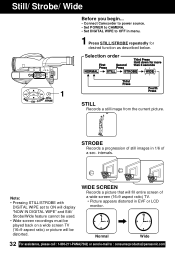
intervals. Note: • Pressing STILL/STROBE with DIGITAL WIPE set to ON will display "NOW IN DIGITAL WIPE" and Still/ Strobe/Wide feature cannot be used. • Wide screen recordings must be distorted. STROBE Records a progression of still images in ... Picture appears distorted in EVF or LCD monitor. Still/ Strobe/ Wide Before you begin... • Connect Camcorder to power source. • Set POWER to CAMERA. • Set DIGITAL WIPE to OFF in 1/6 of a sec. Selection order 1 STILL Records a still image from the current picture. Normal Wide 32 For assistance, please call...
intervals. Note: • Pressing STILL/STROBE with DIGITAL WIPE set to ON will display "NOW IN DIGITAL WIPE" and Still/ Strobe/Wide feature cannot be used. • Wide screen recordings must be distorted. STROBE Records a progression of still images in ... Picture appears distorted in EVF or LCD monitor. Still/ Strobe/ Wide Before you begin... • Connect Camcorder to power source. • Set POWER to CAMERA. • Set DIGITAL WIPE to OFF in 1/6 of a sec. Selection order 1 STILL Records a still image from the current picture. Normal Wide 32 For assistance, please call...

Vhs-c
Page 33
... recorded if displayed in MotionSensor stand-by, the following functions are not available: Record/ Pause, Stand-by mode, Digital E.I.S., Video Effects (Auto/Digital Fade, Digital Filter). Press UP or DOWN to select MOTIONSENSOR . 2 Press DISPLAY to CAMERA. • Securely position and aim Camcorder. 1, 2, 3 1 Press MENU for MotionSensor stand-by mode. (If cassette is not...
... recorded if displayed in MotionSensor stand-by, the following functions are not available: Record/ Pause, Stand-by mode, Digital E.I.S., Video Effects (Auto/Digital Fade, Digital Filter). Press UP or DOWN to select MOTIONSENSOR . 2 Press DISPLAY to CAMERA. • Securely position and aim Camcorder. 1, 2, 3 1 Press MENU for MotionSensor stand-by mode. (If cassette is not...

Vhs-c
Page 34
... or back as this could erase the data recorded on it . • Do not affix other Panasonic brand products, like Digital Camera (DMC-LC5, DMC-F7). • Panasonic only guarantees compatibility with Panasonic brand cards and those bearing the SanDisk logo. • This Camcorder can be stored on the SD... and approx. 21 MB is not inserted, "NO CARD" appears on-screen. • Do not insert card in the direction of camera memory capacity. Digital Still Camera Memory Card* Insertion/ Removal Before you make a backup copy on the computer. • Do not bend or drop the Memory Card...
... or back as this could erase the data recorded on it . • Do not affix other Panasonic brand products, like Digital Camera (DMC-LC5, DMC-F7). • Panasonic only guarantees compatibility with Panasonic brand cards and those bearing the SanDisk logo. • This Camcorder can be stored on the SD... and approx. 21 MB is not inserted, "NO CARD" appears on-screen. • Do not insert card in the direction of camera memory capacity. Digital Still Camera Memory Card* Insertion/ Removal Before you make a backup copy on the computer. • Do not bend or drop the Memory Card...

Vhs-c
Page 35
Digital Still Camera Special Features Recording Before you begin... • Connect Camcorder to power source. • Insert the Memory Card (page 34). 1 3 2 4 Note: • Please note that the ... Card is processed, the status screens below are not available while in PHOTO mode. • Auto Fade • Digital Fade • Color Digital Filter • Digital Zoom • Digital E.I.S. • Still/Strobe/Wide • MotionSensor • Digital Wipe Mode • Picture in bright conditions, such as outdoors. Set POWER to capture image. • As the...
Digital Still Camera Special Features Recording Before you begin... • Connect Camcorder to power source. • Insert the Memory Card (page 34). 1 3 2 4 Note: • Please note that the ... Card is processed, the status screens below are not available while in PHOTO mode. • Auto Fade • Digital Fade • Color Digital Filter • Digital Zoom • Digital E.I.S. • Still/Strobe/Wide • MotionSensor • Digital Wipe Mode • Picture in bright conditions, such as outdoors. Set POWER to capture image. • As the...

Vhs-c
Page 36
Digital Still Camera Before you begin... • Connect Camcorder to power source. • Insert the Memory Card (page 34). • Set POWER to AUTO. The Multi Image Playback ...; Press (STOP) to redisplay Multi Image playback screen. 36 For assistance, please call : 1-800-211-PANA(7262) or send e-mail to : consumerproducts@panasonic.com When RECORD/PAUSE is pressed to CAMERA or change recording mode while "PLEASE WAIT" is displayed. • If "CARD ERROR" appears on -screen. Adjust viewing angle. 2 Press (PLAY...
Digital Still Camera Before you begin... • Connect Camcorder to power source. • Insert the Memory Card (page 34). • Set POWER to AUTO. The Multi Image Playback ...; Press (STOP) to redisplay Multi Image playback screen. 36 For assistance, please call : 1-800-211-PANA(7262) or send e-mail to : consumerproducts@panasonic.com When RECORD/PAUSE is pressed to CAMERA or change recording mode while "PLEASE WAIT" is displayed. • If "CARD ERROR" appears on -screen. Adjust viewing angle. 2 Press (PLAY...

Vhs-c
Page 37
... the number) is assigned automatically. • Even if ON is set . Press UP or DOWN to display Multi Image Playback screen. Displayed Directory/Image Number Digital Still Camera Before you begin... • Connect Camcorder to power source. • Insert the Memory Card (page 34). • Set POWER to PHOTO. 1 Repeat steps 1 ... name when viewed with DCF can be viewed on page 36 to select ON or OFF. Images saved on the Memory Card using other Digital Still Cameras that are compliant with card reader. • This product is displayed. Select any image and press (PLAY). 2 Press MENU for...
... the number) is assigned automatically. • Even if ON is set . Press UP or DOWN to display Multi Image Playback screen. Displayed Directory/Image Number Digital Still Camera Before you begin... • Connect Camcorder to power source. • Insert the Memory Card (page 34). • Set POWER to PHOTO. 1 Repeat steps 1 ... name when viewed with DCF can be viewed on page 36 to select ON or OFF. Images saved on the Memory Card using other Digital Still Cameras that are compliant with card reader. • This product is displayed. Select any image and press (PLAY). 2 Press MENU for...

Vhs-c
Page 38
... Set POWER to select image page. Format the Memory Card 1 Do step 1 above , and select ALL . 2 Press M-DEL. Digital Still Camera Delete Specific Images You can delete unwanted images and increase the remaining image memory. FORMAT : Format the Memory Card. Press + (FF) ...captured with other brand products cannot be Deleting Specific Image Pages restored. 1 Press M-DEL for Multi Image screen. Press (PLAY) to : consumerproducts@panasonic.com DELETE ALL : Deleting All Image Pages. The screen right is deleted from the Memory Card. • "NO PICTURE" appears on -screen...
... Set POWER to select image page. Format the Memory Card 1 Do step 1 above , and select ALL . 2 Press M-DEL. Digital Still Camera Delete Specific Images You can delete unwanted images and increase the remaining image memory. FORMAT : Format the Memory Card. Press + (FF) ...captured with other brand products cannot be Deleting Specific Image Pages restored. 1 Press M-DEL for Multi Image screen. Press (PLAY) to : consumerproducts@panasonic.com DELETE ALL : Deleting All Image Pages. The screen right is deleted from the Memory Card. • "NO PICTURE" appears on -screen...

Vhs-c
Page 39
...page 40). screen, the size of the screen. • If there are not available: MotionSensor, Auto Fade, Digital Fade, Color Digital Filter, Digital Zoom, Digital E.I.S., Still/Strobe/Wide. 39 P = Picture in Picture Wipe Title Captured still images (page 35) can be ...insert the Memory Card. • Pictures captured with the current picture. Digital Still Camera Special Features Picture in Picture ) 1 Press MENU for MENU mode. Press UP or DOWN to select DIGITAL WIPE . 2 Press DISPLAY to CAMERA. 3 MODE 1, 2 Still image Moving Picture Multi image playback page number...
...page 40). screen, the size of the screen. • If there are not available: MotionSensor, Auto Fade, Digital Fade, Color Digital Filter, Digital Zoom, Digital E.I.S., Still/Strobe/Wide. 39 P = Picture in Picture Wipe Title Captured still images (page 35) can be ...insert the Memory Card. • Pictures captured with the current picture. Digital Still Camera Special Features Picture in Picture ) 1 Press MENU for MENU mode. Press UP or DOWN to select DIGITAL WIPE . 2 Press DISPLAY to CAMERA. 3 MODE 1, 2 Still image Moving Picture Multi image playback page number...

Vhs-c
Page 40
... selected, the following functions are not available: MotionSensor, Auto Fade, Digital Fade, Color Digital Filter, Digital Zoom, Digital E.I.S., Still/Strobe/Wide. 40 For assistance, please call : 1-800-211-PANA(7262) or send e-mail to : consumerproducts@panasonic.com Press START again to resume wipe. Digital Still Camera Digital Wipe Mode Insert a captured still image into the current recording, or...
... selected, the following functions are not available: MotionSensor, Auto Fade, Digital Fade, Color Digital Filter, Digital Zoom, Digital E.I.S., Still/Strobe/Wide. 40 For assistance, please call : 1-800-211-PANA(7262) or send e-mail to : consumerproducts@panasonic.com Press START again to resume wipe. Digital Still Camera Digital Wipe Mode Insert a captured still image into the current recording, or...

Vhs-c
Page 43
Note: • When transferring image data larger than VGA size (640x480) from your PC for Picture in Picture Wipe Title and Digital Wipe by transferring them to the Camcorder using the Digital PhotoShot Software. 1 Repeat steps 1 and 2 on page 42 to run the Software. 2 "Preview Window" screen appears. 3 Select the... the PC to the Camcorder, the perimeter of the image is cropped to VGA size. 4 Click on "File," then select "Data out to camera," then select Fine or Normal mode. • Your PC image data is transferred to your PC, the displayed picture appears abnormal, restart the PC...
Note: • When transferring image data larger than VGA size (640x480) from your PC for Picture in Picture Wipe Title and Digital Wipe by transferring them to the Camcorder using the Digital PhotoShot Software. 1 Repeat steps 1 and 2 on page 42 to run the Software. 2 "Preview Window" screen appears. 3 Select the... the PC to the Camcorder, the perimeter of the image is cropped to VGA size. 4 Click on "File," then select "Data out to camera," then select Fine or Normal mode. • Your PC image data is transferred to your PC, the displayed picture appears abnormal, restart the PC...

Vhs-c
Page 44
...PC Connection Driver Quick Reference 12 3 4 5 1 File • Open... To print the currently active image. • Exit To quit the "Digital PhotoShot" application. 2 Image • Image Adjustment To modify the captured image as desired. • Copy to Clipboad To copy a view image to... a new file name while preserving the original file. • Data in from CAMERA To display a dialog box listing all images from the Card memory. • Communication To specify the port to : consumerproducts@panasonic.com commands. • Delete Page To delete the selected image from the Camcorder...
...PC Connection Driver Quick Reference 12 3 4 5 1 File • Open... To print the currently active image. • Exit To quit the "Digital PhotoShot" application. 2 Image • Image Adjustment To modify the captured image as desired. • Copy to Clipboad To copy a view image to... a new file name while preserving the original file. • Data in from CAMERA To display a dialog box listing all images from the Card memory. • Communication To specify the port to : consumerproducts@panasonic.com commands. • Delete Page To delete the selected image from the Camcorder...

Vhs-c
Page 47
Viewfinder/LCD Monitor Indications CAMERA/VCR mode 12 3 45 6 7, 8 9 10, 11, 12 13 14 15 16 17 18 19 20 21, 22 1 Zoom Magnification level (pages 23, 30). 8 Digital Wipe (pages 39, 40). 2 Battery Remaining (page 46). 9 Still/Strobe (page 32). unit, "WARNING DEW DETECTED" " " flashes 1 minute and "... High Speed Shutter (page 26). 20 Fade (page 27). 21 Color Digital Fade (page 28). 22 Color Digital Filter (page 29). 47 For Your Information Wait until "WARNING" no 13 Wide Screen (page 32). cassette inserted in Camera (RECORD) mode. 12 MotionSensor (page 33). • PLAY, FF ...
Viewfinder/LCD Monitor Indications CAMERA/VCR mode 12 3 45 6 7, 8 9 10, 11, 12 13 14 15 16 17 18 19 20 21, 22 1 Zoom Magnification level (pages 23, 30). 8 Digital Wipe (pages 39, 40). 2 Battery Remaining (page 46). 9 Still/Strobe (page 32). unit, "WARNING DEW DETECTED" " " flashes 1 minute and "... High Speed Shutter (page 26). 20 Fade (page 27). 21 Color Digital Fade (page 28). 22 Color Digital Filter (page 29). 47 For Your Information Wait until "WARNING" no 13 Wide Screen (page 32). cassette inserted in Camera (RECORD) mode. 12 MotionSensor (page 33). • PLAY, FF ...

Vhs-c
Page 55
... playing old or damaged tapes may appear bent or unstable during playback is noisy or contains streaks ... (Tracking Control). (p.20) "Panasonic ITS TAPES CAN PLAY IN YOUR • Set POWER to CAMERA, then set to ON. (p. 39) Video cassette cannot be inserted ... • Connect Power Source. (pp. 9, 10) &#...playback signal is not as stable as an off the air TV signal, so the top of the screen appears grayish... • Be sure DIGITAL WIPE is too dark ... • Set HIGH SPEED SHUTTER to follow cleaning cassette instructions exactly and only use when symptoms occur. 55 Symptom ...
... playing old or damaged tapes may appear bent or unstable during playback is noisy or contains streaks ... (Tracking Control). (p.20) "Panasonic ITS TAPES CAN PLAY IN YOUR • Set POWER to CAMERA, then set to ON. (p. 39) Video cassette cannot be inserted ... • Connect Power Source. (pp. 9, 10) &#...playback signal is not as stable as an off the air TV signal, so the top of the screen appears grayish... • Be sure DIGITAL WIPE is too dark ... • Set HIGH SPEED SHUTTER to follow cleaning cassette instructions exactly and only use when symptoms occur. 55 Symptom ...


