

Owner's Manual
Page 7
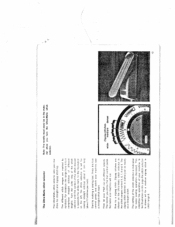
The bobbin winder stops automatically when - Wind the thread clockwise around the bobbin a few times. Push lever E against the bohhin and start the bobbin winder by press ing down on the bobbin winder disc the bobbin is disengaged, i. I mechanism is full, ... where it is in its highest position. e. the presser 5 Raise both spool pins and place a spool of thread on the back of them. Pass the thread from the spool to wind the bobbin bar lifter...
The bobbin winder stops automatically when - Wind the thread clockwise around the bobbin a few times. Push lever E against the bohhin and start the bobbin winder by press ing down on the bobbin winder disc the bobbin is disengaged, i. I mechanism is full, ... where it is in its highest position. e. the presser 5 Raise both spool pins and place a spool of thread on the back of them. Pass the thread from the spool to wind the bobbin bar lifter...

Owner's Manual
Page 12
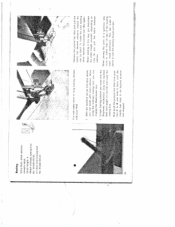
Draw bobbin thread up tnraugn the eodie hub Hold the needle thread loosely in a loop. lb. PFAFF) 1222 10 I Place both threads back under the sewing tool If the bobbin thread should break in the seam or the bobbin becomes empty while sewing, you start sewing, the t)ObbiIi ttireau has to do this, push the presaur bar lnttr down, as instructed in nom her 3 ann pagi.. This causes the needle to...
Draw bobbin thread up tnraugn the eodie hub Hold the needle thread loosely in a loop. lb. PFAFF) 1222 10 I Place both threads back under the sewing tool If the bobbin thread should break in the seam or the bobbin becomes empty while sewing, you start sewing, the t)ObbiIi ttireau has to do this, push the presaur bar lnttr down, as instructed in nom her 3 ann pagi.. This causes the needle to...
Owner's Manual
Page 15
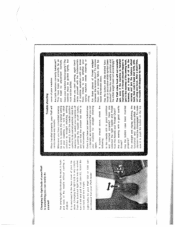
... 12 stitches per inch), Start by numbers. Then lot your machine sew a straight'stitch seam. The zigzag stitch desired is dialed just as easily as a straight stitch, The setting of the stitch desired is opposite the white mark, ln the illustration on the left, the stitch selector is set for a medium zigzag stitch in the mate del when you press the foot control pedal, the faster your ma chine for every sewing operation discussed...
... 12 stitches per inch), Start by numbers. Then lot your machine sew a straight'stitch seam. The zigzag stitch desired is dialed just as easily as a straight stitch, The setting of the stitch desired is opposite the white mark, ln the illustration on the left, the stitch selector is set for a medium zigzag stitch in the mate del when you press the foot control pedal, the faster your ma chine for every sewing operation discussed...

Owner's Manual
Page 17
... turning the material. (i,F4FF) 1222 Hold the presser bar lifter in case of seam interruptions, when the bobbin becomes empty, or when the bobbin thread breaks. The sewing foot is raised autorni,caIty to its highest pnsi tion. When you need to turn the fabric. This position is to be drawn up, in its lowest posi tion until the needle has stopped at its various...
... turning the material. (i,F4FF) 1222 Hold the presser bar lifter in case of seam interruptions, when the bobbin becomes empty, or when the bobbin thread breaks. The sewing foot is raised autorni,caIty to its highest pnsi tion. When you need to turn the fabric. This position is to be drawn up, in its lowest posi tion until the needle has stopped at its various...

Owner's Manual
Page 20
... change the sewIng foot, push the presser bar lifter to use for changing. Changing the sewing foot is attached in me reverse order. Loosen screw B until the sewing foot can be removed, tilt rug it to sew. 18 Tighten screw B again betore starting to position D (see ill. The acctssory box of its shank tacos toward the back. A detailed Needle and Thread Chart is easy. below) and pull the old needle out of the needle holder Insert a new needle and...
... change the sewIng foot, push the presser bar lifter to use for changing. Changing the sewing foot is attached in me reverse order. Loosen screw B until the sewing foot can be removed, tilt rug it to sew. 18 Tighten screw B again betore starting to position D (see ill. The acctssory box of its shank tacos toward the back. A detailed Needle and Thread Chart is easy. below) and pull the old needle out of the needle holder Insert a new needle and...

Owner's Manual
Page 21
... that they normally need not change the lower tension if you always use the same size thread on the bobbin and in the needle, 19 Turn this case, check to see whether the upper or lower tension needs adjusting Then regulate the tensions as follows: The upper tension is located under the top cover of your finger nail) for a looser tension. Perfect seams through property balanced tensions I 'V The thread tensions are indicated by arrows...
... that they normally need not change the lower tension if you always use the same size thread on the bobbin and in the needle, 19 Turn this case, check to see whether the upper or lower tension needs adjusting Then regulate the tensions as follows: The upper tension is located under the top cover of your finger nail) for a looser tension. Perfect seams through property balanced tensions I 'V The thread tensions are indicated by arrows...
Owner's Manual
Page 28
..., operate the preser but litter again, When nashog in H s way', you determine the stitch length yoi.rseP depending err sw far you can baste wrtti stint t Sliit:[n-s. You can make snort or 009 00 05tifl stitches with the Stoprnatic r'iechionisrn. [irup tic riichine feed )see pages 14 id 24) nct wor the. basting thread out later Basting Ultra-Matic. stitch selector. straight stitch Stitch length 4 Attach...
..., operate the preser but litter again, When nashog in H s way', you determine the stitch length yoi.rseP depending err sw far you can baste wrtti stint t Sliit:[n-s. You can make snort or 009 00 05tifl stitches with the Stoprnatic r'iechionisrn. [irup tic riichine feed )see pages 14 id 24) nct wor the. basting thread out later Basting Ultra-Matic. stitch selector. straight stitch Stitch length 4 Attach...

Owner's Manual
Page 32
... (see ill below ) The tiller thread rTlakes the cording mm e prominent. Cording is duflO. Inset I the cordiricj plate in thu slot of the face cover tsee ill below ). Cording on men goods, dresses, blou, etc. to suit the type 01 nioterial used for this por pose. Cording Ultra-Matic stitch selector: straight sttch Stitch length: 1 5---2 Insert twin needle. Hold both needle threads lightly and operate thu Stopinetic nieclianusin to page...
... (see ill below ) The tiller thread rTlakes the cording mm e prominent. Cording is duflO. Inset I the cordiricj plate in thu slot of the face cover tsee ill below ). Cording on men goods, dresses, blou, etc. to suit the type 01 nioterial used for this por pose. Cording Ultra-Matic stitch selector: straight sttch Stitch length: 1 5---2 Insert twin needle. Hold both needle threads lightly and operate thu Stopinetic nieclianusin to page...

Owner's Manual
Page 37
... fabric. 2 Stitch along the outline of the design with a straight-stitch seam 3 Turn the stitch selector to the largost 7igzag stitch in stitch range 9 Then sew the fabric to he ippiiqued to the right side of tire material (Fig f) so that the desiqrr is con coaled 4 Turn the stitch sclecter back to its original position, setting rhe mchine for straiqht stitching with a stitch !enclth of the applique...
... fabric. 2 Stitch along the outline of the design with a straight-stitch seam 3 Turn the stitch selector to the largost 7igzag stitch in stitch range 9 Then sew the fabric to he ippiiqued to the right side of tire material (Fig f) so that the desiqrr is con coaled 4 Turn the stitch sclecter back to its original position, setting rhe mchine for straiqht stitching with a stitch !enclth of the applique...

Owner's Manual
Page 38
...-long zigzag stitch in the fabric previously (I). Attach clear-view sewing foot NC) 93-040920-91. straight stitch Stitch length: 2 Attach clear-view sewing foot No. 93-040 920-91 2. When using a twin hemstitching needle (obtainable at your Plaff dealer): Ultra-Matic stitch selector. At every Stitch, the wing needle dispiaces the fabric yarns and gathers ttmni 0 ham When sewing several henistitctnng Seaiiis One beside the othei make sure the needle enters the left needle holes...
...-long zigzag stitch in the fabric previously (I). Attach clear-view sewing foot NC) 93-040920-91. straight stitch Stitch length: 2 Attach clear-view sewing foot No. 93-040 920-91 2. When using a twin hemstitching needle (obtainable at your Plaff dealer): Ultra-Matic stitch selector. At every Stitch, the wing needle dispiaces the fabric yarns and gathers ttmni 0 ham When sewing several henistitctnng Seaiiis One beside the othei make sure the needle enters the left needle holes...

Owner's Manual
Page 40
... ()rrucis to t y out lIlo stitch density whi h Si ould So soOt Ion ti o000 ounce with auh thr '1 lie njclii,- This selector is set correctly if the needle enters the left hole exactly as you taCit it descends icr its lett stitch. in the button. Button sewing Ultra-Matic stitch selector straight stitch Drop the machine teed (see p. 3/). Right needle positron (see pp, 14...
... ()rrucis to t y out lIlo stitch density whi h Si ould So soOt Ion ti o000 ounce with auh thr '1 lie njclii,- This selector is set correctly if the needle enters the left hole exactly as you taCit it descends icr its lett stitch. in the button. Button sewing Ultra-Matic stitch selector straight stitch Drop the machine teed (see p. 3/). Right needle positron (see pp, 14...

Owner's Manual
Page 42
... again snaps into the buttonhole seam completely (5) and trim both seams ore the same ong!h, iionin press buttonhole contru T clown to its normal position. Open the buttonhole with your foot on the type of fabric it to its highect position Th set the mochno for the central needle position is released, the machine aulo mc.tically proceeds. to loosen the t1))ffm thread tension somewhat. When both...
... again snaps into the buttonhole seam completely (5) and trim both seams ore the same ong!h, iionin press buttonhole contru T clown to its normal position. Open the buttonhole with your foot on the type of fabric it to its highect position Th set the mochno for the central needle position is released, the machine aulo mc.tically proceeds. to loosen the t1))ffm thread tension somewhat. When both...

Owner's Manual
Page 47
... the needle position symbol indi cated on the button is to be set your machine tom the desired stitch. Overedgestitch seam /,X.XX?/\ Inserting patches, sewing and simnultane oy finishing hems and edges of elastic V ZZV_\/7 Hemstitching seam edges with a 1EEEEEEE Triple-stitch seam -' I a* aa 'a >5u Darning of rips and worn areas, sewing on elastics, inserting patches in knitted fabrics, sewing combinations of the respec tive functional stitch, and indicates the stitch length recommended...
... the needle position symbol indi cated on the button is to be set your machine tom the desired stitch. Overedgestitch seam /,X.XX?/\ Inserting patches, sewing and simnultane oy finishing hems and edges of elastic V ZZV_\/7 Hemstitching seam edges with a 1EEEEEEE Triple-stitch seam -' I a* aa 'a >5u Darning of rips and worn areas, sewing on elastics, inserting patches in knitted fabrics, sewing combinations of the respec tive functional stitch, and indicates the stitch length recommended...

Owner's Manual
Page 53
Fold the labric along the line which is drawn in ward, Inus producing a shell edging effect. * 4 - I- 50 Shell edgrng Blind-stitch seam Stitch length; 1 2 Attach clear-view sewing toot No. 93-040 920-91 Slightly increase the tension for non-elastic tab rice. Shell edging makes a nice trimming on lingerie and garments made of sheer, soft rrialerials or tricot. As the threads are interlocked out side the fabric, the fabric edge is to be trimmed by shell edging Sew along this folded edge with the needle alternately taking one stitch into the tabric arid the other over its edge.
Fold the labric along the line which is drawn in ward, Inus producing a shell edging effect. * 4 - I- 50 Shell edgrng Blind-stitch seam Stitch length; 1 2 Attach clear-view sewing toot No. 93-040 920-91 Slightly increase the tension for non-elastic tab rice. Shell edging makes a nice trimming on lingerie and garments made of sheer, soft rrialerials or tricot. As the threads are interlocked out side the fabric, the fabric edge is to be trimmed by shell edging Sew along this folded edge with the needle alternately taking one stitch into the tabric arid the other over its edge.

Owner's Manual
Page 54
Regulate the needle position by machine, follow the instructions given on the sewing foot (ill, at right). Edge 51 Finish the raw edge with zigzag stitches before It is discussed on page 29. If you want to haste by turnin knob O in the stitch selector toward the right that its folded edge runs along the edge guide mounted on p. 26. Place...
Regulate the needle position by machine, follow the instructions given on the sewing foot (ill, at right). Edge 51 Finish the raw edge with zigzag stitches before It is discussed on page 29. If you want to haste by turnin knob O in the stitch selector toward the right that its folded edge runs along the edge guide mounted on p. 26. Place...

Owner's Manual
Page 59
... poses only The patterns on the top cover as indicated on the button next to the fancy-stitch syrmol. Simply turn the stitch selector to the stitch length and needle position indicated on the button. Ornamental stitches The decorahvestitch mechanism To sew various fancy stitches, you have to do to sew the pattern selected. stance, push the first button. In case sewing is interrupted because bobbin is empty or...
... poses only The patterns on the top cover as indicated on the button next to the fancy-stitch syrmol. Simply turn the stitch selector to the stitch length and needle position indicated on the button. Ornamental stitches The decorahvestitch mechanism To sew various fancy stitches, you have to do to sew the pattern selected. stance, push the first button. In case sewing is interrupted because bobbin is empty or...

Owner's Manual
Page 61
... hem stitching design. Second border: To sew the center strip, push the button marked Next, combine the blind stitch with the zigzag stitch (turning the stitch selector to the right and left position. Make sure the scallops match the pattern sewn pieviously (see II.) Before you like best? [\1 jt; Then push the button marked €I i) The two borders shown on the stitch selector to a dense zigzag stitch...
... hem stitching design. Second border: To sew the center strip, push the button marked Next, combine the blind stitch with the zigzag stitch (turning the stitch selector to the right and left position. Make sure the scallops match the pattern sewn pieviously (see II.) Before you like best? [\1 jt; Then push the button marked €I i) The two borders shown on the stitch selector to a dense zigzag stitch...

Owner's Manual
Page 66
• and this is how your Ptatt 1222 looks: 1 Take-up lever 2 Thread retainer stud 3 Push button (K) 4 Top cover lid 5 Spool pins 6 indicator wheel (8) 7 Pattern length wheel (E) 8 Bobbin winder 9 Ultra-Matic stitch selector 10 Needle position control (D) 11 Buttonhole control (T) 12 Master on-ott switch (C) 13 Free arm 14 Free arm cover (enclosing the sewing hook) 15 SewIng foot 16 Matchmaker loot 17 Needle threader control 18 Upper tension 19 Reverse-teed control 20 Presser bar lifter (on back of machine arm) 63
• and this is how your Ptatt 1222 looks: 1 Take-up lever 2 Thread retainer stud 3 Push button (K) 4 Top cover lid 5 Spool pins 6 indicator wheel (8) 7 Pattern length wheel (E) 8 Bobbin winder 9 Ultra-Matic stitch selector 10 Needle position control (D) 11 Buttonhole control (T) 12 Master on-ott switch (C) 13 Free arm 14 Free arm cover (enclosing the sewing hook) 15 SewIng foot 16 Matchmaker loot 17 Needle threader control 18 Upper tension 19 Reverse-teed control 20 Presser bar lifter (on back of machine arm) 63
Owner's Manual
Page 68
... needle and thread from the Needle and Thread Chart? To make sure t m push the hutton on -off by pushing thn master on the top cover of your machine feed properly? Before you start sewing, again famil iarize yourself with out using any trouble. e. Have the needle position and the stitch length been set correctly by Itself, Have you sewing wth a good quality thread? [las the bobbin case been inserted proper lv? Changing the light...
... needle and thread from the Needle and Thread Chart? To make sure t m push the hutton on -off by pushing thn master on the top cover of your machine feed properly? Before you start sewing, again famil iarize yourself with out using any trouble. e. Have the needle position and the stitch length been set correctly by Itself, Have you sewing wth a good quality thread? [las the bobbin case been inserted proper lv? Changing the light...

Owner's Manual
Page 70
V Subiec,t to look... iOS) 27i Wi 68 Applique work Basting Before you start sewing Bhndshtching Bobbin winding Button sewing Carrying case Changing the light bulb Changing the needle Changing the sewing foot Cleaning the machine Cording Darning Darning rips Darning with filler thread Single noodle carding Slitching lorry cloth Slopmatic mucharnsnn Straight siit:hng Thr aiin ig tine noodle Trooble shooting Ultra MatS, stitch selector Vibrator \Ninidnrig tii bobbin Zigzag stitching Zipper insertion F age 2 2 16 46 40 37 61 9 64 58 59, 60 62...
V Subiec,t to look... iOS) 27i Wi 68 Applique work Basting Before you start sewing Bhndshtching Bobbin winding Button sewing Carrying case Changing the light bulb Changing the needle Changing the sewing foot Cleaning the machine Cording Darning Darning rips Darning with filler thread Single noodle carding Slitching lorry cloth Slopmatic mucharnsnn Straight siit:hng Thr aiin ig tine noodle Trooble shooting Ultra MatS, stitch selector Vibrator \Ninidnrig tii bobbin Zigzag stitching Zipper insertion F age 2 2 16 46 40 37 61 9 64 58 59, 60 62...


