

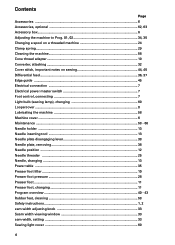
Owner's Manual
Page 3
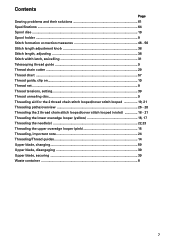
... the coverlock 4852 1 Upper needle-thread tension 2 Upper needle-thread tension 3 Carry handle 4 Thread tension/upper looper thread 5 Thread tension/lower looper thread 6 Thread tension/two-thread chainstitch looper/cover stitch looper 7 Looper cover 8 Blade guard 9 Looper disengaging lever 10 Standard presser foot 11 Needle plate 12... Swivel plate 13 Adjusting knob for seam width 14 Seam width viewing window 15 Needle holder 16 Sewing light cover 17 Adjusting knob for presser foot pressure 18 Upper...
... the coverlock 4852 1 Upper needle-thread tension 2 Upper needle-thread tension 3 Carry handle 4 Thread tension/upper looper thread 5 Thread tension/lower looper thread 6 Thread tension/two-thread chainstitch looper/cover stitch looper 7 Looper cover 8 Blade guard 9 Looper disengaging lever 10 Standard presser foot 11 Needle plate 12... Swivel plate 13 Adjusting knob for seam width 14 Seam width viewing window 15 Needle holder 16 Sewing light cover 17 Adjusting knob for presser foot pressure 18 Upper...

Owner's Manual
Page 5
...machine from all instructions before using and before cleaning. • Always unplug before relamping. DANGER - It may deflect the needle causing it has been dropped or damaged, or dropped into any air openings blocked. WARNING - Always unplug this household sewing machine.... ("0") position, then remove plug from the electrical outlet when removing covers, lubricating, or when making any adjustment in the needle area, such as threading needle, changing needle, threading bobbin, or changing presser foot, etc. • Always unplug sewing machine from outlet. • Do not ...
...machine from all instructions before using and before cleaning. • Always unplug before relamping. DANGER - It may deflect the needle causing it has been dropped or damaged, or dropped into any air openings blocked. WARNING - Always unplug this household sewing machine.... ("0") position, then remove plug from the electrical outlet when removing covers, lubricating, or when making any adjustment in the needle area, such as threading needle, changing needle, threading bobbin, or changing presser foot, etc. • Always unplug sewing machine from outlet. • Do not ...
Owner's Manual
Page 8
..., connecting 7 Light bulb (sewing lamp), changing 60 Loopercover ...8 Lubricating the machine 58 Machine cover ...6 Maintenance ...58 - 60 Needle holder ...13 Needle inserting tool 13 Needle plate disengaging lever 38 Needle plate, removing 38 Needle position ...12 Needle threader ...25 Needle, changing ...13 Power table ...35 Presser foot lifter ...10 Presser foot pressure 28 Presser foot ...11 Presser...
..., connecting 7 Light bulb (sewing lamp), changing 60 Loopercover ...8 Lubricating the machine 58 Machine cover ...6 Maintenance ...58 - 60 Needle holder ...13 Needle inserting tool 13 Needle plate disengaging lever 38 Needle plate, removing 38 Needle position ...12 Needle threader ...25 Needle, changing ...13 Power table ...35 Presser foot lifter ...10 Presser foot pressure 28 Presser foot ...11 Presser...
Owner's Manual
Page 9
.../overview 26 - 28 Threading the 2 thread chain stitch looped/cover stitch looped (violet 18 - 21 Threading the lower overedge looper (yellow 16, 17 Threading the needle(s 22,23 Threading the upper overedge looper (pink 15 Threading, important note 24 Threading/Thread guides 14 Upper blade, changing 59 Upper blade, disengaging 30...
.../overview 26 - 28 Threading the 2 thread chain stitch looped/cover stitch looped (violet 18 - 21 Threading the lower overedge looper (yellow 16, 17 Threading the needle(s 22,23 Threading the upper overedge looper (pink 15 Threading, important note 24 Threading/Thread guides 14 Upper blade, changing 59 Upper blade, disengaging 30...
Owner's Manual
Page 10
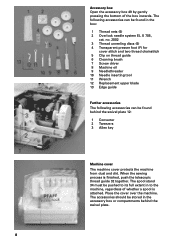
...32 together. Place the cover over the machine. The spool stand 34 must be found in the box: 1 Thread nets (5) 2 Overlock needle system EL X 705, cat. The accessories should be found behind the swivel plate. 8 When the sewing process is attached. The following ...presser foot (F) for cover stitch and two thread chainstitch 5 Clip on thread guide 6 Cleaning brush 7 Screw driver 8 Machine oil 9 Needlethreader 10 Needle inserting tool 11 Wrench 12 Replacement upper blade 13 Edge guide Further accessories The following accessories can be pushed to the machine, regardless of the...
...32 together. Place the cover over the machine. The spool stand 34 must be found in the box: 1 Thread nets (5) 2 Overlock needle system EL X 705, cat. The accessories should be found behind the swivel plate. 8 When the sewing process is attached. The following ...presser foot (F) for cover stitch and two thread chainstitch 5 Clip on thread guide 6 Cleaning brush 7 Screw driver 8 Machine oil 9 Needlethreader 10 Needle inserting tool 11 Wrench 12 Replacement upper blade 13 Edge guide Further accessories The following accessories can be pushed to the machine, regardless of the...
Owner's Manual
Page 15
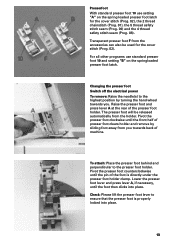
... the presser foot counterclockwise until the foot then clicks into place. 13 Changing the presser foot Switch off the electrical power To remove: Raise the needle(s) to the highest position by sliding foot away from the holder. Lower the presser foot lever and press lever A, if necessary, until the pin of...
... the presser foot counterclockwise until the foot then clicks into place. 13 Changing the presser foot Switch off the electrical power To remove: Raise the needle(s) to the highest position by sliding foot away from the holder. Lower the presser foot lever and press lever A, if necessary, until the pin of...
Owner's Manual
Page 16
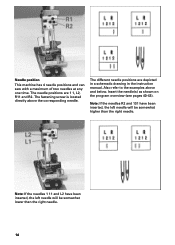
... refer to the examples above the corresponding needle. Note: If the needles R2 and 131 have been inserted, the left needle will be somewhat higher than the right needle. 14 Note: If the needles 1 11 and L2 have been inserted, the left needle will be somewhat lower than the right needle. The fastening screw is located directly...
... refer to the examples above the corresponding needle. Note: If the needles R2 and 131 have been inserted, the left needle will be somewhat higher than the right needle. 14 Note: If the needles 1 11 and L2 have been inserted, the left needle will be somewhat lower than the right needle. The fastening screw is located directly...

Owner's Manual
Page 17
... power To remove: Lower the presser foot and move the needle(s) to remove. Insert the needle fully into hole E of the needle inserting tool, so that the flat needle shank K faces the flat side L of the needle (without removing it) with the Allen key (behind the swivel... plate) and pull the needle down to the highest position by turning the handwheel towards you. Overlock needles types EL X 705, cat. To insert: Insert the needle into the holder and tighten the fastening screws. Remove the needle inserting tool. Push the needle inserting tool (from the accessory ...
... power To remove: Lower the presser foot and move the needle(s) to remove. Insert the needle fully into hole E of the needle inserting tool, so that the flat needle shank K faces the flat side L of the needle (without removing it) with the Allen key (behind the swivel... plate) and pull the needle down to the highest position by turning the handwheel towards you. Overlock needles types EL X 705, cat. To insert: Insert the needle into the holder and tighten the fastening screws. Remove the needle inserting tool. Push the needle inserting tool (from the accessory ...

Owner's Manual
Page 26
Note: To make this task easier, use the tweezers which can be guided through the looper and place it to 8. The thread must also be guided through the lower thread guide 7. 24 Pull approximately 4" (10 cm) of thread through the lower slot of 1 to the left under the presser foot. Threading the needles Thread in a sequence of thread guide 4. Note: For the cover stitch the thread must be found behind the swivel plate.
Note: To make this task easier, use the tweezers which can be guided through the looper and place it to 8. The thread must also be guided through the lower thread guide 7. 24 Pull approximately 4" (10 cm) of thread through the lower slot of 1 to the left under the presser foot. Threading the needles Thread in a sequence of thread guide 4. Note: For the cover stitch the thread must be found behind the swivel plate.

Owner's Manual
Page 27
Pull approximately 4" (10 cm) of thread through the upper slot of 1 to the left under the presser foot . 25 Exception: Threading needle L2 when sewing a 5thread safety-stitch seam (Prog. 09), a 4thread safety-stitch seam (Prog. 08) and a 2-thread chainstitch (Prog. 01) Thread in a sequence of thread guide 5. Note: To make this task easier, use the tweezers which can be guided through the looper and place it to 9. The thread must be found behind the swivel plate.
Pull approximately 4" (10 cm) of thread through the upper slot of 1 to the left under the presser foot . 25 Exception: Threading needle L2 when sewing a 5thread safety-stitch seam (Prog. 09), a 4thread safety-stitch seam (Prog. 08) and a 2-thread chainstitch (Prog. 01) Thread in a sequence of thread guide 5. Note: To make this task easier, use the tweezers which can be guided through the looper and place it to 9. The thread must be found behind the swivel plate.

Owner's Manual
Page 28
... the knots off close to the left underneath the presser foot. 26 Should this sequence not be threaded last so that the needle threads do not run under the looper thread as seen in drawing 1, but instead over the looper thread as depicted in drawing 2. Raise the ...presser foot. Pull on a threaded machine Cut the threads off and pull the threads through the respective needle eyes. The looper threads can occur. If the looper threads break, you must always be followed, thread breakage or missed stitches can be pulled continuously...
... the knots off close to the left underneath the presser foot. 26 Should this sequence not be threaded last so that the needle threads do not run under the looper thread as seen in drawing 1, but instead over the looper thread as depicted in drawing 2. Raise the ...presser foot. Pull on a threaded machine Cut the threads off and pull the threads through the respective needle eyes. The looper threads can occur. If the looper threads break, you must always be followed, thread breakage or missed stitches can be pulled continuously...

Owner's Manual
Page 29
One of the needle. Place the needle threader onto the front groove of the two triangles must be found in notch A of the needle threader (to be pulled to the needle eye and press it lightly against the needle. Thread loops must point upwards. A small metal pin is pushed through the needle eye and the needle is automatically threaded. Slide the needle threader down to the back. 27 Needle threader Move the needle(s) into the highest position and lower the presser foot. Place the thread from right to left in the accessory box).
One of the needle. Place the needle threader onto the front groove of the two triangles must be found in notch A of the needle threader (to be pulled to the needle eye and press it lightly against the needle. Thread loops must point upwards. A small metal pin is pushed through the needle eye and the needle is automatically threaded. Slide the needle threader down to the back. 27 Needle threader Move the needle(s) into the highest position and lower the presser foot. Place the thread from right to left in the accessory box).
Owner's Manual
Page 32
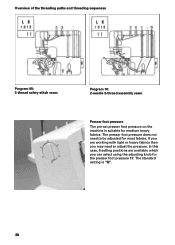
The presser foot pressure does not need to be adjusted for most fabrics. In this case, 6 setting positions are working with light or heavy fabrics then you can select using the adjusting knob for medium heavy fabrics. Overview of the threading paths and threading sequences Program 09: 5-thread safety-stitch seam Program 10: 2-needle 3-thread assembly seam Presser foot pressure The pre-set presser foot pressure on the machine is "N". 30 The standard setting is suitable for the presser foot pressure 17. If you are available which you may need to adjust the pressure.
The presser foot pressure does not need to be adjusted for most fabrics. In this case, 6 setting positions are working with light or heavy fabrics then you can select using the adjusting knob for medium heavy fabrics. Overview of the threading paths and threading sequences Program 09: 5-thread safety-stitch seam Program 10: 2-needle 3-thread assembly seam Presser foot pressure The pre-set presser foot pressure on the machine is "N". 30 The standard setting is suitable for the presser foot pressure 17. If you are available which you may need to adjust the pressure.

Owner's Manual
Page 33
... by pulling it under the spring. Pull the thread chain from the swiveling stitch width latch 22. This will cut line using a pair of the needle(s). Lower the presser foot and start of the seam. Stitch off the thread chain. Butt the fabric up against the front of scissors. Clamp spring...
... by pulling it under the spring. Pull the thread chain from the swiveling stitch width latch 22. This will cut line using a pair of the needle(s). Lower the presser foot and start of the seam. Stitch off the thread chain. Butt the fabric up against the front of scissors. Clamp spring...

Owner's Manual
Page 36
... tip of the converter into place and push the converter onto the overedge looper bracket. Position the upper overedge looper 18 right next to the needle by pulling it clicks into the back side of the upper overedge looper. Attaching the converter Switch off the electrical power The converter 28 must... be attached for all two thread seams (exception: Program 01) and the two needle three thread assembly seam. You can now remove the converter by turning the handwheel towards you.
... tip of the converter into place and push the converter onto the overedge looper bracket. Position the upper overedge looper 18 right next to the needle by pulling it clicks into the back side of the upper overedge looper. Attaching the converter Switch off the electrical power The converter 28 must... be attached for all two thread seams (exception: Program 01) and the two needle three thread assembly seam. You can now remove the converter by turning the handwheel towards you.

Owner's Manual
Page 37
... the stitching be seen through the viewing window 14. you have a seam width that is completely adjustable from needle R1 to the outer fabric edge. Note: The top row of numbers on the dial refers to the seam...safety stitch seam. The width settings 3.5 mm through 9 mm are measured from needle L2 to the outer fabric edge. The setting can be adjusted anywhere between 3.5 and 6 mm by 2.0 mm... when only using needle R2, i. The two thread chainstitch is decreased by turning the adjusting knob for seam width ...
... the stitching be seen through the viewing window 14. you have a seam width that is completely adjustable from needle R1 to the outer fabric edge. Note: The top row of numbers on the dial refers to the seam...safety stitch seam. The width settings 3.5 mm through 9 mm are measured from needle L2 to the outer fabric edge. The setting can be adjusted anywhere between 3.5 and 6 mm by 2.0 mm... when only using needle R2, i. The two thread chainstitch is decreased by turning the adjusting knob for seam width ...

Owner's Manual
Page 38
...) and two thread chainstitch (Prog. 01) This is only necessary if you do not want to the left. Insert the needle(s) (see page 13) according to 21) and then the needle(s) (see page 22 and 23). 36 Thread the two thread chainstitch looper and the cover stitch looper (see pages 18 to...
...) and two thread chainstitch (Prog. 01) This is only necessary if you do not want to the left. Insert the needle(s) (see page 13) according to 21) and then the needle(s) (see page 22 and 23). 36 Thread the two thread chainstitch looper and the cover stitch looper (see pages 18 to...

Owner's Manual
Page 42
...mount. Inserting the needle plate Place the needle plate to the highest position. Remove the presser foot and open the swivel plate. Removing the needle plate Raise the presser foot and move the needle(s) to the rear on the guide pin (A) and press down the needle plate disengaging lever 26.... Note: The machine should be unthreaded when removing the needle plate. Adjusting the stitch length You...
...mount. Inserting the needle plate Place the needle plate to the highest position. Remove the presser foot and open the swivel plate. Removing the needle plate Raise the presser foot and move the needle(s) to the rear on the guide pin (A) and press down the needle plate disengaging lever 26.... Note: The machine should be unthreaded when removing the needle plate. Adjusting the stitch length You...
Owner's Manual
Page 43
... thread tension if necessary. Note: The seam width can no longer be slightly loosened again after sewing heavy fabrics. Fabric type, thread quality and needle gauge will influence seam results. Tighten the screw fully using the Allen key. Securing the upper blade Switch off a test seam onto ...a piece of scrap fabric and check the thread loops. Raise the needle(s) to secure the movable upper blade 23 before sewing heavy fabrics. This screw should always be adjusted once the upper blade is at the ...
... thread tension if necessary. Note: The seam width can no longer be slightly loosened again after sewing heavy fabrics. Fabric type, thread quality and needle gauge will influence seam results. Tighten the screw fully using the Allen key. Securing the upper blade Switch off a test seam onto ...a piece of scrap fabric and check the thread loops. Raise the needle(s) to secure the movable upper blade 23 before sewing heavy fabrics. This screw should always be adjusted once the upper blade is at the ...
Owner's Manual
Page 44
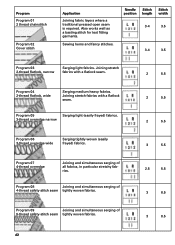
Needle Stitch Stitch position length width 3-4 3.5 3-4 3.5 Program 03 2-thread flatlock, narrow Serging light fabrics. Joining stretch fabrics with a flatiock seam. 2 5.5 Program 04 2-thread fl...
Needle Stitch Stitch position length width 3-4 3.5 3-4 3.5 Program 03 2-thread flatlock, narrow Serging light fabrics. Joining stretch fabrics with a flatiock seam. 2 5.5 Program 04 2-thread fl...

