

Leaflet (English)
Page 1
... the advantage of total audio control with ® Technology Features • Larger image in a compact size makes it • One-click connectivity. 19" (18.0" VIS) High-Resolution Monitor with built-in front firing stereo speakers, microphone, headphone jack, bass, treble, balance, volume, and mute features Professional Series Monitor 109MP Implement USB Technology with one -button setup. Get nearly 30% more viewable screen area than our previous...
... the advantage of total audio control with ® Technology Features • Larger image in a compact size makes it • One-click connectivity. 19" (18.0" VIS) High-Resolution Monitor with built-in front firing stereo speakers, microphone, headphone jack, bass, treble, balance, volume, and mute features Professional Series Monitor 109MP Implement USB Technology with one -button setup. Get nearly 30% more viewable screen area than our previous...

Leaflet (English)
Page 2
...SD™ Convergence Self Converging Yoke SCANNING Horizontal Frequency Vertical Frequency 30 - 107kHz 50 - 160Hz VIDEO Video Dot Rate Input Impedance: - BNC x 5 Connectors - V-Shift - Trapezoid - Mac is a registered trademark of Philips Electronics North America Corp. Switchless Mac Adaptor OSD Menu Structure: Brightness and Contrast Geometry: - Recall User Presets Degauss OSD Position Input Selection Rotary Default Reset Factory Settings Audio: Bass, Treble, Balance, Volume, Mute Display Language: - Sync Input Signal Levels: - Standard (kHz) (Hz) 640 x 400 31...
...SD™ Convergence Self Converging Yoke SCANNING Horizontal Frequency Vertical Frequency 30 - 107kHz 50 - 160Hz VIDEO Video Dot Rate Input Impedance: - BNC x 5 Connectors - V-Shift - Trapezoid - Mac is a registered trademark of Philips Electronics North America Corp. Switchless Mac Adaptor OSD Menu Structure: Brightness and Contrast Geometry: - Recall User Presets Degauss OSD Position Input Selection Rotary Default Reset Factory Settings Audio: Bass, Treble, Balance, Volume, Mute Display Language: - Sync Input Signal Levels: - Standard (kHz) (Hz) 640 x 400 31...

User manual
Page 1
... of Controls 2-3 Setting Up Guide Foldout HOW TO USE THE ON SCREEN DISPLAY MAIN CONTROLS WINDOW Brightness 4 Contrast 4 Degauss 5 Volume 5 SCREEN SIZE & POSITION WINDOW Vertical Size 6 Vertical Position 6 Horizontal Size 6 Horizontal Position 7 Zoom 7 GEOMETRY CONTROLS WINDOW Pincushion 8 Balanced Pincushion 8 Trapezoid 8 Parallelogram 8 Rotation 8 COLOR TEMPERATURE WINDOW 9300 K CAD/CAM 9 6500 K DTP 9 5500 K Photo Retouch 9 Advance Color Control 10 AUDIO CONTROLS WINDOW Mute 11 Bass 11 Treble 11 Balance 11 SPECIAL CONTROLS WINDOW Video Input 12 OSD Controls 12...
... of Controls 2-3 Setting Up Guide Foldout HOW TO USE THE ON SCREEN DISPLAY MAIN CONTROLS WINDOW Brightness 4 Contrast 4 Degauss 5 Volume 5 SCREEN SIZE & POSITION WINDOW Vertical Size 6 Vertical Position 6 Horizontal Size 6 Horizontal Position 7 Zoom 7 GEOMETRY CONTROLS WINDOW Pincushion 8 Balanced Pincushion 8 Trapezoid 8 Parallelogram 8 Rotation 8 COLOR TEMPERATURE WINDOW 9300 K CAD/CAM 9 6500 K DTP 9 5500 K Photo Retouch 9 Advance Color Control 10 AUDIO CONTROLS WINDOW Mute 11 Bass 11 Treble 11 Balance 11 SPECIAL CONTROLS WINDOW Video Input 12 OSD Controls 12...

User manual
Page 2
... can automatically adjust itself to the video card's scanning frequency and displays an image with a dry cloth is okay when the power is a U.S. such as speakers, electric motors, transformers, etc. • When positioning the monitor, make use of the monitor is optimal for different application. • The Image Tilt Adjustment feature corrects a rotated image. To avoid electric shock, do not expose it for 109MP), and vertical frequencies from 30KHz to...
... can automatically adjust itself to the video card's scanning frequency and displays an image with a dry cloth is okay when the power is a U.S. such as speakers, electric motors, transformers, etc. • When positioning the monitor, make use of the monitor is optimal for different application. • The Image Tilt Adjustment feature corrects a rotated image. To avoid electric shock, do not expose it for 109MP), and vertical frequencies from 30KHz to...

User manual
Page 3
... OSD button, it . Turns the electricity On and Off. See page 18. Helps guide you navigate through the front speakers or to a computer or amplifier. Description of the monitor cable here. Plug in earphones here. RIGHT VIEW CABLE COVER - Connect the supplied audio cable to send sound from the monitor to the computer. See next page for details. Snaps onto the back of hooking video from your computer. D-SUB / BNC Switch - POWER Button...
... OSD button, it . Turns the electricity On and Off. See page 18. Helps guide you navigate through the front speakers or to a computer or amplifier. Description of the monitor cable here. Plug in earphones here. RIGHT VIEW CABLE COVER - Connect the supplied audio cable to send sound from the monitor to the computer. See next page for details. Snaps onto the back of hooking video from your computer. D-SUB / BNC Switch - POWER Button...

User manual
Page 4
... On Screen Display windows. With the built-in pedestal, you to change the On Screen Display from English to page 15. ON SCREEN DISPLAY - The way to pages 6 - 8. MAIN CONTROLS - It has four features: BRIGHTNESS, CONTRAST, DEGAUSS, and VOLUME. It has five features: ZOOM, HORIZONTAL POSITION, HORIZONTAL SIZE, VERTICAL POSITION, and VERTICAL SIZE. GEOMETRY CONTROLS - To adjust these features, turn to French, Spanish, German, or Italian. This window highlighted after the OSD has been selected. Note: LANGUAGE...
... On Screen Display windows. With the built-in pedestal, you to change the On Screen Display from English to page 15. ON SCREEN DISPLAY - The way to pages 6 - 8. MAIN CONTROLS - It has four features: BRIGHTNESS, CONTRAST, DEGAUSS, and VOLUME. It has five features: ZOOM, HORIZONTAL POSITION, HORIZONTAL SIZE, VERTICAL POSITION, and VERTICAL SIZE. GEOMETRY CONTROLS - To adjust these features, turn to French, Spanish, German, or Italian. This window highlighted after the OSD has been selected. Note: LANGUAGE...

User manual
Page 5
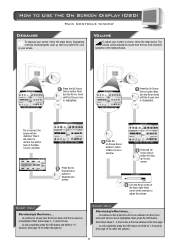
... of the monitor) to adjust the brightness. 3 Turn the ROTARY knob to adjust the contrast. to exit completely, press the OSD button and hold for 1.5 seconds. (See page 16 for other exit options.) Smart Help After returning to MAIN CONTROLS to continue to DEGAUSS, turn the ROTARY knob until the CONTRAST icon is highlighted. How to Use the On Screen Display (OSD) Main Controls window Brightness To adjust your screen's contrast, follow...
... of the monitor) to adjust the brightness. 3 Turn the ROTARY knob to adjust the contrast. to exit completely, press the OSD button and hold for 1.5 seconds. (See page 16 for other exit options.) Smart Help After returning to MAIN CONTROLS to continue to DEGAUSS, turn the ROTARY knob until the CONTRAST icon is highlighted. How to Use the On Screen Display (OSD) Main Controls window Brightness To adjust your screen's contrast, follow...
User manual
Page 6
... SCREEN SIZE & POSITION window, turn the ROTARY knob until VERTICAL SIZE is highlighted. You will be back at the lower right-hand corner of the monitor) to Use the On Screen Display (OSD) Main Controls window Degauss To degauss your monitor's volume, follow the steps below . The volume control adjusts the sound from the two front-mounted speakers or the earphones jack. 1 Press the ON SCREEN DISPLAY button. Next, follow steps 2 - 5 SCREEN SIZE & POSITION window on your screen. How to adjust...
... SCREEN SIZE & POSITION window, turn the ROTARY knob until VERTICAL SIZE is highlighted. You will be back at the lower right-hand corner of the monitor) to Use the On Screen Display (OSD) Main Controls window Degauss To degauss your monitor's volume, follow the steps below . The volume control adjusts the sound from the two front-mounted speakers or the earphones jack. 1 Press the ON SCREEN DISPLAY button. Next, follow steps 2 - 5 SCREEN SIZE & POSITION window on your screen. How to adjust...
User manual
Page 9
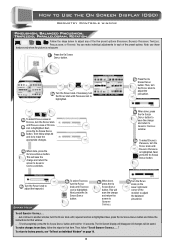
... ON SCREEN DISPLAY button. To return to factory presets, see "To Reset an Individual Window" on the lower right-hand corner of the monitor) to adjust the balanced pincushion. Next, press the ON SCREEN DISPLAY 5c button. You can make changes to adjust the trapezoid. Then, turn the ROTARY knob to adjust the pincushion. 2c When done, press the ON SCREEN DISPLAY button to save the change and return to GEOMETRY CONTROLS window...
... ON SCREEN DISPLAY button. To return to factory presets, see "To Reset an Individual Window" on the lower right-hand corner of the monitor) to adjust the balanced pincushion. Next, press the ON SCREEN DISPLAY 5c button. You can make changes to adjust the trapezoid. Then, turn the ROTARY knob to adjust the pincushion. 2c When done, press the ON SCREEN DISPLAY button to save the change and return to GEOMETRY CONTROLS window...

User manual
Page 10
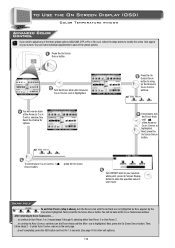
.... 1 Press the ON SCREEN DISPLAY button. After each preset setting is highlighted. How to Use the On Screen Display (OSD) Color Temperature window 9300 K Cad/Cam / 6500 K DTP / 5500 K Photo Retouch Your monitor has three preset options you select an option, the computer automatically adjusts itself for other exit options.) 9 Smart Help After returning to COLOR TEMPERATURE to continue to ADVANCED COLOR CONTROL, turn the ROTARY knob...
.... 1 Press the ON SCREEN DISPLAY button. After each preset setting is highlighted. How to Use the On Screen Display (OSD) Color Temperature window 9300 K Cad/Cam / 6500 K DTP / 5500 K Photo Retouch Your monitor has three preset options you select an option, the computer automatically adjusts itself for other exit options.) 9 Smart Help After returning to COLOR TEMPERATURE to continue to ADVANCED COLOR CONTROL, turn the ROTARY knob...
User manual
Page 11
Next, press the ON SCREEN DISPLAY button. How to Use the On Screen Display (OSD) Color Temperature window ADVANCED COLOR CONTROL If you need to adjust any of the three preset options (CAD/CAM, DTP, or PHOTO RETOUCH), follow steps 2 - 5 under AUDIO CONTROL WINDOW on your required white point, press On Screen Display button to each of the ADVANCED COLOR CONTROL is highlighted. Smart Help To exit USER PRESETS (step 3 above), turn the ROTARY knob until...
Next, press the ON SCREEN DISPLAY button. How to Use the On Screen Display (OSD) Color Temperature window ADVANCED COLOR CONTROL If you need to adjust any of the three preset options (CAD/CAM, DTP, or PHOTO RETOUCH), follow steps 2 - 5 under AUDIO CONTROL WINDOW on your required white point, press On Screen Display button to each of the ADVANCED COLOR CONTROL is highlighted. Smart Help To exit USER PRESETS (step 3 above), turn the ROTARY knob until...
User manual
Page 12
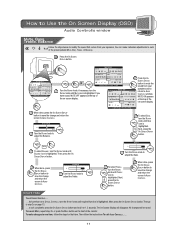
... Turn the ROTARY knob to one item, follow the instructions To exit AUDIO CONTROLS . . . . 11 To make individual adjustments to adjust the Treble. ma i n MUTE ON g e ome t r y aud i o EXIT RESET 2b Press the ON SCREEN DISPLAY button to mute the sound from your speakers and to s c r e e n return to modify the sound that item. Then, press the ON SCREEN DISPLAY button. 4c When done, press the ON SCREEN DISPLAY button to save...
... Turn the ROTARY knob to one item, follow the instructions To exit AUDIO CONTROLS . . . . 11 To make individual adjustments to adjust the Treble. ma i n MUTE ON g e ome t r y aud i o EXIT RESET 2b Press the ON SCREEN DISPLAY button to mute the sound from your speakers and to s c r e e n return to modify the sound that item. Then, press the ON SCREEN DISPLAY button. 4c When done, press the ON SCREEN DISPLAY button to save...

User manual
Page 13
... ma i n VIDEO INPUT sc reen g e ome t r y aud i o EXIT RESET co l or spec i a l 1 6 0 0 x 1 2 00 9 3 . 8 K / 7 5HZ 3 Press the ON SCREEN DISPLAY button. How to Use the On Screen Display (OSD) Special Controls window Video Input VIDEO INPUT helps determine what you may want to change it to 1.0V. to continue to SPECIAL CONTROLS, turn the ROTARY knob until OSD CONTROLS icon is highlighted. 5 Press the ON SCREEN DISPLAY button to save your change the vertical and horizontal position of the OSD on the screen. ma...
... ma i n VIDEO INPUT sc reen g e ome t r y aud i o EXIT RESET co l or spec i a l 1 6 0 0 x 1 2 00 9 3 . 8 K / 7 5HZ 3 Press the ON SCREEN DISPLAY button. How to Use the On Screen Display (OSD) Special Controls window Video Input VIDEO INPUT helps determine what you may want to change it to 1.0V. to continue to SPECIAL CONTROLS, turn the ROTARY knob until OSD CONTROLS icon is highlighted. 5 Press the ON SCREEN DISPLAY button to save your change the vertical and horizontal position of the OSD on the screen. ma...

User manual
Page 14
... ON SCREEN DISPLAY button. ma i n BR IGHTNESS sc reen g e ome t r y aud i o EXIT RESET co l or spec i a l 1 6 0 0 x 1 2 00 9 3 . 8 K / 7 5HZ 6 Press the ON SCREEN DISPLAY button to adjust the UP CORNER OR BUTTOM CORNER. 4 If necessary, turn the ROTARY knob until the ADVANCED CONTROLS icon is the degree with its intended location. They include UP CORNER, BUTTOM CORNER, VERTICAL LINEARITY, MOIRE, ROTARY DEFAULT, and POWER SAVING. Then...
... ON SCREEN DISPLAY button. ma i n BR IGHTNESS sc reen g e ome t r y aud i o EXIT RESET co l or spec i a l 1 6 0 0 x 1 2 00 9 3 . 8 K / 7 5HZ 6 Press the ON SCREEN DISPLAY button to adjust the UP CORNER OR BUTTOM CORNER. 4 If necessary, turn the ROTARY knob until the ADVANCED CONTROLS icon is the degree with its intended location. They include UP CORNER, BUTTOM CORNER, VERTICAL LINEARITY, MOIRE, ROTARY DEFAULT, and POWER SAVING. Then...

User manual
Page 15
... DEFAULT icon is highlighted. ADVANCED CONTROLS ROTARY DEFAULT 4 Turn the ROTARY knob until MOIRE is highlighted. Smart Help To select VERTICAL MOIRE or to turn the ROTARY knob until POWER SAVING is highlighted. MOIRE is volume. To adjust your ON SCREEN DISPLAY. ADVANCED CONTROLS ma i n sc reen g e ome t r y aud i o EXIT RESET co l or spec i a l 1 6 0 0 x 1 2 00 9 3 . 8 K / 7 5HZ 3 Press the ON SCREEN DISPLAY button to adjust the moire. Then, press the ON SCREEN DISPLAY button...
... DEFAULT icon is highlighted. ADVANCED CONTROLS ROTARY DEFAULT 4 Turn the ROTARY knob until MOIRE is highlighted. Smart Help To select VERTICAL MOIRE or to turn the ROTARY knob until POWER SAVING is highlighted. MOIRE is volume. To adjust your ON SCREEN DISPLAY. ADVANCED CONTROLS ma i n sc reen g e ome t r y aud i o EXIT RESET co l or spec i a l 1 6 0 0 x 1 2 00 9 3 . 8 K / 7 5HZ 3 Press the ON SCREEN DISPLAY button to adjust the moire. Then, press the ON SCREEN DISPLAY button...

User manual
Page 16
... i n BR IGHTNE SS sc reen g e ome t r y aud i o EXIT RESET co l or spec i a l 1 6 0 0 x 1 2 00 9 3 . 8 K / 7 5HZ 1 Press the ON SCREEN DISPLAY button. Then, turn the ROTARY knob until LANGUAGE icon highlighted. 6 Press the ON SCREEN DISPLAY button to add your selection and return to ADVANCED CONTROLS . . . . . . How to Use the On Screen Display (OSD) Special Controls window Advanced Controls Power Saving POWER SAVING helps save energy when the monitor is on but you can select French, Spanish...
... i n BR IGHTNE SS sc reen g e ome t r y aud i o EXIT RESET co l or spec i a l 1 6 0 0 x 1 2 00 9 3 . 8 K / 7 5HZ 1 Press the ON SCREEN DISPLAY button. Then, turn the ROTARY knob until LANGUAGE icon highlighted. 6 Press the ON SCREEN DISPLAY button to add your selection and return to ADVANCED CONTROLS . . . . . . How to Use the On Screen Display (OSD) Special Controls window Advanced Controls Power Saving POWER SAVING helps save energy when the monitor is on but you can select French, Spanish...

User manual
Page 18
... Switch For an IBM-compatible computer: 1. Turn on the monitor. Connect the Mac adapter to take advantage of the correct software, you will be ready to one end of monitor. Connect the power cable. 4. USB Bay exists in computer development. Turn off the computer. 2. If you have Windows '95" steps on the computer. Connect the power cable. 5. Turn on the computer. 5. Plus, you will have USB port.) 3. H/H+V V R G B BNC D-SUB ISD-SUB USB USB USB...
... Switch For an IBM-compatible computer: 1. Turn on the monitor. Connect the Mac adapter to take advantage of the correct software, you will be ready to one end of monitor. Connect the power cable. 4. USB Bay exists in computer development. Turn off the computer. 2. If you have Windows '95" steps on the computer. Connect the power cable. 5. Turn on the computer. 5. Plus, you will have USB port.) 3. H/H+V V R G B BNC D-SUB ISD-SUB USB USB USB...

User manual
Page 19
... * only for a detailed guide to setting up ." Power Management Definition VESA's mode Video H-sync V-sync Power used with a computer equipped with VESA DPMS power management capabilities. Microphone and Audio-in jacks A microphone jack is also one set of left shows the power consumption and signalling of jacks). H/H+V V R G B BNC D-SUB ISD-SUB USB USB USB R L AUDIO IN Refer to the owner's manuals included with your computer or an amplifier, make the connections shown below. The...
... * only for a detailed guide to setting up ." Power Management Definition VESA's mode Video H-sync V-sync Power used with a computer equipped with VESA DPMS power management capabilities. Microphone and Audio-in jacks A microphone jack is also one set of left shows the power consumption and signalling of jacks). H/H+V V R G B BNC D-SUB ISD-SUB USB USB USB R L AUDIO IN Refer to the owner's manuals included with your computer or an amplifier, make the connections shown below. The...

User manual
Page 20
... order to reduce screen distortion and color impurity. TTL level Composite sync. Sync / H+V 14 V. This is to "square up" the picture. Your monitor comes with a D-Sub cable. 10 15 For work with this Book Specifications (107MP) GENERAL CRT Screen size Viewable Image Size (VIS) Focusing method Dot pitch Phosphor Screen treatment Display area Factory preset Maximum usable Scanning frequency Horizontal (line) Vertical (frame) Input power Power consumption Thermal dissipation Input signal Video Sync Pedestal Tilt Swivel Physical Unit...
... order to reduce screen distortion and color impurity. TTL level Composite sync. Sync / H+V 14 V. This is to "square up" the picture. Your monitor comes with a D-Sub cable. 10 15 For work with this Book Specifications (107MP) GENERAL CRT Screen size Viewable Image Size (VIS) Focusing method Dot pitch Phosphor Screen treatment Display area Factory preset Maximum usable Scanning frequency Horizontal (line) Vertical (frame) Input power Power consumption Thermal dissipation Input signal Video Sync Pedestal Tilt Swivel Physical Unit...

User manual
Page 21
... your video card and the manual instructions for more colors Check user settings of Color Temperature. HAVING THIS PROBLEM? See pages 12 and 18 for it. No Picture (Power LED is properly connected to make sure Moire is turned on . Check to 0.7 volts. Screen says NO SYNC INPUT NNOO SYNC INNPPUUTT NO SYNC INPUT when you are not square The geometry controls require adjusting. Make sure the monitor cable is Green in color) Make sure the computer is switched off. Remove any nearby...
... your video card and the manual instructions for more colors Check user settings of Color Temperature. HAVING THIS PROBLEM? See pages 12 and 18 for it. No Picture (Power LED is properly connected to make sure Moire is turned on . Check to 0.7 volts. Screen says NO SYNC INPUT NNOO SYNC INNPPUUTT NO SYNC INPUT when you are not square The geometry controls require adjusting. Make sure the monitor cable is Green in color) Make sure the computer is switched off. Remove any nearby...


