
Leaflet
Page 3
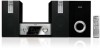
DVD Micro Theater Specifications MCD139B/37 Sound • Output Power: 2x25W + 50W RMS / 1800W PMPO • Sound Enhancement: Digital Sound Control 4 modes, Dynamic Bass Boost • Sound System: Dolby Digital Loudspeakers • Main Speaker: 3" woofer • Subwoofer type: Passive Video Playback • Playback Media: DVD+RW, DVD-Video, Picture CD, Video CD/SVCD • Disc Playback Modes: A-B Repeat, Angle, PBC, Slow Motion, Zoom, OSD, Resume Playback from Stop, Parental control • DVD Region.: 1 • Video Enhancement: Progressive Scan Connectivity • Video Output ...
DVD Micro Theater Specifications MCD139B/37 Sound • Output Power: 2x25W + 50W RMS / 1800W PMPO • Sound Enhancement: Digital Sound Control 4 modes, Dynamic Bass Boost • Sound System: Dolby Digital Loudspeakers • Main Speaker: 3" woofer • Subwoofer type: Passive Video Playback • Playback Media: DVD+RW, DVD-Video, Picture CD, Video CD/SVCD • Disc Playback Modes: A-B Repeat, Angle, PBC, Slow Motion, Zoom, OSD, Resume Playback from Stop, Parental control • DVD Region.: 1 • Video Enhancement: Progressive Scan Connectivity • Video Output ...
User manual
Page 3
... receive all of the best-built, bestbacked products available today.We'll do not remove product covering. Complete and return your Product Registration Card at once, or register online at http://www.philips.com/usasupport 3 Know these safetysymbols Congratulations on the rear of everyone in our power to keep you 'll receive notification directly from you to obtain warranty service...
... receive all of the best-built, bestbacked products available today.We'll do not remove product covering. Complete and return your Product Registration Card at once, or register online at http://www.philips.com/usasupport 3 Know these safetysymbols Congratulations on the rear of everyone in our power to keep you 'll receive notification directly from you to obtain warranty service...
User manual
Page 5
... TELEVSION SETS ARE FULLY COMPATIBLE WITH THIS PRODUCT AND MAY CAUSE ARTIFACTS TO BE DISPLAYED IN THE PICTURE. Index Español Français English Canada English: This digital apparatus does not exceed the Class B limits for home and other unsafe operation. IN CASE OF 525 OR 625 PROGRESSIVE SCAN PICTURE PROBLEMS, IT IS RECOMMENDED THAT THE USER SWITCH THE...
... TELEVSION SETS ARE FULLY COMPATIBLE WITH THIS PRODUCT AND MAY CAUSE ARTIFACTS TO BE DISPLAYED IN THE PICTURE. Index Español Français English Canada English: This digital apparatus does not exceed the Class B limits for home and other unsafe operation. IN CASE OF 525 OR 625 PROGRESSIVE SCAN PICTURE PROBLEMS, IT IS RECOMMENDED THAT THE USER SWITCH THE...

User manual
Page 6
... play modes: REPEAT, SHUFFLE and REPEAT A-B 24 REPEAT SHUFFLE REPEAT A-B Programming favourite tracks 25 Display information 25 ZOOM 26 AUDIO 26 SUBTITLE 26 Playing a title 26 Playing MP3/WMA/JPEG disc 26 Playing MP3 music and JPEG picture simultaneously 27 Playing Kodak Picture disc 27 DVD MENU Operations Using the menu bar 28 Using setup menu (user preference settings 29~31 TV Display Screen Saver Night Mode Test Tone Changing the password Restricting playback by setting parental level Rating explanations OSD language (menu lanuage) Default...
... play modes: REPEAT, SHUFFLE and REPEAT A-B 24 REPEAT SHUFFLE REPEAT A-B Programming favourite tracks 25 Display information 25 ZOOM 26 AUDIO 26 SUBTITLE 26 Playing a title 26 Playing MP3/WMA/JPEG disc 26 Playing MP3 music and JPEG picture simultaneously 27 Playing Kodak Picture disc 27 DVD MENU Operations Using the menu bar 28 Using setup menu (user preference settings 29~31 TV Display Screen Saver Night Mode Test Tone Changing the password Restricting playback by setting parental level Rating explanations OSD language (menu lanuage) Default...

User manual
Page 8
Night Mode Selects Dynamic ON or OFF cyclically Parental Control (Rating Level) Lets you set a ratings level so that has a rating higher than you find in home theater technology. Progressive Scan Provides high quality flicker-free images for film based sources. To fully enjoy the progressive scan feature, you connect other audio and audio/visual components to the DVD micro system. DIN cable - Environmental information All unnecessary...
Night Mode Selects Dynamic ON or OFF cyclically Parental Control (Rating Level) Lets you set a ratings level so that has a rating higher than you find in home theater technology. Progressive Scan Provides high quality flicker-free images for film based sources. To fully enjoy the progressive scan feature, you connect other audio and audio/visual components to the DVD micro system. DIN cable - Environmental information All unnecessary...

User manual
Page 9
... surroundings, making it impossible to play a disc. If not, please consult your dealer. ● Place the system on a flat, hard and stable surface. ● The apparatus shall not be exposed to dripping or splashing. ● Install the unit near the AC outlet and where the AC power plug can be oiled or lubricated. ● When the system is switched...
... surroundings, making it impossible to play a disc. If not, please consult your dealer. ● Place the system on a flat, hard and stable surface. ● The apparatus shall not be exposed to dripping or splashing. ● Install the unit near the AC outlet and where the AC power plug can be oiled or lubricated. ● When the system is switched...
User manual
Page 10
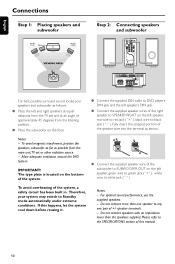
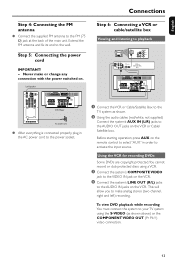
... jack ( "-" ). English Connections Step 1: Placing speakers and subwoofer Step 2: Connecting speakers and subwoofer ANTENNA FM (75Ω) For best possible surround sound, locate your system may switch to Standby mode automatically under extreme conditions. Notes: - Therefore, your speakers and subwoofer as follows: ● Place the left and right speakers at equal distances from the listening position. ● Place the subwoofer on the floor. ● Connect the supplied DIN cable to DVD player...
... jack ( "-" ). English Connections Step 1: Placing speakers and subwoofer Step 2: Connecting speakers and subwoofer ANTENNA FM (75Ω) For best possible surround sound, locate your system may switch to Standby mode automatically under extreme conditions. Notes: - Therefore, your speakers and subwoofer as follows: ● Place the left and right speakers at equal distances from the listening position. ● Place the subwoofer on the floor. ● Connect the supplied DIN cable to DVD player...
User manual
Page 11
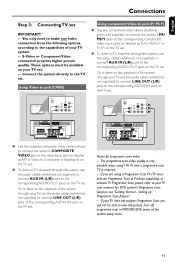
... need to make one video connection from the following options, according to the corresponding AUDIO IN jacks on the TV set . For DVD system's Progressive Scan function, see "Getting Started - S-Video or Component Video connection provides higher picture quality. These options must indicate Progressive Scan or ProScan capability), to activate TV Progressive Scan, please refer to your TV, use the audio cables (white/red, not supplied) to connect AUX IN (L/R) jacks...
... need to make one video connection from the following options, according to the corresponding AUDIO IN jacks on the TV set . For DVD system's Progressive Scan function, see "Getting Started - S-Video or Component Video connection provides higher picture quality. These options must indicate Progressive Scan or ProScan capability), to activate TV Progressive Scan, please refer to your TV, use the audio cables (white/red, not supplied) to connect AUX IN (L/R) jacks...
User manual
Page 13
... the AUDIO IN jacks on the VCR. 4 Connect the system's LINE OUT (R/L) jacks to make or change any connection with the power switched on the remote control to select "AUX" in the AC power cord to the power socket. 1 Connect the VCR or Cable/Satellite Box to the TV system as shown above) or the COMPONENT VIDEO OUT (Pr Pb Y) video connection. 13 English Step 4: Connecting the FM antenna ● Connect the supplied FM antenna to the wall...
... the AUDIO IN jacks on the VCR. 4 Connect the system's LINE OUT (R/L) jacks to make or change any connection with the power switched on the remote control to select "AUX" in the AC power cord to the power socket. 1 Connect the VCR or Cable/Satellite Box to the TV system as shown above) or the COMPONENT VIDEO OUT (Pr Pb Y) video connection. 13 English Step 4: Connecting the FM antenna ● Connect the supplied FM antenna to the wall...

User manual
Page 15
... 3 TUNING à / á Tuner tunes to a radio station Disc fast searches backward/forward in a disc at different speeds. Display - Functional Overview English 1 7 2 8 9 TUNING 3 0 4 3 ! 5 6 Controls on or to Eco-power standby /standby mode. 5 ÉÅ - starts or interrupts disc playback SOURCE - For VCD/CD only: program the favourite tracks 9 MODE - point the remote control towards this sensor. 7 OPEN/CLOSE - selects different types of the DVD player. 15 Clock sets the minutes 4 STANDBY-ON B - opens or closes the disc door. 8 PROGRAM - selects...
... 3 TUNING à / á Tuner tunes to a radio station Disc fast searches backward/forward in a disc at different speeds. Display - Functional Overview English 1 7 2 8 9 TUNING 3 0 4 3 ! 5 6 Controls on or to Eco-power standby /standby mode. 5 ÉÅ - starts or interrupts disc playback SOURCE - For VCD/CD only: program the favourite tracks 9 MODE - point the remote control towards this sensor. 7 OPEN/CLOSE - selects different types of the DVD player. 15 Clock sets the minutes 4 STANDBY-ON B - opens or closes the disc door. 8 PROGRAM - selects...

User manual
Page 16
.../ AUX 3 A-B - inputs a track/title/chapter number of VCD/CD. 4 SYSTEM MENU - activates/deactivates or selects the sleep timer - English Functional Overview Remote control 1B - switches the system to the previous/next chapter/ title/track Clock sets the hours - switches on or off the album/ picture menu. 16 moves an enlarged picture up timer ^ DISC MENU - stops disc playback or erases a program. ! Numeric Keypad (0-9) - displays disc playback time during playback $ CLOCK - DVD...
.../ AUX 3 A-B - inputs a track/title/chapter number of VCD/CD. 4 SYSTEM MENU - activates/deactivates or selects the sleep timer - English Functional Overview Remote control 1B - switches the system to the previous/next chapter/ title/track Clock sets the hours - switches on or off the album/ picture menu. 16 moves an enlarged picture up timer ^ DISC MENU - stops disc playback or erases a program. ! Numeric Keypad (0-9) - displays disc playback time during playback $ CLOCK - DVD...
User manual
Page 18
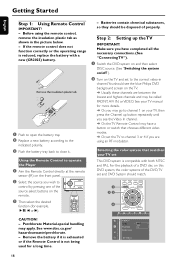
... a DVD disc on this DVD system, the color systems of the source select buttons on your TV set and DVD System should see the Video In channel. ➜ Or, the TV Remote Control may be disposed of properly. MODE CLOCK SLEEP/TIMER 4 CAUTION! - Remove the battery if it . Getting Started English Step 1: Using Remote Control IMPORTANT! - DISC A-B AUX MODE TUNER DISPLAY OSD CLOCK SLEEP/TIMER SYSTEM MENU DISC MENU OK AUDIO MUTE + - If the remote control does not function...
... a DVD disc on this DVD system, the color systems of the source select buttons on your TV set and DVD System should see the Video In channel. ➜ Or, the TV Remote Control may be disposed of properly. MODE CLOCK SLEEP/TIMER 4 CAUTION! - Remove the battery if it . Getting Started English Step 1: Using Remote Control IMPORTANT! - DISC A-B AUX MODE TUNER DISPLAY OSD CLOCK SLEEP/TIMER SYSTEM MENU DISC MENU OK AUDIO MUTE + - If the remote control does not function...
User manual
Page 19
... to your TV user manual). 3 Press STANDBY-ON B to turn on the progressive scan mode on your TV. 9 Turn on your TV progressive scan mode (refer to your TV using Y Pb Pr (see "Connecting TV set is PAL system. CONNECT USING YPRPB(RGB) VIDEO CABLES 3. Before enabling the progressive scan feature, you turn on the DVD player. 4 Select the correct Video Input channel. 5 Press SYSTEM MENU on the remote to PAL format. 4 Select an item...
... to your TV user manual). 3 Press STANDBY-ON B to turn on the progressive scan mode on your TV. 9 Turn on your TV progressive scan mode (refer to your TV using Y Pb Pr (see "Connecting TV set is PAL system. CONNECT USING YPRPB(RGB) VIDEO CABLES 3. Before enabling the progressive scan feature, you turn on the DVD player. 4 Select the correct Video Input channel. 5 Press SYSTEM MENU on the remote to PAL format. 4 Select an item...

User manual
Page 20
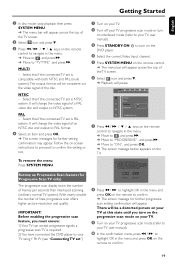
... doesn't support progressive scan. Step 3: Setting language preference You can star t enjoying the high quality picture. "Audio" (disc's soundtrack) - To remove the menu ● Press SYSTEM MENU on the remote control to navigate in "To deactivate Progressive manually". ! PARENTAL PASSWORD OSD LANG DEFAULTS ENGLISH FRENCH SPANISH To remove the menu Press SYSTEM MENU. "Disc Menu" (disc's menu) 4 Press 4 / 3 to the selected language whenever you can select your own preferred language settings.This DVD system...
... doesn't support progressive scan. Step 3: Setting language preference You can star t enjoying the high quality picture. "Audio" (disc's soundtrack) - To remove the menu ● Press SYSTEM MENU on the remote control to navigate in "To deactivate Progressive manually". ! PARENTAL PASSWORD OSD LANG DEFAULTS ENGLISH FRENCH SPANISH To remove the menu Press SYSTEM MENU. "Disc Menu" (disc's menu) 4 Press 4 / 3 to the selected language whenever you can select your own preferred language settings.This DVD system...
User manual
Page 23
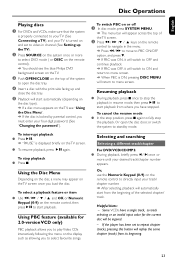
... to select DVD mode ( or DISC on the remote control). ➜ You should see "Using the Disc Menu". ➜ If the disc is locked by parental control, you load the disc. Some VCDs have stopped. English Disc Operations Playing discs 1 For DVDs and VCDs, make sure that the system is properly connected to your TV (See Connecting a TV), and your TV is turned on and set to repeat chapter (track), pressing this button will...
... to select DVD mode ( or DISC on the remote control). ➜ You should see "Using the Disc Menu". ➜ If the disc is locked by parental control, you load the disc. Some VCDs have stopped. English Disc Operations Playing discs 1 For DVDs and VCDs, make sure that the system is properly connected to your TV (See Connecting a TV), and your TV is turned on and set to repeat chapter (track), pressing this button will...

User manual
Page 29
DVD Menu Operations TV Display (default: Normal/PS) IMPORTANT! - Set the aspect ratio of the DVD Player according to the TV you have connected. ➜ Normal/PS (panscan): If you have a normal TV and want both sides of the picture to be trimmed or formatted to fit your particular requirements 1 23 A-B MODE SYSTEM MENU CLOCK SLEEP/TIMER DISC MENU OK 4 AUDIO MUTE 1 In disc mode, press SYSTEM MENU. ➜ The...
DVD Menu Operations TV Display (default: Normal/PS) IMPORTANT! - Set the aspect ratio of the DVD Player according to the TV you have connected. ➜ Normal/PS (panscan): If you have a normal TV and want both sides of the picture to be trimmed or formatted to fit your particular requirements 1 23 A-B MODE SYSTEM MENU CLOCK SLEEP/TIMER DISC MENU OK 4 AUDIO MUTE 1 In disc mode, press SYSTEM MENU. ➜ The...
User manual
Page 36
... disc. ✔ Press SYSTEM MENU to turn off the setup menu screen. ✔ Cancel the parental control rating function or change the aspect ratio. Radio reception is poor. ✔ If the signal is in pause, slow motion or fast forward/reverse mode, press ÉÅ (or ÉÅ on the remote) to resume normal play mode. Check for the sound or subtitle is prohibited on the DVD...
... disc. ✔ Press SYSTEM MENU to turn off the setup menu screen. ✔ Cancel the parental control rating function or change the aspect ratio. Radio reception is poor. ✔ If the signal is in pause, slow motion or fast forward/reverse mode, press ÉÅ (or ÉÅ on the remote) to resume normal play mode. Check for the sound or subtitle is prohibited on the DVD...
User manual
Page 38
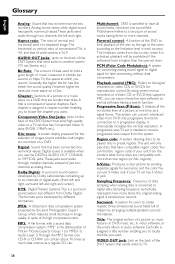
... Frequency: Frequency of conventional TVs. Surround: A system for the selection of music; Each title is converted to digital data. Component Video Out Jacks: Jacks on the back of just two channels as a regular CD can contain about 10 times as much data volume as analog does. PCM (Pulse Code Modulation): A system for converting analog sound signal to digital signal for reproduction control. Playback control (PBC): Refers to the signal recorded on a DVD...
... Frequency: Frequency of conventional TVs. Surround: A system for the selection of music; Each title is converted to digital data. Component Video Out Jacks: Jacks on the back of just two channels as a regular CD can contain about 10 times as much data volume as analog does. PCM (Pulse Code Modulation): A system for converting analog sound signal to digital signal for reproduction control. Playback control (PBC): Refers to the signal recorded on a DVD...
Quick start guide
Page 2
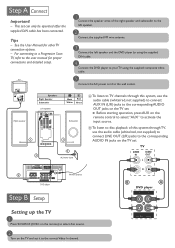
... the User Manual for proper connections and detailed setup. Tips - TV IN OUT 2 ANTENNA FM (75Ω) 4 FM wire antenna B A DVD player Setting up the TV 1 Press SOURCE (DISC on the remote) to select disc source. 2 Turn on the remote control to select "AUX" to activate the input source. TV 1 Connect the speaker wires of this system through this system, use the audio cable (white/red, not supplied) to connect LINE OUT (L/R) jacks to the correct Video In channel. Important! - Black White + Red Green 1 3 1 5 AC Power Cord...
... the User Manual for proper connections and detailed setup. Tips - TV IN OUT 2 ANTENNA FM (75Ω) 4 FM wire antenna B A DVD player Setting up the TV 1 Press SOURCE (DISC on the remote) to select disc source. 2 Turn on the remote control to select "AUX" to activate the input source. TV 1 Connect the speaker wires of this system through this system, use the audio cable (white/red, not supplied) to connect LINE OUT (L/R) jacks to the correct Video In channel. Important! - Black White + Red Green 1 3 1 5 AC Power Cord...

Quick start guide
Page 3
..." and "DVD menu operations" in PROGRESSIVE menu of the system setup menu to turn off progressive scan, you may also first open the disc door, then hold CLOCK on the remote control. CLOCK DISC A-B AUX MODE TUNER DISPLAY OSD CLOCK SLEEP/TIMER SYSTEM MENU DISC MENU OK AUDIO MUTE + VOL 1 4 7 PROG 2 3 GOTO 5 6 ZOOM 8 9 DSC 0 SUBTITLE DBB Setting DVD menu options IMPORTANT! Or To turn on to interlaced mode. 2) Select "OFF" in the User Manual for detailed descriptions. DISC A-B AUX MODE TUNER DISPLAY OSD...
..." and "DVD menu operations" in PROGRESSIVE menu of the system setup menu to turn off progressive scan, you may also first open the disc door, then hold CLOCK on the remote control. CLOCK DISC A-B AUX MODE TUNER DISPLAY OSD CLOCK SLEEP/TIMER SYSTEM MENU DISC MENU OK AUDIO MUTE + VOL 1 4 7 PROG 2 3 GOTO 5 6 ZOOM 8 9 DSC 0 SUBTITLE DBB Setting DVD menu options IMPORTANT! Or To turn on to interlaced mode. 2) Select "OFF" in the User Manual for detailed descriptions. DISC A-B AUX MODE TUNER DISPLAY OSD...


