Leaflet
Page 3
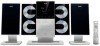
...: 9073 100 13426 UPC: 6 09585 11458 6 © 2009 Koninklijke Philips Electronics N.V. Trademarks are subject to change without notice. or their respective owners. Micro Hi-Fi System Specifications MCM298/37 Sound • Sound Enhancement: Digital Sound Control 4 modes, Dynamic ... 1 watt Accessories • Included Accessories: Wall mounting bracket, Guarantee booklet • Remote control: 47-key with battery • Quick start guide: Eng, Spa • User Manual: Eng, Spa • Warranty Card: Philips (USA) Product Registration Card Dimensions • Set dimensions (W x H x D): ...
...: 9073 100 13426 UPC: 6 09585 11458 6 © 2009 Koninklijke Philips Electronics N.V. Trademarks are subject to change without notice. or their respective owners. Micro Hi-Fi System Specifications MCM298/37 Sound • Sound Enhancement: Digital Sound Control 4 modes, Dynamic ... 1 watt Accessories • Included Accessories: Wall mounting bracket, Guarantee booklet • Remote control: 47-key with battery • Quick start guide: Eng, Spa • User Manual: Eng, Spa • Warranty Card: Philips (USA) Product Registration Card Dimensions • Set dimensions (W x H x D): ...
User manual
Page 8
... and speakers 11 Optional connection 11 Connecting other equipment to your system Inserting batteries into the Remote Control 12 Using the Remote Control to operate the Player Controls Controls on the system 13 Controls on the remote 13~14 Basic Functions Switching the system on 15 Switching the system to Eco Power Standby...
... and speakers 11 Optional connection 11 Connecting other equipment to your system Inserting batteries into the Remote Control 12 Using the Remote Control to operate the Player Controls Controls on the system 13 Controls on the remote 13~14 Basic Functions Switching the system on 15 Switching the system to Eco Power Standby...
User manual
Page 9
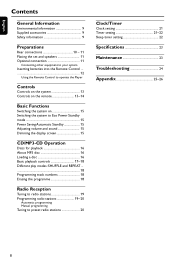
... is still consuming some power. Allow at least 10 cm (4 inches) clearance from the rear and the top of the disc unit inside the system. remote control (with the voltage of the set and speakers - stands for about one hour with no disc in the system until normal playback is placed...
... is still consuming some power. Allow at least 10 cm (4 inches) clearance from the rear and the top of the disc unit inside the system. remote control (with the voltage of the set and speakers - stands for about one hour with no disc in the system until normal playback is placed...

User manual
Page 12
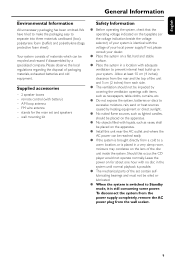
... (IR) on the front panel. 2 Do not put any objects between the Remote Control and the system while operating the system. Remove batteries if they should be disposed of batteries in combination. - Do not use old and new ...or different types of properly. 12 CAUTION! - Batteries contain chemical substances, so they are exhausted or if the Remote Control is not being used for a long time. - English Preparations Inserting batteries into the Remote Control 3 1 2 1 Open the battery compartment. 2 Insert two AAA batteries following the indications (+/-) inside the compartment. 3 Close the cover...
... (IR) on the front panel. 2 Do not put any objects between the Remote Control and the system while operating the system. Remove batteries if they should be disposed of batteries in combination. - Do not use old and new ...or different types of properly. 12 CAUTION! - Batteries contain chemical substances, so they are exhausted or if the Remote Control is not being used for a long time. - English Preparations Inserting batteries into the Remote Control 3 1 2 1 Open the battery compartment. 2 Insert two AAA batteries following the indications (+/-) inside the compartment. 3 Close the cover...
User manual
Page 13
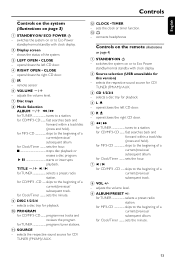
switches the system on or to Eco Power standby/normal standby with clock display. 2 Display screen - remote sensor 6 VOLUME -/+ - for CD/ TUNER (FM/AM)/ AUX. @ CLOCK • TIMER - programmes tracks and reviews the program. selects the ...of a current/previous/ subsequent track. shows the status of a current/previous/ subsequent album. for CD/MP3-CD ........ SOURCE - connects headphones Controls on the remote (illustrations on page 3) 1 STANDBY-ON/ ECO POWER B - fast searches back and forward within a track/disc (press and hold ). skips to the beginning...
switches the system on or to Eco Power standby/normal standby with clock display. 2 Display screen - remote sensor 6 VOLUME -/+ - for CD/ TUNER (FM/AM)/ AUX. @ CLOCK • TIMER - programmes tracks and reviews the program. selects the ...of a current/previous/ subsequent track. shows the status of a current/previous/ subsequent album. for CD/MP3-CD ........ SOURCE - connects headphones Controls on the remote (illustrations on page 3) 1 STANDBY-ON/ ECO POWER B - fast searches back and forward within a track/disc (press and hold ). skips to the beginning...
User manual
Page 14
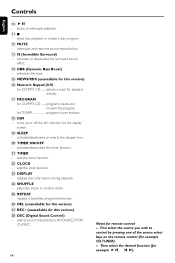
...for the display screen. ( SLEEP - selects a track for playback directly. & PROGRAM for TUNER programs tuner stations. * DIM - turns on the remote control (for this version) • DSC (Digital Sound Control) - for CD/MP3-CD ........ plays disc tracks in random order. ∞ ...tracks and reviews the program. activates or deactivates the surround sound effect. $ DBB (Dynamic Bass Boost) - Then select the desired function (for remote control: - interrupts and resumes sound reproduction. # IS (Incredible Surround) - enhances the bass. % NEWS/RDS (unavailable for example CD, ...
...for the display screen. ( SLEEP - selects a track for playback directly. & PROGRAM for TUNER programs tuner stations. * DIM - turns on the remote control (for this version) • DSC (Digital Sound Control) - for CD/MP3-CD ........ plays disc tracks in random order. ∞ ...tracks and reviews the program. activates or deactivates the surround sound effect. $ DBB (Dynamic Bass Boost) - Then select the desired function (for remote control: - interrupts and resumes sound reproduction. # IS (Incredible Surround) - enhances the bass. % NEWS/RDS (unavailable for example CD, ...

User manual
Page 15
...; The system enters Eco power standby (the ECO POWER LED is on or off . ➜ Display shows: DBB. 4 Press IS on the remote repeatedly. ➜ If activated, INCR SUR is displayed. ➜ If deactivated, IS OFF is operated. Power Saving Automatic Standby As a power-saving...adjust the volume controls; - Switching the system to the CD source. press MUTE again; - Dimming the display screen ● Press DIM on the remote repeatedly to interrupt sound reproduction instantly. ➜ Playback will switch to the selected source. ● Press LEFT OPEN • CLOSE or RIGHT OPEN...
...; The system enters Eco power standby (the ECO POWER LED is on or off . ➜ Display shows: DBB. 4 Press IS on the remote repeatedly. ➜ If activated, INCR SUR is displayed. ➜ If deactivated, IS OFF is operated. Power Saving Automatic Standby As a power-saving...adjust the volume controls; - Switching the system to the CD source. press MUTE again; - Dimming the display screen ● Press DIM on the remote repeatedly to interrupt sound reproduction instantly. ➜ Playback will switch to the selected source. ● Press LEFT OPEN • CLOSE or RIGHT OPEN...

User manual
Page 16
... (or the total number of the system to select CD or press CD on the remote. 2 Press LEFT OPEN • CLOSE or RIGHT OPEN • CLOSE on the front panel (L ç or R ...çon the remote) again to open the left or right CD door respectively. ➜ OPEN is found in the four disc... Press LEFT OPEN • CLOSE or RIGHT OPEN • CLOSE on the front panel (L ç or R çon the remote) to close the CD door. ➜ CLOSE is designed for MP3 disc) are not possible. Maximum album number: 99 - About...
... (or the total number of the system to select CD or press CD on the remote. 2 Press LEFT OPEN • CLOSE or RIGHT OPEN • CLOSE on the front panel (L ç or R ...çon the remote) again to open the left or right CD door respectively. ➜ OPEN is found in the four disc... Press LEFT OPEN • CLOSE or RIGHT OPEN • CLOSE on the front panel (L ç or R çon the remote) to close the CD door. ➜ CLOSE is designed for MP3 disc) are not possible. Maximum album number: 99 - About...

User manual
Page 17
... playback ● Press ÉÅduring playback ● During playback of a disc in "DISC 3" or "DISC 4", you want, release ALBUM on the remote). ➜ Normal playback continues. To select a desired album/title (MP3 disc only) To select a desired album ● Press ALBUM-/+ à á(ALBUM... stop playback ● Press 9. 17 To play the selected disc only ● In CD mode, press DISC 1/2/3/4 (CD 1/2/3/4 on the remote). ➜ The selected disc will scroll through the display once. Text display during disc playback. ➜ For mixed mode discs, only one mode...
... playback ● Press ÉÅduring playback ● During playback of a disc in "DISC 3" or "DISC 4", you want, release ALBUM on the remote). ➜ Normal playback continues. To select a desired album/title (MP3 disc only) To select a desired album ● Press ALBUM-/+ à á(ALBUM... stop playback ● Press 9. 17 To play the selected disc only ● In CD mode, press DISC 1/2/3/4 (CD 1/2/3/4 on the remote). ➜ The selected disc will scroll through the display once. Text display during disc playback. ➜ For mixed mode discs, only one mode...
User manual
Page 18
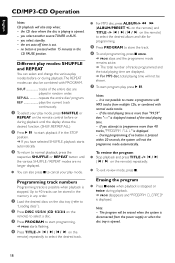
... Press 9 once when playback is pressed within 15 minutes in the CD PAUSE position. you select another source:TUNER or AUX. - on the remote) and TITLE on the remote) to select the desired album and title for programming. 5 Press PROGRAM to 40 tracks can be shown. 7 To start program play, press&#... the display shows the desired function. (SHUF, REP, REP ALL) 2 PressÉÅ to start programming. ➜ PROG starts flashing. 4 Press TITLE on the remote control before or during playback.The REPEAT modes can also press 9 to cancel your play mode, press SHUFFLE or REPEAT on the...
... Press 9 once when playback is pressed within 15 minutes in the CD PAUSE position. you select another source:TUNER or AUX. - on the remote) and TITLE on the remote) to select the desired album and title for programming. 5 Press PROGRAM to 40 tracks can be shown. 7 To start program play, press&#... the display shows the desired function. (SHUF, REP, REP ALL) 2 PressÉÅ to start programming. ➜ PROG starts flashing. 4 Press TITLE on the remote control before or during playback.The REPEAT modes can also press 9 to cancel your play mode, press SHUFFLE or REPEAT on the...
User manual
Page 19
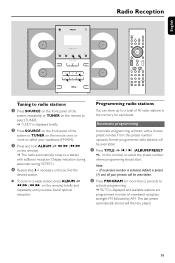
...be overridden. 1 Press TITLE ALBUM/PRESET +/- Note: - From this preset number upwards, former programmed radio stations will start . on the remote) to select the preset number where programming should start with sufficient reception. Display indication during automatic tuning: SEARCH. 4 Repeat step 3 if ...reception. Radio Reception English Tuning to radio stations 1 Press SOURCE on the front panel of the system repeatedly or TUNER on the remote to select TUNER. ➜ TUNER is displayed briefly. 2 Press SOURCE on the front panel of waveband reception strength: FM followed...
...be overridden. 1 Press TITLE ALBUM/PRESET +/- Note: - From this preset number upwards, former programmed radio stations will start . on the remote) to select the preset number where programming should start with sufficient reception. Display indication during automatic tuning: SEARCH. 4 Repeat step 3 if ...reception. Radio Reception English Tuning to radio stations 1 Press SOURCE on the front panel of the system repeatedly or TUNER on the remote to select TUNER. ➜ TUNER is displayed briefly. 2 Press SOURCE on the front panel of waveband reception strength: FM followed...

User manual
Page 20
on the remote to allocate a number from 1 to 40 to this station. 4 Press PROGRAM again to confirm the setting. ➜ The preset number and the frequency of the ... Manual programming 1 Tune to your desired station (see "Tuning to radio stations"). 2 Press PROGRAM to preset radio stations ● Press TITLE ALBUM/PRESET +/- on the remote) on the remote) until the desired preset station is displayed. 20
on the remote to allocate a number from 1 to 40 to this station. 4 Press PROGRAM again to confirm the setting. ➜ The preset number and the frequency of the ... Manual programming 1 Tune to your desired station (see "Tuning to radio stations"). 2 Press PROGRAM to preset radio stations ● Press TITLE ALBUM/PRESET +/- on the remote) on the remote) until the desired preset station is displayed. 20

User manual
Page 21
...the specific disc you up. TUNER - The clock setting will be lighted. 2 Press SOURCE (CD or TUNER on the remote) to select the desired source. ● You can switch on the remote) to select timer mode. ➜ The last timer setting starts flashing. ➜ The selected source will exit clock ...Load the disc(s).To start . 21 tune to the desired radio station. 3 Press ALBUM on the remote) again to "CD/MP3 CD Operation - To exit without storing the setting ● Press Çon the remote) repeatedly to set correctly. 1 Press and hold CLOCK•TIMER on the front panel of the...
...the specific disc you up. TUNER - The clock setting will be lighted. 2 Press SOURCE (CD or TUNER on the remote) to select the desired source. ● You can switch on the remote) to select timer mode. ➜ The last timer setting starts flashing. ➜ The selected source will exit clock ...Load the disc(s).To start . 21 tune to the desired radio station. 3 Press ALBUM on the remote) again to "CD/MP3 CD Operation - To exit without storing the setting ● Press Çon the remote) repeatedly to set correctly. 1 Press and hold CLOCK•TIMER on the front panel of the...

User manual
Page 22
...timer ● Press SLEEP repeatedly until "OFF" is activated ● Press SLEEP once. 22 To activate the TIMER ● Press TIMER ON/OFF on the remote control. ➜ will disappear from the display. To check the remaining length of time, stop pressing SLEEP. ➜ is shown, except for "OFF" ...mode. ➜ The sleep timer is now set the minute for the timer to start. 5 Press CLOCK•TIMER (TIMER on the remote) to select a preset time. ➜ The selections are not available,Tuner will play. Notes: - During timer setting, if no button is empty, the...
...timer ● Press SLEEP repeatedly until "OFF" is activated ● Press SLEEP once. 22 To activate the TIMER ● Press TIMER ON/OFF on the remote control. ➜ will disappear from the display. To check the remaining length of time, stop pressing SLEEP. ➜ is shown, except for "OFF" ...mode. ➜ The sleep timer is now set the minute for the timer to start. 5 Press CLOCK•TIMER (TIMER on the remote) to select a preset time. ➜ The selections are not available,Tuner will play. Notes: - During timer setting, if no button is empty, the...
User manual
Page 24
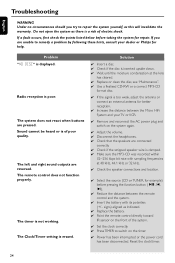
...erased. The system does not react when buttons are reversed. signs) aligned as indicated. ✔ Replace the battery. ✔ Point the remote control directly toward IR sensor on the front of poor quality. If a fault occurs, first check the points listed below before pressing the ...function button ✔ Reduce the distance between the Micro HiFi System and your dealer or Philips for repair. The left and right sound outputs are pressed. The Clock/Timer setting is displayed. Solution ✔ Insert a disc. &#...
...erased. The system does not react when buttons are reversed. signs) aligned as indicated. ✔ Replace the battery. ✔ Point the remote control directly toward IR sensor on the front of poor quality. If a fault occurs, first check the points listed below before pressing the ...function button ✔ Reduce the distance between the Micro HiFi System and your dealer or Philips for repair. The left and right sound outputs are pressed. The Clock/Timer setting is displayed. Solution ✔ Insert a disc. &#...

Quick start guide
Page 1
MCM 298 Quick start guide What's in the Box? You should find these items upon opening the box. 1 x main unit speaker 2 x speaker stands 1 Quick Start Guide Wall 3 Mounting Quick Start Guide Wall Mounting FM and AM antennas Remote control with two AAA batteries 2 User Manual User manual 6 x screws and dowels 2 x speaker brackets
MCM 298 Quick start guide What's in the Box? You should find these items upon opening the box. 1 x main unit speaker 2 x speaker stands 1 Quick Start Guide Wall 3 Mounting Quick Start Guide Wall Mounting FM and AM antennas Remote control with two AAA batteries 2 User Manual User manual 6 x screws and dowels 2 x speaker brackets

Quick start guide
Page 2
...) 1 2 Speaker (left) 4 AC power cord Setting the clock 1 In active mode, press CLOCK•TIMER (CLOCK on the remote) repeatedly until the time digits flash. / // 2 Press ALBUM-/+ 5 6 (5 6 on the remote) repeatedly to mount the system on a desktop. 2 Connect the speaker cables. 3 Connect the AM and FM antennas. See Wall Mounting... Tip - See the User Manual for detailed instructions if you want to set the minute. 4 Press CLOCK•TIMER (CLOCK on the remote) repeatedly to set the hour. 3 Press TITLE ALBUM/PRESET +/- 1 Attach the supplied stands to this system. - on the...
...) 1 2 Speaker (left) 4 AC power cord Setting the clock 1 In active mode, press CLOCK•TIMER (CLOCK on the remote) repeatedly until the time digits flash. / // 2 Press ALBUM-/+ 5 6 (5 6 on the remote) repeatedly to mount the system on a desktop. 2 Connect the speaker cables. 3 Connect the AM and FM antennas. See Wall Mounting... Tip - See the User Manual for detailed instructions if you want to set the minute. 4 Press CLOCK•TIMER (CLOCK on the remote) repeatedly to set the hour. 3 Press TITLE ALBUM/PRESET +/- 1 Attach the supplied stands to this system. - on the...
Quick start guide
Page 3
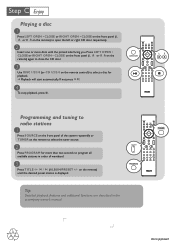
Tip Detailed playback features and additional functions are described in order of the system repeatedly or TUNER on the remote to select the tuner source. 2 Press PROGRAM for playback. ➜ Playback will start automatically. Programming and tuning to radio stations 1 Press SOURCE on ...playback, press 9 . C Enjoy Playing a disc 1 Press LEFT OPEN • CLOSE or RIGHT OPEN • CLOSE on the front panel (L ç or R çon the remote) to open the left or right CD door respectively. 2 Insert one or more than two seconds to select a disc for more discs with the printed...
Tip Detailed playback features and additional functions are described in order of the system repeatedly or TUNER on the remote to select the tuner source. 2 Press PROGRAM for playback. ➜ Playback will start automatically. Programming and tuning to radio stations 1 Press SOURCE on ...playback, press 9 . C Enjoy Playing a disc 1 Press LEFT OPEN • CLOSE or RIGHT OPEN • CLOSE on the front panel (L ç or R çon the remote) to open the left or right CD door respectively. 2 Insert one or more than two seconds to select a disc for more discs with the printed...


