
Owner's Manual
Page 1
Audio Visual Master Unit ENGLISH Before Using This Product Owner's Manual AVM-P8000R This product conforms to CEMA cord colors.
Audio Visual Master Unit ENGLISH Before Using This Product Owner's Manual AVM-P8000R This product conforms to CEMA cord colors.

Owner's Manual
Page 2
... 24 Before Using This Product 4 Key Finder 4 About This Product 5 • Video System of a Connected Component • Output Setting of the DVD Player About This Manual 6 To Ensure Safe Driving 6 • When Using a Display connected to Rear Video Output Important 6 Resetting the Microprocessor 7 Precaution 7 When using the 50-Disc Type Multi...
... 24 Before Using This Product 4 Key Finder 4 About This Product 5 • Video System of a Connected Component • Output Setting of the DVD Player About This Manual 6 To Ensure Safe Driving 6 • When Using a Display connected to Rear Video Output Important 6 Resetting the Microprocessor 7 Precaution 7 When using the 50-Disc Type Multi...

Owner's Manual
Page 6
The basic structure of the DVD Player When connecting Pioneer's Multi-DVD player such as the XDV-P9, make those settings. When connecting an external component to this product, be sure the component is compatible ... quite easily throughout it is not, images will be able to "Virtual Theater Quick Tour" on this manual as follows: Function DIGITAL OUTPUT OUT SELECTION Setting LPCM 96 kHz Refer to the DVD Player manual for use in improper reception. If not, no audio can be correctly reproduced. This product features a "Virtual...
The basic structure of the DVD Player When connecting Pioneer's Multi-DVD player such as the XDV-P9, make those settings. When connecting an external component to this product, be sure the component is compatible ... quite easily throughout it is not, images will be able to "Virtual Theater Quick Tour" on this manual as follows: Function DIGITAL OUTPUT OUT SELECTION Setting LPCM 96 kHz Refer to the DVD Player manual for use in improper reception. If not, no audio can be correctly reproduced. This product features a "Virtual...

Owner's Manual
Page 7
...the Rear seats to view pictures from their operation by persons other sections. For your listening enjoyment. Before Using This Product About This Manual This product features a number of this product during driving. We recommend that is especially important that you familiarize yourself with a video ...screen that you read and observe the "Precaution" on a display inside a vehicle even by reading through the manual before you benefit fully from a DVD-Video disc or other sources on the screen. All are not self-explanatory. It is visible ...
...the Rear seats to view pictures from their operation by persons other sections. For your listening enjoyment. Before Using This Product About This Manual This product features a number of this product during driving. We recommend that is especially important that you familiarize yourself with a video ...screen that you read and observe the "Precaution" on a display inside a vehicle even by reading through the manual before you benefit fully from a DVD-Video disc or other sources on the screen. All are not self-explanatory. It is visible ...

Owner's Manual
Page 8
...available, please contact the companies listed below for repair without advance contact. 7 U.S.A. 7 CANADA Pioneer Electronics Service, Inc. CUSTOMER SERVICE CUSTOMER SERVICE DEPARTMENT DEPARTMENT P.O. grammed. Pioneer Electronics of the 50-Disc Type Multi-CD Player are described in this product for the ...Using This Product Resetting the Microprocessor The microprocessor must be used with a pen tip or other pointed instrument. When using this manual. When strange (incorrect) messages appear on the display. • To reset the microprocessor, press the RESET button on ...
...available, please contact the companies listed below for repair without advance contact. 7 U.S.A. 7 CANADA Pioneer Electronics Service, Inc. CUSTOMER SERVICE CUSTOMER SERVICE DEPARTMENT DEPARTMENT P.O. grammed. Pioneer Electronics of the 50-Disc Type Multi-CD Player are described in this product for the ...Using This Product Resetting the Microprocessor The microprocessor must be used with a pen tip or other pointed instrument. When using this manual. When strange (incorrect) messages appear on the display. • To reset the microprocessor, press the RESET button on ...

Owner's Manual
Page 16
...navigation unit ON before performing operations. (Refer to the sound from the audio) of the Mobile Navigation to another source while listening to the navigation manual.) • Select the "NAVI" by pressing the V.SEL button. Switch the power to your navigation unit, you can confirm it on the display.... The Set Up Menu appears. 4. Press the MENU button. Note: • You can select the Pioneer Mobile Navigation Unit only when that unit is switched on this product. Each click toggles Video On/Off. 6. Using the Screen Pictures (Selecting the ...
...navigation unit ON before performing operations. (Refer to the sound from the audio) of the Mobile Navigation to another source while listening to the navigation manual.) • Select the "NAVI" by pressing the V.SEL button. Switch the power to your navigation unit, you can confirm it on the display.... The Set Up Menu appears. 4. Press the MENU button. Note: • You can select the Pioneer Mobile Navigation Unit only when that unit is switched on this product. Each click toggles Video On/Off. 6. Using the Screen Pictures (Selecting the ...
Owner's Manual
Page 17
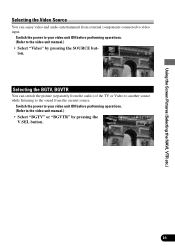
...; Select "Video" by pressing the V.SEL button. 16 Switch the power to your video unit ON before performing operations. (Refer to the video unit manual.) • Select "BGTV" or "BGVTR" by pressing the SOURCE button. Selecting the BGTV, BGVTR You can enjoy video and audio entertainment from external components connected ...
...; Select "Video" by pressing the V.SEL button. 16 Switch the power to your video unit ON before performing operations. (Refer to the video unit manual.) • Select "BGTV" or "BGVTR" by pressing the SOURCE button. Selecting the BGTV, BGVTR You can enjoy video and audio entertainment from external components connected ...
Owner's Manual
Page 18
... switch rear display source audio and video separately. 17 Switch the power to your video unit ON before performing operations. (Refer to the video unit manual.) • Press the V.SEL button for 2 seconds selects the source in the following order: OFF = Link to video input on a rear display (sold separately...
... switch rear display source audio and video separately. 17 Switch the power to your video unit ON before performing operations. (Refer to the video unit manual.) • Press the V.SEL button for 2 seconds selects the source in the following order: OFF = Link to video input on a rear display (sold separately...
Owner's Manual
Page 20
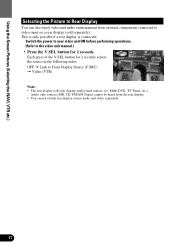
... by step) Seek Tuning Less than 0.5 seconds More than 0.5 seconds, you can memorize broadcast stations in buttons 1 through 6. tions. Band FM1 = FM2 = FM3 = AM Manual and Seek Tuning You can also use the 5/∞ button to recall broadcast stations memorized in memory. • You can select the tuning method by ...
... by step) Seek Tuning Less than 0.5 seconds More than 0.5 seconds, you can memorize broadcast stations in buttons 1 through 6. tions. Band FM1 = FM2 = FM3 = AM Manual and Seek Tuning You can also use the 5/∞ button to recall broadcast stations memorized in memory. • You can select the tuning method by ...

Owner's Manual
Page 42
..., an error message such as necessary. Note: • When a 12-Disc Multi-CD Player is displayed. back. played. Refer to the Multi-CD player owner's manual. 41 • If there are no discs in the Multi-CD player magazine, "NO DISC" is connected and you want to select disc 7 to 12...
..., an error message such as necessary. Note: • When a 12-Disc Multi-CD Player is displayed. back. played. Refer to the Multi-CD player owner's manual. 41 • If there are no discs in the Multi-CD player magazine, "NO DISC" is connected and you want to select disc 7 to 12...
Owner's Manual
Page 52
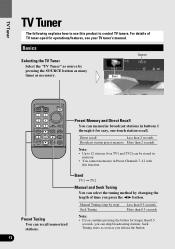
... Seek Tuning You can select the tuning method by changing the length of TV tuner-specific operations/features, see your TV tuner's manual. Direct recall Less than 2 seconds Broadcast station preset memory More than 0.5 seconds, you continue pressing the button for longer than 2 seconds ...Note: • Up to 12 stations (6 in TV1 and TV2) can skip broadcasting stations. Manual Tuning (step by pressing the SOURCE button as many times as you press the 2/3 button. Band Channel DISP RTN Preset Memory and Direct Recall You...
... Seek Tuning You can select the tuning method by changing the length of TV tuner-specific operations/features, see your TV tuner's manual. Direct recall Less than 2 seconds Broadcast station preset memory More than 0.5 seconds, you continue pressing the button for longer than 2 seconds ...Note: • Up to 12 stations (6 in TV1 and TV2) can skip broadcasting stations. Manual Tuning (step by pressing the SOURCE button as many times as you press the 2/3 button. Band Channel DISP RTN Preset Memory and Direct Recall You...
Owner's Manual
Page 54
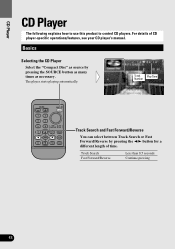
... CD Player Select the "Compact Disc" as source by pressing the 2/3 button for a different length of CD player-specific operations/features, see your CD player's manual. Track Search Fast Forward/Reverse Less than 0.5 seconds Continue pressing 53 For details of time.
... CD Player Select the "Compact Disc" as source by pressing the 2/3 button for a different length of CD player-specific operations/features, see your CD player's manual. Track Search Fast Forward/Reverse Less than 0.5 seconds Continue pressing 53 For details of time.

Owner's Manual
Page 56
... Continue pressing Note: • If "TEMP" is displayed, look it up (or "HEAT") in the error message table in the MD Player's manual. 55 Basics Selecting the MD Player Select the "Mini Disc" as source by pressing the 2/3 button for a different length of MD player-specific operations.../features, see your MD player's manual. The player starts playing automatically. For details of time. MD Player MD Player The following explains how to use this product to control MD players...
... Continue pressing Note: • If "TEMP" is displayed, look it up (or "HEAT") in the error message table in the MD Player's manual. 55 Basics Selecting the MD Player Select the "Mini Disc" as source by pressing the 2/3 button for a different length of MD player-specific operations.../features, see your MD player's manual. The player starts playing automatically. For details of time. MD Player MD Player The following explains how to use this product to control MD players...

Owner's Manual
Page 73
... or Viewing Images from Additional Units Accessing the Set Up Menu 1. "AUX" is currently highlighted. You go back to the IP-BUS-RCA Interconnector's Owner's Manual. 1. Click the joystick. The Set Up Menu appears. 7 Set Up Menu Switching the Video Mode (See page 73.) Switching the Aux Source (See below.) Switching...
... or Viewing Images from Additional Units Accessing the Set Up Menu 1. "AUX" is currently highlighted. You go back to the IP-BUS-RCA Interconnector's Owner's Manual. 1. Click the joystick. The Set Up Menu appears. 7 Set Up Menu Switching the Video Mode (See page 73.) Switching the Aux Source (See below.) Switching...

Owner's Manual
Page 77
No sounds come from the DVD player only. 7 DVD Player (if installed) Symptom The DVD player's remote control does not operate. The DVD player is not in the correct operation mode. The optical cable has become detached. Make the correct output setting. (See the manual for output. Remedy Switch the remote control to the proper mode. (See the manual for the DVD player.) Connect the cable correctly. Cause The remote control is not properly set for the DVD player.) Troubleshooting 76
No sounds come from the DVD player only. 7 DVD Player (if installed) Symptom The DVD player's remote control does not operate. The DVD player is not in the correct operation mode. The optical cable has become detached. Make the correct output setting. (See the manual for output. Remedy Switch the remote control to the proper mode. (See the manual for the DVD player.) Connect the cable correctly. Cause The remote control is not properly set for the DVD player.) Troubleshooting 76

Owner's Manual
Page 78
... lead. Do not route wiring in the electrical system, be sure to disconnect the · battery cable before beginning installation. • Refer to each product's manual for vehicles with output and/or impedance values other than those noted here may fail to work when it in a recreational vehicle, truck, or bus...
... lead. Do not route wiring in the electrical system, be sure to disconnect the · battery cable before beginning installation. • Refer to each product's manual for vehicles with output and/or impedance values other than those noted here may fail to work when it in a recreational vehicle, truck, or bus...

Owner's Manual
Page 79
... that does not have an ACC (accessory) position on the ignition switch, the red lead of the unit should be connected to the supplied Installation manuals of high-current products such as power amps. Please ground this lead separately from the vehicle for other products may be drained when you ground...
... that does not have an ACC (accessory) position on the ignition switch, the red lead of the unit should be connected to the supplied Installation manuals of high-current products such as power amps. Please ground this lead separately from the vehicle for other products may be drained when you ground...

Owner's Manual
Page 80
... method Clamp the parking brake switch power supply side lead. Clamp firmly with power regardless of ignition switch position. For details, consult the vehicle Owner's Manual or dealer. This lead must be connected to detect the ON/OFF status of any connections. 79 Red To electric terminal controlled by ignition switch...
... method Clamp the parking brake switch power supply side lead. Clamp firmly with power regardless of ignition switch position. For details, consult the vehicle Owner's Manual or dealer. This lead must be connected to detect the ON/OFF status of any connections. 79 Red To electric terminal controlled by ignition switch...


