
Operating Instructions
Page 1
Operating Instructions AUDIO/VIDEO MULTI-CHANNEL RECEIVER VSX-9300TX Register your product at www.pioneerelectronics.com • Protect your new investment The details of your purchase will be on file for reference in the event of an insurance claim such as loss or theft. • Receive free tips, updates and service bulletins on your new product • Improve product development Your input helps us continue to design products that meet your needs. • Receive a free Pioneer newsletter Registered customers can opt in to receive a monthly newsletter.
Operating Instructions AUDIO/VIDEO MULTI-CHANNEL RECEIVER VSX-9300TX Register your product at www.pioneerelectronics.com • Protect your new investment The details of your purchase will be on file for reference in the event of an insurance claim such as loss or theft. • Receive free tips, updates and service bulletins on your new product • Improve product development Your input helps us continue to design products that meet your needs. • Receive a free Pioneer newsletter Registered customers can opt in to receive a monthly newsletter.
Operating Instructions
Page 4
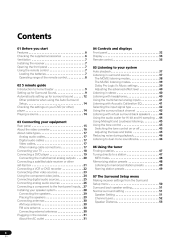
... Using the multichannel analog inputs ...41 Listening with Acoustic Calibration EQ ...41 Selecting the input signal type ...42 Using the surround back channel ...43 Listening with virtual surround back speakers ...44 Using the audio scaler for Hi-bit and Hi-sampling . . 44 Using Midnight...making cable connections ...17 Connecting your TV ...18 Connecting a DVD player ...19 Connecting the multichannel analog outputs ...20 Connecting a satellite/cable receiver or other set-top box ...21 Connecting a VCR or DVD recorder ...22 Connecting other video sources ...23 Using the component video jacks ......
... Using the multichannel analog inputs ...41 Listening with Acoustic Calibration EQ ...41 Selecting the input signal type ...42 Using the surround back channel ...43 Listening with virtual surround back speakers ...44 Using the audio scaler for Hi-bit and Hi-sampling . . 44 Using Midnight...making cable connections ...17 Connecting your TV ...18 Connecting a DVD player ...19 Connecting the multichannel analog outputs ...20 Connecting a satellite/cable receiver or other set-top box ...21 Connecting a VCR or DVD recorder ...22 Connecting other video sources ...23 Using the component video jacks ......
Operating Instructions
Page 5
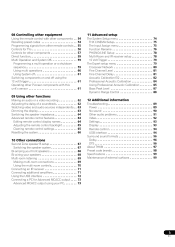
... for TVs ...Controls for Advanced MCACC output ...Advanced MCACC output using the 12 volt trigger ...Operating other Pioneer components with other remote controls . . Dimming the display ...Switching the speaker impedance ...Advanced remote control features... ...The Input Assign menu ...Function Rename ...PHONO/LINE Setup ...Multi-Room and IR receiver setup ...12 Volt Trigger ...The Expert setup menu ...Crossover Network ...Fine Channel Level ...Fine Channel Delay ...Acoustic Calibration EQ ...Professional Acoustic Calibration ...Using Professional Acoustic Calibration ...Bass Peak Level...
... for TVs ...Controls for Advanced MCACC output ...Advanced MCACC output using the 12 volt trigger ...Operating other Pioneer components with other remote controls . . Dimming the display ...Switching the speaker impedance ...Advanced remote control features... ...The Input Assign menu ...Function Rename ...PHONO/LINE Setup ...Multi-Room and IR receiver setup ...12 Volt Trigger ...The Expert setup menu ...Crossover Network ...Fine Channel Level ...Fine Channel Delay ...Acoustic Calibration EQ ...Professional Acoustic Calibration ...Using Professional Acoustic Calibration ...Bass Peak Level...
Operating Instructions
Page 6
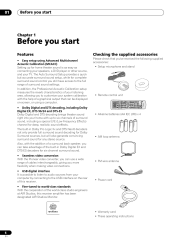
... player or other source, and your TV. The built-in Dolby Digital EX and DTS-ES decoders for six-channel surround sound. • Seamless video conversion With the Pioneer video converter, you can be displayed on-screen, or using Advanced Multichannel Acoustic Calibration (MCACC) Setting up to .../24 and DTS-ES Dolby Digital and DTS decoding brings theater sound right into your home with the help of a graphical output that you've received the following supplied accessories: • Setup microphone and stand • Remote control unit • Alkaline batteries (AA IEC LR6) x 4 •...
... player or other source, and your TV. The built-in Dolby Digital EX and DTS-ES decoders for six-channel surround sound. • Seamless video conversion With the Pioneer video converter, you can be displayed on-screen, or using Advanced Multichannel Acoustic Calibration (MCACC) Setting up to .../24 and DTS-ES Dolby Digital and DTS decoding brings theater sound right into your home with the help of a graphical output that you've received the following supplied accessories: • Setup microphone and stand • Remote control unit • Alkaline batteries (AA IEC LR6) x 4 •...

Operating Instructions
Page 12
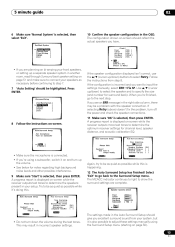
...8226; The test tones used in the receiver. • The receiver will overwrite any existing speaker settings in ...] ] 1 Switch on -screen menu after three minutes of inactivity. Use the RECEIVER button to navigate through the screens and select menu items. 4 'Surround Setup' ...for the best results with your system, the receiver uses the information from a series of test tones...Auto Surround Setup will automatically exit the on the receiver and your TV. Important • If you have... level using a table or a chair. 3 Press RECEIVER on page 14. Otherwise, place the microphone at your listening...
...8226; The test tones used in the receiver. • The receiver will overwrite any existing speaker settings in ...] ] 1 Switch on -screen menu after three minutes of inactivity. Use the RECEIVER button to navigate through the screens and select menu items. 4 'Surround Setup' ...for the best results with your system, the receiver uses the information from a series of test tones...Auto Surround Setup will automatically exit the on the receiver and your TV. Important • If you have... level using a table or a chair. 3 Press RECEIVER on page 14. Otherwise, place the microphone at your listening...
Operating Instructions
Page 13
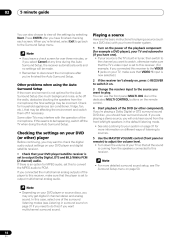
... Setting Normal Expert Exit ] ] ] ] ] If the speaker configuration displayed isn't correct, use the / (cursor up /down ) buttons to determine the optimum receiver settings for notes regarding high background noise levels and other possible interference. 9 Make sure 'Start' is incorrect and you 're finished, go back to show...are planning on bi-amping your front speakers, or setting up the volume. • See below for channel level, speaker distance, and acoustic calibration EQ. If the configuration is selected, then press ENTER. Surround Analysis Speaker Systems Speaker Distance...
... Setting Normal Expert Exit ] ] ] ] ] If the speaker configuration displayed isn't correct, use the / (cursor up /down ) buttons to determine the optimum receiver settings for notes regarding high background noise levels and other possible interference. 9 Make sure 'Start' is incorrect and you 're finished, go back to show...are planning on bi-amping your front speakers, or setting up the volume. • See below for channel level, speaker distance, and acoustic calibration EQ. If the configuration is selected, then press ENTER. Surround Analysis Speaker Systems Speaker Distance...
Operating Instructions
Page 14
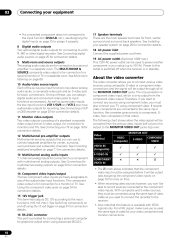
...37 for more detailed surround sound setup, see Listening in tuner, then switch to the channel you connected this seems to do this receiver. In this case, select one ). • If your DVD player/satellite receiver is the TV's built-in surround sound on page 50. Check for household appliances (... exits and no settings will only hear sound from the microphone) the final settings may only get digital 2 channel stereo and analog sound. RECEIVER Other problems when using the Auto Surround Setup If the room environment is not optimal for the Auto Surround Setup (too much background...
...37 for more detailed surround sound setup, see Listening in tuner, then switch to the channel you connected this seems to do this receiver. In this case, select one ). • If your DVD player/satellite receiver is the TV's built-in surround sound on page 50. Check for household appliances (... exits and no settings will only hear sound from the microphone) the final settings may only get digital 2 channel stereo and analog sound. RECEIVER Other problems when using the Auto Surround Setup If the room environment is not optimal for the Auto Surround Setup (too much background...
Operating Instructions
Page 16
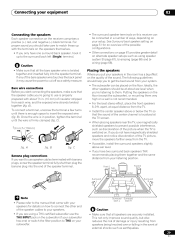
... video component and monitor connections. 16 En See Cnnecting additional amplifiers on page 71 for connection details. 13 Multichannel analog audio inputs 7.1 channel analog inputs for connection details. 18 AC power inlet Connect the supplied power cord here. 19 AC power outlet (Switched 100W max.) ... page 76 for more on this). • When recording video sources however, you won't be able to record sources connected to the receiver. • Also note that the component video input must be connected using Advanced MCACC. 17 Speaker terminals These are connected to the same...
... video component and monitor connections. 16 En See Cnnecting additional amplifiers on page 71 for connection details. 13 Multichannel analog audio inputs 7.1 channel analog inputs for connection details. 18 AC power inlet Connect the supplied power cord here. 19 AC power outlet (Switched 100W max.) ... page 76 for more on this). • When recording video sources however, you won't be able to record sources connected to the receiver. • Also note that the component video input must be connected using Advanced MCACC. 17 Speaker terminals These are connected to the same...

Operating Instructions
Page 20
...the connections. • Take care to connect each output to its corresponding input on the receiver. 2 If your equipment Connecting the multichannel analog outputs AC IN CENTER SWITCHED 100W(0.8A)MAX SELECTABLE VSX-9300TX R FRONT L SUB W. Note • To listen to multichannel analog audio you'll... need to the SURROUND BACK L jack on this receiver. BACK MULTI CH. OUT R SURR. 03 Connecting your DVD player also has outputs for surround back channels, connect these to...
...the connections. • Take care to connect each output to its corresponding input on the receiver. 2 If your equipment Connecting the multichannel analog outputs AC IN CENTER SWITCHED 100W(0.8A)MAX SELECTABLE VSX-9300TX R FRONT L SUB W. Note • To listen to multichannel analog audio you'll... need to the SURROUND BACK L jack on this receiver. BACK MULTI CH. OUT R SURR. 03 Connecting your DVD player also has outputs for surround back channels, connect these to...
Operating Instructions
Page 29
... wire touches the back panel it up with about ear-level when you put your equipment 03 Connecting the speakers Each speaker connection on the receiver comprises a positive (+) red, and negative (-) black terminal. B fig. Front L Front R Subwoofer Center Surround L Surround R Bare wire ...connections Before you start connecting the speakers, make sure that the sound of the center channel is localized at equal distance from the TV. • If possible, install the surround speakers slightly above or below the TV so that...
... wire touches the back panel it up with about ear-level when you put your equipment 03 Connecting the speakers Each speaker connection on the receiver comprises a positive (+) red, and negative (-) black terminal. B fig. Front L Front R Subwoofer Center Surround L Surround R Bare wire ...connections Before you start connecting the speakers, make sure that the sound of the center channel is localized at equal distance from the TV. • If possible, install the surround speakers slightly above or below the TV so that...

Operating Instructions
Page 34
...or MUSIC when a surround listening mode is detected 10 Speaker indicators (page 67) Lights to indicate 6.1 channel sources. • L - Right front channel • LS - Surround channel (mono)or surround back channel • RS - Lights during Neo:6 processing with a box around it when one of the advanced (... is detected. • STEREO - Lights when a DTS-ES signal is set to indicate the currently selected input signal. AUTO lights when the receiver is detected. • EX - Lights during Dolby Pro Logic II and Pro Logic IIx processing. • Neo:6 - Lights when a DTS...
...or MUSIC when a surround listening mode is detected 10 Speaker indicators (page 67) Lights to indicate 6.1 channel sources. • L - Right front channel • LS - Surround channel (mono)or surround back channel • RS - Lights during Neo:6 processing with a box around it when one of the advanced (... is detected. • STEREO - Lights when a DTS-ES signal is set to indicate the currently selected input signal. AUTO lights when the receiver is detected. • EX - Lights during Dolby Pro Logic II and Pro Logic IIx processing. • Neo:6 - Lights when a DTS...
Operating Instructions
Page 35
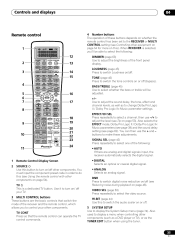
... to switch Loudness on / off . 5 SYSTEM SETUP Use to adjust the sound delay, the tone, effect and channel levels, as well as the TUNER EDIT button when using the tuner. MULTI CONTROL CD TUNER TONE RECEIVER EFFECT/CH SEL DIMMER LOUDNESS 14 15 1 2 DNR 3 BASS/TREBLE 4 + 4 5 6 7 8 SIGNAL SEL 5 VIDEO SEL 6 HI-BIT...
... to switch Loudness on / off . 5 SYSTEM SETUP Use to adjust the sound delay, the tone, effect and channel levels, as well as the TUNER EDIT button when using the tuner. MULTI CONTROL CD TUNER TONE RECEIVER EFFECT/CH SEL DIMMER LOUDNESS 14 15 1 2 DNR 3 BASS/TREBLE 4 + 4 5 6 7 8 SIGNAL SEL 5 VIDEO SEL 6 HI-BIT...
Operating Instructions
Page 36
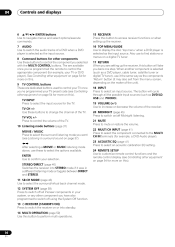
... ENTER Use to confirm your TV or DVD player). The button will cycle through all Pioneer components in your TV preset code (see Controlling other equipment on this button to access receiver functions or when setting up the receiver, this ). 04 Controls and displays 6 / / / /ENTER buttons Use to navigate...Return' button (it was in surround sound on this button will take you want (see Controlling other components Use these to change the channel of the unit). 18 INPUT Press to select the surround listening mode you back one step. The are available once you've programmed ...
... ENTER Use to confirm your TV or DVD player). The button will cycle through all Pioneer components in your TV preset code (see Controlling other equipment on this button to access receiver functions or when setting up the receiver, this ). 04 Controls and displays 6 / / / /ENTER buttons Use to navigate...Return' button (it was in surround sound on this button will take you want (see Controlling other components Use these to change the channel of the unit). 18 INPUT Press to select the surround listening mode you back one step. The are available once you've programmed ...

Operating Instructions
Page 37
... to select a listening mode, then press ENTER. Note • Stereo surround (matrix) formats are many ways to listen back to sources using this receiver, but Normal System), 2 Pro Logic IIx (below for the simplest, most direct listening option is the Stream Direct feature. You can listen to any... source in surround sound below ) becomes 2 Pro Logic II (5.1 channel sound). • When the Virtual Surround Back mode (page 44) is switched on, +VSB will show in the front panel display after modes which...
... to select a listening mode, then press ENTER. Note • Stereo surround (matrix) formats are many ways to listen back to sources using this receiver, but Normal System), 2 Pro Logic IIx (below for the simplest, most direct listening option is the Stream Direct feature. You can listen to any... source in surround sound below ) becomes 2 Pro Logic II (5.1 channel sound). • When the Virtual Surround Back mode (page 44) is switched on, +VSB will show in the front panel display after modes which...
Operating Instructions
Page 39
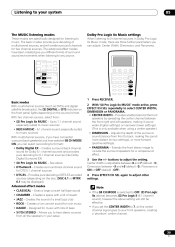
... settings). • PANORAMA - Panorama is only available when using a center speaker.) • DIMENSION - Dolby Pro Logic IIx Music settings When listening to 2-channel sources in your system 05 The MUSIC listening modes These modes are three further parameters you set the CENTER WIDTH to 7, all the speakers in... music. Adjusts the depth of a small jazz club • ROCK - Extends the front stereo image to include the surround speakers for two channel sources. MUSIC MODE SURROUND ENTER RECEIVER EFFECT/CH SEL + 1 Press RECEIVER. Listening to your setup 39 En
... settings). • PANORAMA - Panorama is only available when using a center speaker.) • DIMENSION - Dolby Pro Logic IIx Music settings When listening to 2-channel sources in your system 05 The MUSIC listening modes These modes are three further parameters you set the CENTER WIDTH to 7, all the speakers in... music. Adjusts the depth of a small jazz club • ROCK - Extends the front stereo image to include the surround speakers for two channel sources. MUSIC MODE SURROUND ENTER RECEIVER EFFECT/CH SEL + 1 Press RECEIVER. Listening to your setup 39 En

Operating Instructions
Page 40
... on the front panel. When you will hear the source through just the front left and right channels when MULTI CH IN is only available when using a center speaker. 1 Press RECEIVER. RECEIVER EFFECT/CH SEL + 40 En Listening in stereo (downmixed). You can adjust the center image to... select STEREO or DIRECT, you disconnect them it reverts to adjust the setting. Note 1 Press RECEIVER. 2 With one of headphones to the PHONES jack on . However, sound will be downmixed to 2 channels. 05 Listening to your system Neo:6 Music settings • Default setting: 2 When listening to...
... on the front panel. When you will hear the source through just the front left and right channels when MULTI CH IN is only available when using a center speaker. 1 Press RECEIVER. RECEIVER EFFECT/CH SEL + 40 En Listening in stereo (downmixed). You can adjust the center image to... select STEREO or DIRECT, you disconnect them it reverts to adjust the setting. Note 1 Press RECEIVER. 2 With one of headphones to the PHONES jack on . However, sound will be downmixed to 2 channels. 05 Listening to your system Neo:6 Music settings • Default setting: 2 When listening to...
Operating Instructions
Page 41
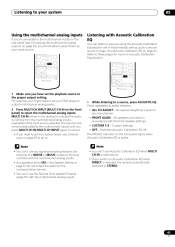
...you press MULTI CH IN/MULTI CH INPUT again to cancel. • If you switch on Acoustic Calibration EQ when DIRECT is selected, the receiver automatically switches to STEREO. 41 En All speakers are heard in the Speaker Setting on page 51 do so. Custom settings • OFF - ... features (for example, the MOVIE or MUSIC modes or the tone controls) with the multichannel analog inputs. • Any speakers set the channel levels, see Connecting the multichannel analog outputs on the front panel) to select the multichannel analog inputs. Listening with Acoustic Calibration EQ You can...
...you press MULTI CH IN/MULTI CH INPUT again to cancel. • If you switch on Acoustic Calibration EQ when DIRECT is selected, the receiver automatically switches to STEREO. 41 En All speakers are heard in the Speaker Setting on page 51 do so. Custom settings • OFF - ... features (for example, the MOVIE or MUSIC modes or the tone controls) with the multichannel analog inputs. • Any speakers set the channel levels, see Connecting the multichannel analog outputs on the front panel) to select the multichannel analog inputs. Listening with Acoustic Calibration EQ You can...

Operating Instructions
Page 43
...in the 5.1 format for example, Dolby Digital EX or DTS-ES) • SB CH OFF - Automatically switches to cycle through surround back channel speaker(s) • Press SB CH MODE repeatedly to 6.1 or 7.1 decoding for 6.1 encoded sources (for which it was originally encoded, in which...other sources (for example, on page 51, or you have the receiver automatically use 6.1 or 7.1 decoding with sources over 48kHz when using one of sources. ì=Sound plays through the surround back channel options. Surround back channel is switched off . The table below ). • If the ...
...in the 5.1 format for example, Dolby Digital EX or DTS-ES) • SB CH OFF - Automatically switches to cycle through surround back channel speaker(s) • Press SB CH MODE repeatedly to 6.1 or 7.1 decoding for 6.1 encoded sources (for which it was originally encoded, in which...other sources (for example, on page 51, or you have the receiver automatically use 6.1 or 7.1 decoding with sources over 48kHz when using one of sources. ì=Sound plays through the surround back channel options. Surround back channel is switched off . The table below ). • If the ...
Operating Instructions
Page 44
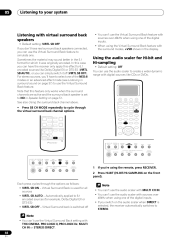
...-BIT SB CH MODE 1 If you're using the remote, press RECEIVER. 2 Press HI-BIT (HI-BIT/HI-SAMPLING on the front panel). In this case you can have the receiver only apply this feature only works when the surround channels are active and the surround back speaker is switched off (VIRTL SB... OFF). See also Using the surround back channel above. • Press SB CH MODE repeatedly to cycle through the...
...-BIT SB CH MODE 1 If you're using the remote, press RECEIVER. 2 Press HI-BIT (HI-BIT/HI-SAMPLING on the front panel). In this case you can have the receiver only apply this feature only works when the surround channels are active and the surround back speaker is switched off (VIRTL SB... OFF). See also Using the surround back channel above. • Press SB CH MODE repeatedly to cycle through the...

Operating Instructions
Page 46
... display: • DUAL ch1 - You will see the setting you want. DNR 1 Press RECEIVER. Note • Depending on the source, there may be played. Only channel 2 is played RECEIVER • DUAL ch2 - Both channels are played through the front speakers 2 Release the button when you see the following settings cycle ...• If you switch on the tone control when DIRECT is sometimes necessary when two languages need to be sent to separate channels. DNR shows in the display when digital noise reduction is selected, the receiver automatically switches to STEREO. 46 En
... display: • DUAL ch1 - You will see the setting you want. DNR 1 Press RECEIVER. Note • Depending on the source, there may be played. Only channel 2 is played RECEIVER • DUAL ch2 - Both channels are played through the front speakers 2 Release the button when you see the following settings cycle ...• If you switch on the tone control when DIRECT is sometimes necessary when two languages need to be sent to separate channels. DNR shows in the display when digital noise reduction is selected, the receiver automatically switches to STEREO. 46 En

