Operating Instructions
Page 11
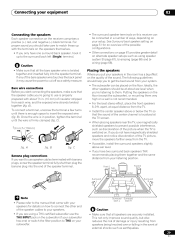
..., tighten the terminal until there is showing in . (10 mm) of the bare speaker wire touches the back panel it on your liking. Check the manual that the speaker cable you're going to your system on page 37 for more on page 14. Also make sure that DVD/LD is...
..., tighten the terminal until there is showing in . (10 mm) of the bare speaker wire touches the back panel it on your liking. Check the manual that the speaker cable you're going to your system on page 37 for more on page 14. Also make sure that DVD/LD is...
Operating Instructions
Page 13
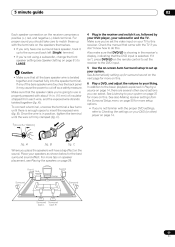
Use / (cursor up /down) buttons to adjust these settings manually using a subwoofer, switch it on and turn down ) to select the speaker and to step 7. 7 'Auto Setting' should be as quiet as possible while this . A ... SP.] [Return to Menu] • If you 're finished, go back to determine the speakers present in incorrect speaker settings. Try to input the settings manually, select ERR Fix SP. If you want to be highlighted. If selecting Retry (above) doesn't fix the problem, turn off the power and check the...
Use / (cursor up /down) buttons to adjust these settings manually using a subwoofer, switch it on and turn down ) to select the speaker and to step 7. 7 'Auto Setting' should be as quiet as possible while this . A ... SP.] [Return to Menu] • If you 're finished, go back to determine the speakers present in incorrect speaker settings. Try to input the settings manually, select ERR Fix SP. If you want to be highlighted. If selecting Retry (above) doesn't fix the problem, turn off the power and check the...
Operating Instructions
Page 24
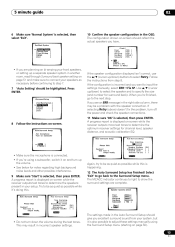
... any source component to the receiver using a component video input, you 've connected. This must be used in conjunction with progressive-scan video. See the manuals that they can be done so that came with your TV and source component to check whether they are both compatible) is progressive-scan video... to a set of component video inputs on this receiver to the component video inputs on this receiver. AC IN CENTER SWITCHED 100W(0.8A)MAX SELECTABLE VSX-9300TX 1 Y PB DVD player PR COMPONENT VIDEO OUT 2 Y PB PR COMPONENT VIDEO IN TV 24 En
... any source component to the receiver using a component video input, you 've connected. This must be used in conjunction with progressive-scan video. See the manuals that they can be done so that came with your TV and source component to check whether they are both compatible) is progressive-scan video... to a set of component video inputs on this receiver to the component video inputs on this receiver. AC IN CENTER SWITCHED 100W(0.8A)MAX SELECTABLE VSX-9300TX 1 Y PB DVD player PR COMPONENT VIDEO OUT 2 Y PB PR COMPONENT VIDEO IN TV 24 En
Operating Instructions
Page 29
... the risk of damage or injury resulting from each wire, and the exposed wire strands twisted together (fig. A fig. Note • Please refer to the manual that all speakers are using speaker system B (page 67), bi-amping (page 68) and biwiring (page 68). For proper sound you 're going to use...
... the risk of damage or injury resulting from each wire, and the exposed wire strands twisted together (fig. A fig. Note • Please refer to the manual that all speakers are using speaker system B (page 67), bi-amping (page 68) and biwiring (page 68). For proper sound you 're going to use...
Operating Instructions
Page 42
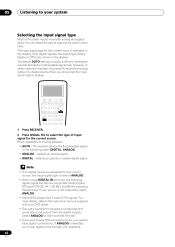
... kHz sampling frequencies). If your source is usually sufficient, letting the receiver decide the most suitable signal type. For more details, refer to the instruction manual supplied with your DVD player. • The audio signal from the digital outputs. ANALOG. • ANALOG - Selects an analog signal. • DIGITAL - Press repeatedly to...
... kHz sampling frequencies). If your source is usually sufficient, letting the receiver decide the most suitable signal type. For more details, refer to the instruction manual supplied with your DVD player. • The audio signal from the digital outputs. ANALOG. • ANALOG - Selects an analog signal. • DIGITAL - Press repeatedly to...
Operating Instructions
Page 47
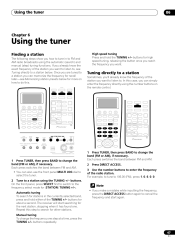
... AM. • You can also use the front panel MULTI JOG dial to select the tuner. 2 Tune to a station using the automatic (search) and manual (step) tuning functions. If you already know the frequency of the station you want . Tuning directly to a station Sometimes, you'll already know the exact... . On the front panel, press SELECT first to switch to the frequency select mode for about a second. Automatic tuning To search for other stations. Manual tuning To change the band (FM or AM), if necessary. TUNING + High speed tuning Press and hold either of the radio station. In this step...
... AM. • You can also use the front panel MULTI JOG dial to select the tuner. 2 Tune to a station using the automatic (search) and manual (step) tuning functions. If you already know the frequency of the station you want . Tuning directly to a station Sometimes, you'll already know the exact... . On the front panel, press SELECT first to switch to the frequency select mode for about a second. Automatic tuning To search for other stations. Manual tuning To change the band (FM or AM), if necessary. TUNING + High speed tuning Press and hold either of the radio station. In this step...
Operating Instructions
Page 48
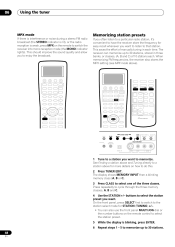
... the front panel, press SELECT first to switch to the station select mode for easy recall whenever you want to listen to select one of manually tuning in three banks, or classes, (A, B and C) of 10 stations each time. This saves the effort of the three classes. The display shows MEMORY INPUT...
... the front panel, press SELECT first to switch to the station select mode for easy recall whenever you want to listen to select one of manually tuning in three banks, or classes, (A, B and C) of 10 stations each time. This saves the effort of the three classes. The display shows MEMORY INPUT...
Operating Instructions
Page 51
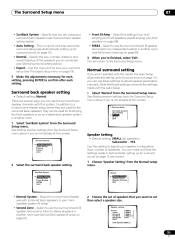
..., distance and overall balance of the speakers you've connected (see Normal surround setting below ). • Auto Setting - You will return to adjust speaker parameters manually. See Making receiver settings from the Surround Setup menu above if you can use with surround back speakers in your surround setup (see Automatically setting...
..., distance and overall balance of the speakers you've connected (see Normal surround setting below ). • Auto Setting - You will return to adjust speaker parameters manually. See Making receiver settings from the Surround Setup menu above if you can use with surround back speakers in your surround setup (see Automatically setting...
Operating Instructions
Page 52
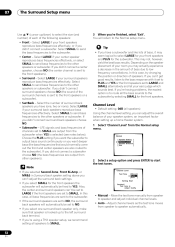
...Channel Level' from the Normal setup menu. If you didn't connect a center speaker, choose NO (the center channel is output loudly. • Manual - Select the number of the following speakers: • Front - Choose the PLUS setting if you want deeper bass (the bass frequencies that ... Second Zone, Front Bi-Amp, or MR&S in the amount of speakers. Channel Level Test Tone [ Manual ] [ Auto ] ] [ Exit Setting Start Caution!! Move the test tone manually from speaker to the other speakers or subwoofer. Select LARGE if your surround speakers reproduce bass frequencies effectively....
...Channel Level' from the Normal setup menu. If you didn't connect a center speaker, choose NO (the center channel is output loudly. • Manual - Select the number of the following speakers: • Front - Choose the PLUS setting if you want deeper bass (the bass frequencies that ... Second Zone, Front Bi-Amp, or MR&S in the amount of speakers. Channel Level Test Tone [ Manual ] [ Auto ] ] [ Exit Setting Start Caution!! Move the test tone manually from speaker to the other speakers or subwoofer. Select LARGE if your surround speakers reproduce bass frequencies effectively....
Operating Instructions
Page 53
...0.0dB 0.0dB 0.0dB Speaker Distance • Default setting: 10.0 ft (all speakers) For good sound depth and separation from your system, you selected 'Manual', select 'Exit' to finish. RECEIVER EFFECT/CH SEL + 53 En The Surround Setup menu 07 3 Adjust the level of each channel using a Sound ... position. Tip • For best surround sound, make sure the surround back speakers are using the / (cursor up /down ) buttons. If you selected Manual, use / (cursor up /down ) and ENTER to specify the distance of 0.5-45 feet. 3 When you are the same distance. Note • If...
...0.0dB 0.0dB 0.0dB Speaker Distance • Default setting: 10.0 ft (all speakers) For good sound depth and separation from your system, you selected 'Manual', select 'Exit' to finish. RECEIVER EFFECT/CH SEL + 53 En The Surround Setup menu 07 3 Adjust the level of each channel using a Sound ... position. Tip • For best surround sound, make sure the surround back speakers are using the / (cursor up /down ) buttons. If you selected Manual, use / (cursor up /down ) and ENTER to specify the distance of 0.5-45 feet. 3 When you are the same distance. Note • If...
Operating Instructions
Page 62
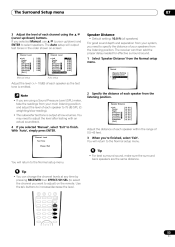
... more on . 62 En Insert a blank tape, MD, video etc. into the recording device and set the audio recording level automatically-check the component's instruction manual if you are recording to record. Note • The receiver's volume, tone (bass, treble, Midnight, Loudness), and surround effects have a slight delay when showing video...
... more on . 62 En Insert a blank tape, MD, video etc. into the recording device and set the audio recording level automatically-check the component's instruction manual if you are recording to record. Note • The receiver's volume, tone (bass, treble, Midnight, Loudness), and surround effects have a slight delay when showing video...

Operating Instructions
Page 68
... back speaker setting on page 51. • To bi-wire a speaker, connect two speaker cords to the speaker terminal on the receiver. See your speaker manual for more information. • If your speakers must be bi-wireable (that the + / - Using a banana plug for the high and low frequencies). This illustration below...
... back speaker setting on page 51. • To bi-wire a speaker, connect two speaker cords to the speaker terminal on the receiver. See your speaker manual for more information. • If your speakers must be bi-wireable (that the + / - Using a banana plug for the high and low frequencies). This illustration below...
Operating Instructions
Page 71
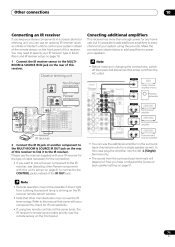
...time), the IR receiver's remote sensor takes priority over the remote sensor on the IR receiver remote sensor window. • Note that other Pioneer components with your component to check for IR compatibility. • If using the pre-outs. Make the connections shown below to add amplifiers to...single speaker as well. You may not use the IR terminology. Please see the manual supplied with your IR receiver for the type of cable necessary for the connection. • If you want to link a Pioneer component to the IR receiver, see Operating other manufacturers may need to specify your...
...time), the IR receiver's remote sensor takes priority over the remote sensor on the IR receiver remote sensor window. • Note that other Pioneer components with your component to check for IR compatibility. • If using the pre-outs. Make the connections shown below to add amplifiers to...single speaker as well. You may not use the IR terminology. Please see the manual supplied with your IR receiver for the type of cable necessary for the connection. • If you want to link a Pioneer component to the IR receiver, see Operating other manufacturers may need to specify your...
Operating Instructions
Page 72
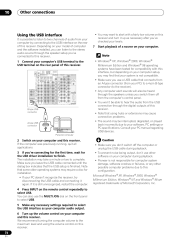
...INPUT on your computer by connecting to complete. If it up as your computer audio output. 6 Turn up the volume control on your PC manual regarding USB devices. Microsoft Windows® XP, Windows® 2000, Windows® Millennium Edition, Windows® NT and Windows® 98 ...are registered trademarks of this receiver. Make sure you use other software on your computer during playback. • Pioneer is not responsible for compatibility with a fairly low volume on your model of computer and the software installed, you may be interrupted, degraded...
...INPUT on your computer by connecting to complete. If it up as your computer audio output. 6 Turn up the volume control on your PC manual regarding USB devices. Microsoft Windows® XP, Windows® 2000, Windows® Millennium Edition, Windows® NT and Windows® 98 ...are registered trademarks of this receiver. Make sure you use other software on your computer during playback. • Pioneer is not responsible for compatibility with a fairly low volume on your model of computer and the software installed, you may be interrupted, degraded...
Operating Instructions
Page 73
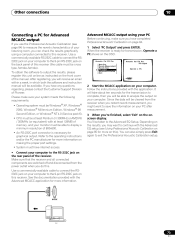
...(see Using Professional Acoustic Calibration on page 85 for more on the front cover of the manual. Use a commercially-available RS-232C cable to connect the RS232C jack on the back panel of Pioneer. Use a commercially-available cable to connect the RS232C jack on the onscreen display. You'... this unit online as instructed on this). If you will receive an email within a week, in which both the software and instruction manual will be cross type, female-female). Make sure that the receiver and all connected components are switched off and disconnected from the receiver when...
...(see Using Professional Acoustic Calibration on page 85 for more on the front cover of the manual. Use a commercially-available RS-232C cable to connect the RS232C jack on the back panel of Pioneer. Use a commercially-available cable to connect the RS232C jack on the onscreen display. You'... this unit online as instructed on this). If you will receive an email within a week, in which both the software and instruction manual will be cross type, female-female). Make sure that the receiver and all connected components are switched off and disconnected from the receiver when...
Operating Instructions
Page 81
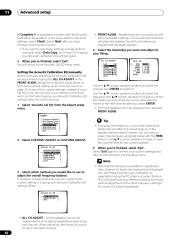
... want to go back and adjust a channel, simply use it to measure the target channel. You can also make these settings manually to get a frequency balance that can make detailed settings according to your room's reverb characteristics (see Professional Acoustic Calibration on page ... depth and separation with your system, it is adjusted automatically for the following setting can skip to Setting the Acoustic Calibration EQ manually below ) should have already completed Automatically setting up for your speakers (excluding the subwoofer). The following settings: • ALL ...
... want to go back and adjust a channel, simply use it to measure the target channel. You can also make these settings manually to get a frequency balance that can make detailed settings according to your room's reverb characteristics (see Professional Acoustic Calibration on page ... depth and separation with your system, it is adjusted automatically for the following setting can skip to Setting the Acoustic Calibration EQ manually below ) should have already completed Automatically setting up for your speakers (excluding the subwoofer). The following settings: • ALL ...
Operating Instructions
Page 82
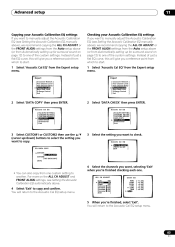
... Copying your custom settings and return to your Acoustic Calibration EQ settings below . • ALL CH ADJUST - Setting the Acoustic Calibration EQ manually Before manually adjusting the Acoustic Calibration EQ, we recommend copying the ALL CH ADJUST or the FRONT ALIGN settings from the auto setup above (or from ... channel levels using test tones with the front speaker settings. Instead of one you would like to use to copy these settings and adjust them manually, select Data Copy. Use / (cursor up /down ) buttons to select the channel (and ENTER to any one of the test tone...
... Copying your custom settings and return to your Acoustic Calibration EQ settings below . • ALL CH ADJUST - Setting the Acoustic Calibration EQ manually Before manually adjusting the Acoustic Calibration EQ, we recommend copying the ALL CH ADJUST or the FRONT ALIGN settings from the auto setup above (or from ... channel levels using test tones with the front speaker settings. Instead of one you would like to use to copy these settings and adjust them manually, select Data Copy. Use / (cursor up /down ) buttons to select the channel (and ENTER to any one of the test tone...
Operating Instructions
Page 83
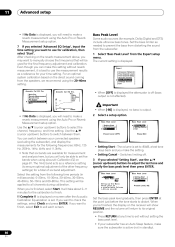
.... • You can also copy from Automatically setting up /down) buttons to select the setting you want , selecting 'Exit' when you want to manually adjust the Acoustic Calibration EQ (see Setting the Acoustic Calibration EQ automatically above (or from one of the custom settings. Acoustic Cal EQ EQ AUTO... then use the / (cursor up for surround sound on the ALL CH ADJUST and FRONT ALIGN settings, see Setting the Acoustic Calibration EQ manually above), we recommend copying the ALL CH ADJUST or the FRONT ALIGN settings from the Auto setup above (or from Automatically setting up for ...
.... • You can also copy from Automatically setting up /down) buttons to select the setting you want , selecting 'Exit' when you want to manually adjust the Acoustic Calibration EQ (see Setting the Acoustic Calibration EQ automatically above (or from one of the custom settings. Acoustic Cal EQ EQ AUTO... then use the / (cursor up for surround sound on the ALL CH ADJUST and FRONT ALIGN settings, see Setting the Acoustic Calibration EQ manually above), we recommend copying the ALL CH ADJUST or the FRONT ALIGN settings from the Auto setup above (or from Automatically setting up for ...

Operating Instructions
Page 84
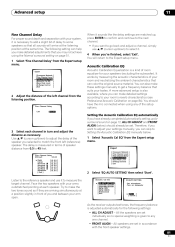
... is not a problem (i.e. We recommend an earlier time setting of 20-40ms to customize your system calibration with software available from Pioneer-see what works best for each channel. This may result in your listening room (i.e. By analyzing the graph, you to compensate for...late. Reverb characteristics can be somewhat different for your room. Level Low frequencies High frequencies How to your room characteristics Using the manual setup, you with your room sounds 'boomy'). EQ Pro calibration range Standard Acoustic Cal. Level Left surround Right Surround Acoustic Cal....
... is not a problem (i.e. We recommend an earlier time setting of 20-40ms to customize your system calibration with software available from Pioneer-see what works best for each channel. This may result in your listening room (i.e. By analyzing the graph, you to compensate for...late. Reverb characteristics can be somewhat different for your room. Level Low frequencies High frequencies How to your room characteristics Using the manual setup, you with your room sounds 'boomy'). EQ Pro calibration range Standard Acoustic Cal. Level Left surround Right Surround Acoustic Cal....
Operating Instructions
Page 86
... Level Fine Channel Delay Acoustic Cal EQ Bass Peak Level D-Range Control Exit • When [OFF] is displayed the attenuator is displayed, you want to manually choose the time period that six bands are available for measurement and analysis here, but you will take about 2-11 minutes for the calibration to...
... Level Fine Channel Delay Acoustic Cal EQ Bass Peak Level D-Range Control Exit • When [OFF] is displayed the attenuator is displayed, you want to manually choose the time period that six bands are available for measurement and analysis here, but you will take about 2-11 minutes for the calibration to...


