
Operating Instructions
Page 1
Operating Instructions AUDIO/VIDEO MULTI-CHANNEL RECEIVER VSX-9300TX Register your product at www.pioneerelectronics.com • Protect your new investment The details of your purchase will be on file for reference in the event of an insurance claim such as loss or theft. • Receive free tips, updates and service bulletins on your new product • Improve product development Your input helps us continue to design products that meet your needs. • Receive a free Pioneer newsletter Registered customers can opt in to receive a monthly newsletter.
Operating Instructions AUDIO/VIDEO MULTI-CHANNEL RECEIVER VSX-9300TX Register your product at www.pioneerelectronics.com • Protect your new investment The details of your purchase will be on file for reference in the event of an insurance claim such as loss or theft. • Receive free tips, updates and service bulletins on your new product • Improve product development Your input helps us continue to design products that meet your needs. • Receive a free Pioneer newsletter Registered customers can opt in to receive a monthly newsletter.
Operating Instructions
Page 4
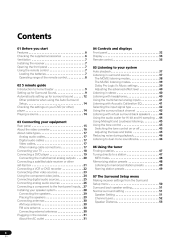
...cable connections ...17 Connecting your TV ...18 Connecting a DVD player ...19 Connecting the multichannel analog outputs ...20 Connecting a satellite/cable receiver or other set-top box ...21 Connecting a VCR or DVD recorder ...22 Connecting other video sources ...23 Using the component video ... ...48 Memorizing station presets ...48 Listening to memorized station presets ...49 Naming station presets ...49 07 The Surround Setup menu Making receiver settings from the Surround Setup menu ...50 Surround back speaker setting ...51 Normal surround setting ...51 Speaker Setting ...51 Channel Level...
...cable connections ...17 Connecting your TV ...18 Connecting a DVD player ...19 Connecting the multichannel analog outputs ...20 Connecting a satellite/cable receiver or other set-top box ...21 Connecting a VCR or DVD recorder ...22 Connecting other video sources ...23 Using the component video ... ...48 Memorizing station presets ...48 Listening to memorized station presets ...49 Naming station presets ...49 07 The Surround Setup menu Making receiver settings from the Surround Setup menu ...50 Surround back speaker setting ...51 Normal surround setting ...51 Speaker Setting ...51 Channel Level...
Operating Instructions
Page 5
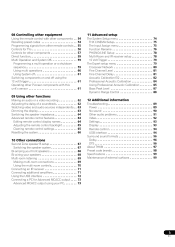
... The System Setup menu ...THX CINEMA Setup ...The Input Assign menu ...Function Rename ...PHONO/LINE Setup ...Multi-Room and IR receiver setup ...12 Volt Trigger ...The Expert setup menu ...Crossover Network ...Fine Channel Level ...Fine Channel Delay ...Acoustic Calibration EQ ...Professional... using your speakers ...Multi-room listening ...Making multi-room connections ...Using the multi-room controls ...Connecting an IR receiver ...Connecting additional amplifiers ...Using the USB interface ...Connecting a PC for Advanced MCACC output ...Advanced MCACC output using the 12 volt ...
... The System Setup menu ...THX CINEMA Setup ...The Input Assign menu ...Function Rename ...PHONO/LINE Setup ...Multi-Room and IR receiver setup ...12 Volt Trigger ...The Expert setup menu ...Crossover Network ...Fine Channel Level ...Fine Channel Delay ...Acoustic Calibration EQ ...Professional... using your speakers ...Multi-room listening ...Making multi-room connections ...Using the multi-room controls ...Connecting an IR receiver ...Connecting additional amplifiers ...Using the USB interface ...Connecting a PC for Advanced MCACC output ...Advanced MCACC output using the 12 volt ...
Operating Instructions
Page 6
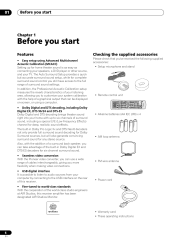
... and DTS-ES decoders for any stereo source. Also, with the help of a graphical output that you start Chapter 1 Before you 've received the following supplied accessories: • Setup microphone and stand • Remote control unit • Alkaline batteries (AA IEC LR6) x 4 ...generate convincing surround sound for six-channel surround sound. • Seamless video conversion With the Pioneer video converter, you can be displayed on the rear of this receiver amplifier has been designated AIR Studios Monitor. In addition, the Professional Acoustic Calibration setup measures...
... and DTS-ES decoders for any stereo source. Also, with the help of a graphical output that you start Chapter 1 Before you 've received the following supplied accessories: • Setup microphone and stand • Remote control unit • Alkaline batteries (AA IEC LR6) x 4 ...generate convincing surround sound for six-channel surround sound. • Seamless video conversion With the Pioneer video converter, you can be displayed on the rear of this receiver amplifier has been designated AIR Studios Monitor. In addition, the Professional Acoustic Calibration setup measures...
Operating Instructions
Page 7
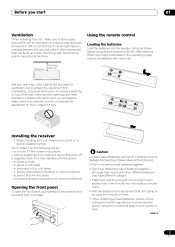
... batteries can result in hazards such as shown below using alkaline batteries (AA IEC LR6) batteries. in extremely hot or cold areas - Receiver Slot and openings in the cabinet are never blocked or covered with items (such as newspapers, table-cloths and curtains), and do not...Caution Incorrect use different kinds of used for ventilation to improve heat dispersal (at least 8 in. (20 cm) at the top). Installing the receiver • When installing this unit, make sure the openings are provided for ventilation and to protect the equipment from equipment that isn't going to ...
... batteries can result in hazards such as shown below using alkaline batteries (AA IEC LR6) batteries. in extremely hot or cold areas - Receiver Slot and openings in the cabinet are never blocked or covered with items (such as newspapers, table-cloths and curtains), and do not...Caution Incorrect use different kinds of used for ventilation to improve heat dispersal (at least 8 in. (20 cm) at the top). Installing the receiver • When installing this unit, make sure the openings are provided for ventilation and to protect the equipment from equipment that isn't going to ...
Operating Instructions
Page 9
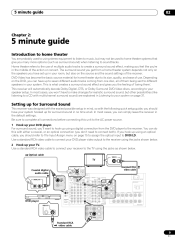
... seven different audio tracks coming from the DVD player to your DVD player. DVD-Video has become the basic source material for Surround Sound This receiver was designed with the easiest possible setup in mind, so with either a coaxial, or an optical connection (you don't need to hook up using an... refers to the AC power source. 1 Hook up for realistic surround sound, but may not be used to DVD/LD. You can simply leave the receiver in no time at all connections before connecting this with the following quick setup guide, you should refer to The Input Assign menu on page...
... seven different audio tracks coming from the DVD player to your DVD player. DVD-Video has become the basic source material for Surround Sound This receiver was designed with the easiest possible setup in mind, so with either a coaxial, or an optical connection (you don't need to hook up using an... refers to the AC power source. 1 Hook up for realistic surround sound, but may not be used to DVD/LD. You can simply leave the receiver in no time at all connections before connecting this with the following quick setup guide, you should refer to The Input Assign menu on page...
Operating Instructions
Page 10
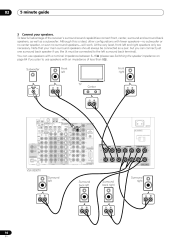
... left surround back terminal). Subwoofer Front left Front right TV LINE LEVEL INPUT Center AC IN CENTER SWITCHED 100W(0.8A)MAX SELECTABLE VSX-9300TX Surround left Surround right Surround back left and right speakers only are necessary. Note that your speakers. 02 5 minute guide 3... as a subwoofer. To take full advantage of less than 8 Ω). Although this is ideal, other configurations with an impedance of the receiver's surround sound capabilities connect front, center, surround and surround back speakers, as well as a pair, but you can use speakers with a...
... left surround back terminal). Subwoofer Front left Front right TV LINE LEVEL INPUT Center AC IN CENTER SWITCHED 100W(0.8A)MAX SELECTABLE VSX-9300TX Surround left Surround right Surround back left and right speakers only are necessary. Note that your speakers. 02 5 minute guide 3... as a subwoofer. To take full advantage of less than 8 Ω). Although this is ideal, other configurations with an impedance of the receiver's surround sound capabilities connect front, center, surround and surround back speakers, as well as a pair, but you can use speakers with a...
Operating Instructions
Page 11
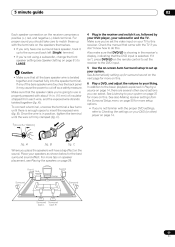
...your system. Also make sure that DVD/LD is showing in Playing a source on page 14, there are several other ) player on this receiver. C Where you don't know how to use is twisted together and inserted fully into the speaker terminal. Once the wire is in position, ... that the DVD input is firmly clamped (fig. If any of insulator stripped from the Surround Setup menu on page 50 for more on the receiver comprises a positive (+) red, and negative (-) black terminal. fig. A). A fig. Front L Front R Subwoofer Center Surround L Surround R Surround back L Surround back R 11 En...
...your system. Also make sure that DVD/LD is showing in Playing a source on page 14, there are several other ) player on this receiver. C Where you don't know how to use is twisted together and inserted fully into the speaker terminal. Once the wire is in position, ... that the DVD input is firmly clamped (fig. If any of insulator stripped from the Surround Setup menu on page 50 for more on the receiver comprises a positive (+) red, and negative (-) black terminal. fig. A). A fig. Front L Front R Subwoofer Center Surround L Surround R Surround back L Surround back R 11 En...

Operating Instructions
Page 12
... no obstacles between the speakers and the microphone. • Place the microphone on page 14. Use the / (cursor up/down) buttons and ENTER on the receiver and your TV. SYSTEM SETUP 1.Surround Setup ENTER [ [ [ [ [ SurrBack System Auto Setting Normal Expert Exit ] ] ] ] ] 1 Switch on the...not moved during the Auto Surround Setup. • Using the Auto Surround Setup will overwrite any existing speaker settings in the receiver. • The receiver will automatically exit the on your listening area, taking into account ambient noise, speaker size and distance, and tests for ...
... no obstacles between the speakers and the microphone. • Place the microphone on page 14. Use the / (cursor up/down) buttons and ENTER on the receiver and your TV. SYSTEM SETUP 1.Surround Setup ENTER [ [ [ [ [ SurrBack System Auto Setting Normal Expert Exit ] ] ] ] ] 1 Switch on the...not moved during the Auto Surround Setup. • Using the Auto Surround Setup will overwrite any existing speaker settings in the receiver. • The receiver will automatically exit the on your listening area, taking into account ambient noise, speaker size and distance, and tests for ...
Operating Instructions
Page 13
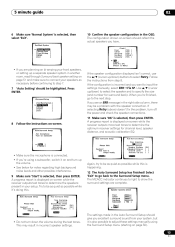
...up /down ) to select the speaker and to adjust these settings manually using the Surround Setup menu (starting on -screen while the receiver outputs test tones to input the settings manually, select ERR Fix SP. Auto Surround Setup Set microphone Turn on -screen. 5 minute ... ] ] ] 10 Confirm the speaker configuration in incorrect speaker settings. The configuration shown on page 51 and make sure to determine the optimum receiver settings for notes regarding high background noise levels and other possible interference. 9 Make sure 'Start' is selected, then press ENTER. When you ...
...up /down ) to select the speaker and to adjust these settings manually using the Surround Setup menu (starting on -screen while the receiver outputs test tones to input the settings manually, select ERR Fix SP. Auto Surround Setup Set microphone Turn on -screen. 5 minute ... ] ] ] 10 Confirm the speaker configuration in incorrect speaker settings. The configuration shown on page 51 and make sure to determine the optimum receiver settings for notes regarding high background noise levels and other possible interference. 9 Make sure 'Start' is selected, then press ENTER. When you ...
Operating Instructions
Page 14
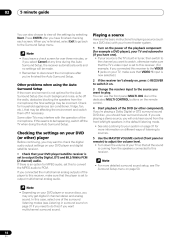
.... 14 En If you will be affecting the environment and switch them off the walls, obstacles blocking the speakers from the speakers connected to this receiver. Note • If you leave a check screen for over three minutes, or if you select Cancel at any time during the Auto Surround Setup, the... receiver automatically exits and no settings will only hear sound from the front left/right speakers in the default listening mode. • See also Listening to ...
.... 14 En If you will be affecting the environment and switch them off the walls, obstacles blocking the speakers from the speakers connected to this receiver. Note • If you leave a check screen for over three minutes, or if you select Cancel at any time during the Auto Surround Setup, the... receiver automatically exits and no settings will only hear sound from the front left/right speakers in the default listening mode. • See also Listening to ...
Operating Instructions
Page 15
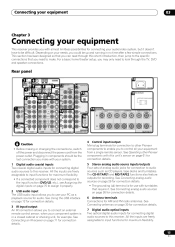
...audio inputs for connecting digital audio sources to look through this receiver. See Connecting analog audio sources on page 71 for connection details. 4 Control input/output Mini-plug terminals for connection to other Pioneer components with your system. 1 Digital audio coaxial inputs Two ...and MD/TAPE2 functions also feature outputs for maximum flexibility. 15 En Connecting your equipment 03 Chapter 3 Connecting your equipment This receiver provides you with almost limitless possibilities for connecting your audio/video system, but it properly. 2 USB audio input The USB audio...
...audio inputs for connecting digital audio sources to look through this receiver. See Connecting analog audio sources on page 71 for connection details. 4 Control input/output Mini-plug terminals for connection to other Pioneer components with your system. 1 Digital audio coaxial inputs Two ...and MD/TAPE2 functions also feature outputs for maximum flexibility. 15 En Connecting your equipment 03 Chapter 3 Connecting your equipment This receiver provides you with almost limitless possibilities for connecting your audio/video system, but it properly. 2 USB audio input The USB audio...
Operating Instructions
Page 16
...inputs/output The two component video inputs are freely assignable to any source using component video, you used to connect the recorder to the receiver. • Also note that order). See Cnnecting additional amplifiers on page 24 for connection details. 15 12V trigger jack This terminal outputs...61 for connection details. 16 RS-232C connector This port is available with multichannel analog outputs. See Switching components on and off when the receiver is for connection to a second monitor or TV in standby. For a PAL signal, make sure you can be able to record ...
...inputs/output The two component video inputs are freely assignable to any source using component video, you used to connect the recorder to the receiver. • Also note that order). See Cnnecting additional amplifiers on page 24 for connection details. 15 12V trigger jack This terminal outputs...61 for connection details. 16 RS-232C connector This port is available with multichannel analog outputs. See Switching components on and off when the receiver is for connection to a second monitor or TV in standby. For a PAL signal, make sure you can be able to record ...
Operating Instructions
Page 17
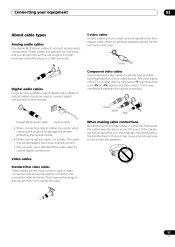
... cables give you should be used to connect to distinguish them from the speakers. • When connecting optical cables, be damaged if bent around this receiver. These cables are the most common type of the TV is avoided. They have yellow plugs to the composite video terminals.
... cables give you should be used to connect to distinguish them from the speakers. • When connecting optical cables, be damaged if bent around this receiver. These cables are the most common type of the TV is avoided. They have yellow plugs to the composite video terminals.
Operating Instructions
Page 18
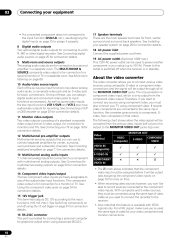
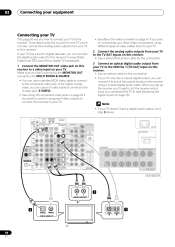
AC IN CENTER SWITCHED 100W(0.8A)MAX SELECTABLE VSX-9300TX 2 R L ANALOG AUDIO OUT 3 OPTICAL COAXIAL DIGITAL AUDIO OUT VIDEO IN S-VIDEO IN 1 TV 18 En If your TV has a built-in digital decoder, you can connect the digital audio output to this receiver to enjoy Dolby Digital and DTS sound from digital TV ... to play the sound from the TV's builtin tuner, connect the analog audio outputs from your TV to the DIGITAL 1 (TV/SAT) input on this receiver. • Use an optical cable for the connection. • If your TV only has a coaxial digital output, you how to connect your TV doesn't ...
AC IN CENTER SWITCHED 100W(0.8A)MAX SELECTABLE VSX-9300TX 2 R L ANALOG AUDIO OUT 3 OPTICAL COAXIAL DIGITAL AUDIO OUT VIDEO IN S-VIDEO IN 1 TV 18 En If your TV has a built-in digital decoder, you can connect the digital audio output to this receiver to enjoy Dolby Digital and DTS sound from digital TV ... to play the sound from the TV's builtin tuner, connect the analog audio outputs from your TV to the DIGITAL 1 (TV/SAT) input on this receiver. • Use an optical cable for the connection. • If your TV only has a coaxial digital output, you how to connect your TV doesn't ...

Operating Instructions
Page 19
...on this receiver. • Use a stereo RCA phono cable for the connection. • If your player also has a component video output, you can connect it . 3 Connect a composite or S-video output on your equipment 03 Connecting a DVD player AC IN CENTER SWITCHED 100W(0.8A)MAX SELECTABLE VSX-9300TX OPTICAL ...of video outputs to choose from. 1 Connect a coaxial digital audio output on your DVD player to the DIGITAL 3 (DVD/LD) input on this receiver. • Use a coaxial digital audio cable for the connection. • If your DVD player only has an optical digital output, you can connect...
...on this receiver. • Use a stereo RCA phono cable for the connection. • If your player also has a component video output, you can connect it . 3 Connect a composite or S-video output on your equipment 03 Connecting a DVD player AC IN CENTER SWITCHED 100W(0.8A)MAX SELECTABLE VSX-9300TX OPTICAL ...of video outputs to choose from. 1 Connect a coaxial digital audio output on your DVD player to the DIGITAL 3 (DVD/LD) input on this receiver. • Use a coaxial digital audio cable for the connection. • If your DVD player only has an optical digital output, you can connect...

Operating Instructions
Page 20
... connections. • Take care to connect each output to its corresponding input on the receiver. 2 If your equipment Connecting the multichannel analog outputs AC IN CENTER SWITCHED 100W(0.8A)MAX SELECTABLE VSX-9300TX R FRONT L SUB W. CENTER R L SURR. 03 Connecting your DVD player also has... outputs for surround back channels, connect these to the corresponding MULTI CH IN jacks on this receiver. • Use standard RCA phono cables for...
... connections. • Take care to connect each output to its corresponding input on the receiver. 2 If your equipment Connecting the multichannel analog outputs AC IN CENTER SWITCHED 100W(0.8A)MAX SELECTABLE VSX-9300TX R FRONT L SUB W. CENTER R L SURR. 03 Connecting your DVD player also has... outputs for surround back channels, connect these to the corresponding MULTI CH IN jacks on this receiver. • Use standard RCA phono cables for...
Operating Instructions
Page 21
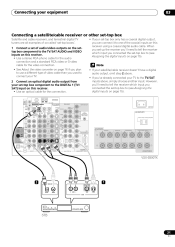
...SWITCHED 100W(0.8A)MAX SELECTABLE VSX-9300TX 2 DIGITAL OUT 1 R AUDIO L AV OUT VIDEO S-VIDEO OPTICAL COAXIAL STB 21 En Note • If your satellite/cable receiver doesn't have a digital audio output, omit step 2 above , simply choose another input. However, you'll need to tell the receiver which input you 've ...'set-top boxes'. 1 Connect a set of audio/video outputs on the settop box component to the TV/SAT AUDIO and VIDEO inputs on this receiver. • Use a stereo RCA phono cable for the audio connection and a standard RCA video or S-video cable for the video connection. •...
...SWITCHED 100W(0.8A)MAX SELECTABLE VSX-9300TX 2 DIGITAL OUT 1 R AUDIO L AV OUT VIDEO S-VIDEO OPTICAL COAXIAL STB 21 En Note • If your satellite/cable receiver doesn't have a digital audio output, omit step 2 above , simply choose another input. However, you'll need to tell the receiver which input you 've ...'set-top boxes'. 1 Connect a set of audio/video outputs on the settop box component to the TV/SAT AUDIO and VIDEO inputs on this receiver. • Use a stereo RCA phono cable for the audio connection and a standard RCA video or S-video cable for the video connection. •...
Operating Instructions
Page 22
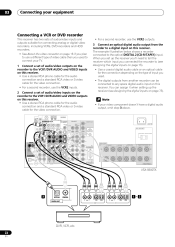
...-R/TAPE1) input. AC IN CENTER SWITCHED 100W(0.8A)MAX SELECTABLE VSX-9300TX 3 OPTICAL DIGITAL OUT COAXIAL R AUDIO L VIDEO AV OUT S-VIDEO R AUDIO L AV IN VIDEO S-VIDEO 1 2 DVR, VCR, etc. 22 En 03 Connecting your equipment Connecting a VCR or DVD recorder This receiver has two sets of audio/video inputs and outputs suitable for...
...-R/TAPE1) input. AC IN CENTER SWITCHED 100W(0.8A)MAX SELECTABLE VSX-9300TX 3 OPTICAL DIGITAL OUT COAXIAL R AUDIO L VIDEO AV OUT S-VIDEO R AUDIO L AV IN VIDEO S-VIDEO 1 2 DVR, VCR, etc. 22 En 03 Connecting your equipment Connecting a VCR or DVD recorder This receiver has two sets of audio/video inputs and outputs suitable for...
Operating Instructions
Page 23
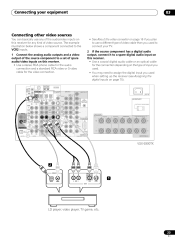
... 100W(0.8A)MAX SELECTABLE VSX-9300TX 2 DIGITAL OUT 1 OPTICAL COAXIAL R AUDIO L AV OUT VIDEO S-VIDEO LD player, video player, TV game, etc. 23 En Connecting your TV. 2 If the source component has a digital audio output, connect it to a spare digital audio input on this receiver. • Use a... Connecting other video sources You can basically use a different type of video cable than you used when setting up the receiver (see Assigning the digital inputs on this receiver. • Use a stereo RCA phono cable for the audio connection and a standard RCA video or S-video cable...
... 100W(0.8A)MAX SELECTABLE VSX-9300TX 2 DIGITAL OUT 1 OPTICAL COAXIAL R AUDIO L AV OUT VIDEO S-VIDEO LD player, video player, TV game, etc. 23 En Connecting your TV. 2 If the source component has a digital audio output, connect it to a spare digital audio input on this receiver. • Use a... Connecting other video sources You can basically use a different type of video cable than you used when setting up the receiver (see Assigning the digital inputs on this receiver. • Use a stereo RCA phono cable for the audio connection and a standard RCA video or S-video cable...


