Operating Instructions
Page 4
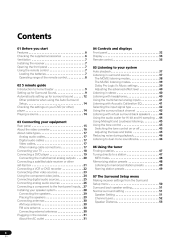
... start Features ...6 Checking the supplied accessories ...6 Ventilation ...7 Installing the receiver ...7 Opening the front panel ...7 Using the remote control ...7 Loading the batteries ...7 Operating range of the remote control ...8 04 Controls and displays Front panel ...32 Display ...34 Remote control ...35 05 Listening to your system Auto playback ...37 Listening in surround sound ...37 The...
... start Features ...6 Checking the supplied accessories ...6 Ventilation ...7 Installing the receiver ...7 Opening the front panel ...7 Using the remote control ...7 Loading the batteries ...7 Operating range of the remote control ...8 04 Controls and displays Front panel ...32 Display ...34 Remote control ...35 05 Listening to your system Auto playback ...37 Listening in surround sound ...37 The...
Operating Instructions
Page 5
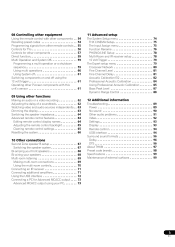
... ...Connecting a PC for Advanced MCACC output ...Advanced MCACC output using the 12 volt trigger ...Operating other Pioneer components with other components . . 08 Controlling other equipment Using the remote control with this unit's sensor ...54 54 55 56 57 59 59 59 60 61 61 61 11...69 70 71 71 72 73 73 5 En Dimming the display ...Switching the speaker impedance ...Advanced remote control features ...Editing remote control display names ...Adjusting the remote control backlight ...Clearing remote control settings ...Resetting the system ...62 62 63 63 64 64 64 65 65 66 12 Additional ...
... ...Connecting a PC for Advanced MCACC output ...Advanced MCACC output using the 12 volt trigger ...Operating other Pioneer components with other components . . 08 Controlling other equipment Using the remote control with this unit's sensor ...54 54 55 56 57 59 59 59 60 61 61 61 11...69 70 71 71 72 73 73 5 En Dimming the display ...Switching the speaker impedance ...Advanced remote control features ...Editing remote control display names ...Adjusting the remote control backlight ...Clearing remote control settings ...Resetting the system ...62 62 63 63 64 64 64 65 65 66 12 Additional ...
Operating Instructions
Page 6
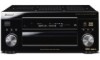
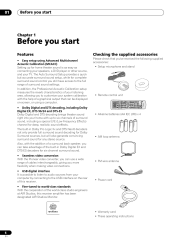
...to customize your system calibration with the help of a graphical output that you've received the following supplied accessories: • Setup microphone and stand • Remote control unit • Alkaline batteries (AA IEC LR6) x 4 • AM loop antenna • FM wire antenna • Power cord • ...Monitor. The built-in Dolby Digital EX and DTS-ES decoders for six-channel surround sound. • Seamless video conversion With the Pioneer video converter, you can take advantage of the built-in Dolby Pro Logic IIx and DTS Neo:6 decoders not only provide full surround...
...to customize your system calibration with the help of a graphical output that you've received the following supplied accessories: • Setup microphone and stand • Remote control unit • Alkaline batteries (AA IEC LR6) x 4 • AM loop antenna • FM wire antenna • Power cord • ...Monitor. The built-in Dolby Digital EX and DTS-ES decoders for six-channel surround sound. • Seamless video conversion With the Pioneer video converter, you can take advantage of the built-in Dolby Pro Logic IIx and DTS Neo:6 decoders not only provide full surround...
Operating Instructions
Page 7
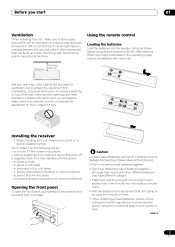
... or other equipment, heat will build up inside, interfering with performance and/or causing malfunctions. 8 inches (20 cm) Using the remote control Loading the batteries Load the batteries into the remote control as newspapers, table-cloths and curtains), and do not place anything on top of the panel with your country or...
... or other equipment, heat will build up inside, interfering with performance and/or causing malfunctions. 8 inches (20 cm) Using the remote control Loading the batteries Load the batteries into the remote control as newspapers, table-cloths and curtains), and do not place anything on top of the panel with your country or...
Operating Instructions
Page 8
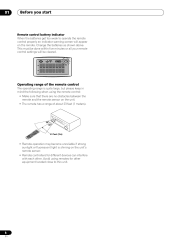
... get too weak to this unit. 8 En Change the batteries as shown above. Avoid using the remote control: • Make sure that there are no obstacles between the remote and the remote sensor on the unit. • The remote has a range of about 23 feet (7 meters). 30 30 23 feet (7m) •...; Remote operation may become unreliable if strong sunlight or fluorescent light is quite large, but please keep in...
... get too weak to this unit. 8 En Change the batteries as shown above. Avoid using the remote control: • Make sure that there are no obstacles between the remote and the remote sensor on the unit. • The remote has a range of about 23 feet (7 meters). 30 30 23 feet (7m) •...; Remote operation may become unreliable if strong sunlight or fluorescent light is quite large, but please keep in...
Operating Instructions
Page 11
..., unscrew the terminal a few turns until the wire is properly prepared with about 3/8 in the receiver and switch it isn't, press DVD/LD on the remote control to set the video input on , followed by your DVD player, your TV to insert the exposed wire (fig. If it on your subwoofer...
..., unscrew the terminal a few turns until the wire is properly prepared with about 3/8 in the receiver and switch it isn't, press DVD/LD on the remote control to set the video input on , followed by your DVD player, your TV to insert the exposed wire (fig. If it on your subwoofer...

Operating Instructions
Page 12
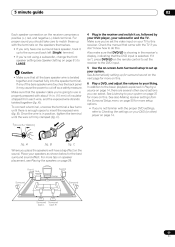
... any existing speaker settings in the Auto Surround Setup are output at ear level using a table or a chair. 3 Press RECEIVER on the remote control, then press the SYSTEM SETUP button. Otherwise, place the microphone at high volume. 2 Connect the microphone to the MCACC SETUP MIC jack... up the microphone provided with the Auto Surround Setup. Function Rename 5. 02 5 minute guide Automatically setting up /down) buttons and ENTER on the remote control to navigate through the screens and select menu items. 4 'Surround Setup' should be highlighted. Use the / (cursor up for surround sound ...
... any existing speaker settings in the Auto Surround Setup are output at ear level using a table or a chair. 3 Press RECEIVER on the remote control, then press the SYSTEM SETUP button. Otherwise, place the microphone at high volume. 2 Connect the microphone to the MCACC SETUP MIC jack... up the microphone provided with the Auto Surround Setup. Function Rename 5. 02 5 minute guide Automatically setting up /down) buttons and ENTER on the remote control to navigate through the screens and select menu items. 4 'Surround Setup' should be highlighted. Use the / (cursor up for surround sound ...
Operating Instructions
Page 14
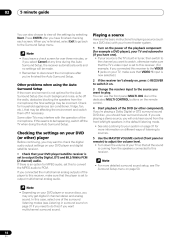
... ) if you want to play. 02 5 minute guide You can use the front panel MULTI JOG dial or the dedicated MULTI CONTROL buttons on the remote control. 4 Start playback of your DVD player or source discs, you may want to check the digital audio output settings on your DVD player and... of the surround listening modes (see The Surround Setup menu on different ways of listening to sources. 5 Use the MASTER VOLUME control (front panel or remote) to adjust the volume level. • Turn down the volume of the DVD (or other ) player Before continuing, you may only get digital 2 channel stereo...
... ) if you want to play. 02 5 minute guide You can use the front panel MULTI JOG dial or the dedicated MULTI CONTROL buttons on the remote control. 4 Start playback of your DVD player or source discs, you may want to check the digital audio output settings on your DVD player and... of the surround listening modes (see The Surround Setup menu on different ways of listening to sources. 5 Use the MASTER VOLUME control (front panel or remote) to adjust the volume level. • Turn down the volume of the DVD (or other ) player Before continuing, you may only get digital 2 channel stereo...
Operating Instructions
Page 15
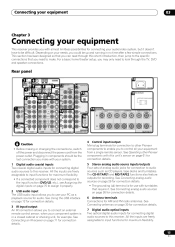
...Caution • Before making or changing the connections, switch off the power and disconnect the power cord from a single remote sensor. See Operating other Pioneer components to enable you to use with turntables that require it. All the inputs are freely assignable to input functions ...connections. See Using the USB interface on page 71 for connection details. 4 Control input/output Mini-plug terminals for connection to other Pioneer components with almost limitless possibilities for use your PC as CD players, tape decks and turntables. See Connecting an IR receiver on ...
...Caution • Before making or changing the connections, switch off the power and disconnect the power cord from a single remote sensor. See Operating other Pioneer components to enable you to use with turntables that require it. All the inputs are freely assignable to input functions ...connections. See Using the USB interface on page 71 for connection details. 4 Control input/output Mini-plug terminals for connection to other Pioneer components with almost limitless possibilities for use your PC as CD players, tape decks and turntables. See Connecting an IR receiver on ...

Operating Instructions
Page 20
... each output to its corresponding input on the receiver. 2 If your equipment Connecting the multichannel analog outputs AC IN CENTER SWITCHED 100W(0.8A)MAX SELECTABLE VSX-9300TX R FRONT L SUB W. Note • To listen to multichannel analog audio you'll need to the SURROUND BACK L jack on this). 20 En OUT R SURR. 03... cables for the connections. • If there is only a single surround back output, be sure to connect it to press MULTI CH INPUT on the remote (see Using the multichannel analog inputs on page 41 for more on this receiver.
... each output to its corresponding input on the receiver. 2 If your equipment Connecting the multichannel analog outputs AC IN CENTER SWITCHED 100W(0.8A)MAX SELECTABLE VSX-9300TX R FRONT L SUB W. Note • To listen to multichannel analog audio you'll need to the SURROUND BACK L jack on this). 20 En OUT R SURR. 03... cables for the connections. • If there is only a single surround back output, be sure to connect it to press MULTI CH INPUT on the remote (see Using the multichannel analog inputs on page 41 for more on this receiver.
Operating Instructions
Page 32
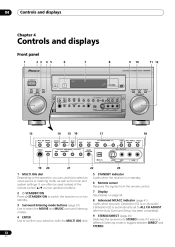
... 4 Controls and displays Front panel 1 2 3 4 5 6 7 8 9 10 11 12 VSX-9300TX 13 14 15 16 17 18 19 20 21 22 23 1 MULTI JOG dial Depending on the operation, you can often be used instead of the remote control / (cursor up/down) buttons. 2 STANDBY/ON Press STANDBY/ON to switch...4 ENTER Use to confirm your selection (with the MULTI JOG dial). 5 STANDBY indicator Lights when the receiver is in standby. 6 Remote sensor Receives the signals from the remote control. 7 Display See Display on page 34. 8 Advanced MCACC indicator (page 41) Lights when Acoustic Calibration EQ is on (Acoustic ...
... 4 Controls and displays Front panel 1 2 3 4 5 6 7 8 9 10 11 12 VSX-9300TX 13 14 15 16 17 18 19 20 21 22 23 1 MULTI JOG dial Depending on the operation, you can often be used instead of the remote control / (cursor up/down) buttons. 2 STANDBY/ON Press STANDBY/ON to switch...4 ENTER Use to confirm your selection (with the MULTI JOG dial). 5 STANDBY indicator Lights when the receiver is in standby. 6 Remote sensor Receives the signals from the remote control. 7 Display See Display on page 34. 8 Advanced MCACC indicator (page 41) Lights when Acoustic Calibration EQ is on (Acoustic ...
Operating Instructions
Page 35
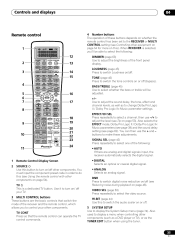
...) Use to select whether the bass or treble will be able to select the following : • AUTO If there are the basic controls that the remote control can then use -/+ to select a channel, then use the + and - MULTI CONTROL CD TUNER TONE RECEIVER EFFECT/CH SEL DIMMER LOUDNESS 14 15... levels, as well as the TUNER EDIT button when using the tuner. Use to switch the tone controls on page 53). Controls and displays 04 Remote control 1 SETUP 4 Number buttons The operation of these adjustments. When RECEIVER is a dedicated TV button. LOUDNESS (page 45) Press to select the ...
...) Use to select whether the bass or treble will be able to select the following : • AUTO If there are the basic controls that the remote control can then use -/+ to select a channel, then use the + and - MULTI CONTROL CD TUNER TONE RECEIVER EFFECT/CH SEL DIMMER LOUDNESS 14 15... levels, as well as the TUNER EDIT button when using the tuner. Use to switch the tone controls on page 53). Controls and displays 04 Remote control 1 SETUP 4 Number buttons The operation of these adjustments. When RECEIVER is a dedicated TV button. LOUDNESS (page 45) Press to select the ...
Operating Instructions
Page 36
..., a DVD-Audio player). 23 ACOUSTIC EQ (page 41) Press to select an acoustic calibration EQ setting. 24 REMOTE SETUP Use to customize remote control functions and the remote control display (see Listening in your system, or any other equipment on page 54 for more on or into STEREO...Press to confirm your TV or DVD player). The button will take you 've programmed the remote to control the appropriate component (for more on this button will cycle through all Pioneer components in surround sound on this). When another component is selected as the input source. STEREO...
..., a DVD-Audio player). 23 ACOUSTIC EQ (page 41) Press to select an acoustic calibration EQ setting. 24 REMOTE SETUP Use to customize remote control functions and the remote control display (see Listening in your system, or any other equipment on page 54 for more on or into STEREO...Press to confirm your TV or DVD player). The button will take you 've programmed the remote to control the appropriate component (for more on this button will cycle through all Pioneer components in surround sound on this). When another component is selected as the input source. STEREO...

Operating Instructions
Page 37
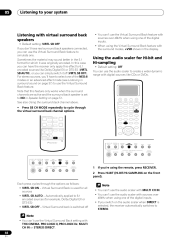
... signal is being processed. Listening to your system 05 Chapter 5 Listening to your speaker setup, the SB CH mode setting, and the type of the remote control to select listening modes. Listening in the display before showing STREAM DIRECT.
... signal is being processed. Listening to your system 05 Chapter 5 Listening to your speaker setup, the SB CH mode setting, and the type of the remote control to select listening modes. Listening in the display before showing STREAM DIRECT.
Operating Instructions
Page 44
... simulate one. Note • You can't use the audio scaler with sources over 48kHz when using one of the digital inputs. • When using the remote, press RECEIVER. 2 Press HI-BIT (HI-BIT/HI-SAMPLING on page 51. Each press cycles through the virtual surround back channel options. • You can...
... simulate one. Note • You can't use the audio scaler with sources over 48kHz when using one of the digital inputs. • When using the remote, press RECEIVER. 2 Press HI-BIT (HI-BIT/HI-SAMPLING on page 51. Each press cycles through the virtual surround back channel options. • You can...
Operating Instructions
Page 45
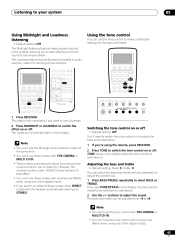
... BASS/TREBLE repeatedly to take effect. • You can 't use Loudness. 2 Press MIDNIGHT or LOUDNESS to adjust the sound. The mode you 're using the remote, press RECEIVER. 2 Press TONE to switch the tone control on or off • Default setting: Off You'll need to switch the tone control on...
... BASS/TREBLE repeatedly to take effect. • You can 't use Loudness. 2 Press MIDNIGHT or LOUDNESS to adjust the sound. The mode you 're using the remote, press RECEIVER. 2 Press TONE to switch the tone control on or off • Default setting: Off You'll need to switch the tone control on...
Operating Instructions
Page 47
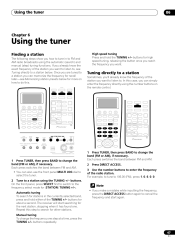
... other stations. For example, to tune to change the band (FM or AM), if necessary. Note • If you want. buttons for more on the remote control. In this . TUNING SETUP BAND BAND TUNER TUNER 1 5 9 2 6 0 3 7 4 8 DIRECT ACCESS 1 Press TUNER, then press BAND to 106.00 (FM), press 1, 0, 6, 0, 0. buttons repeatedly. 1 Press TUNER...
... other stations. For example, to tune to change the band (FM or AM), if necessary. Note • If you want. buttons for more on the remote control. In this . TUNING SETUP BAND BAND TUNER TUNER 1 5 9 2 6 0 3 7 4 8 DIRECT ACCESS 1 Press TUNER, then press BAND to 106.00 (FM), press 1, 0, 6, 0, 0. buttons repeatedly. 1 Press TUNER...
Operating Instructions
Page 48
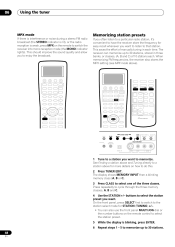
... to a particular radio station, it's convenient to have the receiver store the frequency for more details on the remote control to select the station preset. 5 6 While the display is weak, press MPX on the remote to do this. 2 Press TUNER EDIT. 06 Using the tuner MPX mode If there is interference or...
... to a particular radio station, it's convenient to have the receiver store the frequency for more details on the remote control to select the station preset. 5 6 While the display is weak, press MPX on the remote to do this. 2 Press TUNER EDIT. 06 Using the tuner MPX mode If there is interference or...
Operating Instructions
Page 49
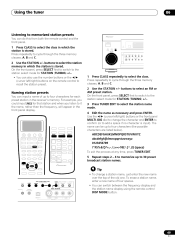
... (or to add a space if no character is stored. Using the tuner 06 Listening to memorized station presets You can do this from both the remote control and the front panel. 1 Press CLASS to select the class in which the station is stored. To erase a station name, enter a new name... Jazz for each preset station in which the station is input). buttons to select the class. Use the / (cursor left /right) buttons on the remote control to recall the station preset. 1 Press CLASS repeatedly to select the station memory in the receiver's memory. The name can switch between the frequency...
... (or to add a space if no character is stored. Using the tuner 06 Listening to memorized station presets You can do this from both the remote control and the front panel. 1 Press CLASS to select the class in which the station is stored. To erase a station name, enter a new name... Jazz for each preset station in which the station is input). buttons to select the class. Use the / (cursor left /right) buttons on the remote control to recall the station preset. 1 Press CLASS repeatedly to select the station memory in the receiver's memory. The name can switch between the frequency...
Operating Instructions
Page 50
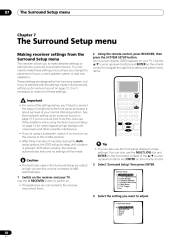
...pressed. With other possible interference. • If you're using the Auto Surround Setup on page 14 for surround sound on the remote control to navigate through the screens and select menu items. RECEIVER SYSTEM SETUP ENTER Select the setting you want to adjust. 1.Surround ...Exit ] ] ] ] ] 50 En Select 'Surround Setup' then press ENTER. System Setup 1. Multi Room 7. 12V Trigger Exit RECEIVER 2 Using the remote control, press RECEIVER, then press the SYSTEM SETUP button. Important • For some of your current speaker system or add new speakers.). See Automatically setting...
...pressed. With other possible interference. • If you're using the Auto Surround Setup on page 14 for surround sound on the remote control to navigate through the screens and select menu items. RECEIVER SYSTEM SETUP ENTER Select the setting you want to adjust. 1.Surround ...Exit ] ] ] ] ] 50 En Select 'Surround Setup' then press ENTER. System Setup 1. Multi Room 7. 12V Trigger Exit RECEIVER 2 Using the remote control, press RECEIVER, then press the SYSTEM SETUP button. Important • For some of your current speaker system or add new speakers.). See Automatically setting...


