
User Manual
Page 2
...or making repairs, always disconnect spark plug wire and place wire where it . • I. Tires can touch hot exhaust / engine parts and burn. WARNING Battery posts, terminals and related accessories contain lead and lead compounds,chemicals known to the State of California to lose ...or counterweights. • Keep machine free of grass , leaves or other safety devices in a large percentage of the machine. Keep all parts to come to protect themselves and others from serious injury. • Follow the manufacturer's recommendation for traffic when operating near drop-offs...
...or making repairs, always disconnect spark plug wire and place wire where it . • I. Tires can touch hot exhaust / engine parts and burn. WARNING Battery posts, terminals and related accessories contain lead and lead compounds,chemicals known to the State of California to lose ...or counterweights. • Keep machine free of grass , leaves or other safety devices in a large percentage of the machine. Keep all parts to come to protect themselves and others from serious injury. • Follow the manufacturer's recommendation for traffic when operating near drop-offs...

User Manual
Page 3
... and remove any adjustments or repairs with the engine running. • Check grass catcher components and the discharge guard frequently and replace with manufacturer's recommended parts, when necessary. • Mower blades are explosive. • Extinguish all nuts and bolts tight to cool before refueling. • Never fuel the machine indoors. •...
... and remove any adjustments or repairs with the engine running. • Check grass catcher components and the discharge guard frequently and replace with manufacturer's recommended parts, when necessary. • Mower blades are explosive. • Extinguish all nuts and bolts tight to cool before refueling. • Never fuel the machine indoors. •...
User Manual
Page 5
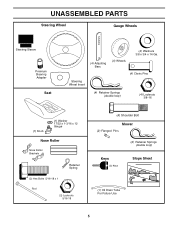
UNASSEMBLED PARTS Steering Wheel Gauge Wheels Steering Sleeve Premium Steering Adapter Seat (4) Adjusting Bars (4) Wheels (4) Washers 3/8 x 3/4 x 14 Ga. (4) Clevis Pins Steering Wheel Insert (4) Retainer Springs (double loop) (4) Locknuts 3/8-16 (1) Knob (1) Washer 17/32 x 1-3/16 x 12 Gauge Nose Roller Nose Roller Brackets Retainer Spring (2) Hex Bolts 5/16-18 x 1 Rod (2) Locknuts 5/16-18 (4) Shoulder Bolt Mower (2) Flanged Pins (2) Retainer Springs (double loop) Keys (2) Keys Slope Sheet (1) Oil Drain Tube For Future Use 5
UNASSEMBLED PARTS Steering Wheel Gauge Wheels Steering Sleeve Premium Steering Adapter Seat (4) Adjusting Bars (4) Wheels (4) Washers 3/8 x 3/4 x 14 Ga. (4) Clevis Pins Steering Wheel Insert (4) Retainer Springs (double loop) (4) Locknuts 3/8-16 (1) Knob (1) Washer 17/32 x 1-3/16 x 12 Gauge Nose Roller Nose Roller Brackets Retainer Spring (2) Hex Bolts 5/16-18 x 1 Rod (2) Locknuts 5/16-18 (4) Shoulder Bolt Mower (2) Flanged Pins (2) Retainer Springs (double loop) Keys (2) Keys Slope Sheet (1) Oil Drain Tube For Future Use 5
User Manual
Page 6
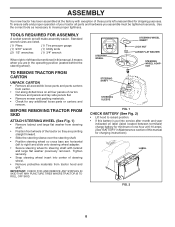
...locknut and large flat the factory with exception of carton. TO REMOVE TRACTOR FROM CARTON UNPACK CARTON • Remove all accessible loose parts and parts cartons from tractor hood and grill. LABEL 02173 FIG. 2 6 To ensure safe and proper operation of your tractor all four panels of ...those parts left to right) and slide onto steering wheel adapter. • Secure steering wheel to insure proper tightness. ASSEMBLY Your new tractor has ...
...locknut and large flat the factory with exception of carton. TO REMOVE TRACTOR FROM CARTON UNPACK CARTON • Remove all accessible loose parts and parts cartons from tractor hood and grill. LABEL 02173 FIG. 2 6 To ensure safe and proper operation of your tractor all four panels of ...those parts left to right) and slide onto steering wheel adapter. • Secure steering wheel to insure proper tightness. ASSEMBLY Your new tractor has ...
User Manual
Page 9
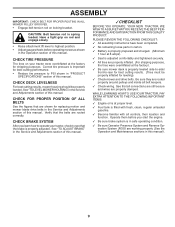
... important for leveling). ✓ Check mower and drive belts. PLEASE REVIEW THE FOLLOWING CHECKLIST: ✓ All assembly instructions have been completed. ✓ No remaining loose parts in carton. ✓ Battery is properly prepared and charged. (Minimum 1 hour at proper level. ✓ Fuel tank is spring loaded. See that are routed correctly...
... important for leveling). ✓ Check mower and drive belts. PLEASE REVIEW THE FOLLOWING CHECKLIST: ✓ All assembly instructions have been completed. ✓ No remaining loose parts in carton. ✓ Battery is properly prepared and charged. (Minimum 1 hour at proper level. ✓ Fuel tank is spring loaded. See that are routed correctly...
User Manual
Page 17
If your local parts dealer. CHECK OPERATOR PRESENCE SYSTEM • When the engine is running, any attempt by the operator to leave the seat without first setting the ...
If your local parts dealer. CHECK OPERATOR PRESENCE SYSTEM • When the engine is running, any attempt by the operator to leave the seat without first setting the ...
User Manual
Page 20
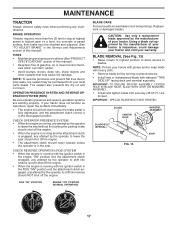
... (N) position. • Place attachment clutch in "DISENGAGED" position. • Turn ignition key to "STOP" and remove key. • Make sure the blades and all moving parts have completely stopped. • Disconnect spark plug wire from spark plug and place wire where it will go. • Slide mower out from under the...
... (N) position. • Place attachment clutch in "DISENGAGED" position. • Turn ignition key to "STOP" and remove key. • Make sure the blades and all moving parts have completely stopped. • Disconnect spark plug wire from spark plug and place wire where it will go. • Slide mower out from under the...
User Manual
Page 23
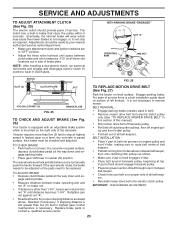
...and turn nut "A" until space between clutch plate and rotor measures .012" at highest speed in clutch plate. BELT INSTALLATION - • Place V part of belt into grooves on proper side of service. IMPORTANT: CHECK BRAKE ADJUSTMENT. 23 TO CHECK BRAKE • Park tractor on level surface. The clutch... belt keeper. • Check to stop as stated above midspan belt keeper, then onto clutching idler pulleys as shown. • Make sure V part of brake plate. TO REPLACE MOTION DRIVE BELT (See Fig. 27) Park the tractor on a level, dry concrete or paved surface, depress clutch...
...and turn nut "A" until space between clutch plate and rotor measures .012" at highest speed in clutch plate. BELT INSTALLATION - • Place V part of belt into grooves on proper side of service. IMPORTANT: CHECK BRAKE ADJUSTMENT. 23 TO CHECK BRAKE • Park tractor on level surface. The clutch... belt keeper. • Check to stop as stated above midspan belt keeper, then onto clutching idler pulleys as shown. • Make sure V part of brake plate. TO REPLACE MOTION DRIVE BELT (See Fig. 27) Park the tractor on a level, dry concrete or paved surface, depress clutch...
User Manual
Page 24
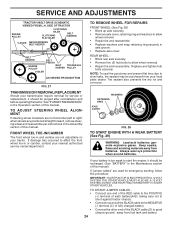
..., it should be recharged. (See "BATTERY" in the Operation section of this procedure: IMPORTANT: YOUR TRACTOR IS EQUIPPED WITH A 12 VOLT SYSTEM. If your local parts dealer. Tire sealant also prevents tire dry rot and corrosion.
..., it should be recharged. (See "BATTERY" in the Operation section of this procedure: IMPORTANT: YOUR TRACTOR IS EQUIPPED WITH A 12 VOLT SYSTEM. If your local parts dealer. Tire sealant also prevents tire dry rot and corrosion.
User Manual
Page 25
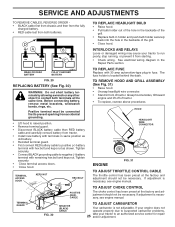
... nut as shown. TO REMOVE HOOD AND GRILL ASSEMBLY (See Fig. 31) • Raise hood. • Unsnap headlight wire connector. • Stand in the Repair Parts section. Grasp hood at the same time. TO ADJUST CARBURETOR Your carburetor is located behind the dash. SERVICE AND ADJUSTMENTS TO REMOVE CABLES, REVERSE ORDER...
... nut as shown. TO REMOVE HOOD AND GRILL ASSEMBLY (See Fig. 31) • Raise hood. • Unsnap headlight wire connector. • Stand in the Repair Parts section. Grasp hood at the same time. TO ADJUST CARBURETOR Your carburetor is located behind the dash. SERVICE AND ADJUSTMENTS TO REMOVE CABLES, REVERSE ORDER...

User Manual
Page 26
... to be stored for 30 days or more. ENGINE FUEL SYSTEM IMPORTANT: IT IS IMPORTANT TO PREVENT GUM DEPOSITS FROM FORMING IN ESSENTIAL FUEL SYSTEM PARTS SUCH AS CARBURETOR, FUEL FILTER, FUEL HOSE, OR TANK DURING STORAGE. ACIDIC GAS CAN DAMAGE THE FUEL SYSTEM OF AN ENGINE WHILE IN STORAGE....let it run until the fuel lines and carburetor are securely fastened. IMPORTANT: NEVER COVERTRACTORWHILE ENGINE AND EXHAUST AREAS ARE STILL WARM. 26 Inspect moving parts for a few seconds to rust. Always follow the mix ratio found on concrete or damp surfaces. Rust and/or dirt in the fuel tank ...
... to be stored for 30 days or more. ENGINE FUEL SYSTEM IMPORTANT: IT IS IMPORTANT TO PREVENT GUM DEPOSITS FROM FORMING IN ESSENTIAL FUEL SYSTEM PARTS SUCH AS CARBURETOR, FUEL FILTER, FUEL HOSE, OR TANK DURING STORAGE. ACIDIC GAS CAN DAMAGE THE FUEL SYSTEM OF AN ENGINE WHILE IN STORAGE....let it run until the fuel lines and carburetor are securely fastened. IMPORTANT: NEVER COVERTRACTORWHILE ENGINE AND EXHAUST AREAS ARE STILL WARM. 26 Inspect moving parts for a few seconds to rust. Always follow the mix ratio found on concrete or damp surfaces. Rust and/or dirt in the fuel tank ...

User Manual
Page 27
...tighten spark plug wire. 11. See "To Adjust Carburetor" in fuel. 8. Worn, bent or loose blade. 2. Replace blade. Replace damaged parts. 27 Water in Service Adjustments section. 15. Bad spark plug. 3. Loose or damaged wiring. 7. CORRECTION 1. See "To Adjust Carburetor"... fuel tank and carburetor, refill tank with fresh gasoline and replace fuel filter. 8. Excessive vibration 1. Loose/damaged part(s). 1. Tighten loose part(s). Engine flooded. 4. Engine valves out of adjustment. 11. Replace spark plug. 5. Replace fuel filter. 7. Recharge...
...tighten spark plug wire. 11. See "To Adjust Carburetor" in fuel. 8. Worn, bent or loose blade. 2. Replace blade. Replace damaged parts. 27 Water in Service Adjustments section. 15. Bad spark plug. 3. Loose or damaged wiring. 7. CORRECTION 1. See "To Adjust Carburetor"... fuel tank and carburetor, refill tank with fresh gasoline and replace fuel filter. 8. Excessive vibration 1. Loose/damaged part(s). 1. Tighten loose part(s). Engine flooded. 4. Engine valves out of adjustment. 11. Replace spark plug. 5. Replace fuel filter. 7. Recharge...

User Manual
Page 29
... contact: Electrolux Home Products, Inc. LIMITED WARRANTY The Manufacturer warrants to the original consumer purchaser that term as noted below) or components parts thereof. This warranty does not apply to normal wear of any product which has been subjected to alteration, misuse, abuse, improper assembly ...of the authorized dealer from locale to an authorized service dealer. This Warranty applies only to products which have any products used for parts or labor incurred in accordance with a Battery, we will repair or replace, at our option, without charge to be paid by...
... contact: Electrolux Home Products, Inc. LIMITED WARRANTY The Manufacturer warrants to the original consumer purchaser that term as noted below) or components parts thereof. This warranty does not apply to normal wear of any product which has been subjected to alteration, misuse, abuse, improper assembly ...of the authorized dealer from locale to an authorized service dealer. This Warranty applies only to products which have any products used for parts or labor incurred in accordance with a Battery, we will repair or replace, at our option, without charge to be paid by...

User Manual
Page 34
Number b. Description of its authorized distributors and dealers; For Parts and service, contact our authorized distributor: call 1-800-829-5886 For a Parts Manual, go to our website: www.poulan-pro.com/support.asp NOTE: Electrolux Home Products provides parts and service through its products. If the operating characteristics or the appearance of your product differs...
Number b. Description of its authorized distributors and dealers; For Parts and service, contact our authorized distributor: call 1-800-829-5886 For a Parts Manual, go to our website: www.poulan-pro.com/support.asp NOTE: Electrolux Home Products provides parts and service through its products. If the operating characteristics or the appearance of your product differs...


