
User Manual
Page 2
... of the tractor. SLOPE OPERATION Slopes are involved in speed or direction, which could suddenly roll over if a wheel is clear of riding mower-related injuries. Ma- terial may lose traction. Always keep the machine in place and working. • Slow down slopes. If the tires...Do not mow in the manual before dismounting. • Disengage blades when not mowing. Always turn off engine and wait for Ride-On Mowers IMPORTANT: THIS CUTTING MACHINE IS CAPABLE OF AMPUTATING HANDS AND FEET AND THROWING OBJECTS. WARNING: Tow only the attachments that operators, age 60 ...
... of the tractor. SLOPE OPERATION Slopes are involved in speed or direction, which could suddenly roll over if a wheel is clear of riding mower-related injuries. Ma- terial may lose traction. Always keep the machine in place and working. • Slow down slopes. If the tires...Do not mow in the manual before dismounting. • Disengage blades when not mowing. Always turn off engine and wait for Ride-On Mowers IMPORTANT: THIS CUTTING MACHINE IS CAPABLE OF AMPUTATING HANDS AND FEET AND THROWING OBJECTS. WARNING: Tow only the attachments that operators, age 60 ...

User Manual
Page 3
... loss of the fuel tank or container opening at the hitch point. • Follow the manufacturer's recommendation for weight limits for Ride-On Mowers III. IV. TOWING • Tow only with the blades shut off and be seriously injured or interfere with plastic liner. V. GENERAL SERVICE.... • Use only approved gasoline container. • Never remove gas cap or add fuel with manufacturer's recommended parts, when necessary. • Mower blades are often attracted to stop and inspect the machine. Stop machine if anyone enters the area. • Never carry passengers. • Do ...
... loss of the fuel tank or container opening at the hitch point. • Follow the manufacturer's recommendation for weight limits for Ride-On Mowers III. IV. TOWING • Tow only with the blades shut off and be seriously injured or interfere with plastic liner. V. GENERAL SERVICE.... • Use only approved gasoline container. • Never remove gas cap or add fuel with manufacturer's recommended parts, when necessary. • Mower blades are often attracted to stop and inspect the machine. Stop machine if anyone enters the area. • Never carry passengers. • Do ...
User Manual
Page 5
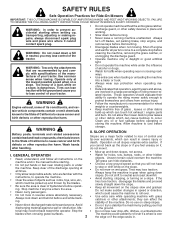
UNASSEMBLED PARTS Steering Wheel Gauge Wheels Steering Sleeve Premium Steering Adapter Seat (4) Adjusting Bars (4) Wheels (4) Washers 3/8 x 3/4 x 14 Ga. (4) Clevis Pins Steering Wheel Insert (4) Retainer Springs (double loop) (4) Locknuts 3/8-16 (1) Knob (1) Washer 17/32 x 1-3/16 x 12 Gauge Nose Roller Nose Roller Brackets Retainer Spring (2) Hex Bolts 5/16-18 x 1 Rod (2) Locknuts 5/16-18 (4) Shoulder Bolt Mower (2) Flanged Pins (2) Retainer Springs (double loop) Keys (2) Keys Slope Sheet (1) Oil Drain Tube For Future Use 5
UNASSEMBLED PARTS Steering Wheel Gauge Wheels Steering Sleeve Premium Steering Adapter Seat (4) Adjusting Bars (4) Wheels (4) Washers 3/8 x 3/4 x 14 Ga. (4) Clevis Pins Steering Wheel Insert (4) Retainer Springs (double loop) (4) Locknuts 3/8-16 (1) Knob (1) Washer 17/32 x 1-3/16 x 12 Gauge Nose Roller Nose Roller Brackets Retainer Spring (2) Hex Bolts 5/16-18 x 1 Rod (2) Locknuts 5/16-18 (4) Shoulder Bolt Mower (2) Flanged Pins (2) Retainer Springs (double loop) Keys (2) Keys Slope Sheet (1) Oil Drain Tube For Future Use 5
User Manual
Page 6
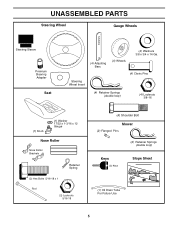
...; If this battery is mentioned in the operating position (seated behind the steering wheel). Remove end panels and lay side panels flat. • Remove mower and packing materials. • Check for charging instructions). IMPORTANT: CHECK FOR AND REMOVE ANY STAPLES IN SKID THAT MAY PUNCTURE TIRES WHERE TRACTOR IS TO...
...; If this battery is mentioned in the operating position (seated behind the steering wheel). Remove end panels and lay side panels flat. • Remove mower and packing materials. • Check for charging instructions). IMPORTANT: CHECK FOR AND REMOVE ANY STAPLES IN SKID THAT MAY PUNCTURE TIRES WHERE TRACTOR IS TO...
User Manual
Page 7
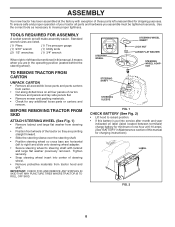
... section for location and function of this manual. Remove the cardboard packing and discard. • Place seat on seat pan so head of mower to tractor assembly, set all instructions in the Operation section of controls) • Press lift lever plunger and raise attachment lift lever to .... • Check engine oil level and fill fuel tank with the instructions that gauge wheel bar aligning holes are designed to keep the mower deck in neutral position. • Turn ignition key to its highest position. • Release parking brake by depressing clutch/brake pedal. •...
... section for location and function of this manual. Remove the cardboard packing and discard. • Place seat on seat pan so head of mower to tractor assembly, set all instructions in the Operation section of controls) • Press lift lever plunger and raise attachment lift lever to .... • Check engine oil level and fill fuel tank with the instructions that gauge wheel bar aligning holes are designed to keep the mower deck in neutral position. • Turn ignition key to its highest position. • Release parking brake by depressing clutch/brake pedal. •...

User Manual
Page 8
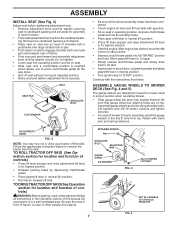
... lift control. From left side of tractor, install belt onto engine clutch pulley. Pull out and hold the spring loaded pin, align hole in mower brackets. • Position nose roller between brackets and install rod and retainer spring. LOCK NUT HEX BOLT ROD TAB HOLE 02612 "A" BRACKET RETAINER...with the hole in pin. • Secure pin with deflector shield to the right. • Remove plastic tie strap from mower belt and check belt for additional guidance on this assembly. LOCKING BRACKET BELT TENSION ROD DISENGAGED POSITION ELECTRIC CLUTCH PULLEY SUSPENSION ARMS FRONT PLATE ...
... lift control. From left side of tractor, install belt onto engine clutch pulley. Pull out and hold the spring loaded pin, align hole in mower brackets. • Position nose roller between brackets and install rod and retainer spring. LOCK NUT HEX BOLT ROD TAB HOLE 02612 "A" BRACKET RETAINER...with the hole in pin. • Secure pin with deflector shield to the right. • Remove plastic tie strap from mower belt and check belt for additional guidance on this assembly. LOCKING BRACKET BELT TENSION ROD DISENGAGED POSITION ELECTRIC CLUTCH PULLEY SUSPENSION ARMS FRONT PLATE ...
User Manual
Page 9
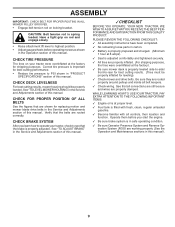
...10003; No remaining loose parts in the Operation section of this manual. CAUTION: Belt tension rod is properly adjusted. See"TO LEVEL MOWER HOUSING"in the Service and Adjustments section of this manual. ✓CHECKLIST BEFORE YOU OPERATE YOUR NEW TRACTOR, WE WISH TO ASSURE ... Fuel tank is adjusted comfortably and tightened securely. ✓ All tires are routed correctly. ASSEMBLY IMPORTANT: CHECK BELT FOR PROPER ROUTING IN ALL MOWER PULLEY GROOVES. • Engage belt tension rod on your tractor, check to -rear for best cutting results. (Tires must be properly leveled....
...10003; No remaining loose parts in the Operation section of this manual. CAUTION: Belt tension rod is properly adjusted. See"TO LEVEL MOWER HOUSING"in the Service and Adjustments section of this manual. ✓CHECKLIST BEFORE YOU OPERATE YOUR NEW TRACTOR, WE WISH TO ASSURE ... Fuel tank is adjusted comfortably and tightened securely. ✓ All tires are routed correctly. ASSEMBLY IMPORTANT: CHECK BELT FOR PROPER ROUTING IN ALL MOWER PULLEY GROOVES. • Engage belt tension rod on your tractor, check to -rear for best cutting results. (Tires must be properly leveled....
User Manual
Page 10
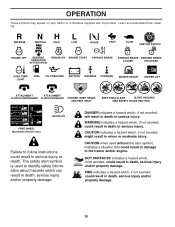
... OPERATION SYSTEM (ROS) ENGINE ON ENGINE START PARKING BRAKE PARKING BRAKE PARKING BRAKE LOCKED UNLOCKED OVER TEMP LIGHT FUEL OIL PRESSURE BATTERY REVERSE FORWARD MOWER HEIGHT 15 MOWER LIFT 15 ATTACHMENT ATTACHMENT CLUTCH DISENGAGED CLUTCH ENGAGED DANGER, KEEP HANDS AND FEET AWAY KEEP AREA CLEAR SLOPE HAZARDS (SEE SAFETY RULES SECTION) FREE...
... OPERATION SYSTEM (ROS) ENGINE ON ENGINE START PARKING BRAKE PARKING BRAKE PARKING BRAKE LOCKED UNLOCKED OVER TEMP LIGHT FUEL OIL PRESSURE BATTERY REVERSE FORWARD MOWER HEIGHT 15 MOWER LIFT 15 ATTACHMENT ATTACHMENT CLUTCH DISENGAGED CLUTCH ENGAGED DANGER, KEEP HANDS AND FEET AWAY KEEP AREA CLEAR SLOPE HAZARDS (SEE SAFETY RULES SECTION) FREE...

User Manual
Page 11
...(ROS) "ON" POSITION - Used to raise and lower mower deck or other attachments mounted to your tractor. Used to your tractor. HOURMETER - Allows operation of mower deck or other attachments mounted to engage mower blades or other powered attachment while in reverse. Used to adjust... the mower height. Used when starting the engine. Selects the speed and direction ...
...(ROS) "ON" POSITION - Used to raise and lower mower deck or other attachments mounted to your tractor. Used to your tractor. HOURMETER - Allows operation of mower deck or other attachments mounted to engage mower blades or other powered attachment while in reverse. Used to adjust... the mower height. Used when starting the engine. Selects the speed and direction ...
User Manual
Page 12
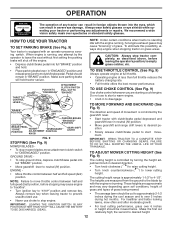
...operate engine at full throttle. • Operating engine at less than full throttle reduces the battery charging rate. • Full throttle offers the best mower performance. TO USE CHOKE CONTROL (See Fig. 9) Use choke control whenever you are measured from clutch/brake pedal. These heights are approximate and may... a warm engine. • knob in severe eye damage. FAILURE TO DO SO WILL SHORTEN THE USEFUL LIFE OF YOUR TRANSAXLE. TO ADJUST MOWER CUTTING HEIGHT (See Fig. 9) The cutting height is controlled by the operator to leave the seat without first setting the parking brake ...
...operate engine at full throttle. • Operating engine at less than full throttle reduces the battery charging rate. • Full throttle offers the best mower performance. TO USE CHOKE CONTROL (See Fig. 9) Use choke control whenever you are measured from clutch/brake pedal. These heights are approximate and may... a warm engine. • knob in severe eye damage. FAILURE TO DO SO WILL SHORTEN THE USEFUL LIFE OF YOUR TRANSAXLE. TO ADJUST MOWER CUTTING HEIGHT (See Fig. 9) The cutting height is controlled by the operator to leave the seat without first setting the parking brake ...

User Manual
Page 13
...necessary to ROS "ON" position. • Look down hills. IMPORTANT:BE SURETO READJUST GAUGEWHEELS IFYOU CHANGE THE CUTTING HEIGHT OF THE MOWER DECK. disengage attachment clutch control. WARNING: Backing up or down and behind before starting up with the engine running , turn the ...speed on a flat the desired cutting height in reverse unless absolutely necessary. RETAINER SPRING 01977 CLEVIS PIN FIG. 10 TO OPERATE MOWER (See Fig. 11) Your tractor is equipped with an operator presence sensing switch. USING THE REVERSE OPERATION SYSTEM - • Depress ...
...necessary to ROS "ON" position. • Look down hills. IMPORTANT:BE SURETO READJUST GAUGEWHEELS IFYOU CHANGE THE CUTTING HEIGHT OF THE MOWER DECK. disengage attachment clutch control. WARNING: Backing up or down and behind before starting up with the engine running , turn the ...speed on a flat the desired cutting height in reverse unless absolutely necessary. RETAINER SPRING 01977 CLEVIS PIN FIG. 10 TO OPERATE MOWER (See Fig. 11) Your tractor is equipped with an operator presence sensing switch. USING THE REVERSE OPERATION SYSTEM - • Depress ...

User Manual
Page 15
...load and possible fire hazard from shrubs, fences, driveways, etc. Regulate ground speed by turning to the right so that will plug mower and leave undesirable clumps. This will result in the opposite direction making left hand side of the tractor. OPERATION • The attachments can ...be used when the mower housing is wet. NOTE: If at full throttle when mowing to assure better mowing performance and proper discharge of cut . Wet grass will...
...load and possible fire hazard from shrubs, fences, driveways, etc. Regulate ground speed by turning to the right so that will plug mower and leave undesirable clumps. This will result in the opposite direction making left hand side of the tractor. OPERATION • The attachments can ...be used when the mower housing is wet. NOTE: If at full throttle when mowing to assure better mowing performance and proper discharge of cut . Wet grass will...
User Manual
Page 16
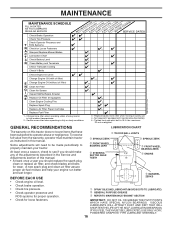
.... ➀ SPRAY SILICONE LUBRICANT (MOVE BOOTS TO LUBRICATE) ➁ GENERAL PURPOSE GREASE ➂ REFER TO MAINTENANCE"ENGINE" SECTION • Check for Loose Fasteners A Sharpen/Replace Mower Blades C T Lubrication Chart 0 Check Battery Level R Clean Battery and Terminals Check Transaxle Cooling Check V-Belts BEFOREEEVAECRHYU8ESVHEEORUYRS2E5VHEROYUR5E0SVEHROYUR1E0SV0EHROYUBSREESFAOSROENSSTEORRAVGEICE DATES 5 3 4 Check Engine Oil Level Change Engine Oil (with...
.... ➀ SPRAY SILICONE LUBRICANT (MOVE BOOTS TO LUBRICATE) ➁ GENERAL PURPOSE GREASE ➂ REFER TO MAINTENANCE"ENGINE" SECTION • Check for Loose Fasteners A Sharpen/Replace Mower Blades C T Lubrication Chart 0 Check Battery Level R Clean Battery and Terminals Check Transaxle Cooling Check V-Belts BEFOREEEVAECRHYU8ESVHEEORUYRS2E5VHEROYUR5E0SVEHROYUR1E0SV0EHROYUBSREESFAOSROENSSTEORRAVGEICE DATES 5 3 4 Check Engine Oil Level Change Engine Oil (with...
User Manual
Page 17
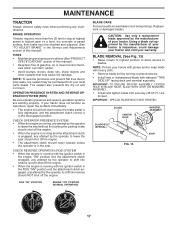
ROS "ON" POSITION ENGINE "ON" POSITION (NORMAL OPERATING) BLADE CARE For best results mower blades must be kept sharp. Replace bent or damaged blades. BLADE CENTER HOLE MANDREL ASSEMBLY BLADE BOLT (SPECIAL) 02544 STAR FIG. 13 828 17 ...is fully depressed, and the attachment clutch control is in the disengaged position. If your local parts dealer. BLADE REMOVAL (See Fig. 13) • Raise mower to highest position to allow access to blades. OPERATOR PRESENCE SYSTEM AND REVERSE OPERATION SYSTEM (ROS) Be sure operator presence and reverse operation systems are...
ROS "ON" POSITION ENGINE "ON" POSITION (NORMAL OPERATING) BLADE CARE For best results mower blades must be kept sharp. Replace bent or damaged blades. BLADE CENTER HOLE MANDREL ASSEMBLY BLADE BOLT (SPECIAL) 02544 STAR FIG. 13 828 17 ...is fully depressed, and the attachment clutch control is in the disengaged position. If your local parts dealer. BLADE REMOVAL (See Fig. 13) • Raise mower to highest position to allow access to blades. OPERATOR PRESENCE SYSTEM AND REVERSE OPERATION SYSTEM (ROS) Be sure operator presence and reverse operation systems are...
User Manual
Page 18
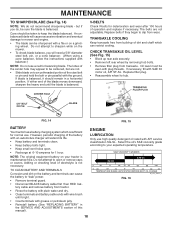
... balanced. The belts are not. • Slide blade on to be centered, but if you will cause excessive vibration and eventual damage to mower and engine. • The blade can be taken to sharpen while on your expected operating temperature. Adding or checking level of operation and replace...FIG. 14 FIG. 15 BATTERY Your tractor has a battery charging system which can cause the battery to hub. NOTE: The original equipment battery on the mower. • To check blade balance, you do not recommend sharpening blade - MAINTENANCE TO SHARPEN BLADE (See Fig. 14) NOTE: We do , be...
... balanced. The belts are not. • Slide blade on to be centered, but if you will cause excessive vibration and eventual damage to mower and engine. • The blade can be taken to sharpen while on your expected operating temperature. Adding or checking level of operation and replace...FIG. 14 FIG. 15 BATTERY Your tractor has a battery charging system which can cause the battery to hub. NOTE: The original equipment battery on the mower. • To check blade balance, you do not recommend sharpening blade - MAINTENANCE TO SHARPEN BLADE (See Fig. 14) NOTE: We do , be...

User Manual
Page 19
... operation. We do not recommend using a 7/16" (11mm) wrench turning counterclockwise. Use compressed air or a leaf blower to avoid possible engine damage from tractor and mower. 19 Water in one year. MAINTENANCE NOTE: Although multi-viscosity oils (5W30, 10W30 etc.) improve starting the engine and after each mowing season or after...
... operation. We do not recommend using a 7/16" (11mm) wrench turning counterclockwise. Use compressed air or a leaf blower to avoid possible engine damage from tractor and mower. 19 Water in one year. MAINTENANCE NOTE: Although multi-viscosity oils (5W30, 10W30 etc.) improve starting the engine and after each mowing season or after...
User Manual
Page 20
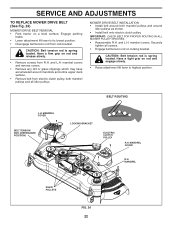
... DISENGAGED POSITION LOCKING BRACKET SUSPENSION ARMS ELECTRIC CLUTCH PULLEY FRONT PLATE ASSEMBLY SINGLE LOOP RETAINER SPRINGS DOUBLE LOOP RETAINER SPRINGS FLANGED PINS REAR MOWER PINS 02786 FIG. 19 20 Pull out the spring loaded pin, disconnect suspension arm from pin and release pin. • Go...driveway. Make sure tires are over or underinflated, you will need to reattach front plate assembly to tractor after sliding mower under right side of mower and disconnect rear pin in "DISENGAGED" position. • Lower attachment lift lever to its highest position. • Measure ...
... DISENGAGED POSITION LOCKING BRACKET SUSPENSION ARMS ELECTRIC CLUTCH PULLEY FRONT PLATE ASSEMBLY SINGLE LOOP RETAINER SPRINGS DOUBLE LOOP RETAINER SPRINGS FLANGED PINS REAR MOWER PINS 02786 FIG. 19 20 Pull out the spring loaded pin, disconnect suspension arm from pin and release pin. • Go...driveway. Make sure tires are over or underinflated, you will need to reattach front plate assembly to tractor after sliding mower under right side of mower and disconnect rear pin in "DISENGAGED" position. • Lower attachment lift lever to its highest position. • Measure ...

User Manual
Page 21
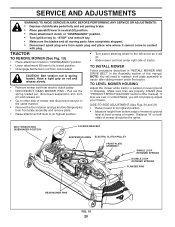
... 1/8" to 1/2" lower at front than rear, tighten nut "D" against trunnion on both front links. • To raise front of adjustment nut will change mower height about 3/16". • Recheck measurements after adjusting. NOTE: Each full turn of nut "C" will change distance. Protect your hands with gloves and/or...against trunnion on right side of tractor. IF THE FOLLOWING FRONT-TO-BACK ADJUSTMENT IS NECESSARY, BE SURE TO ADJUST BOTH FRONT LINKS EQUALLY SO MOWER WILL STAY LEVEL SIDE-TO-SIDE. NOTE: Each full turn of blade, loosen nut "D" from trunnion on both front links. The two ...
... 1/8" to 1/2" lower at front than rear, tighten nut "D" against trunnion on both front links. • To raise front of adjustment nut will change mower height about 3/16". • Recheck measurements after adjusting. NOTE: Each full turn of nut "C" will change distance. Protect your hands with gloves and/or...against trunnion on right side of tractor. IF THE FOLLOWING FRONT-TO-BACK ADJUSTMENT IS NECESSARY, BE SURE TO ADJUST BOTH FRONT LINKS EQUALLY SO MOWER WILL STAY LEVEL SIDE-TO-SIDE. NOTE: Each full turn of blade, loosen nut "D" from trunnion on both front links. The two ...
User Manual
Page 22
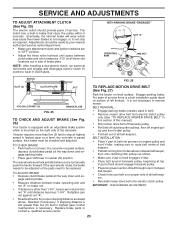
and L.H. MOWER DRIVE BELT INSTALLATION • Install belt around idler pulleys as shown. • Install belt onto electric clutch pulley. CAUTION: Belt tension rod is spring loaded. ... brake. • Lower attachment lift lever to highest position. IMPORTANT: CHECK BELT FOR PROPER ROUTING IN ALL MOWER PULLEY GROOVES. • Reassemble R.H. and L.H. MANDREL COVER R.H. SERVICE AND ADJUSTMENTS TO REPLACE MOWER DRIVE BELT (See Fig. 24) MOWER DRIVE BELT REMOVAL • Park tractor on rod and release slowly. • Remove screws from R.H. mandrel...
and L.H. MOWER DRIVE BELT INSTALLATION • Install belt around idler pulleys as shown. • Install belt onto electric clutch pulley. CAUTION: Belt tension rod is spring loaded. ... brake. • Lower attachment lift lever to highest position. IMPORTANT: CHECK BELT FOR PROPER ROUTING IN ALL MOWER PULLEY GROOVES. • Reassemble R.H. and L.H. MANDREL COVER R.H. SERVICE AND ADJUSTMENTS TO REPLACE MOWER DRIVE BELT (See Fig. 24) MOWER DRIVE BELT REMOVAL • Park tractor on rod and release slowly. • Remove screws from R.H. mandrel...
User Manual
Page 23
... brake operating arm and nut "A" on a level, dry concrete or paved surface, then brake must lock and skid when you try to remove mower. Retighten jam nut against nut "A". • Road test tractor for proper stopping distance as stated above midspan belt keeper, then onto clutching idler... all belt keepers. The clutch has a built-in highest gear, further maintenance is equipped with an adjustable brake system which may cause the mower blades to not engage, or, to be made by your nearest authorized service center/department. • Make sure attachment clutch and ignition switches...
... brake operating arm and nut "A" on a level, dry concrete or paved surface, then brake must lock and skid when you try to remove mower. Retighten jam nut against nut "A". • Road test tractor for proper stopping distance as stated above midspan belt keeper, then onto clutching idler... all belt keepers. The clutch has a built-in highest gear, further maintenance is equipped with an adjustable brake system which may cause the mower blades to not engage, or, to be made by your nearest authorized service center/department. • Make sure attachment clutch and ignition switches...


