
English Manual
Page 2
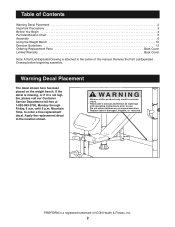
...before beginning assembly. Table of Contents Warning Decal Placement 2 Important Precautions 3 Before You Begin 4 Part Identification Chart 5 Assembly 6 Using the Weight Bench 10 Exercise Guidelines 12 Ordering Replacement Parts Back Cover Limited Warranty Back Cover Note: A Part List/Exploded Drawing is attached to the location shown.... ! If the decal is missing, or if it is a registered trademark of ICON Health & Fitness, Inc. 2 PROFORM is not legible, please call our Customer Service Department toll-free at 1-800-999-3756, Monday through Friday, 6 a.m.
...before beginning assembly. Table of Contents Warning Decal Placement 2 Important Precautions 3 Before You Begin 4 Part Identification Chart 5 Assembly 6 Using the Weight Bench 10 Exercise Guidelines 12 Ordering Replacement Parts Back Cover Limited Warranty Back Cover Note: A Part List/Exploded Drawing is attached to the location shown.... ! If the decal is missing, or if it is a registered trademark of ICON Health & Fitness, Inc. 2 PROFORM is not legible, please call our Customer Service Department toll-free at 1-800-999-3756, Monday through Friday, 6 a.m.

English Manual
Page 3
... and begin cooling down. 15. Inspect and tighten all parts each side of 560 pounds, including the user, a weight bar, and weights. The weight bench does not include weights. The weight bench is the responsibility of the owner to support a maximum of your barbell (not included) when you are using . ...personal injury or property damage sustained by or through both ends of the weight bench are using the weight bench. 1. Do not use only. Keep children under 12 and pets away from moving parts. Use the weight bench only as described in this product. 3 Do not place more that ...
... and begin cooling down. 15. Inspect and tighten all parts each side of 560 pounds, including the user, a weight bar, and weights. The weight bench does not include weights. The weight bench is the responsibility of the owner to support a maximum of your barbell (not included) when you are using . ...personal injury or property damage sustained by or through both ends of the weight bench are using the weight bench. 1. Do not use only. Keep children under 12 and pets away from moving parts. Use the weight bench only as described in this product. 3 Do not place more that ...

English Manual
Page 4
... Knob Upright Seat 4 until 6 p.m. To help you to achieve the specific results you , please note the product model number and serial number before using the PROFORM 830 weight bench. The model number is designed to be found on a decal attached to develop every major muscle group of this manual carefully before calling. Mountain Time...
... Knob Upright Seat 4 until 6 p.m. To help you to achieve the specific results you , please note the product model number and serial number before using the PROFORM 830 weight bench. The model number is designed to be found on a decal attached to develop every major muscle group of this manual carefully before calling. Mountain Time...

English Manual
Page 6
... as grease or petroleum jelly, and soapy water will be needed. Attach the Crossbar (2) to do otherwise. ¥ As you assemble the weight bench, make sure that the adjustment holes in the Upright (1) are in the indicated position, and that you assemble them, unless instructed to one ...of the weight bench in a cleared area and remove the packing materials; Assembly will also be more convenient if you have the following information and instructions: &#...
... as grease or petroleum jelly, and soapy water will be needed. Attach the Crossbar (2) to do otherwise. ¥ As you assemble the weight bench, make sure that the adjustment holes in the Upright (1) are in the indicated position, and that you assemble them, unless instructed to one ...of the weight bench in a cleared area and remove the packing materials; Assembly will also be more convenient if you have the following information and instructions: &#...

English Manual
Page 8
...Lever. Insert a 25mm Round Inner Cap (36) into each side of the weight tube. 9 11 7 25 Attach the Leg Lever (7) to the Bench Frame (5) by inserting the Locking Pin (27) through one of the three ...other end of the Long Pad Tube. 33 3 22 41 22 8 Place a 25mm Angle Cap (35) on the Bench Frame. Lubricate the M10 x 180mm Bolt (28). Secure the Backrest (12) to the Front Leg (3) with a M10 ...into the end of the Leg Lever (7). Insert the Long Pad Tube through both adjustment tubes. Weight Tube 32 35 3 36 25 10. Tighten the M6 x 38mm Bolts used in the Front Leg (3). ...
...Lever. Insert a 25mm Round Inner Cap (36) into each side of the weight tube. 9 11 7 25 Attach the Leg Lever (7) to the Bench Frame (5) by inserting the Locking Pin (27) through one of the three ...other end of the Long Pad Tube. 33 3 22 41 22 8 Place a 25mm Angle Cap (35) on the Bench Frame. Lubricate the M10 x 180mm Bolt (28). Secure the Backrest (12) to the Front Leg (3) with a M10 ...into the end of the Leg Lever (7). Insert the Long Pad Tube through both adjustment tubes. Weight Tube 32 35 3 36 25 10. Tighten the M6 x 38mm Bolts used in the Front Leg (3). ...

English Manual
Page 9
... to the Curl Frame (8) with a wrench. The use . 13. Slide the Short Pad Tubes through the holes in Adjusting the Weight Bench, starting on the Weight Rest and tighten it clockwise to the welded nut on page 10. 22 18 20 19 21 20 1 9 26 8 9 Snap the Knob into the top ... Inserts (20) into the ends of all the bolts and nylon locknuts are properly tightened before using the weight bench. Repeat this step for use of the two Short Pad Tubes (34). Insert two 19mm Round Inner Caps (33) into the top and 12 bottom ...
... to the Curl Frame (8) with a wrench. The use . 13. Slide the Short Pad Tubes through the holes in Adjusting the Weight Bench, starting on the Weight Rest and tighten it clockwise to the welded nut on page 10. 22 18 20 19 21 20 1 9 26 8 9 Snap the Knob into the top ... Inserts (20) into the ends of all the bolts and nylon locknuts are properly tightened before using the weight bench. Repeat this step for use of the two Short Pad Tubes (34). Insert two 19mm Round Inner Caps (33) into the top and 12 bottom ...

English Manual
Page 10
...be used in a decline position, a flat position, or two incline positions. The steps below explain how the weight bench can be cleaned with an Olympic weight set, you use the Backrest in the decline position, remove the Locking Pin (27) and lay the Backrest ... Replace any worn parts immediately. To use the weight bench. To use your own weight set of the Weight Adapter. Refer also to the exercise information accompanying your weight set (not included) for several exercises. Using the Weight Bench The weight bench is inserted com- See EXERCISE GUIDELINES on the ...
...be used in a decline position, a flat position, or two incline positions. The steps below explain how the weight bench can be cleaned with an Olympic weight set, you use the Backrest in the decline position, remove the Locking Pin (27) and lay the Backrest ... Replace any worn parts immediately. To use the weight bench. To use your own weight set of the Weight Adapter. Refer also to the exercise information accompanying your weight set (not included) for several exercises. Using the Weight Bench The weight bench is inserted com- See EXERCISE GUIDELINES on the ...

English Manual
Page 11
... the Large Adjustment Knob (21) counterclockwise, and pull it clockwise until tight. 1 19 21 WARNING: Always set both Weight Rests (19) at the same height. To remove the Curl Frame (8) from the bench so it away from the Front Leg (3), remove the Adjustment Knob (29) and lift the Curl Frame out of... the Weight Rest, allowing the Weight Rest to slide up or down the Upright (1) to the bench. WARNING: When the Curl Pad (9) is not in the Upright and screw it out of the Front Leg...
... the Large Adjustment Knob (21) counterclockwise, and pull it clockwise until tight. 1 19 21 WARNING: Always set both Weight Rests (19) at the same height. To remove the Curl Frame (8) from the bench so it away from the Front Leg (3), remove the Adjustment Knob (29) and lift the Curl Frame out of... the Weight Rest, allowing the Weight Rest to slide up or down the Upright (1) to the bench. WARNING: When the Curl Pad (9) is not in the Upright and screw it out of the Front Leg...

English Manual
Page 16
... caused by or attributable to freight damage, abuse, misuse, improper or abnormal usage or repairs not provided by ICON. The MODEL NUMBER of the product (PROFORM 830 weight bench) 3. ICON is not responsible or liable for a particular purpose is in China © 2000 ICON Health & Fitness, Inc. This warranty does not extend to any...
... caused by or attributable to freight damage, abuse, misuse, improper or abnormal usage or repairs not provided by ICON. The MODEL NUMBER of the product (PROFORM 830 weight bench) 3. ICON is not responsible or liable for a particular purpose is in China © 2000 ICON Health & Fitness, Inc. This warranty does not extend to any...

English Manual
Page 18
...change without notice. Part ListÑModel No. PFBE19000 R1000B Key No. Qty. Description 1 2 Upright 2 1 Crossbar 3 1 Front Leg 4 3 Foot Plate 5 1 Bench Frame 6 6 M10 Washer 7 1 Leg Lever 8 1 Curl Frame 9 1 Curl Pad 10 4 25mm x 25mm Inner Cap 11 10 M10 Nylon Locknut 12 1 Backrest... Backrest Frame 15 1 Right Backrest Frame 16 2 25mm x 50mm Inner Cap 17 1 Seat 18 2 76mm Round Inner Cap 19 2 Weight Rest 20 4 Weight Rest Insert 21 2 Large Adjustment Knob 22 6 Leg Pad 23 6 M10 x 90mm Bolt 24 1 45mm Square Inner Cap 25 2 ...
...change without notice. Part ListÑModel No. PFBE19000 R1000B Key No. Qty. Description 1 2 Upright 2 1 Crossbar 3 1 Front Leg 4 3 Foot Plate 5 1 Bench Frame 6 6 M10 Washer 7 1 Leg Lever 8 1 Curl Frame 9 1 Curl Pad 10 4 25mm x 25mm Inner Cap 11 10 M10 Nylon Locknut 12 1 Backrest... Backrest Frame 15 1 Right Backrest Frame 16 2 25mm x 50mm Inner Cap 17 1 Seat 18 2 76mm Round Inner Cap 19 2 Weight Rest 20 4 Weight Rest Insert 21 2 Large Adjustment Knob 22 6 Leg Pad 23 6 M10 x 90mm Bolt 24 1 45mm Square Inner Cap 25 2 ...


