
Instruction Manual
Page 2
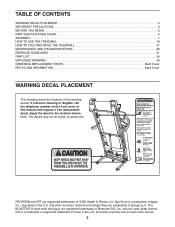
...CONTENTS WARNING DECAL PLACEMENT 2 IMPORTANT PRECAUTIONS 3 BEFORE YOU BEGIN 5 PART IDENTIFICATION CHART 6 ASSEMBLY 7 HOW TO USE THE TREADMILL 18 HOW TO FOLD AND MOVE THE TREADMILL 27 MAINTENANCE AND TROUBLESHOOTING 28 EXERCISE GUIDELINES 31 PART LIST 34 EXPLODED DRAWING 36 ORDERING REPLACEMENT ...PARTS Back Cover RECYCLING INFORMATION Back Cover WARNING DECAL PLACEMENT This drawing shows the locations of Bluetooth SIG, Inc. PROFORM and IFIT ...
...CONTENTS WARNING DECAL PLACEMENT 2 IMPORTANT PRECAUTIONS 3 BEFORE YOU BEGIN 5 PART IDENTIFICATION CHART 6 ASSEMBLY 7 HOW TO USE THE TREADMILL 18 HOW TO FOLD AND MOVE THE TREADMILL 27 MAINTENANCE AND TROUBLESHOOTING 28 EXERCISE GUIDELINES 31 PART LIST 34 EXPLODED DRAWING 36 ORDERING REPLACEMENT ...PARTS Back Cover RECYCLING INFORMATION Back Cover WARNING DECAL PLACEMENT This drawing shows the locations of Bluetooth SIG, Inc. PROFORM and IFIT ...
Instruction Manual
Page 4
...the treadmill until it is properly assembled. (See ASSEMBLY on page 7 and HOW TO FOLD AND MOVE THE TREADMILL on page 27.) You must be performed by an authorized ser- Never insert any object into the off position (see the drawing on the treadmill. 28. DANGER: 29. ing the treadmill, ... down. Always remove the key, press the power switch into any opening on page 5 for the location of the power switch), and unplug the power cord when the treadmill is capable of heart rate readings. SAVE THESE INSTRUCTIONS 4 Always unplug the power cord immediately after use . 24. The heart...
...the treadmill until it is properly assembled. (See ASSEMBLY on page 7 and HOW TO FOLD AND MOVE THE TREADMILL on page 27.) You must be performed by an authorized ser- Never insert any object into the off position (see the drawing on the treadmill. 28. DANGER: 29. ing the treadmill, ... down. Always remove the key, press the power switch into any opening on page 5 for the location of the power switch), and unplug the power cord when the treadmill is capable of heart rate readings. SAVE THESE INSTRUCTIONS 4 Always unplug the power cord immediately after use . 24. The heart...
Instruction Manual
Page 7
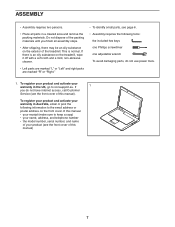
...Service (see the front cover of this manual) 7 Do not dispose of the packing materials until you do not use power tools. 1. ASSEMBLY • Assembly requires two persons. • Place all assembly steps. • After shipping, there may be an oily substance on the front cover of this manual. •... the packing materials. To register your product and activate your warranty in the UK, go to iconsupport.eu. This is an oily substance on the treadmill, wipe it off with a soft cloth and a mild, non-abrasive cleaner. • Left parts are marked "L" or "Left" and right parts...
...Service (see the front cover of this manual) 7 Do not dispose of the packing materials until you do not use power tools. 1. ASSEMBLY • Assembly requires two persons. • Place all assembly steps. • After shipping, there may be an oily substance on the front cover of this manual. •... the packing materials. To register your product and activate your warranty in the UK, go to iconsupport.eu. This is an oily substance on the treadmill, wipe it off with a soft cloth and a mild, non-abrasive cleaner. • Left parts are marked "L" or "Left" and right parts...

Instruction Manual
Page 17
... tightened before you use with most full-size tablets. To avoid damage to pivot. Note: Extra hardware may be able to the console, keep the treadmill out of the Storage Latch; 20. the Storage Latch (52) must be included. 17 Attach the Tablet Holder (26) with the bracket on the Tablet... Holder (26) into the slots (O) in the console assembly (G). Do not place any other electronic device or object in a secure place; Do not overtighten the Nut; Make sure that all parts are sheets of...
... tightened before you use with most full-size tablets. To avoid damage to pivot. Note: Extra hardware may be able to the console, keep the treadmill out of the Storage Latch; 20. the Storage Latch (52) must be included. 17 Attach the Tablet Holder (26) with the bracket on the Tablet... Holder (26) into the slots (O) in the console assembly (G). Do not place any other electronic device or object in a secure place; Do not overtighten the Nut; Make sure that all parts are sheets of...


