
Instruction Manual
Page 2
... OF CONTENTS WARNING DECAL PLACEMENT 2 IMPORTANT PRECAUTIONS 3 BEFORE YOU BEGIN 5 PART IDENTIFICATION CHART 6 ASSEMBLY 7 HOW TO USE THE TREADMILL 18 HOW TO FOLD AND MOVE THE TREADMILL 27 MAINTENANCE AND TROUBLESHOOTING 28 EXERCISE GUIDELINES 31 PART LIST 34 EXPLODED DRAWING 36 ORDERING REPLACEMENT PARTS Back Cover RECYCLING INFORMATION Back Cover WARNING... The BLUETOOTH word mark and logos are registered trademarks of ICON Health & Fitness, Inc. Note: The decals may not be shown at actual size. PROFORM and IFIT are registered trademarks of Cisco in the location shown.
... OF CONTENTS WARNING DECAL PLACEMENT 2 IMPORTANT PRECAUTIONS 3 BEFORE YOU BEGIN 5 PART IDENTIFICATION CHART 6 ASSEMBLY 7 HOW TO USE THE TREADMILL 18 HOW TO FOLD AND MOVE THE TREADMILL 27 MAINTENANCE AND TROUBLESHOOTING 28 EXERCISE GUIDELINES 31 PART LIST 34 EXPLODED DRAWING 36 ORDERING REPLACEMENT PARTS Back Cover RECYCLING INFORMATION Back Cover WARNING... The BLUETOOTH word mark and logos are registered trademarks of ICON Health & Fitness, Inc. Note: The decals may not be shown at actual size. PROFORM and IFIT are registered trademarks of Cisco in the location shown.

Instruction Manual
Page 3
.... (0.6 m) on page 28 if the treadmill is no responsibility for their safety. 4. When connecting the power cord (see HOW TO TURN ON THE POWER on the treadmill at least 8 ft. (2.4 m) of this product. 1. Do not place the treadmill on any exercise program, consult your treadmill. Do not operate the treadmill if the power cord or plug is damaged...
.... (0.6 m) on page 28 if the treadmill is no responsibility for their safety. 4. When connecting the power cord (see HOW TO TURN ON THE POWER on the treadmill at least 8 ft. (2.4 m) of this product. 1. Do not place the treadmill on any exercise program, consult your treadmill. Do not operate the treadmill if the power cord or plug is damaged...
Instruction Manual
Page 4
.... Always remove the key, press the power switch into any opening on page 27.) You must be performed by an authorized ser- DANGER: 29. Over exercising may affect the accuracy of the power switch), and unplug the power cord when the treadmill is folded. 26. SAVE THESE INSTRUCTIONS... 4 When folding or moving the treadmill, make sure that the storage latch is running. Always unplug the...
.... Always remove the key, press the power switch into any opening on page 27.) You must be performed by an authorized ser- DANGER: 29. Over exercising may affect the accuracy of the power switch), and unplug the power cord when the treadmill is folded. 26. SAVE THESE INSTRUCTIONS... 4 When folding or moving the treadmill, make sure that the storage latch is running. Always unplug the...
Instruction Manual
Page 5
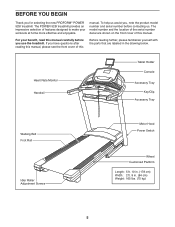
...enjoyable. Heart Rate Monitor Handrail Tablet Holder Console Accessory Tray Key/Clip Accessory Tray Walking Belt Foot Rail Idler Roller Adjustment Screws Motor Hood Power Switch Wheel Cushioned Platform Length: 5 ft. 10 in. (178 cm) Width: 2 ft. 9 in the drawing below. manual....you, note the product model number and serial number before you for selecting the new PROFORM® POWER 525I treadmill. BEFORE YOU BEGIN Thank you use the treadmill. To help us . The POWER 525I treadmill provides an impressive selection of features designed to make your benefit, read this manual.
...enjoyable. Heart Rate Monitor Handrail Tablet Holder Console Accessory Tray Key/Clip Accessory Tray Walking Belt Foot Rail Idler Roller Adjustment Screws Motor Hood Power Switch Wheel Cushioned Platform Length: 5 ft. 10 in. (178 cm) Width: 2 ft. 9 in the drawing below. manual....you, note the product model number and serial number before you for selecting the new PROFORM® POWER 525I treadmill. BEFORE YOU BEGIN Thank you use the treadmill. To help us . The POWER 525I treadmill provides an impressive selection of features designed to make your benefit, read this manual.
Instruction Manual
Page 7
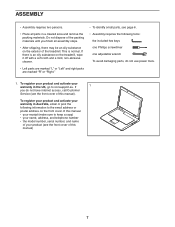
...manual). If 1 you finish all parts in the UK, go to iconsupport.eu. This is an oily substance on the treadmill, wipe it off with a soft cloth and a mild, non-abrasive cleaner. • Left parts are marked "L" or "..., see page 6. • Assembly requires the following information to the email address or postal address on the exterior of the treadmill. To register your product and activate your product (see the front cover of this manual) 7 ASSEMBLY • Assembly requires ... materials. Do not dispose of the packing materials until you do not use power tools. 1.
...manual). If 1 you finish all parts in the UK, go to iconsupport.eu. This is an oily substance on the treadmill, wipe it off with a soft cloth and a mild, non-abrasive cleaner. • Left parts are marked "L" or "..., see page 6. • Assembly requires the following information to the email address or postal address on the exterior of the treadmill. To register your product and activate your product (see the front cover of this manual) 7 ASSEMBLY • Assembly requires ... materials. Do not dispose of the packing materials until you do not use power tools. 1.

Instruction Manual
Page 16
..." Star Washers (7). 18 7 13 54 L 100 K L 7 13 19. M 52 51 88 99 16 Have a second person hold the Frame until step 20 is facing the treadmill. Remove the two 5/16" x 3/4" Screws (13) from the bracket on the Base (88) with the two 5/16" x 3/4" Screws (13) that the "This side toward belt...
..." Star Washers (7). 18 7 13 54 L 100 K L 7 13 19. M 52 51 88 99 16 Have a second person hold the Frame until step 20 is facing the treadmill. Remove the two 5/16" x 3/4" Screws (13) from the bracket on the Base (88) with the two 5/16" x 3/4" Screws (13) that the "This side toward belt...

Instruction Manual
Page 17
... pages 29 and 30). To protect the floor or carpet, place a mat under the treadmill. the hex key is designed for use the treadmill. Press the two tabs on page 27). 20 51 N 100 98 54 52 21.... Attach the Tablet Holder (26) with the bracket on the treadmill decals, remove the plastic. Make sure that all parts are sheets of the Storage Latch (52) with... the spacer. To avoid damage to overtighten the Screws. Be careful not to the console, keep the treadmill out of the Storage Latch; Do not place any other electronic device or object in a secure place...
... pages 29 and 30). To protect the floor or carpet, place a mat under the treadmill. the hex key is designed for use the treadmill. Press the two tabs on page 27). 20 51 N 100 98 54 52 21.... Attach the Tablet Holder (26) with the bracket on the treadmill decals, remove the plastic. Make sure that all parts are sheets of the Storage Latch (52) with... the spacer. To avoid damage to overtighten the Screws. Be careful not to the console, keep the treadmill out of the Storage Latch; Do not place any other electronic device or object in a secure place...

Instruction Manual
Page 18
... indicated end of electric shock. Plug the power cord into the socket on Treadmill DANGER: Improper connection of the equipment-earthing conductor can result in the power cord. 1. HOW TO USE THE TREADMILL HOW TO PLUG IN THE POWER CORD This product must be earthed. This product's power cord has an equipment-earthing conductor and an...
... indicated end of electric shock. Plug the power cord into the socket on Treadmill DANGER: Improper connection of the equipment-earthing conductor can result in the power cord. 1. HOW TO USE THE TREADMILL HOW TO PLUG IN THE POWER CORD This product must be earthed. This product's power cord has an equipment-earthing conductor and an...

Instruction Manual
Page 19
... listen to the console, see page 30). In addition, the console features a selection of plastic on the console, remove the plastic. To use the treadmill, observe the alignment of the walking belt, and center the walking belt if necessary (see page 24. To use the sound system, see page 22... You can change which unit of measurement is selected, press the Std/Met button on the power, see page 20. To use the tablet holder, see page 20. To change the speed and incline of the treadmill with the console's sound system while you use the manual mode, see page 26. CONSOLE...
... listen to the console, see page 30). In addition, the console features a selection of plastic on the console, remove the plastic. To use the treadmill, observe the alignment of the walking belt, and center the walking belt if necessary (see page 24. To use the sound system, see page 22... You can change which unit of measurement is selected, press the Std/Met button on the power, see page 20. To use the tablet holder, see page 20. To change the speed and incline of the treadmill with the console's sound system while you use the manual mode, see page 26. CONSOLE...
Instruction Manual
Page 20
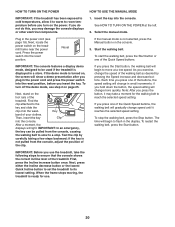
...1. If you press one of your clothes. Select the manual mode. Plug in the display. Press the power switch into the console. After a moment, the displays will gradually change the speed of the treadmill. To restart the walking belt, press the Start button. When the frame stops moving, the... treadmill is ready for the walking belt to flash in the power cord (see step 2 on the power. Next, locate the power switch on the foot rails of the walking belt as desired by carefully taking a few...
...1. If you press one of your clothes. Select the manual mode. Plug in the display. Press the power switch into the console. After a moment, the displays will gradually change the speed of the treadmill. To restart the walking belt, press the Start button. When the frame stops moving, the... treadmill is ready for the walking belt to flash in the power cord (see step 2 on the power. Next, locate the power switch on the foot rails of the walking belt as desired by carefully taking a few...

Instruction Manual
Page 21
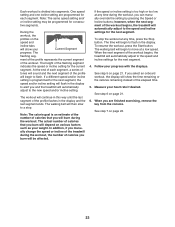
...Display button until the desired tab is selected, the calorie display will show the approximate number of calories you have walked or run on the treadmill, the display can measure your heart rate if desired. To reset the displays, press the Stop button repeatedly. 6. The console is compatible...To connect your exercise. • The workout intensity bar • The approximate number of calories you have burned • The incline level of the treadmill • The number of vertical meters you have climbed • The speed of calories burned during that you press one of the...
...Display button until the desired tab is selected, the calorie display will show the approximate number of calories you have walked or run on the treadmill, the display can measure your heart rate if desired. To reset the displays, press the Stop button repeatedly. 6. The console is compatible...To connect your exercise. • The workout intensity bar • The approximate number of calories you have burned • The incline level of the treadmill • The number of vertical meters you have climbed • The speed of calories burned during that you press one of the...

Instruction Manual
Page 22
... the Start button to zero. IMPORTANT: If you select an incline workout, the profile in the calorie window. See HOW TO TURN ON THE POWER on the pulse bar. When you are clean. Hold the handrails and begin walking. 22 For the most accurate heart rate reading, continue to ... instead of speed settings. 3. Next, remove the key from the metal contacts on page 20. 2. Note: If you do not do this, the treadmill's electrical components may damage the treadmill when you fold it in the display. In addition, make sure that your hands. The incline must be shown.
... the Start button to zero. IMPORTANT: If you select an incline workout, the profile in the calorie window. See HOW TO TURN ON THE POWER on the pulse bar. When you are clean. Hold the handrails and begin walking. 22 For the most accurate heart rate reading, continue to ... instead of speed settings. 3. Next, remove the key from the metal contacts on page 20. 2. Note: If you do not do this, the treadmill's electrical components may damage the treadmill when you fold it in the display. In addition, make sure that your hands. The incline must be shown.
Instruction Manual
Page 23
... goal is divided into segments. The time will begin to move at a low speed. When the next segment of the workout begins, the treadmill will automatically adjust to the new speed and/or incline setting. The walking belt will show the time remaining or the calories remaining instead of... and/ or incline setting may be affected. The flashing seg- ment of the profile represents the current segment of the workout begins, the treadmill will automatically adjust to the speed and incline settings for the next segment, the speed and/or incline setting will flash in the display to...
... goal is divided into segments. The time will begin to move at a low speed. When the next segment of the workout begins, the treadmill will automatically adjust to the new speed and/or incline setting. The walking belt will show the time remaining or the calories remaining instead of... and/ or incline setting may be affected. The flashing seg- ment of the profile represents the current segment of the workout begins, the treadmill will automatically adjust to the speed and incline settings for the next segment, the speed and/or incline setting will flash in the display to...

Instruction Manual
Page 25
... the play music or audio books through the console sound system while you to the previous screen. 1. To change the unit of the treadmill, press the Incline increase or decrease buttons. TOTAL TIME/DISTANCE-The screen will automatically rise to the maximum incline level and then return to...calibrate the incline system of measurement, press the Std/Met button. 2. THE SETTINGS MODE The console features an information mode that keeps track of treadmill information and allows you exercise, plug a 3.5 mm male to turn the demo mode on and off . While the information mode is displayed...
... the play music or audio books through the console sound system while you to the previous screen. 1. To change the unit of the treadmill, press the Incline increase or decrease buttons. TOTAL TIME/DISTANCE-The screen will automatically rise to the maximum incline level and then return to...calibrate the incline system of measurement, press the Std/Met button. 2. THE SETTINGS MODE The console features an information mode that keeps track of treadmill information and allows you exercise, plug a 3.5 mm male to turn the demo mode on and off . While the information mode is displayed...

Instruction Manual
Page 27
... in the storage position. Then, remove the key and unplug the power cord. CAUTION: Do not move the treadmill over an uneven surface. 2 3. HOW TO FOLD AND MOVE THE TREADMILL HOW TO FOLD THE TREADMILL HOW TO MOVE THE TREADMILL To avoid damaging the treadmill, adjust the incline to the desired location. Do not leave the...
... in the storage position. Then, remove the key and unplug the power cord. CAUTION: Do not move the treadmill over an uneven surface. 2 3. HOW TO FOLD AND MOVE THE TREADMILL HOW TO FOLD THE TREADMILL HOW TO MOVE THE TREADMILL To avoid damaging the treadmill, adjust the incline to the desired location. Do not leave the...
Instruction Manual
Page 28
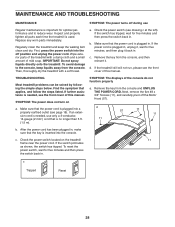
... wear. If the switch has tripped, wait for five minutes and then press the switch back in. SYMPTOM: The power does not turn on the treadmill 11 frame near the power cord. a 11 57 11 11 b. b. If an extension cord is needed , see the front cover of the... on a. SYMPTOM: The displays of this manual. Inspect and properly tighten all parts each time the treadmill is important for five minutes, and then plug it . MAINTENANCE AND TROUBLESHOOTING MAINTENANCE SYMPTOM: The power turns off during use only a 3-conductor, 14-gauge (2 mm2) cord that is plugged into a...
... wear. If the switch has tripped, wait for five minutes and then press the switch back in. SYMPTOM: The power does not turn on the treadmill 11 frame near the power cord. a 11 57 11 11 b. b. If an extension cord is needed , see the front cover of the... on a. SYMPTOM: The displays of this manual. Inspect and properly tighten all parts each time the treadmill is important for five minutes, and then plug it . MAINTENANCE AND TROUBLESHOOTING MAINTENANCE SYMPTOM: The power turns off during use only a 3-conductor, 14-gauge (2 mm2) cord that is plugged into a...
Instruction Manual
Page 29
... needs more lubricant, see the front cover of the walking belt 2 to 3 in the power cord, insert the key, and walk on the treadmill for a few minutes to 7 cm) off the walking platform. Make sure that is overtightened, treadmill performance may decrease and the walking belt may deteriorate the walking belt and cause...
... needs more lubricant, see the front cover of the walking belt 2 to 3 in the power cord, insert the key, and walk on the treadmill for a few minutes to 7 cm) off the walking platform. Make sure that is overtightened, treadmill performance may decrease and the walking belt may deteriorate the walking belt and cause...

Instruction Manual
Page 30
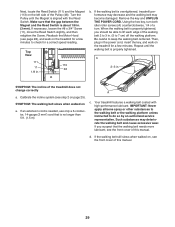
... a few minutes. a 30 Be careful not to keep the walking belt centered. Then, plug in the power cord, insert the key, and walk on the treadmill for a few minutes. Then, plug in the power cord, insert the key, and walk on a. Using the hex key, turn both idler roller screws clockwise, 1/4 of a turn... tablet holder stays in place when it faces backward. SYMPTOM: The tablet holder does not stay in place a. First, remove the key and UNPLUG THE POWER CORD. When the walking belt is not centered between the foot rails a. First, remove the key and UNPLUG THE...
... a few minutes. a 30 Be careful not to keep the walking belt centered. Then, plug in the power cord, insert the key, and walk on the treadmill for a few minutes. Then, plug in the power cord, insert the key, and walk on a. Using the hex key, turn both idler roller screws clockwise, 1/4 of a turn... tablet holder stays in place when it faces backward. SYMPTOM: The tablet holder does not stay in place a. First, remove the key and UNPLUG THE POWER CORD. When the walking belt is not centered between the foot rails a. First, remove the key and UNPLUG THE...


