
Instruction Manual
Page 2
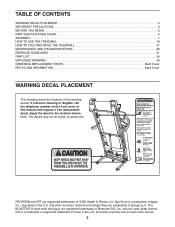
PROFORM and IFIT are trademarks of Google LLC. If a decal is ...IMPORTANT PRECAUTIONS 3 BEFORE YOU BEGIN 5 PART IDENTIFICATION CHART 6 ASSEMBLY 7 HOW TO USE THE TREADMILL 18 HOW TO FOLD AND MOVE THE TREADMILL 27 MAINTENANCE AND TROUBLESHOOTING 28 EXERCISE GUIDELINES 31 PART LIST 34 EXPLODED DRAWING 36 ORDERING REPLACEMENT ...PARTS Back Cover RECYCLING INFORMATION Back Cover WARNING DECAL PLACEMENT This drawing shows the locations of this manual and ...
PROFORM and IFIT are trademarks of Google LLC. If a decal is ...IMPORTANT PRECAUTIONS 3 BEFORE YOU BEGIN 5 PART IDENTIFICATION CHART 6 ASSEMBLY 7 HOW TO USE THE TREADMILL 18 HOW TO FOLD AND MOVE THE TREADMILL 27 MAINTENANCE AND TROUBLESHOOTING 28 EXERCISE GUIDELINES 31 PART LIST 34 EXPLODED DRAWING 36 ORDERING REPLACEMENT ...PARTS Back Cover RECYCLING INFORMATION Back Cover WARNING DECAL PLACEMENT This drawing shows the locations of this manual and ...

Instruction Manual
Page 3
... shock, or injury to ensure that is being administered. 9. Do not use of clearance behind it and 2 ft. (0.6 m) on your treadmill. Do not put the treadmill in the power cord adapter, insert an ASTA-approved BS1362, 13-amp fuse into an earthed circuit. Do not operate the...or persons with bare feet, wearing only stockings, or in this product. 1. Keep the power cord away from the treadmill at least 8 ft. (2.4 m) of this manual. 13. Wear appropriate exercise clothes while using the treadmill. 19. Never use by someone responsible for both men and women. Never allow more ...
... shock, or injury to ensure that is being administered. 9. Do not use of clearance behind it and 2 ft. (0.6 m) on your treadmill. Do not put the treadmill in the power cord adapter, insert an ASTA-approved BS1362, 13-amp fuse into an earthed circuit. Do not operate the...or persons with bare feet, wearing only stockings, or in this product. 1. Keep the power cord away from the treadmill at least 8 ft. (2.4 m) of this manual. 13. Wear appropriate exercise clothes while using the treadmill. 19. Never use by someone responsible for both men and women. Never allow more ...
Instruction Manual
Page 4
...is not in use , before performing the maintenance and adjustment procedures described in this manual should be able to safely lift 45 lbs. (20 kg) to move the treadmill. 25. Always unplug the power cord immediately after use . 24. vice representative only. 30. If you feel faint... properly assembled. (See ASSEMBLY on page 7 and HOW TO FOLD AND MOVE THE TREADMILL on page 5 for the location of the power switch), and unplug the power cord when the treadmill is folded. 26. The treadmill is not a medical device. Various factors, including the user's movement, may result ...
...is not in use , before performing the maintenance and adjustment procedures described in this manual should be able to safely lift 45 lbs. (20 kg) to move the treadmill. 25. Always unplug the power cord immediately after use . 24. vice representative only. 30. If you feel faint... properly assembled. (See ASSEMBLY on page 7 and HOW TO FOLD AND MOVE THE TREADMILL on page 5 for the location of the power switch), and unplug the power cord when the treadmill is folded. 26. The treadmill is not a medical device. Various factors, including the user's movement, may result ...
Instruction Manual
Page 5
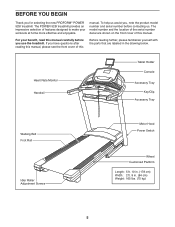
... serial number before you have questions after reading this manual, please see the front cover of this manual. The POWER 525I treadmill provides an impressive selection of features designed to make your benefit, read this manual carefully before contacting us assist you for selecting the new PROFORM® POWER 525I treadmill. For your workouts at home more effective and enjoyable...
... serial number before you have questions after reading this manual, please see the front cover of this manual. The POWER 525I treadmill provides an impressive selection of features designed to make your benefit, read this manual carefully before contacting us assist you for selecting the new PROFORM® POWER 525I treadmill. For your workouts at home more effective and enjoyable...
Instruction Manual
Page 7
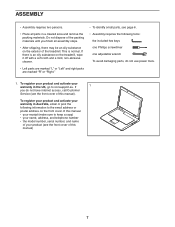
... have internet access, call Customer Service (see the front cover of the packing materials until you do not use power tools. 1. Do not dispose of this manual) 7 This is an oily substance on the treadmill, wipe it off with a soft cloth and a mild, non-abrasive cleaner. • Left parts are marked "L" or "Left...
... have internet access, call Customer Service (see the front cover of the packing materials until you do not use power tools. 1. Do not dispose of this manual) 7 This is an oily substance on the treadmill, wipe it off with a soft cloth and a mild, non-abrasive cleaner. • Left parts are marked "L" or "Left...

Instruction Manual
Page 19
...connect your tablet to record and track your tablet to the console and use the manual mode, you exercise. 19 To use the manual mode, see page 20. To change the speed and incline of the treadmill with the console's sound system while you can even listen to kilometers. See page ... 20. You can also connect your workout information. You can change which unit of measurement is selected, press the Std/Met button on the power, see page 25. As you through an effective exercise session. For simplicity, all instructions in either miles or kilometers. To prevent damage to...
...connect your tablet to record and track your tablet to the console and use the manual mode, you exercise. 19 To use the manual mode, see page 20. To change the speed and incline of the treadmill with the console's sound system while you can even listen to kilometers. See page ... 20. You can also connect your workout information. You can change which unit of measurement is selected, press the Std/Met button on the power, see page 25. As you through an effective exercise session. For simplicity, all instructions in either miles or kilometers. To prevent damage to...
Instruction Manual
Page 20
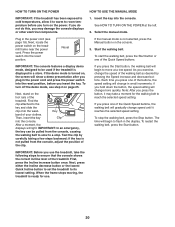
... one of the buttons, the speed setting will light. First, press the Incline increase button once. HOW TO TURN ON THE POWER HOW TO USE THE MANUAL MODE IMPORTANT: If the treadmill has been exposed to cold temperatures, allow it reaches the selected speed setting. Next, stand on the console. 3. If you plug...
... one of the buttons, the speed setting will light. First, press the Incline increase button once. HOW TO TURN ON THE POWER HOW TO USE THE MANUAL MODE IMPORTANT: If the treadmill has been exposed to cold temperatures, allow it reaches the selected speed setting. Next, stand on the console. 3. If you plug...
Instruction Manual
Page 23
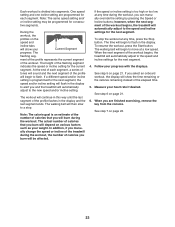
... for the next segment. 4. During the workout, the profiles on page 21. ment of the profile represents the current segment of the treadmill during the workout. The workout will automatically adjust to the new speed and/or incline setting. To stop . The height of the flashing...treadmill will automatically adjust to a stop the workout at a low speed. To resume the workout, press the Start button. In addition, if you are programmed for the current segment. however, when the next segment of the profile flashes in the display and the last segment ends. When you manually...
... for the next segment. 4. During the workout, the profiles on page 21. ment of the profile represents the current segment of the treadmill during the workout. The workout will automatically adjust to the new speed and/or incline setting. To stop . The height of the flashing...treadmill will automatically adjust to a stop the workout at a low speed. To resume the workout, press the Start button. In addition, if you are programmed for the current segment. however, when the next segment of the profile flashes in the display and the last segment ends. When you manually...
Instruction Manual
Page 28
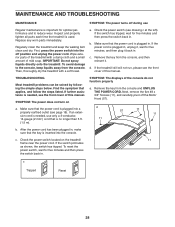
... exterior parts of the treadmill with a soft towel. To avoid damage to reduce wear. Then, thoroughly dry the treadmill with a damp cloth and a small amount of the console do not function properly a. a. Check the power switch (see the front cover of this manual. If the power cord is inserted into ...the off the Motor Hood (57). d. If the treadmill still will not run, please see drawing c at the left). If further ...
... exterior parts of the treadmill with a soft towel. To avoid damage to reduce wear. Then, thoroughly dry the treadmill with a damp cloth and a small amount of the console do not function properly a. a. Check the power switch (see the front cover of this manual. If the power cord is inserted into ...the off the Motor Hood (57). d. If the treadmill still will not run, please see drawing c at the left). If further ...
Instruction Manual
Page 29
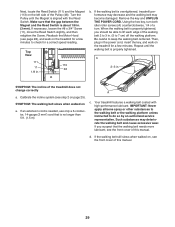
Next, locate the Reed Switch (111) and the Magnet (113) on the left side of this manual. 29 b. Then, plug in the power cord, insert the key, and walk on the treadmill for a few minutes to check for a few minutes. If an extension cord is needed, use only a 3-conductor, 14-gauge ... the walking belt needs more lubricant, see the front cover of a turn both idler roller screws (A) counterclockwise, 1/4 of this manual. Remove the key and UNPLUG THE POWER CORD. Such substances may become damaged. If you should be able to 7 cm) off the walking platform. If the walking belt...
Next, locate the Reed Switch (111) and the Magnet (113) on the left side of this manual. 29 b. Then, plug in the power cord, insert the key, and walk on the treadmill for a few minutes to check for a few minutes. If an extension cord is needed, use only a 3-conductor, 14-gauge ... the walking belt needs more lubricant, see the front cover of a turn both idler roller screws (A) counterclockwise, 1/4 of this manual. Remove the key and UNPLUG THE POWER CORD. Such substances may become damaged. If you should be able to 7 cm) off the walking platform. If the walking belt...

