
English Manual
Page 5
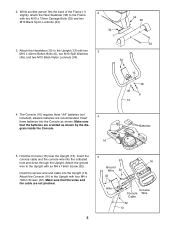
... the Console (16) near the Upright (13). Attach the Console (16) to the Frame with four M4 x 16mm Screws (32). Make sure that the batteries are oriented as shown. While another person lifts the back of the Frame (1) slightly, attach the Rear Stabilizer (30) to the Upright with two M10 x ...75mm Carriage Bolts (33) and two M10 Black Nylon Locknuts (34). 2 34 1 3. Insert 4 three batteries into the Console as shown by the dia- Insert the console cable and the console wire into the Upright (13). alkaline...
... the Console (16) near the Upright (13). Attach the Console (16) to the Frame with four M4 x 16mm Screws (32). Make sure that the batteries are oriented as shown. While another person lifts the back of the Frame (1) slightly, attach the Rear Stabilizer (30) to the Upright with two M10 x ...75mm Carriage Bolts (33) and two M10 Black Nylon Locknuts (34). 2 34 1 3. Insert 4 three batteries into the Console as shown by the dia- Insert the console cable and the console wire into the Upright (13). alkaline...

English Manual
Page 9
... mode displays your heart rate when you can display speed and distance in either miles or kilometers. The mode indicators will pause. When the batteries are described below to operate the console. 1. Note: If a different mode is selected, you use the pulse sensor. Calories-This mode...the time mode will show which mode is currently dis- Distance-This mode displays the distance you have burned (see BATTERY REPLACEMENT on page 12). Make sure that there are batteries in the dis- Scan-This mode displays the speed, time, distance, calorie, and fat calorie modes, for a...
... mode displays your heart rate when you can display speed and distance in either miles or kilometers. The mode indicators will pause. When the batteries are described below to operate the console. 1. Note: If a different mode is selected, you use the pulse sensor. Calories-This mode...the time mode will show which mode is currently dis- Distance-This mode displays the distance you have burned (see BATTERY REPLACEMENT on page 12). Make sure that there are batteries in the dis- Scan-This mode displays the speed, time, distance, calorie, and fat calorie modes, for a...

English Manual
Page 10
For the most accurate heart rate reading, continue to conserve the batteries. 10 Various factors may affect the accuracy of the pulse sensor, peel off to hold the handle on the metal contacts of heart rate readings. ...
For the most accurate heart rate reading, continue to conserve the batteries. 10 Various factors may affect the accuracy of the pulse sensor, peel off to hold the handle on the metal contacts of heart rate readings. ...
English Manual
Page 11
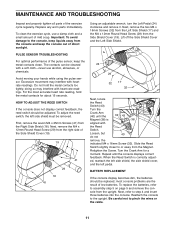
... shield must be cleaned with the Reed Switch. Next, refer to assembly step 5 on page 5 and remove the console from the right side of low batteries. First, remove the seven M4 x 25mm Screws (41) from the Side Shield Cover (19). Next, remove the M4 x 12mm Round Head Screw (...remove, the indicated M4 x 16mm Screw (32). Retighten the Screw. Repeat until the 32 43 Magnet (38) is correctly adjust- BATTERY REPLACEMENT If the console display becomes dim, the batteries should be replaced; The contacts can be removed. Turn the Crank Arm for about 15 seconds. To replace the...
... shield must be cleaned with the Reed Switch. Next, refer to assembly step 5 on page 5 and remove the console from the right side of low batteries. First, remove the seven M4 x 25mm Screws (41) from the Side Shield Cover (19). Next, remove the M4 x 12mm Round Head Screw (...remove, the indicated M4 x 16mm Screw (32). Retighten the Screw. Repeat until the 32 43 Magnet (38) is correctly adjust- BATTERY REPLACEMENT If the console display becomes dim, the batteries should be replaced; The contacts can be removed. Turn the Crank Arm for about 15 seconds. To replace the...


